当前位置:网站首页>Steps to build a personal website using servers purchased by Alibaba cloud international
Steps to build a personal website using servers purchased by Alibaba cloud international
2022-06-10 20:28:00 【87cloud】
In today's post , I will show you how I deploy my website on Alibaba cloud 87cloud,com.
I'm at alicloud Elastic computing services (ECS) Use WordPress Built my website , have Nginx,PHP 7.2,FastCGI,MariaDB and Redis cache , For best performance .
Before we start , I assume that you are already interested in the cloud 、 The Internet and Linux Command line knowledge has a basic understanding .
You also need to provide a functional domain name for your website .
step #1: Create a new account
If you don't have an account , Sure Register here . Users can enjoy new value 300-1200 Free trial of USD , Valid for 2 Months . If you're not sure how to do this , see also This tutorial .
After setting up the account , You can deploy high-performance WordPress The web site !
step 2: Create a new ECS example
Log in by entering your email and password Alicloud console . For safety purposes , You may need to enter a security code .
In the ali cloud console , Click products , Then select elastic computing service from the list .
Click on the instance , Then select your area from the drop-down menu in the upper left corner . A list of available areas will be displayed .
Click Create instance . For my example , I chose the following configuration .
- Billing method : subscribe
- Instance type :IO Optimize
- vCPU: 1
- Memory : 4GB
- family : Balanced type mn4
- Number of sets : 1 platform
I chose one with 4GB Physical memory (RAM) and 1 A virtual CPU Of IO Optimized instance . If your website will host more dynamic content , Please consider purchasing a higher specification instance .
Now? , You must select the appropriate image for the instance . I chose one for my server Ubuntu 16.04 image .
- Image type : Public image
- operating system (OS):Ubuntu
- Operating system version : 16.04 64 position
- Enable security enhancements . This feature will add some security features , For example, rear door detection , Remote login alarm, etc .
There are other configurations to consider , I chose the default settings for the rest of the configuration .
step #3: Set up alicloud DNS
Alibaba cloud DNS It is an authoritative domain name resolution and management service with high availability and high scalability .DNS On behalf of the domain name system , It helps us to IP Address mapping to domain name . Use Alibaba cloud DNS service , You need to update the name server in the domain control panel . The domain name server will be provided by Alibaba cloud .
Before we start , You need to get the public of our instance IP. Please follow these steps to continue :
- Sign in ECS Administrative console
- Click on the instance
- Note the public name of the instance IP
- Log in to Alibaba cloud console
- Click... In the product list CloudDNS
- single click “ basic DNS”
- Click on Add domain name
- Enter your domain name , Then click OK
Several name servers are displayed . Update them in the domain control panel .DNS Migration may take up to 48 Hours , So you must be patient !
Now? , You must add two “A” Record .
For article 1 “A” Record enter the following details .
- Record type : A
- host :@
- ISP line : Default
- value : Example of IP Address
- TTL: 10 minute
For others “A” Record enter the following details .
- Record type : A
- host : *
- ISP line : Default
- value : Example of IP Address
- TTL: 10 minute
step #4: Connect to our instance
You can VNC or SSH Connect to your instance .VNC Need a high-speed Internet connection , and SSH It works even on slow connections . therefore , I prefer to use it SSH instead of VNC.
adopt Linux/Mac
Connect Open the command line and enter the following code :
ssh [email protected]type yes And enter the root password . If the password is correct , You will successfully log in .
adopt Windows
Connect If you are using Windows Computer , You need to use a third-party program , Such as PuTTY. Use PuTTY Connect to the server . Enter the user name and password of the instance to log in
step #5: Check for driver errors
When the instance is started for the first time , It is best to check for driver related error messages and warnings . stay Linux in ,dmesg The command is used to view driver messages .
Intel RAPL The driver displays an error message . If you have the same problem , You can safely blacklist the driver by running the following command .
echo "blacklist intel_rapl" >> /etc/modprobe.d/blacklist.confThe kernel will not load this driver the next time it starts . Restart the server by typing the restart command .
step #6: Update system
Ubuntu be based on Debian.APT The package manager is used for all based on Debian Distribution version , Include Ubuntu.
apt update && apt full-upgrade -yThis will update all packages and kernels to the latest version . Restart after the upgrade is recommended .
Let's clean up the system and delete all the packages we no longer need .
apt clean -y && apt remove -ystep #7: Set the default time zone
Run the following command :
dpkg-reconfigure tzdataSelect your geographic area , Then choose your city .
step #8: install Nginx
Nginx Is a high-performance Web The server , Can handle thousands of concurrent connections . It is Apache Web A great alternative to servers .
Before installation , Let's install the required packages :
apt install software-properties-common zip sendmail vim nano -yYou will install the latest version of Nginx, This version is officially Ubuntu Not available in repository .
add to Nginx The repository :
echo "deb Index of /packages/ubuntu/ xenial nginx" >> /etc/apt/sources.list.d/nginx.listadd to Nginx Signature key for :
curl -O https://nginx.org/keys/nginx_signing.key && apt-key add ./nginx_signing.keyUpdate package list :
apt updateinstall NGINX:
apt install nginx -y verification Nginx Is the installation successful :
nginx -vDelete the default configuration :
rm /etc/nginx/sites-enabled/default rm /etc/nginx/sites-available/defaultRemove the default webpage:
rm /var/www/html/index.nginx-debian.htmlStart during startup Nginx:
systemctl enable nginxstep #9: install PHP-FPM
add to PHP 7.2 PPA:
add-apt-repository ppa:ondrej/php -yUpdate package list :
apt updateinstall PHP:
apt install php7.2-fpm -yverification PHP Has been successfully installed :
php -vFor installation PHP Expand :
apt install php7.2-redis php7.2-imap php7.2-xmlrpc php7.2-mysqlnd php7.2-imagick php7.2-gd php7.2-mbstring php7.2-common php7.2-zip php7.2-curl -yStart during boot PHP:
systemctl enable php7.2-fpmstep #10: install MariaDB
add to MariaDB PPA:
add-apt-repository 'deb [arch=amd64,i386,ppc64el] http://mirror.sax.uk.as61049.net/mariadb/repo/10.1/ubuntu xenial main' -yUpdate package list :
apt updateinstall MariaDB The server :
apt install mariadb-server -yDuring installation , You will be prompted to enter root password . Re-enter the same password and press Enter key .
Please note that , The default installation is not secure . You can protect the installation by running the following command :
mysql_secure_installationYou will be asked to enter root password . then , You will be prompted with some questions . I used the following settings ( Press Y Express “ yes ”, Press N Express “ no ”):
- Change root password ? No
- Delete anonymous users ? Yes
- Remote control is prohibited root Sign in ? Yes
- Delete the test database and access it ? Yes
- Whether to reload the permission table now ? Yes
Start during startup MariaDB:
systemctl enable mysqlstep #11: Create databases and database users
With root Login as user :
mysql -u root -pEnter your root password . You will be logged in to MariaDB Console .
Create a new user :
CREATE USER "example-user"@"localhost" IDENTIFIED BY "password";take “ Sample users ” and “ password ” Replace with your own username and password .
Create a new database :
CREATE DATABASE wordpress;Grant all permissions to newly created users :
GRANT ALL PRIVILEGES ON . to "example-user"@"localhost";Reload permission table :
FLUSH PRIVILEGES;Exit console :
EXIT;step #12: To configure Nginx
open Nginx The configuration file :
nano /etc/nginx/nginx.confDon't forget to example.com Replace with your actual domain name .
Paste the following :
user www-data; worker_processes auto; error_log /var/log/nginx/error.log warn; pid /var/run/nginx.pid; events { worker_connections 10240; multi_accept on; use epoll; } http { include /etc/nginx/mime.types; default_type application/octet-stream; log_format main '$remote_addr - $remote_user [$time_local] "$request" ' '$status $body_bytes_sent "$http_referer" ' '"$http_user_agent" "$http_x_forwarded_for"'; access_log /var/log/nginx/access.log main; fastcgi_cache_path /var/www/cache levels=1:2 keys_zone=example.com:200m inactive=60m; fastcgi_cache_key "$scheme$request_method$host$request_uri"; sendfile on; tcp_nopush on; tcp_nodelay on; types_hash_max_size 2048; server_tokens off; keepalive_timeout 15; client_max_body_size 512M; add_header X-Frame-Options SAMEORIGIN; add_header X-Content-Type-Options nosniff; add_header X-XSS-Protection "1; mode=block"; add_header Referrer-Policy "strict-origin-when-cross-origin"; add_header X-FastCGI-Cache $upstream_cache_status; gzip_vary on; gzip_comp_level 5; gzip_min_length 1024; gzip_proxied any; gzip_buffers 16 8k; gzip_types text/plain text/css application/json application/x-javascript text/xml application/xml application/xml+rss text/javascript application/javascript text/x-js; limit_req_zone $binary_remote_addr zone=one:10m rate=1r/s; limit_req_status 444; gzip on; include /etc/nginx/conf.d/*.conf; include /etc/nginx/sites-enabled/*; server { listen 80 default_server; listen [::]:80 default_server; server_name _; return 444; } }This is our global Nginx To configure . To exit nano, Please press Ctrl+O, And then click Enter.
You must create another... For your domain :
nano /etc/nginx/sites-enabled/example.comPaste the following :
server { listen 80; listen [::]:80; server_name example.com www.example.com; root /var/www/html; index index.php; set $skip_cache 0; if ($request_method = POST) { set $skip_cache 1; } if ($query_string != "") { set $skip_cache 1; } if ($request_uri ~* "/wp-admin/|/xmlrpc.php|wp-.*.php|/feed/|index.php|sitemap(_index)?.xml") { set $skip_cache 1; } if ($http_cookie ~* "comment_author|wordpress_[a-f0-9]+|wp-postpass|wordpress_no_cache|wordpress_logged_in") { set $skip_cache 1; } if ($request_uri ~* "/cart/*$|/checkout/*$|/my-account/*$") { set $skip_cache 1; } location / { try_files $uri $uri/ /index.php?$args; } location ~ \.php$ { try_files $uri =404; fastcgi_split_path_info ^(.+\.php)(/.+)$; fastcgi_pass unix:/run/php/php7.2-fpm.sock; fastcgi_index index.php; fastcgi_cache example.com; include fastcgi.conf; fastcgi_cache_bypass $skip_cache; fastcgi_no_cache $skip_cache; fastcgi_cache_valid 10m; } location ~* \.(jpg|jpeg|gif|png)$ { expires 365d; } location ~* \.(pdf|css|ico|js|swf)$ { expires 10d; } }test Nginx To configure :
nginx -tIf the test is successful , Please restart by typing nginx:
systemctl restart nginxstep 13: Configure the object cache Redis The server
install Redis The server :
apt install redis-server -yStart during boot Redis The server :
systemctl enable redis-serverTo configure Redis Memory limit of the server :
echo "maxmemory 256mb" >> /etc/redis/redis.confRestart Redis The server :
systemctl restart redis-serverRestart PHP:
systemctl restart php7.2-fpmstep #14: To configure PHP
open PHP 7.2 The configuration file :
nano /etc/php/7.2/fpm/php.iniChange the following values :
max_execution_time = 60 max_input_time = 60 memory_limit = 512M max_input_vars = 6000 upload_max_filesize = 512M post_max_size = 512Mstep #15: Install free through encryption SSL certificate
Add let's encrypt PPA:
add-apt-repository ppa:certbot/certbotUpdate package list :
apt updateby Nginx install certbot:
apt-get install python-certbot-nginx -yobtain SSL:
certbot --nginx -d example.com -d www.example.comPress 2 And press Enter key .
You will get SSL certificate ,certbot It will be automatically configured for you .
please remember ,SSL The certificate will be in 90 Expires in days . Run the following command to renew the certificate manually :
certbot renewstep #16: install WordPress
Move to Nginx root directory :
cd /var/www/htmldownload WordPress:
wget wget https://wordpress.org/latest.zipDecompress package
unzip latest.zipMove all files to Nginx Root directory :
mv wordpress/* ./ && rmdir wordpressCreate a directory for storing the cache :
mkdir -p /var/www/cachechange Nginx Ownership of the root directory :
chown -R www-data:www-data /var/www/Now? , Type the address of the web site in the address bar of the browser URL.
Follow the instructions on the screen to complete the installation . You need to enter steps 10 Database details in .
in addition , Don't forget to install Nginx Cache and Redis Cache plug-in unit .
边栏推荐
- NFS network mount to create server image
- 4.35V锂电充电IC
- Redis集群形式--哨兵模式集群和高可用模式集群---Redis学习笔记003
- ESP8266 系统环境搭建
- 【Educational Codeforces Round 120 (Rated for Div. 2)】C. Set or Decrease
- Build a BPMN modeling Web Service
- CVPR 2022丨清华大学提出:无监督域泛化 (UDG)
- 零信任架构
- Fs2117 boost IC output 5v2.4a synchronous rectification
- Uni app custom navigation
猜你喜欢

如何使用物联网低代码平台进行工作表管理?

玩艺术也得学数学?
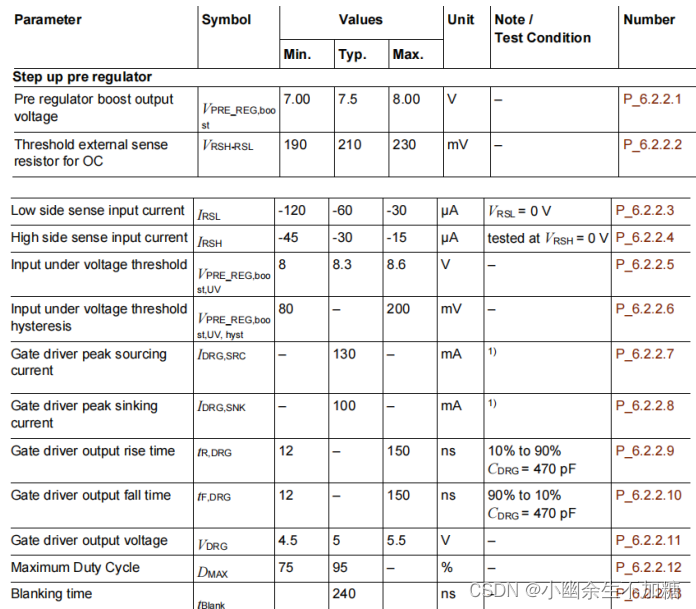
SBC芯片35584数据手册预调节器翻译

暗黑破坏神不朽数据库怎么用 暗黑破坏神手游不朽数据库使用方法

【录入课本latex记录】

One question to explain the past and present life of dynamic planning

Trilogy to solve the problem of playing chess first and then

批量检测不同url的指定端口(py脚本)

I drew several exquisite charts with plotly, which turned out to be beautiful!!
![[observation] shengteng Zhixing: scene driven, innovation first, press the](/img/53/29f5fd8b869087bafbe74849329c84.jpg)
[observation] shengteng Zhixing: scene driven, innovation first, press the "acceleration key" for Intelligent Transportation
随机推荐
MBA-day21 线性规划问题
20192407 2021-2022-2 《网络与系统攻防技术》实验八实验报告
传音 Infinix 新机现身谷歌产品库,TECNO CAMON 19 预装 Android 13
Spark ShuffleManager
Trilogy to solve the problem of playing chess first and then
mixin--混入
Tutoriel Microsoft Word "5", comment changer les marges de page et créer une barre de nouvelles en word?
身份识别与访问管理(IAM)
seata 还是不支持sqlserver吗?
Recommend a crud tool that may become the best crud tool in 2019 during the National Day
FS4100 锂电充电管理IC输入12V给8.4V充电IC
Microsoft Word tutorial "5", how to change the margins and create a newsletter column in word?
Redis集群形式--哨兵模式集群和高可用模式集群---Redis学习笔记003
ESP8266 系统环境搭建
How to stack double and float in the bottom layer of C language
C pointer (interview classic topic exercise)
Change the root
【技术碎片】重名文件 加后缀重命名过滤实现
[enter textbook latex record]
Is it safe to open a futures account online? How to avoid being cheated?