当前位置:网站首页>Black Qunhui dsm7.0.1 physical machine installation tutorial
Black Qunhui dsm7.0.1 physical machine installation tutorial
2022-06-11 07:37:00 【Diligent Kelsen】
One 、 Hardware information description
| project | To configure | RMB |
|---|---|---|
| CPU | i7 8700T | 1245 element |
| a main board | Jijia B365 M AORUS ELITE | 509 element |
| Memory module | American pirate ship DDR4 3000Hz 8G * 4 | 1000 element |
| The case | Wanyou NSC-810A U-NAS | 1150 element |
| Power Supply | Haiyun 350W | 450 element |
| Dissipate heat | Intel CPU Bring your own heat dissipation | No money |
| SSD | samsung 980 500G * 2 | 1000 element |
| NAS Hard disk | Seagate cool wolf 4T * 8 | 6250 element |
| 11604 element |
Two 、 Make U Disk boot
Use the chip worry free tool , see U Discoid PID and UID.

Use DiskGenius, format U disc .

Use the mirror write tool , Write boot to U disc .
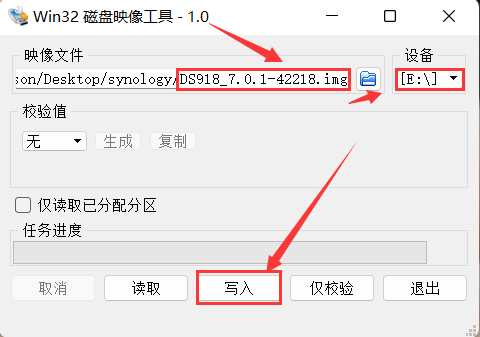
modify grub.cfg file , have access to DiskGenius Tools copy files to the desktop , adopt notepad++ After modification , Drag in DiskGenius In this interface . Or in a computer , see U disc , open U On the plate grub.cfg Directly modify the file .
The specific amendments are as follows :
PID It is amended as follows U Discoid PID
VID It is amended as follows U Discoid VID
Only by default mac1=a8412083CB52 mac2=0a11323D47F7 , increase :mac3=a15823C08000 mac4=a23C04158B52 mac5=82a002524158 mac6=38233052415a
SataPortMap=64
DiskIdxMap=0006
SataPortMap=64, Because my motherboard has 6 individual sata mouth , then PCIE Expanded 4 individual SATA mouth , So it's written here 64, Corresponding to the main board SATA Number and PCIE Of SATA number .
DiskIdxMap=0006, Because of the motherboard 6 individual SATA The mouth is respectively 00、01、02、03、04、05, therefore PCIE Of SATA from 06 Start . in other words , The first two 00 On the motherboard SATA Control from 00 Start counting ,PCIE Of SATA from 06 Start counting .
#
# ### !!! WARNING - READ ME !!! ###
#
# DO NOT edit this file. This file has been generated automatically by the loader generator.
# If you were asked to use a pre-made image and asked by someone to edit this file DO NOT do it. The only
# supported method of obtaining the loader image is generating it using the loader generator provided.
#

terminal_output console
if serial --unit=0 --speed=115200; then
    terminal_input --append serial_com0
    terminal_output --append serial_com0
fi

set default="0"
set timeout="0"
set timeout_style="menu"

if [ -s $prefix/grubenv ]; then
    load_env --file $prefix/grubenv --skip-sig
    set has_env="1"
    if [ -n "${saved_entry}" ]; then
        set default="${saved_entry}"
    fi
else
    set has_env="0"
    echo "WARN: failed to load env. Default choice will NOT be saved!"
fi


function savedefault {
    saved_entry="${chosen}"
    save_env --file $prefix/grubenv saved_entry
}


insmod usb_keyboard
insmod part_msdos
insmod ext2
insmod fat
insmod linux
insmod gzio

set gfxmode=auto
insmod vbe
insmod vga

# UEFI
insmod efi_gop
insmod efi_uga

insmod font
if loadfont ${prefix}/unicode.pf2
then
    insmod gfxterm
    set gfxmode=auto
    set gfxpayload=keep
    terminal_output gfxterm
fi

menuentry 'RedPill DS918+ v7.1.0-42661 (USB, Verbose)' {
	savedefault
	set root=(hd0,msdos1)
	echo Loading Linux...
	linux /zImage HddHotplug=0 withefi console=ttyS0,115200n8 DiskIdxMap=0006 netif_num=2 syno_hdd_detect=0 syno_port_thaw=1 SasIdxMap=0 vender_format_version=2 earlyprintk syno_hdd_powerup_seq=1 pid=0x5583 log_buf_len=32M syno_hw_version=DS918+ vid=0x0781 earlycon=uart8250,io,0x3f8,115200n8 sn=2022NAS123456 elevator=elevator root=/dev/md0 loglevel=15 SataPortMap=64  mac1=a8412083CB52  mac2=0a11323D47F7 mac3=a15823C08000  mac4=a23C04158B52  mac5=82a002524158  mac6=38233052415a
	echo Loading initramfs...
	initrd /rd.gz /custom.gz
	echo Starting kernel with USB boot
}

menuentry 'RedPill DS918+ v7.1.0-42661 (SATA, Verbose)' {
	savedefault
	set root=(hd0,msdos1)
	echo Loading Linux...
	linux /zImage HddHotplug=0 withefi console=ttyS0,115200n8 synoboot_satadom=2 DiskIdxMap=0006 netif_num=2 syno_hdd_detect=0 syno_port_thaw=1 SasIdxMap=0 vender_format_version=2 earlyprintk  syno_hdd_powerup_seq=1 pid=0x5583 log_buf_len=32M syno_hw_version=DS918+ vid=0x0781 earlycon=uart8250,io,0x3f8,115200n8 sn=2022NAS123456 elevator=elevator root=/dev/md0 loglevel=15 SataPortMap=64 mac1=58412083CB52  mac2=0011323D47F7 mac3=415823C08000  mac4=123C04158B52  mac5=823002524158  mac6=382330524158
	echo Loading initramfs...
	initrd /rd.gz /custom.gz
	echo Starting kernel with SATA boot
	echo WARNING: SATA boot support on this platform is experimental!
}


3、 ... and 、 Qunhui system installation
stay BIOS Set in U Disk start , Then you can search through Qunhui assistant .

Enter Qunhui in the browser ip Address +5000 Port number , Access and install .

Choose here 7.1.0 perhaps 7.0.1, It depends on the version of your boot .

Waiting for the installation , This process takes about ten minutes .


Installation is complete .

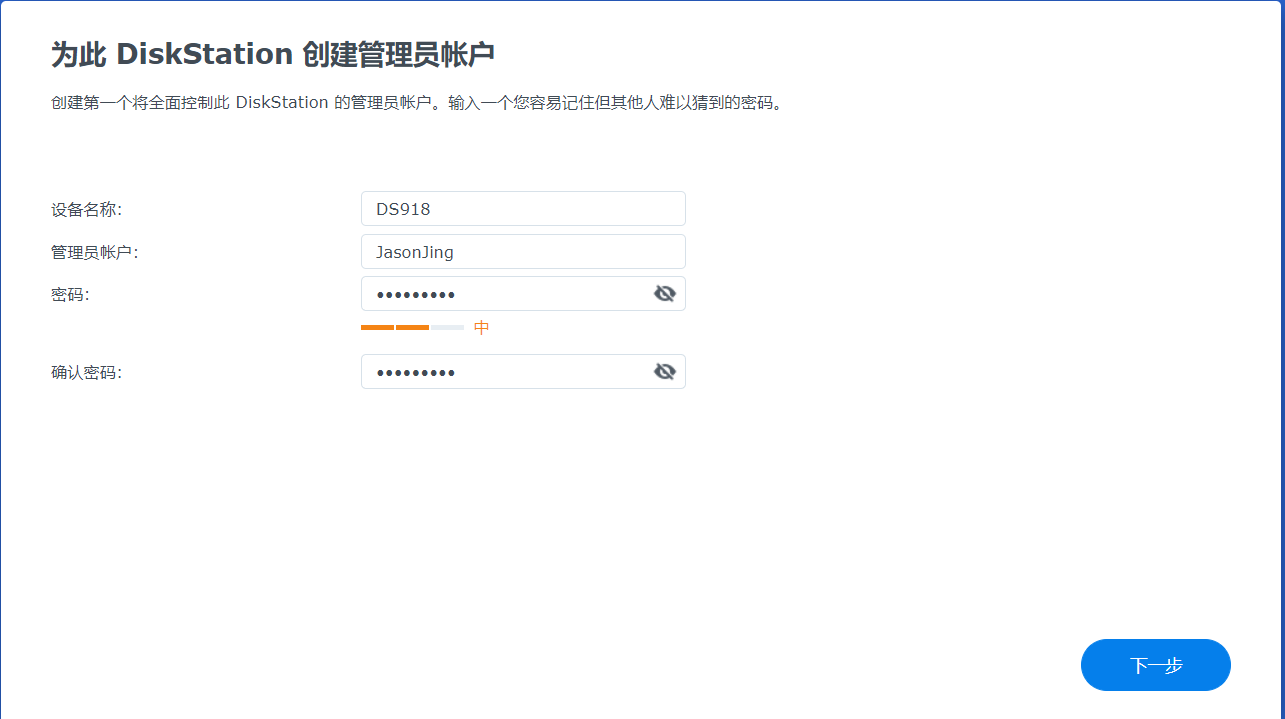
Set the device name , And user name and password .
Select manual update , Because the heiqunhui update system is extremely unstable , It is easy to cause Qunhui collapse .

Here you choose to skip .


Here we enter Qunhui's DSM Interface .

So here we create 8 Block disk storage pool .

Four 、 add to 2.5G Network card driver
1、 Add driver to boot
2、 adopt SSH Add the driver to the Qunhui system file
3、 install bb-qq Great God drive kit . Download address
The third way is the simplest , What I have installed here is DS918 So it is apollolak framework , So download r8152-apollolake-2.15.0-7.spk.
In the suite Center , Select manual installation in the upper right corner , Then select the just downloaded r8152-apollolake-2.15.0-7.spk file . You will be prompted that you cannot install , And then use ssh Tools for remote connection to Qunhui , Enter the following command :
sudo install -m 4755 -o root -D /var/packages/r8152/target/r8152/spk_su /opt/sbin/spk_su
At this point, click manual installation again .
But at this time, there are only two network ports by default , I use PCIE Expanded 4 individual 2.5G Of the Internet , So I want to add all four ports .
Modify the largest lan Network card configuration , Input
vi /etc.defaults/synoinfo.conf
hold maxlanport="2" It is amended as follows maxlanport="6"
And then locate
eth0_mtu="1500"
eth0_wol_options="d"
eth1_mtu="1500"
eth1_wol_options="d"
increase
eth2_mtu="1500"
eth2_wol_options="d"
eth3_mtu="1500"
eth3_wol_options="d"
eth4_mtu="1500"
eth4_wol_options="d"
eth5_mtu="1500"
eth5_wol_options="d"
Enter the command reboot restart .
Open Qun Hui , You can see our 2.5G The Internet port is ready . Add a gigabit network port on the motherboard , There are five in all .

5、 ... and 、 add to NVME Solid state disk
# see nvme Hard disk
ls /dev/nvme*

# View the first hard disk information
udevadm info /dev/nvme0

# View the information of the second hard disk
udevadm info /dev/nvme1

# hold libsynonvme.so.1 copy to document Shared folder
cp /lib64/libsynonvme.so.1 /volume1/document/libsynonvme.so.1

# Backup libsynonvme.so.1 file
cp /lib64/libsynonvme.so.1 /lib64/libsynonvme.so.1.bak
Use udevadm info /dev/nvme0 and udevadm info /dev/nvme1 Command to view hard disk information , Remember 0000:00:1b:4 and 0000:00:1d.0.

Use on computer winhex Open the software just downloaded libsynonvme.so.1 file
Search for nvme_model_spec_get, On the right, find the original data of the fields shown in the following figure as 0000:00:13.0 and 0000:00:13.1, Change it to 0000:00:1b:4 and 0000:00:1d.0, Then save the file , And upload it to Qunhui document Shared folder .

# Original libsynonvme.so.1 Delete
rm /lib64/libsynonvme.so.1

# Take the file we just modified ,copy To lib64 Under the table of contents
cp /volume1/document/libsynonvme.so.1 /lib64/libsynonvme.so.1

# to grant authorization
chmod 644 /lib64/libsynonvme.so.1

# Restart the system
reboot
After reboot , In storage manager , You can see two pieces ssd Hard disk .

Be accomplished ,enjoy it.
边栏推荐
- 2020080 simulation competition [horizontal and vertical coordinates do not affect each other, cactus minimum cut, combined meaning translation formula]
- [atcoder1983] BBQ hard (combination number + clever model transformation)
- C language function stack frame
- [analysis of STL source code] summary notes (6): Design of iterator and magical traits
- May 30-June 5, 2022 AI industry weekly (issue 100): three years
- After 4 years of naked resignation from the test, the test post of 15K interview was rubbed on the ground, and the result made me collapse and cry
- Rabin-Miller素数测试
- 【AtCoder2305】Decrementing(博弈)
- Zero foundation self-study SQL course | outer join external connection
- 【AtCoder2376】Black and White Tree(博弈)
猜你喜欢
![[codeforces1019e] raining season](/img/8e/4a96954ee7dae5f81eaae05b5a075b.png)
[codeforces1019e] raining season
![20200803 T3 my friends [divide and conquer NTT optimization recursion]](/img/35/01201e3136e3dd5cd562a0481f1ee9.jpg)
20200803 T3 my friends [divide and conquer NTT optimization recursion]
After 4 years of naked resignation from the test, the test post of 15K interview was rubbed on the ground, and the result made me collapse and cry

群晖DS918创建m.2 固态硬盘SSD读写缓存
![[analysis of STL source code] summary notes (3): vector introduction](/img/70/faa40c273f6b3a6b124fb870058489.jpg)
[analysis of STL source code] summary notes (3): vector introduction

Raspberry pie builds a full-featured NAS server (07): manage your library & read as you please
![2020080 simulation competition [horizontal and vertical coordinates do not affect each other, cactus minimum cut, combined meaning translation formula]](/img/4d/a67a63d2c4eb80c98315c3057b01b9.jpg)
2020080 simulation competition [horizontal and vertical coordinates do not affect each other, cactus minimum cut, combined meaning translation formula]

Building a full-featured NAS server with raspberry pie (05): playing with video and audio & sorting out movies

2022.5.30-6.5 AI行业周刊(第100期):三年时光

QT custom control library creation
随机推荐
A case in which the MySQL administrator password cannot take effect
QT table display data
【AtCoder2376】Black and White Tree(博弈)
Summary of written test questions of shopee 2021 autumn recruitment
二本畢業,銀行外包測試工作 4 個月有餘。聊聊一些真實感受 ...
【Oracle 数据库】奶妈式教程day04 排序查询
20200802 T3 I always like [generating function exclusion, Lagrangian inversion]
2、 User login and registration
[STL source code analysis] summary notes (1): Opening
C language judging big end and small end [consortium or pointer] big end and small end conversion
Rabin Miller prime test
Use of wordcloud
You got 8K in the 3-year function test, but you were actually pretending to work hard
【编译原理】05-语法制导的语义计算——基于翻译模式的语义计算
Bidirectional linked list simple template (pointer version)
Simple configuration of vscade
QObject usage skills -- control function class
Nim product
【IoT】项目管理:如何打造更好的跨职能团队?
[cluster] haproxy load balancing