当前位置:网站首页>PR 2021 quick start tutorial, learn about the and functions of the timeline panel
PR 2021 quick start tutorial, learn about the and functions of the timeline panel
2022-07-02 12:25:00 【Mac1236】
PR2021 Quick start tutorial , After learning , Making tiktok videos ,vlog, Movie mix cut , Daily records, etc ! Zero basis , Welcome to the pit !
Content of this section
In the previous section, we introduced PR Preview the material and understand the operation of the material monitoring window of the source panel , Finally, I explained to you pr Basic clip for , Mainly the use of razor tools , Need to know , These are all in PR Completed on the timeline panel .PR The timeline panel is also the whole Premiere Pro The core functional areas of the software , Most of the daily video editing work , clip , Subtitle , Adding effects and so on need to be completed in this panel area , Main editing instructions covering video and audio tracks , In this article, we first get to know Pr The timeline panel of introduces several small functions used in the timeline panel .
Know the timeline panel
Each sequence corresponds to a time axis , The sequence panel is the timeline panel
Here's the picture :V1、V2、V3 Wait for the video track ,A1、A2、A3 Wait for the audio track . Video or audio clips should be dragged onto the appropriate track .

Introduction to timeline panel buttons

Pictured above :
1、 Panel name and panel control menu
Double click the panel name , The panel can be maximized ( You can also use shortcut keys :~ key ).
Opens the timeline panel control menu , You can change the style of the clip thumbnail .
2、 By default, it is in the pressed state . namely , When another sequence is dragged into the current sequence , This sequence is used as a clip of the current sequence ; If it is not pressed , All clips in the dragged sequence are added to the current sequence with the original track settings .
3、 alignment . By default , When moving clips , Will automatically close and align other clips or the current playback indicator position .
4、 Link selection . On , When inserting material , The audio in the video is linked with the video .
5、 Add tag . Shortcut key :M. There are two main categories : Clip tags ( When a clip is selected ) And timeline marks ( When no clip is selected ).
Tips : Available on the source panel 、 Timeline panel 、 Add or clear flags in the sequence panel . Also available on the source panel 、 Add a tag positioning button in the sequence panel . Or use shortcut keys :
Go to the next mark :Shift + M
Go to the previous tag :Ctrl/Cmd +Shift + M
There is a special sign management panel .
6、 Timeline display settings .
such as , Sure “ Expand all tracks ”、“ Minimize all tracks ” etc. ;
You can also change the display height of a single track by pulling the line between the two tracks on the left side of the timeline panel .
Relevant buttons of the timeline panel track

Pictured above :
1、 Working track signs : Newly inserted or overwritten clip's work track , Only one video or audio track can be lit . such as ,A1 When not lit , Insert video only to light up V1 On the track of , On the contrary, the same is true .
Tips : The display of this flag is related to the selected materials in the project panel and the source panel .
2、 Lock track signs : After the track is locked, no operation can be carried out ;
3、 Activate track signs : You can activate or deactivate multiple tracks . If shut down , So that the track does not participate in the sequence operation command .
such as , Use the cursor 、 Pressing the key will only jump to the edit point on the active track ;
perhaps , Press Ctrl/Cmd + K Key will only cut clips on the active track ;
perhaps ,Ctrl/Cmd + C After copying clips , Use Ctrl/Cmd + V When pasting , It will be automatically pasted onto the active track with the smallest number .
4、 Sync lock flag : such as , When the ripple is deleted , The corresponding clip on the track with this flag turned on will move synchronously ; Track set to closed state , It won't change .
5、 Track output sign : Whether the clip content on the track is visible during playback ;
6、 Silent track sign M: Do not play the audio of this track :
7、 Solo track sign S: Except for the track , The audio of other tracks will be muted ;
8、 Voiceover recording logo : Record a voice over during production .
Here are some small functions used in the timeline panel :
Video audio separation
The video dragged from the source panel may be both audio and video , What if we don't want this audio ?
It's simple , Select material , Right click to find the unlink , single click , Now drag the video , The audio will not change , This has separated video and audio , You can drag in your favorite background music , Put it on the audio track .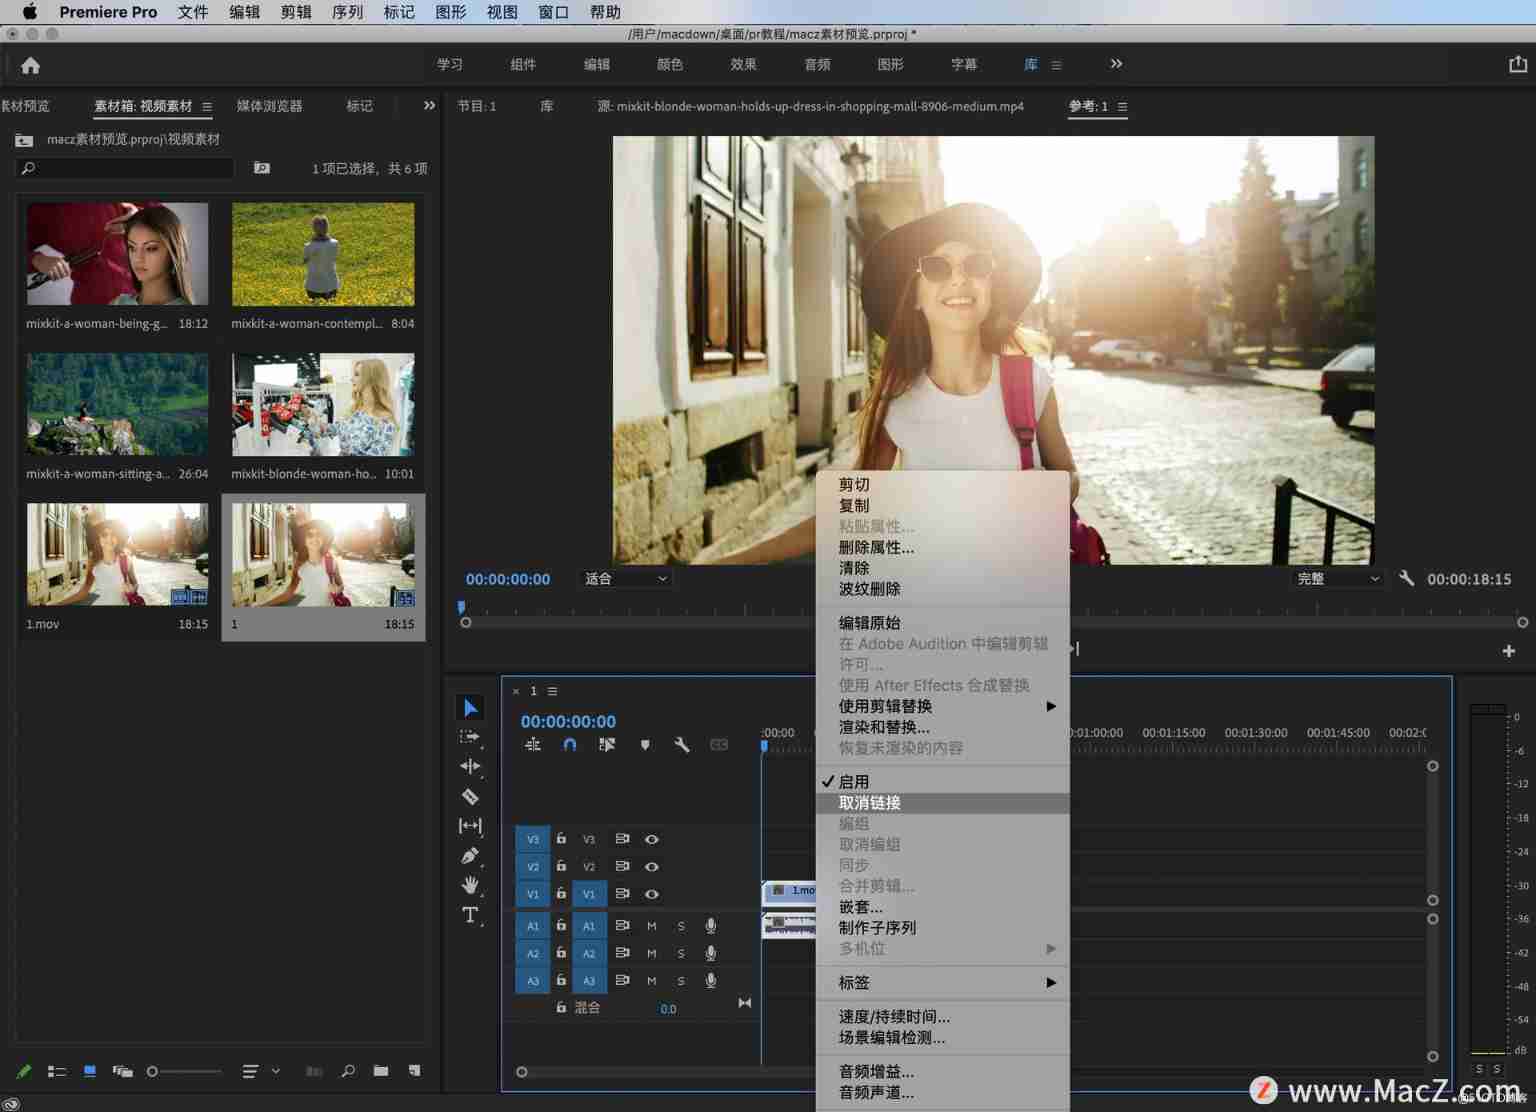
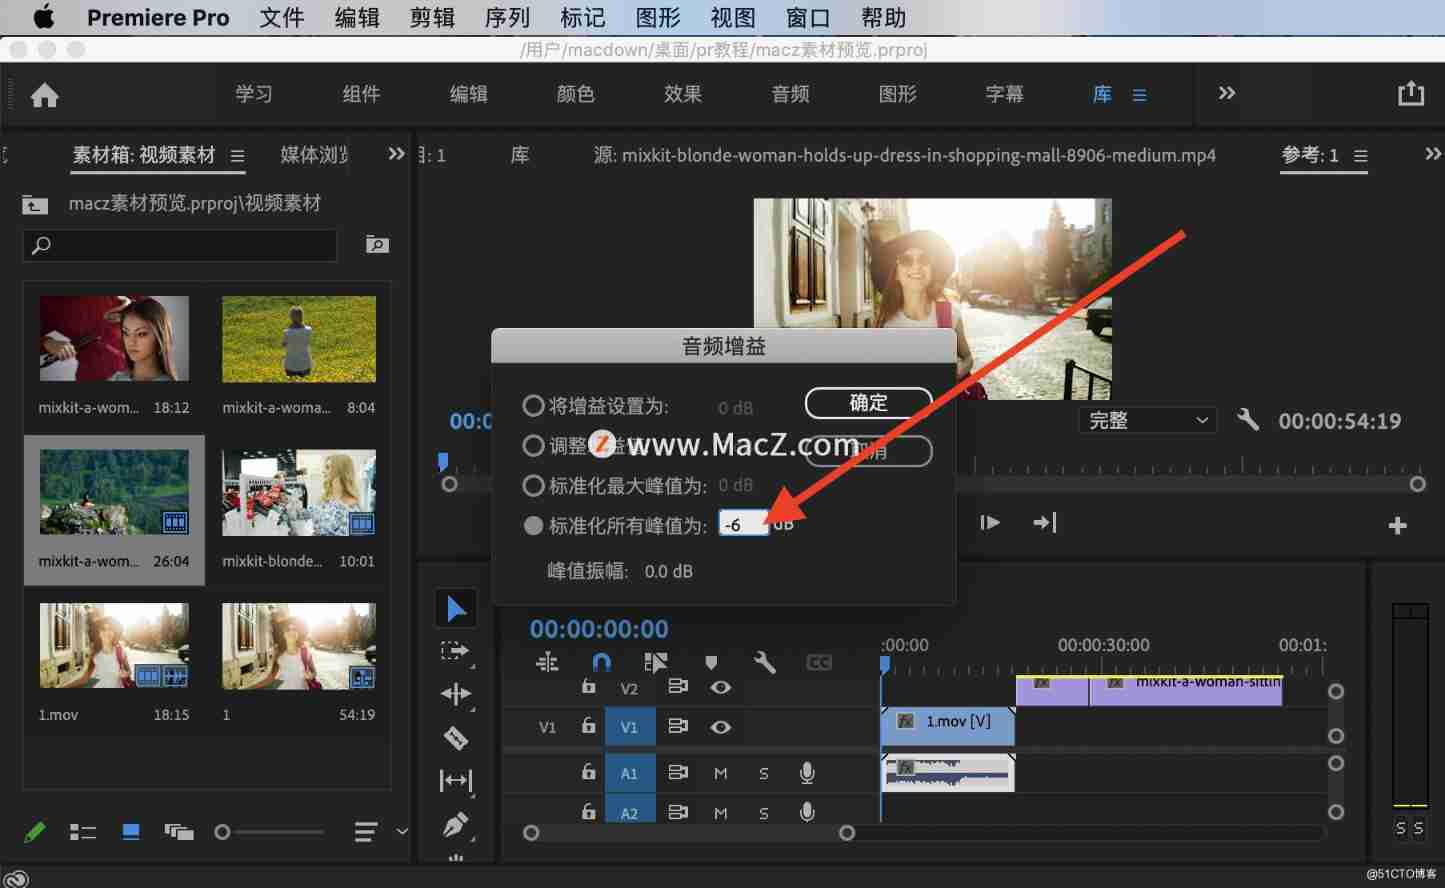
What if the selected background music is too loud ? It's simple , Select music , Right click to find " Audio gain ", In the last box, type -6.( The audio unit is dB , Generally, the maximum audio we can accept is -6, If it were higher, it would blow up , therefore -6 Is an ideal value , Of course, you can also analyze according to the level meter on the right , The higher the negative number, the lower the sound , The higher the sound, the louder , The background music should be smaller than the human voice .)
Zoom in and out on the timeline track
Sometimes the material track of the timeline is very short , Don't use us to manipulate clips , How to zoom in ?
The two methods , The first is to press the plus or minus sign on the keyboard , The plus sign is to lengthen and enlarge the track , A minus sign is a reduction ; The second kind , Press down option Key to slide the mouse wheel , You can also lengthen or narrow the material track , Be careful : Both methods zoom in and out based on the position of the mouse pointer .

Global preview material track
What if you want to preview the material track globally ?
Press the... Above the Enter key “|” Key , At this time, the material track will be displayed in the timeline panel , You can view it globally , This small function is very convenient .

in addition , If you place the mouse at the beginning of the video material or audio material , There will be a red brace like thing , At this time, pulling the material can also adjust the material . This method is suitable when there are not many track materials , Students can cut the video or audio on your timeline panel , Keep what you think is the essence .

reminder : During video editing , After creating a new project , Always remember to save the edited content , To prevent PR Collapse when you don't expect it , It is recommended to com +S, Otherwise, when you cut a lot of films , Sudden collapse , It feels really sour !
There are many functions about the timeline panel , Let's talk about these first , Let's familiarize ourselves with the basic operation of the timeline panel .
pr Video editing software download address : Premiere Pro 2021 for Mac(pr 2021 Direct Edition )
边栏推荐
- OpenCV中cv2.VideoWriter_fourcc()函数和cv2.VideoWriter()函数的结合使用
- 测试左移和右移
- Experiment of connecting mobile phone hotspot based on Arduino and esp8266 (successful)
- Leetcode - Sword finger offer 37, 38
- Leetcode - Sword finger offer 51 Reverse pairs in an array
- Jenkins user rights management
- Sort---
- 史上最易懂的f-string教程,收藏這一篇就够了
- 【工控老马】西门子PLC Siemens PLC TCP协议详解
- PyTorch nn. Full analysis of RNN parameters
猜你喜欢
分布式机器学习框架与高维实时推荐系统

Multiply LCA (nearest common ancestor)

Use sqoop to export ads layer data to MySQL

【C语言】十进制数转换成二进制数
中国交通标志检测数据集

Simple use of drools decision table

记录一下MySql update会锁定哪些范围的数据
Map和Set
drools决策表的简单使用
There is a hidden danger in CDH: the exchange memory used by the process of this role is XX megabytes. Warning threshold: 200 bytes
随机推荐
5g era, learning audio and video development, a super hot audio and video advanced development and learning classic
计算二叉树的最大路径和
Test shift left and right
Heap (priority queue)
There is a hidden danger in CDH: the exchange memory used by the process of this role is XX megabytes. Warning threshold: 200 bytes
Leetcode122 买卖股票的最佳时机 II
[old horse of industrial control] detailed explanation of Siemens PLC TCP protocol
AI中台技术调研
When uploading a file, the server reports an error: iofileuploadexception: processing of multipart / form data request failed There is no space on the device
深拷贝 事件总线
(C语言)八进制转换十进制
arcgis js 4. Add pictures to x map
Leetcode - < dynamic planning special> Jianzhi offer 19, 49, 60
Jenkins voucher management
How does Premiere (PR) import the preset mogrt template?
Post request body content cannot be retrieved repeatedly
Less than three months after the programmer was hired, the boss wanted to launch the app within one month. If he was dissatisfied, he was dismissed immediately
分布式机器学习框架与高维实时推荐系统
High performance erasure code coding
China traffic sign detection data set