当前位置:网站首页>Kubedm series-00-overview
Kubedm series-00-overview
2022-07-05 08:46:00 【runzhliu】
List of articles
Overview
Kubernetes 1.24 Is officially abandoned Dockershim Version of , This article mainly describes the installation Kubernetes 1.24 + containerd 1.6.6 As CRI The cluster of , It is mainly installed in the way of package manager , The installation process can also be referred to Official documents
Software | edition | other |
|---|---|---|
kubernetes | 1.24.1 | |
containerd | 1.6.6 | |
runc | 1.1.2 | |
Centos | 8 Stream | |
kernel | 5.18.5-1.el8.elrepo.x86_64 |
To configure yum repo file
stay 1.24 Version of , When installing, you may encounter this strange problem , gpgcheck=0 repo_gpgcheck=0 Just turn off these two parameters
cat <<EOF | sudo tee /etc/yum.repos.d/kubernetes.repo
[kubernetes]
name=Kubernetes
baseurl=https://packages.cloud.google.com/yum/repos/kubernetes-el7-\$basearch
enabled=1
gpgcheck=0
repo_gpgcheck=0
gpgkey=https://packages.cloud.google.com/yum/doc/yum-key.gpg https://packages.cloud.google.com/yum/doc/rpm-package-key.gpg
exclude=kubelet kubeadm kubectl
EOF

#  Domestic sources can also
cat <<EOF | sudo tee /etc/yum.repos.d/kubernetes.repo
[kubernetes]
name=Kubernetes
baseurl=http://mirrors.aliyun.com/kubernetes/yum/repos/kubernetes-el7-x86_64
enabled=1
gpgcheck=0
repo_gpgcheck=0
gpgkey=http://mirrors.aliyun.com/kubernetes/yum/doc/yum-key.gpg
       http://mirrors.aliyun.com/kubernetes/yum/doc/rpm-package-key.gpg
EOFConfiguration of machine initialization
If it is a public cloud , These configurations may be related to some software and images of the public cloud's own machine and system initialization , So the following commands are not not always 100% whole , Of course , If you lack any software or configuration , Carry out later kubeadm init You'll find out
# Set SELinux in permissive mode (effectively disabling it)
sudo setenforce 0
sudo sed -i 's/^SELINUX=enforcing$/SELINUX=permissive/' /etc/selinux/config
#  Turn off firewall
systemctl stop firewalld && systemctl disable firewalld
sysctl -w net.ipv4.ip_forward=1
echo 1 > /proc/sys/net/bridge/bridge-nf-call-iptables
echo 1 > /proc/sys/net/ipv4/ip_forward
#  Loading kernel modules
modprobe br_netfilter
modprobe overlay
#  Time synchronization
yum install ntpdate -y
#  Easy to check ipvs The problem of
yum install -y ipset ipvsadmSoftware dependency
If no version is specified , With yum install kubeadm The operation of , The default is to find the latest , Therefore, it is recommended to install the specified version according to the following command
#  install 1.24.1
sudo yum install -y kubelet-1.24.1-0 kubeadm-1.24.1-0 kubectl-1.24.1-0 --disableexcludes=kubernetes
#  install 1.21.7
sudo yum install -y kubelet-1.21.7-0 kubeadm-1.21.7-0 kubectl-1.21.7-0 --disableexcludes=kubernetes
#  Delete 1.24.1
sudo yum remove -y kubelet-1.24.1-0 kubeadm-1.24.1-0 kubectl-1.24.1-0 --disableexcludes=kubernetes
#  Delete 1.21.7
sudo yum remove -y kubelet-1.21.7-0 kubeadm-1.21.7-0 kubectl-1.21.7-0 --disableexcludes=kubernetesin addition , As a dependency , In the installation kubelet/kubeadm/kubectl When , The following software will also be installed , You also need to pay attention to the version , Don't have too big version differences , If it is installed in the way of package manager , Generally, these software versions correspond well
cri-tools.x86_64 0:1.24.0-0
kubernetes-cni.x86_64 0:0.8.7-0
socat.x86_64 0:1.7.3.2-2.el7kubelet.service
Check it out. kubelet.service File structure , More common , But you need to know ,kubeadm Initialized cluster , The default is to use the kubelet As service To deploy , Unlike other components kube-apiserver/etcd In that way Static Pod Form operation
cat /etc/systemd/system/multi-user.target.wants/kubelet.service
[Unit]
Description=kubelet: The Kubernetes Node Agent
Documentation=https://kubernetes.io/docs/
Wants=network-online.target
After=network-online.target

[Service]
ExecStart=/usr/bin/kubelet
Restart=always
StartLimitInterval=0
RestartSec=10

[Install]
WantedBy=multi-user.targetkubeadm init
actually kubeadm init Will do a lot of configuration checks , For example, it will check cri runtime What is it? Wait a minute , Or set the host name
#  Set host name
hostnamectl set-hostname masterMirror image problem
In the domestic public cloud environment , Image download stuck , In fact, you can execute the following command to confirm , If ps -ef Take a look , The following process cannot be mirrored in China , So think about the configuration
kubeadm config images pull --kubernetes-version 1.24.1
#  use crictl download
/usr/bin/crictl -r unix:///var/run/containerd/containerd.sock pull k8s.gcr.io/kube-apiserver:v1.24.1Containerd Common configuration of
#  Two must be replaced endpoint, This operation can also be modified directly kubeadm Initialization profile for
crictl config runtime-endpoint unix:///run/containerd/containerd.sock
crictl config image-endpoint unix:///run/containerd/containerd.sock
#  Test it
crictl pull docker.io/library/redis:alpine3.13
# Replace it with a domestic image Look at the mirror image
Be careful ctr To view the image, you need to bring namespace Of
ctr --namespace k8s.io images listMake this problem to the extent that the business has to solve
If there is any problem during the installation , please Look carefully kube init The following command output , The other is to check kubelet as well as containerd Logs of these two services , The following are the possible troubleshooting commands
journalctl -xeu containerd --no-page -f
journalctl -xeu kubelet --no-page -fModify the certificate
We can refer to post
perform
In the face of kubeadm In the analysis , The author mainly refers to two major editions , Namely Kubernetes 1.21.7 as well as Kubernetes 1.24.1, Old irons are reading , If in doubt , You can download these two versions of code for reference , If not specially marked , Generally speaking, it means Kubernetes 1.24.1 Code for
Below kubeadm init Log , Some personal information is omitted , And added some step notes , Relevant information can also be obtained through kubeadm init --help Command to print out
#  Created k8s edition
[init] Using Kubernetes version: v1.24.1
#  Enter from here preflight The stage of
[preflight] Running pre-flight checks
	[WARNING SystemVerification]: missing optional cgroups: blkio
[preflight] Pulling images required for setting up a Kubernetes cluster
[preflight] This might take a minute or two, depending on the speed of your internet connection
[preflight] You can also perform this action in beforehand using 'kubeadm config images pull'
#  Enter the certificate stage from here
[certs] Using certificateDir folder "/etc/kubernetes/pki"
[certs] Generating "ca" certificate and key
[certs] Generating "apiserver" certificate and key
[certs] apiserver serving cert is signed for DNS names [ip-172-31-90-126 kubernetes kubernetes.default kubernetes.default.svc kubernetes.default.svc.cluster.local] and IPs [10.96.0.1 172.31.90.126]
[certs] Generating "apiserver-kubelet-client" certificate and key
[certs] Generating "front-proxy-ca" certificate and key
[certs] Generating "front-proxy-client" certificate and key
[certs] Generating "etcd/ca" certificate and key
[certs] Generating "etcd/server" certificate and key
[certs] etcd/server serving cert is signed for DNS names [ip-172-31-90-126 localhost] and IPs [172.31.90.126 127.0.0.1 ::1]
[certs] Generating "etcd/peer" certificate and key
[certs] etcd/peer serving cert is signed for DNS names [ip-172-31-90-126 localhost] and IPs [172.31.90.126 127.0.0.1 ::1]
[certs] Generating "etcd/healthcheck-client" certificate and key
[certs] Generating "apiserver-etcd-client" certificate and key
[certs] Generating "sa" key and public key
#  Get into kubeconfig The stage of
[kubeconfig] Using kubeconfig folder "/etc/kubernetes"
[kubeconfig] Writing "admin.conf" kubeconfig file
[kubeconfig] Writing "kubelet.conf" kubeconfig file
[kubeconfig] Writing "controller-manager.conf" kubeconfig file
[kubeconfig] Writing "scheduler.conf" kubeconfig file
#  To start kubelet
[kubelet-start] Writing kubelet environment file with flags to file "/var/lib/kubelet/kubeadm-flags.env"
[kubelet-start] Writing kubelet configuration to file "/var/lib/kubelet/config.yaml"
[kubelet-start] Starting the kubelet
#  Start controlplane The start-up phase
[control-plane] Using manifest folder "/etc/kubernetes/manifests"
[control-plane] Creating static Pod manifest for "kube-apiserver"
[control-plane] Creating static Pod manifest for "kube-controller-manager"
[control-plane] Creating static Pod manifest for "kube-scheduler"
[etcd] Creating static Pod manifest for local etcd in "/etc/kubernetes/manifests"
[wait-control-plane] Waiting for the kubelet to boot up the control plane as static Pods from directory "/etc/kubernetes/manifests". This can take up to 4m0s
#  health examination
[apiclient] All control plane components are healthy after 16.503764 seconds
[upload-config] Storing the configuration used in ConfigMap "kubeadm-config" in the "kube-system" Namespace
[kubelet] Creating a ConfigMap "kubelet-config" in namespace kube-system with the configuration for the kubelets in the cluster
[upload-certs] Skipping phase. Please see --upload-certs
#  to controlplane Put on the necessary label
[mark-control-plane] Marking the node ip-172-31-90-126 as control-plane by adding the labels: [node-role.kubernetes.io/control-plane node.kubernetes.io/exclude-from-external-load-balancers]
[mark-control-plane] Marking the node ip-172-31-90-126 as control-plane by adding the taints [node-role.kubernetes.io/master:NoSchedule node-role.kubernetes.io/control-plane:NoSchedule]
#  establish token
[bootstrap-token] Using token: qlk4br.83yi47aqacj3cwzh
[bootstrap-token] Configuring bootstrap tokens, cluster-info ConfigMap, RBAC Roles
[bootstrap-token] Configured RBAC rules to allow Node Bootstrap tokens to get nodes
[bootstrap-token] Configured RBAC rules to allow Node Bootstrap tokens to post CSRs in order for nodes to get long term certificate credentials
[bootstrap-token] Configured RBAC rules to allow the csrapprover controller automatically approve CSRs from a Node Bootstrap Token
[bootstrap-token] Configured RBAC rules to allow certificate rotation for all node client certificates in the cluster
[bootstrap-token] Creating the "cluster-info" ConfigMap in the "kube-public" namespace
[kubelet-finalize] Updating "/etc/kubernetes/kubelet.conf" to point to a rotatable kubelet client certificate and key
#  The stage of plug-in installation
[addons] Applied essential addon: CoreDNS
[addons] Applied essential addon: kube-proxyThe following is the log of successful installation after the above process , Will prompt you to kubeconig Configure it
Your Kubernetes control-plane has initialized successfully!

To start using your cluster, you need to run the following as a regular user:

  mkdir -p $HOME/.kube
  sudo cp -i /etc/kubernetes/admin.conf $HOME/.kube/config
  sudo chown $(id -u):$(id -g) $HOME/.kube/config

Alternatively, if you are the root user, you can run:

  export KUBECONFIG=/etc/kubernetes/admin.conf

You should now deploy a pod network to the cluster.
Run "kubectl apply -f [podnetwork].yaml" with one of the options listed at:
  https://kubernetes.io/docs/concepts/cluster-administration/addons/

Then you can join any number of worker nodes by running the following on each as root:

kubeadm join 172.31.90.126:6443 --token qlk4br.83yi47aqacj3cwzh \
--discovery-token-ca-cert-hash sha256:cc121a0e581abbdedcbad370077c46e11da9d6ea60a201dd54be4c70893f98f4In fact, for kubeadm The understanding of the , I think so , He did a lot of scripted work , Thanks to go Relatively rich toolkits bound to the system , So it will be very convenient to call , The other is to use actually , All these inspections and installation work , Using scripts shell And the like can also be written well , Actually, I used to do Kubernetes 1.8 And previous versions , Deployment is done with scripts written by operation and maintenance , There is not much difference in essence , But with go To write , You can add some scalability and robustness , This is something considered from the grammatical level
边栏推荐
- 猜谜语啦(142)
- Bluebridge cup internet of things competition basic graphic tutorial - clock selection
- Business modeling of software model | overview
- 暑假第一周
- 整形的分类:short in long longlong
- 深度学习模型与湿实验的结合,有望用于代谢通量分析
- 猜谜语啦(8)
- Halcon wood texture recognition
- Low code platform | apaas platform construction analysis
- Basic number theory - factors
猜你喜欢
C#【必备技能篇】ConfigurationManager 类的使用(文件App.config的使用)

Halcon snap, get the area and position of coins
Halcon: check of blob analysis_ Blister capsule detection

Halcon color recognition_ fuses. hdev:classify fuses by color
My university

Halcon shape_ trans
![[牛客网刷题 Day4] JZ35 复杂链表的复制](/img/bc/ce90bb3cb6f52605255f1d6d6894b0.png)
[牛客网刷题 Day4] JZ35 复杂链表的复制
Halcon clolor_ pieces. Hedv: classifier_ Color recognition
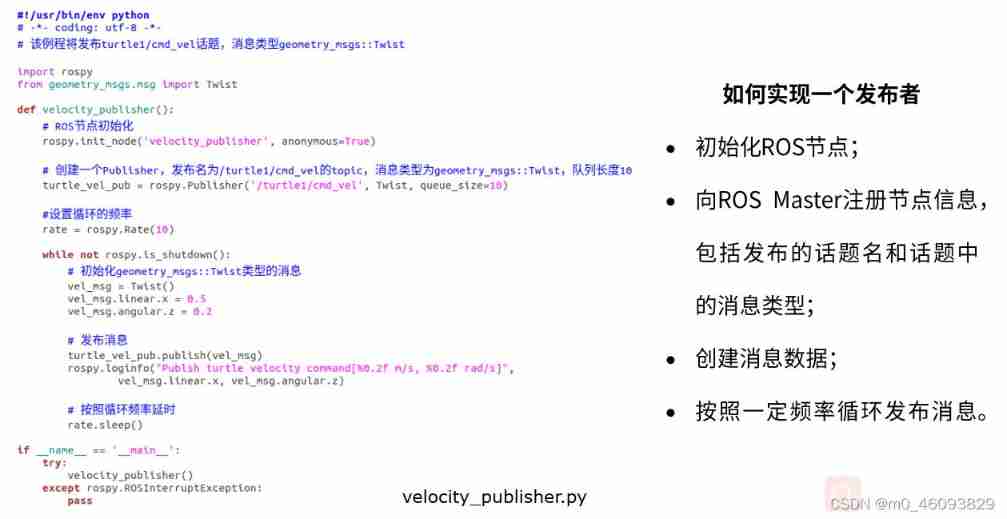
Programming implementation of ROS learning 2 publisher node
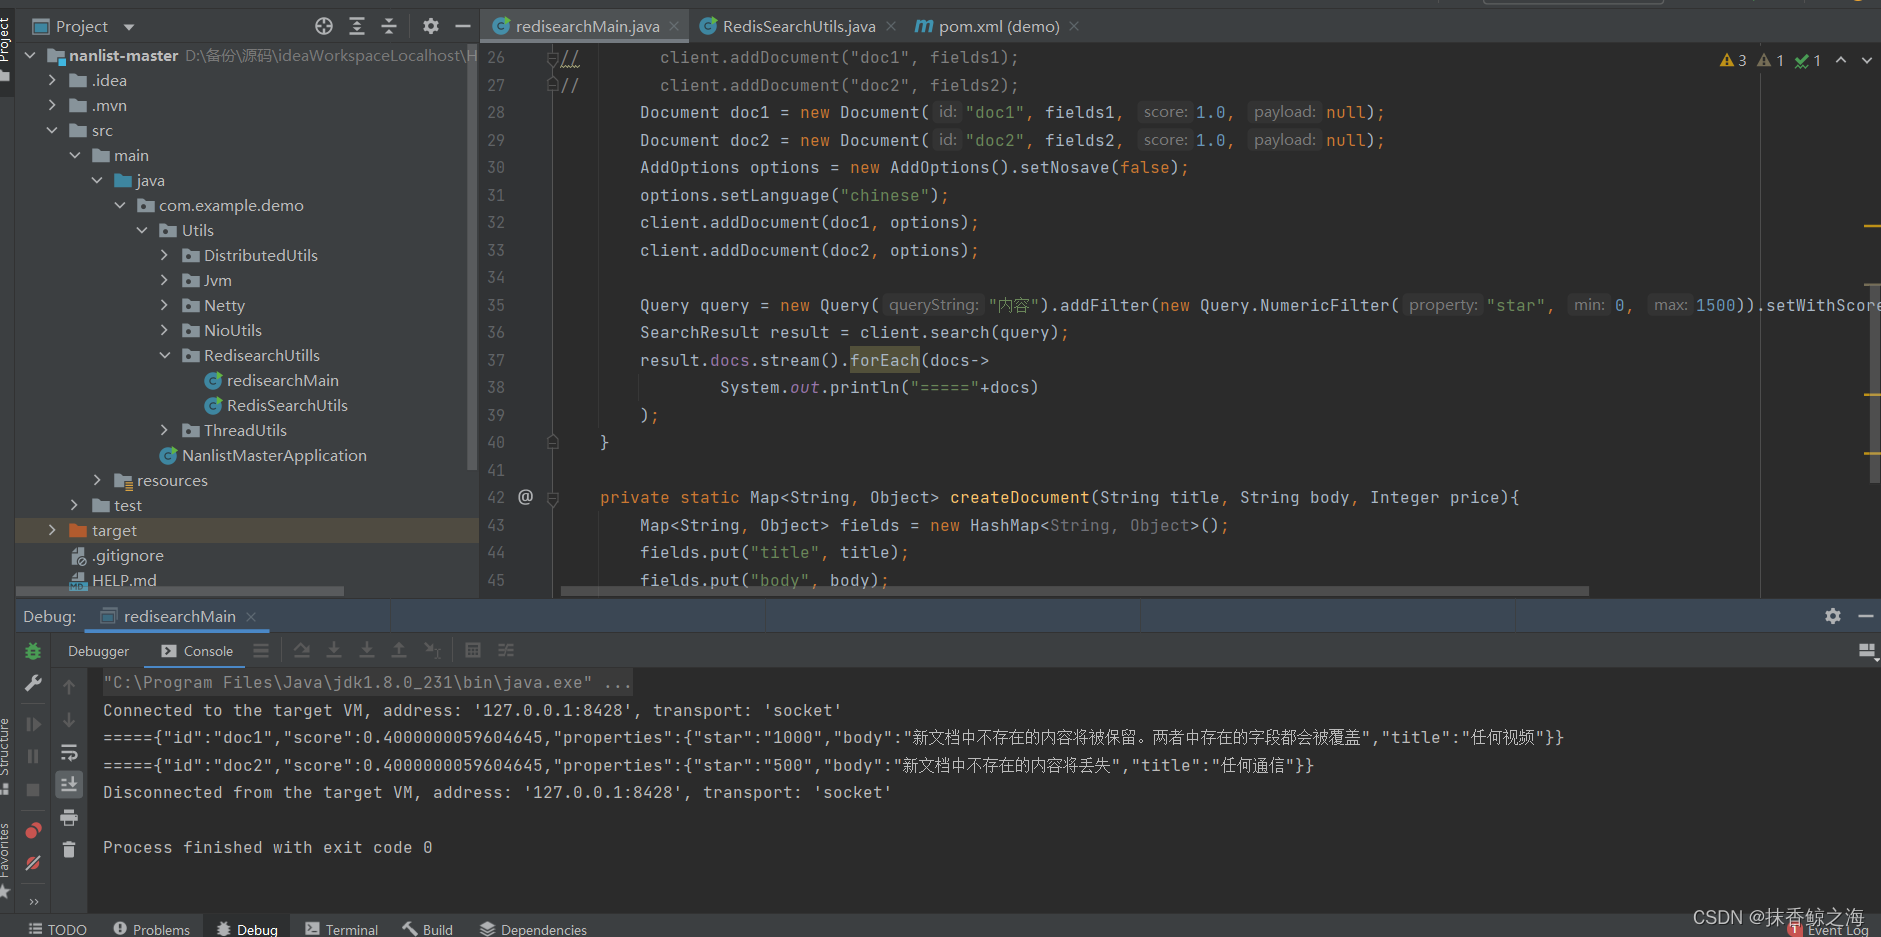
Redis实现高性能的全文搜索引擎---RediSearch
随机推荐
How to manage the performance of R & D team?
整形的分类:short in long longlong
Guess riddles (10)
Shift operation of complement
Apaas platform of TOP10 abroad
EA introduction notes
Cmder of win artifact
暑假第一周
猜谜语啦(7)
Guess riddles (4)
猜谜语啦(6)
Halcon color recognition_ fuses. hdev:classify fuses by color
IT冷知识(更新ing~)
Adaboost使用
Yolov4 target detection backbone
轮子1:QCustomPlot初始化模板
Arduino operation stm32
深度学习模型与湿实验的结合,有望用于代谢通量分析
Redis implements a high-performance full-text search engine -- redisearch
The first week of summer vacation