当前位置:网站首页>32、树莓派的简单测试串口通信和超声波模块测距
32、树莓派的简单测试串口通信和超声波模块测距
2022-06-10 12:43:00 【sxj731533730】
基本思想:随手记录一下众灵科技树莓派的测试串口通信和超声波模块,其镜像还是很nice,基本的库都给你安装了,比较大
链接:https://pan.baidu.com/s/11tMdoRh3bHmcYzPyolm96g
提取码:fd58
第一步、测试树莓派的串口程序

可以通过桌面的设置,在Raspberry Pi Configuration中将Serial Port设置为Enable, 我全部打开了

引脚定义

第二步、根据pin引脚,引入usb转ttl引针,然后打开串口工具

第三步、先使用权限命令打开权限
[email protected]:~/sxj731533730 $ sudo chmod 777 /dev/ttyS0测试代码
[email protected]:~/sxj731533730 $ cat a.py
import serial
ser = serial.Serial('/dev/ttyS0',9600)
ser.isOpen()
ser.write('Hello CSDN !!'.encode('utf-8'))
python测试结果

c++测试代码
#include <chrono>
#include <sys/stat.h>
#include <fcntl.h>
#include <termios.h>
#include <unistd.h>
#include<unistd.h>
#include<stdio.h>
#include<sys/types.h>
#include<sys/stat.h>
#include <iostream>
#include <cstring>

using namespace std;

int sendSerialPort(const unsigned char W_BUF[], int length) {

    int tty_fd = -1;

    int rv = -1;

    struct termios options;

    tty_fd = open("/dev/ttyS0", O_RDWR | O_NOCTTY | O_NDELAY); //打开串口设备
    fcntl(tty_fd, F_SETFL, 0);
    if (tty_fd < 0) {
        printf("open tty failed:%s\n", strerror(errno));
        close(tty_fd);
        return -1;
    }

    printf("open devices sucessful!\n");


    memset(&options, 0, sizeof(options));

    rv = tcgetattr(tty_fd, &options); //获取原有的串口属性的配置
    if (rv != 0) {
        printf("tcgetattr() failed:%s\n", strerror(errno));
        close(tty_fd);
        return -1;

    }

    options.c_cflag |= (CLOCAL | CREAD); // CREAD 开启串行数据接收,CLOCAL并打开本地连接模式
    options.c_cflag &= ~CSIZE;// 先使用CSIZE做位屏蔽
    options.c_cflag |= CS8; //设置8位数据位
    options.c_cflag &= ~PARENB; //无校验位
    cfsetispeed(&options, B9600);
    cfsetospeed(&options, B9600);
    options.c_cflag &= ~CSTOPB;
    options.c_cc[VTIME] = 0;
    options.c_cc[VMIN] = 0;
    tcflush(tty_fd, TCIFLUSH);


    if ((tcsetattr(tty_fd, TCSANOW, &options)) != 0) {
        printf("tcsetattr failed:%s\n", strerror(errno));
        close(tty_fd);
        return -1;
    }


    std::cout << std::endl << "length= " << length << std::endl;
    rv = write(tty_fd, W_BUF, length);
    if(rv<=0) /* 出错了*/
    {
        if (errno == EINTR) /* 中断错误 我们继续写*/
        {
            close(tty_fd);
            printf("[SeanSend]error errno==EINTR continue\n");
        } else if (errno == EAGAIN) /* EAGAIN : Resource temporarily unavailable*/
        {
            sleep(1);//等待一秒,希望发送缓冲区能得到释放
            close(tty_fd);
            printf("[SeanSend]error errno==EAGAIN continue\n");
        } else /* 其他错误 没有办法,只好退了*/
        {
            printf("[SeanSend]ERROR: errno = %d, strerror = %s \n", errno, strerror(errno));
            return (-1);
        }
    }
        if (rv < 0) {
        printf("Write() error:%s\n", strerror(errno));
        close(tty_fd);
        return -1;
    }
    for (int i = 0; i < length; i++) {
        std::cout << std::hex << (int) W_BUF[i] << " ";

    }
    close(tty_fd);
    printf("\nWrite() successfully\n");
    return 0;

}


int main(int argc, char **argv) {
    //0xFD 0x00 0x07 0x01 0x01 0xD6 0xB1 0xD0 0xD0 0x9D  //直行
    //0xFD 0x00 0x07 0x01 0x01 0xD7 0xF3 0xD7 0xAA 0xA3  //左转
    //0xFD 0x00 0x07 0x01 0x01 0xD3 0xD2 0xD7 0xAA 0x86  //右转


    const unsigned char data[][10] = {
   {0xFD, 0x00, 0x07, 0x01, 0x01, 0xD6, 0xB1, 0xD0, 0xD0, 0x9D},
                                      {0xFD, 0x00, 0x07, 0x01, 0x01, 0xD7, 0xF3, 0xD7, 0xAA, 0xA3},
                                      {0xFD, 0x00, 0x07, 0x01, 0x01, 0xD3, 0xD2, 0xD7, 0xAA, 0x86}};
    sendSerialPort(data[0], sizeof(data[0]));//测试


    return 0;
}
测试方法
[email protected]:~/sxj731533730 $ g++ a.cpp
[email protected]:~/sxj731533730 $ ./a.out
open devices sucessful!
length= 10
fd 0 7 1 1 d6 b1 d0 d0 9d
Write() successfully
测试结果

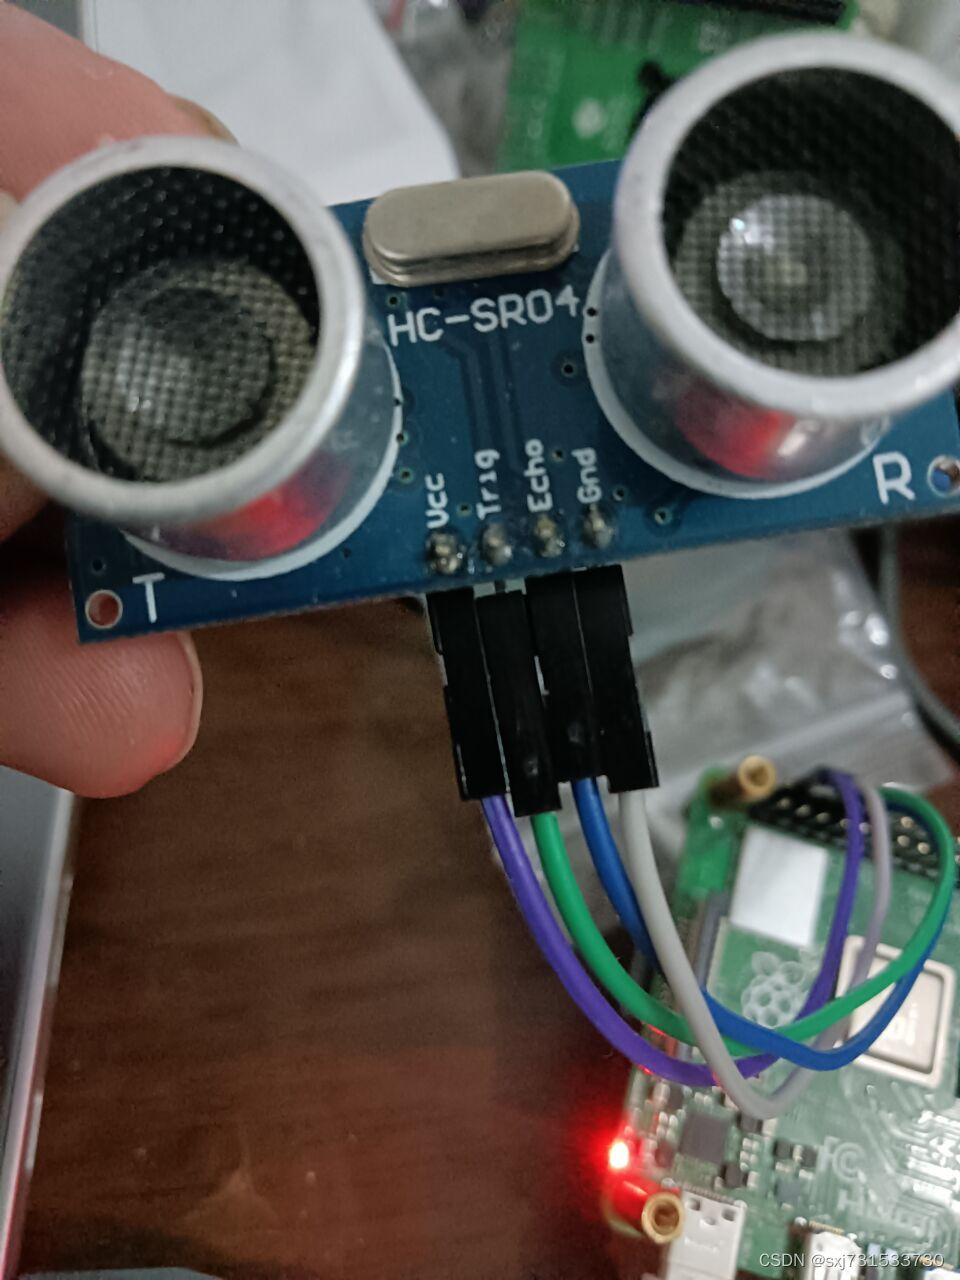
第四步、测试超声波模块

引脚插线 我用的gpio14 和 15 引脚 ,超声波模块来自我2009年买的锐志开发板带的超声波 哈哈


测试代码
import RPi.GPIO as GPIO
import time

Trig_Pin = 14
Echo_Pin = 15
GPIO.setmode(GPIO.BCM)
GPIO.setup(Trig_Pin, GPIO.OUT, initial = GPIO.LOW)
GPIO.setup(Echo_Pin, GPIO.IN)
time.sleep(2)
def checkdist():
     GPIO.output(Trig_Pin, GPIO.HIGH)
     time.sleep(0.000015)
     GPIO.output(Trig_Pin, GPIO.LOW)
     while not GPIO.input(Echo_Pin):
         pass
     t1 = time.time()
     while GPIO.input(Echo_Pin):
         pass
     t2 = time.time()
     return (t2-t1) *340/2
try:
     while True:
         print('Distance:%0.2f m' % checkdist())
         time.sleep(3)
except KeyboardInterrupt:
     GPIO.cleanup()
测试结果

c++ 测距代码 代码需要修改,在while循环那里,判断异常退出
#include <wiringPi.h>
#include <stdio.h>
#include <sys/time.h>
#define Trig    14
#define Echo    15

void chaoShengBoInit(void)
{


    pinMode(Echo, INPUT);  //设置端口为输入
    pinMode(Trig, OUTPUT);  //设置端口为输出
}

float disMeasure(void)
{

      struct timeval tv0;
    struct timeval tv1;  //timeval是time.h中的预定义结构体 其中包含两个一个是秒,一个是微秒
    /*
    struct timeval
    {
        time_t tv_sec;  //Seconds.
        suseconds_t tv_usec;  //Microseconds.
    };
    */

    struct timeval tv2;
     struct timeval tv3;
    long start, stop;
    float dis;

    digitalWrite(Trig, LOW);
    delayMicroseconds(2);

    digitalWrite(Trig, HIGH);
    delayMicroseconds(10);      //发出超声波脉冲
    digitalWrite(Trig, LOW);
   gettimeofday(&tv0, NULL);           //获取当前时间 开
    while(!(digitalRead(Echo) == 1))
    {
         gettimeofday(&tv3, NULL);           //获取当前时间  超时退出
         if(tv3.tv_usec-tv0.tv_usec>10)
          break;
    }
    gettimeofday(&tv1, NULL);           //获取当前时间 开始接收到返回信号的时候

    while(!(digitalRead(Echo) == 0))
    {
         gettimeofday(&tv3, NULL);           //获取当前时间  超时退出
         if(tv3.tv_usec-tv1.tv_usec>10)
          break;
    }

    gettimeofday(&tv2, NULL);           //获取当前时间  最后接收到返回信号的时候

    start = tv1.tv_sec * 1000000 + tv1.tv_usec;   //微秒级的时间
    stop  = tv2.tv_sec * 1000000 + tv2.tv_usec;

    dis = (float)(stop - start) / 1000000 * 34000 / 2;  //计算时间差求出距离

    return dis;
}

int main(void)
{
    float dis;
     printf("wiringPiSetup\n");
    if(wiringPiSetup() == -1){ //如果初始化失败,就输出错误信息 程序初始化时务必进行
        printf("setup wiringPi failed !");
        return 1;
    }

    chaoShengBoInit();

    while(1){
        dis = disMeasure();
        printf("distance = %0.2f cm\n",dis);
        delay(20);
    }

    return 0;
}
编译命令和测试
[email protected]:~ $ g++ -g test.cpp -lwiringPi
[email protected]:~ $ ./a.out
distance = 0.03 cm
distance = 0.02 cm
distance = 0.03 cm
distance = 0.03 cm
distance = 0.02 cm
distance = 0.03 cm
参考:
边栏推荐
- [raise bar C #] how to call the base of the interface
- Dynaslam ii: carefully coupled multi object tracking and slam
- Tensorflow2.0 advanced learning - image (11)
- Leetcode 96. Différents arbres de recherche binaires
- How about the one-stop machine learning opening platform mlflow?
- Idea custom configuration link Nacos
- 出海企业遇瓶颈 茄子科技(SHAREit Group)有话说
- Today, a couple won the largest e-commerce IPO in Hong Kong
- GNN is used as the new backbone of the three major tasks of CV, with the same cost performance as CNN, Vit and MLP | Chinese Academy of Sciences & Huawei Noah open source
- 从解读 BDC 自动生成的代码谈起,讲解 SAPGUI 的程序组成部分试读版
猜你喜欢

MySQL service evolution

百度程序员删库被判9个月,手机号一键解绑功能发布,推特再向马斯克妥协,今日更多大新闻在此...

The deep neural network classifies nearly 2billion images per second, and the new brain like optical classifier chip is on nature
Baidu programmers were sentenced to nine months for deleting the database. The one click unbinding function of the mobile phone number was released. Twitter compromised with musk again. Today, more bi

Today, a couple won the largest e-commerce IPO in Hong Kong

Google proposed the super pre training model coca, and the accuracy of fine-tuning top-1 on Imagenet reached 91%! SOTA on multiple downstream tasks!
Automatic Mapping of Tailored Landmark Representations for Automated Driving and Map Learning 论文阅读

从解读 BDC 自动生成的代码谈起,讲解 SAPGUI 的程序组成部分
Automatic mapping of tailored landmark representations for automated driving and map learning

change system time
随机推荐
蔚来:“拿捏”了数据,“扭捏”着未来
Leetcode 96. 不同的二叉搜索树
[spark] (task8) pipeline channel establishment in sparkml
Error:top-left corner pixel must be either opaque white or transparent.
OFFICE技术讲座:标点符号-英文-大全
Final exam - Principles of compilation
'setbackgrounddrawable() 'is deprecated, setbackgrounddrawable is obsolete
Mobile phone manufacturers "go back to their ancestors", only apple said no
从解读 BDC 自动生成的代码谈起,讲解 SAPGUI 的程序组成部分试读版
colmap源码阅读笔记[1] threading.cc
Some words from ShareIt group
[summary] individual competition supplement POJ - 3041 asteroids & codeforces - 173b chamber of Secrets
Technology sharing | quick intercom, global intercom
Which EDA design software should Altium Allegro pads choose
Colmap source code reading notes [1] threading cc
汇编语言入门-总结
不吐不快
Office technical lecture: punctuation - Chinese - vertical
The Japanese version of arXiv is a cool batch: only 37 papers have been received after more than 2 months
Leetcode 96. 不同的二叉搜索樹