当前位置:网站首页>调用TensorFlow Objection Detection API进行目标检测并将检测结果保存至本地
调用TensorFlow Objection Detection API进行目标检测并将检测结果保存至本地
2022-08-05 05:18:00 【cql_cqu】
参照之前的博客“ensorFlow ObjecDetectionAPI在win10系统Anaconda3下的配置”:https://blog.csdn.net/liu_yanxiaobai/article/details/86077459,将环境配置好,下面开始调用该API对视频中的动态目标进行检测。
我们这里还是在jupyter notebook编译环境下进行代码的测试。
首先,通过CMD窗口进入到所配置好的TensorFlow环境(我这里是activate python35),然后进入到TensorFlow API的指定目录(我这里是E:\ProjectTest\PythonTests\CNN_Test\Image-labels-system\TensorFlow-ObjectDetection\models-master),接着在此目录下输入jupyter notebook调出网页版编译环境,最后进入research>objection_detection,点击object_detection_tutorial.ipynb,便可进行代码的修改测试。
1、使用OpenCV的VideoCapture类可调出本地摄像头或外接摄像头或者读取本地视频,例如:
cap = cv2.VideoCapture(0)#调出本地摄像头
cap = cv2.VideoCapture(1)#调出外接摄像头
ca= = cv2.VideoCapture(“本地视频路径”)#读入本地视频
2、在TensorFlow官方源代码的基础上加入如下代码:
import cv2
import numpy as np

Video_Path = "E://Test Sources//car_2.avi"#此处视频格式好像只能为AVI格式,否则后面将检测后的视频流无法写入本地保存,原因可能跟fourcc的编码格式有关
cap = cv2.VideoCapture(Video_Path)#读入本地视频
fps = cap.get(cv2.CAP_PROP_FPS)#设置读入视频帧率
size = (int(cap.get(cv2.CAP_PROP_FRAME_WIDTH)),int(cap.get(cv2.CAP_PROP_FRAME_HEIGHT)))#设置读入视频大小,(此处注意python2与python3代码不同)
fourcc = cv2.VideoCapture('M','P', '4', '2')#设置视频编码格式
out = cv2.VideoCapture('output.avi', fourcc, fps, size)#目标检测后视频写入格式
3、最后在while循环中读取视频(摄像头)帧,利用API对检测到的动态目标画矩形框并显示其类别,一帧帧图像组成视频流显示,并将视频流写入本地保存。
with detection_graph.as_default():
    with tf.Session(graph=detection_graph) as sess:
        while True:
            ret, image_np = cap.read()
            # Expand dimensions since the model expects images to have shape: [1, None, None, 3]
            image_np_expanded = np.expand_dims(image_np, axis=0)
            image_tensor = detection_graph.get_tensor_by_name('image_tensor:0')
            # Each box represents a part of the image where a particular object was detected.
            boxes = detection_graph.get_tensor_by_name('detection_boxes:0')
            # Each score represent how level of confidence for each of the objects.
            # Score is shown on the result image, together with the class label.
            scores = detection_graph.get_tensor_by_name('detection_scores:0')
            classes = detection_graph.get_tensor_by_name('detection_classes:0')
            num_detections = detection_graph.get_tensor_by_name('num_detections:0')
            # Actual detection.
            (boxes, scores, classes, num_detections) = sess.run(
                    [boxes, scores, classes, num_detections],
                    feed_dict={image_tensor: image_np_expanded})
            # Visualization of the results of a detection.
            vis_util.visualize_boxes_and_labels_on_image_array(
                    image_np,
                    np.squeeze(boxes),
                    np.squeeze(classes).astype(np.int32),
                    np.squeeze(scores),
                    category_index,
                    use_normalized_coordinates=True,
                    line_thickness=8)

            cv2.imshow('object detection', cv2.resize(image_np, (800,600)))
            out.write(image_np)  ###将图像一帧帧写成视频流
            if cv2.waitKey(25) & 0xFF == ord('q'):
                cv2.destroyAllWindows()
                break
        cap.release()###释放内存
        out.release()
附完整版源代码如下:
import numpy as np
import os
import six.moves.urllib as urllib
import sys
import tarfile
import tensorflow as tf
import zipfile

from distutils.version import StrictVersion
from collections import defaultdict
from io import StringIO
from matplotlib import pyplot as plt
from PIL import Image

import cv2
Video_Path = "E://Test Sources//car_2.avi"###此处原视频必须是AVI格式的才可以将最后的检测结果保存到本地,其他格式(mp4)不可以,因为fourcc只支持AVI格式编码
cap = cv2.VideoCapture(Video_Path)#调出本地摄像头时为0
#####将视频读入本地保存######
fps = cap.get(cv2.CAP_PROP_FPS)
size = (int(cap.get(cv2.CAP_PROP_FRAME_WIDTH)),int(cap.get(cv2.CAP_PROP_FRAME_HEIGHT)))
fourcc = cv2.VideoWriter_fourcc('M', 'P', '4', '2')
out = cv2.VideoWriter('output_car_2.avi', fourcc, fps, size)

# This is needed since the notebook is stored in the object_detection folder.
sys.path.append("..")
from object_detection.utils import ops as utils_ops

if StrictVersion(tf.__version__) < StrictVersion('1.9.0'):
  raise ImportError('Please upgrade your TensorFlow installation to v1.9.* or later!')

%matplotlib inline

from utils import label_map_util
from utils import visualization_utils as vis_util

##模型下载
MODEL_NAME = 'ssd_mobilenet_v1_coco_2017_11_17'
MODEL_FILE = MODEL_NAME + '.tar.gz'
DOWNLOAD_BASE = 'http://download.tensorflow.org/models/object_detection/'

# Path to frozen detection graph. This is the actual model that is used for the object detection.
PATH_TO_FROZEN_GRAPH = MODEL_NAME + '/frozen_inference_graph.pb'

# List of the strings that is used to add correct label for each box.
PATH_TO_LABELS = os.path.join('data', 'mscoco_label_map.pbtxt')
NUM_CLASSES = 90#能够识别到的类别种类
opener = urllib.request.URLopener()
opener.retrieve(DOWNLOAD_BASE + MODEL_FILE, MODEL_FILE)
tar_file = tarfile.open(MODEL_FILE)
for file in tar_file.getmembers():
  file_name = os.path.basename(file.name)
  if 'frozen_inference_graph.pb' in file_name:
    tar_file.extract(file, os.getcwd())

detection_graph = tf.Graph()
with detection_graph.as_default():
  od_graph_def = tf.GraphDef()
  with tf.gfile.GFile(PATH_TO_FROZEN_GRAPH, 'rb') as fid:
    serialized_graph = fid.read()
    od_graph_def.ParseFromString(serialized_graph)
    tf.import_graph_def(od_graph_def, name='')

category_index = label_map_util.create_category_index_from_labelmap(PATH_TO_LABELS, use_display_name=True)

def load_image_into_numpy_array(image):
  (im_width, im_height) = image.size
  return np.array(image.getdata()).reshape(
      (im_height, im_width, 3)).astype(np.uint8)

with detection_graph.as_default():
    with tf.Session(graph=detection_graph) as sess:
        while True:
            ret, image_np = cap.read()
            # Expand dimensions since the model expects images to have shape: [1, None, None, 3]
            image_np_expanded = np.expand_dims(image_np, axis=0)
            image_tensor = detection_graph.get_tensor_by_name('image_tensor:0')
            # Each box represents a part of the image where a particular object was detected.
            boxes = detection_graph.get_tensor_by_name('detection_boxes:0')
            # Each score represent how level of confidence for each of the objects.
            # Score is shown on the result image, together with the class label.
            scores = detection_graph.get_tensor_by_name('detection_scores:0')
            classes = detection_graph.get_tensor_by_name('detection_classes:0')
            num_detections = detection_graph.get_tensor_by_name('num_detections:0')
            # Actual detection.
            (boxes, scores, classes, num_detections) = sess.run(
                    [boxes, scores, classes, num_detections],
                    feed_dict={image_tensor: image_np_expanded})
            # Visualization of the results of a detection.
            vis_util.visualize_boxes_and_labels_on_image_array(
                    image_np,
                    np.squeeze(boxes),
                    np.squeeze(classes).astype(np.int32),
                    np.squeeze(scores),
                    category_index,
                    use_normalized_coordinates=True,
                    line_thickness=8)

            cv2.imshow('object detection', cv2.resize(image_np, (800,600)))
            out.write(image_np)  ###将图像一帧帧写成视频流
            if cv2.waitKey(25) & 0xFF == ord('q'):
                cv2.destroyAllWindows()
                break
        cap.release()###释放内存
        out.release()
正常情况下运行,结果会在object_detection文件夹下生成output.avi视频文件(注:如果读入的原视频不是AVI格式的话,生成的视频流文件可能会打不开,所以尽量使用AVI格式文件作为测试视频)。
检测结果见视频:http://v.youku.com/v_show/id_XNDA3ODA3MjM0OA==.html?spm=a2hzp.8244740.0.0
本文目的旨在记录自己的学习过程,也希望对同样做这方面研究的同学有所帮助,本人水平有限,文中可能会有交代不清或说明不当的地方,欢迎指导交流!
边栏推荐
- [Pytorch study notes] 11. Take a subset of the Dataset and shuffle the order of the Dataset (using Subset, random_split)
- Redis设计与实现(第三部分):多机数据库的实现
- 教你如何封装功能组件和页面组件
- (C语言)strlen、strcpy、strcat、strcmp、strstr函数的模拟实现
- 【ts】typescript高阶:条件类型与infer
- LeetCode刷题之第23题
- Redis设计与实现(第二部分):单机数据库的实现
- LeetCode刷题之第54题
- Leetcode刷题——对链表进行插入排序
- Unity中的GetEnumerator 方法及MoveNext、Reset方法
猜你喜欢
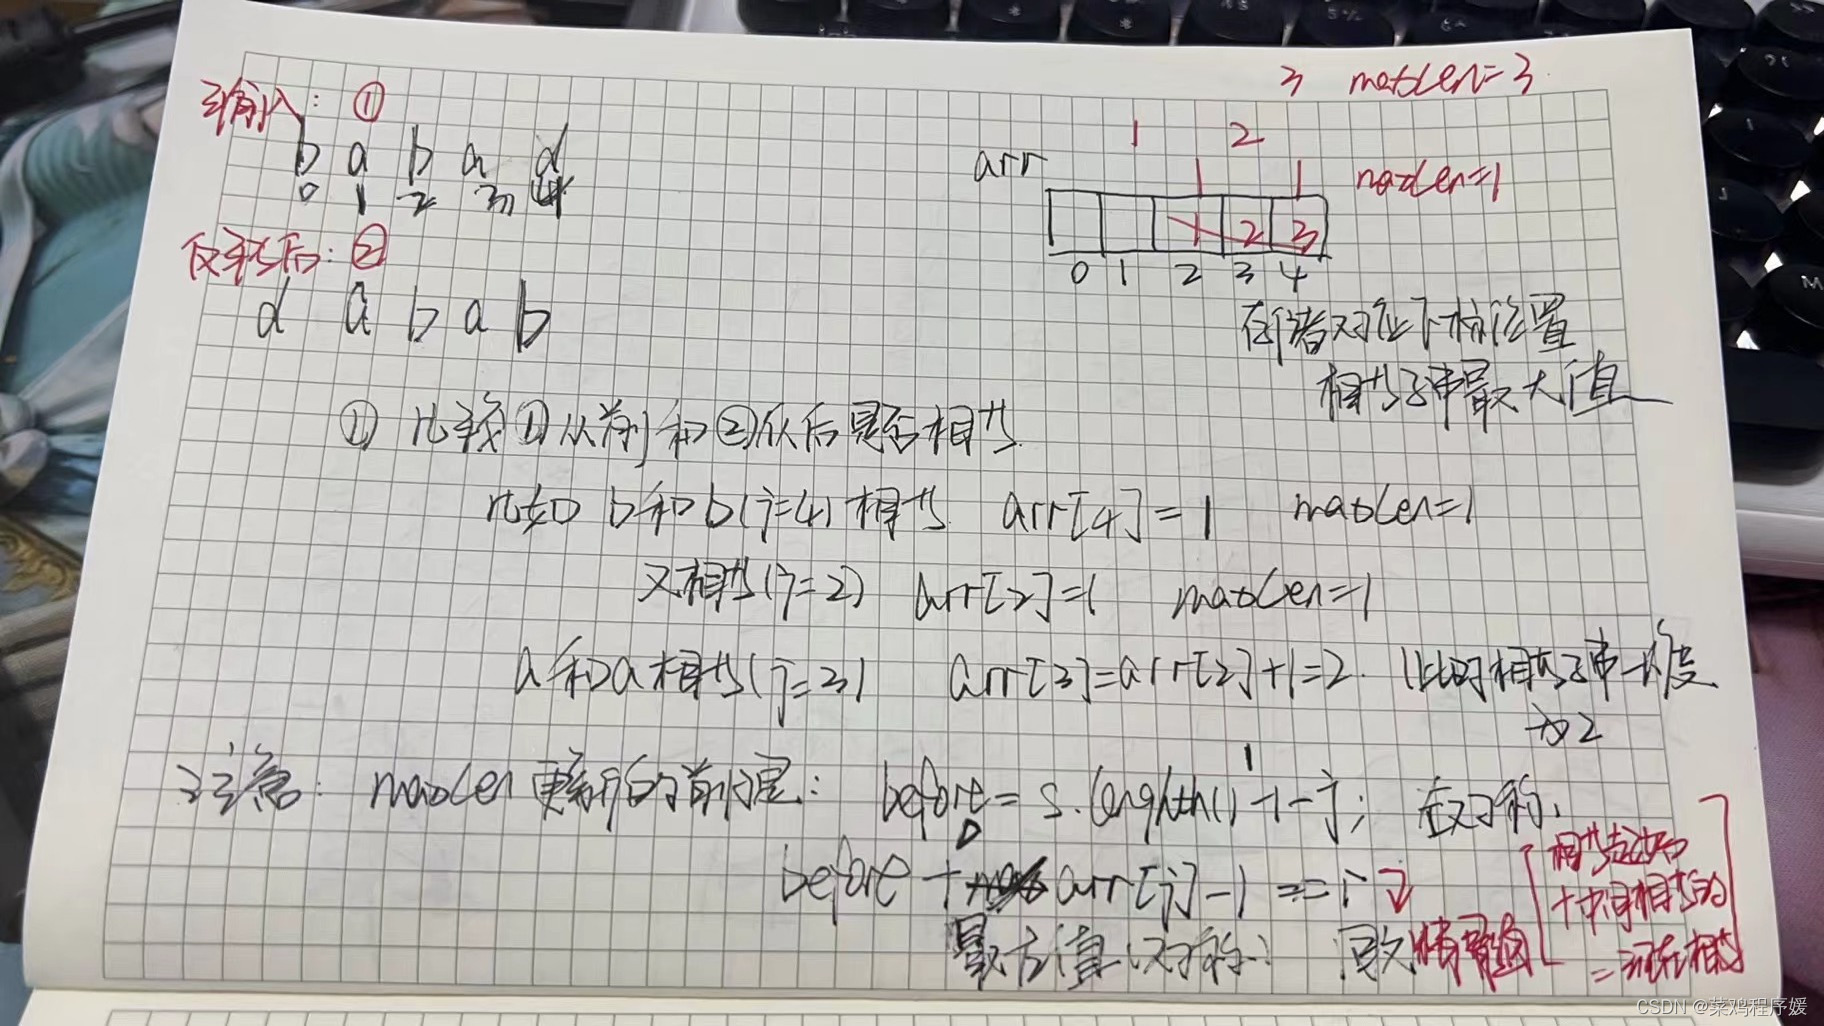
每日一题-最长回文子串-0714
![[Intensive reading of the paper] R-CNN's Bounding box regression problem is detailed](/img/ef/a058ec08bd0a6313e3610a4ebc9685.png)
[Intensive reading of the paper] R-CNN's Bounding box regression problem is detailed
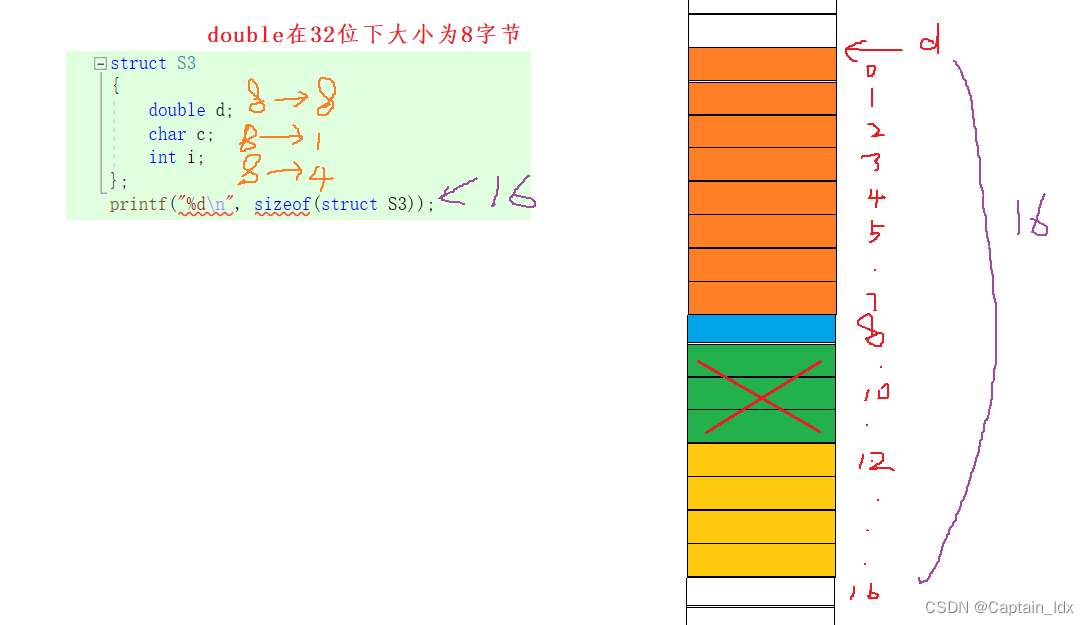
(C语言)计算结构体大小——结构体内存对齐
![[Pytorch study notes] 11. Take a subset of the Dataset and shuffle the order of the Dataset (using Subset, random_split)](/img/59/ce3e18f32c40a97631f5ac1b53662a.png)
[Pytorch study notes] 11. Take a subset of the Dataset and shuffle the order of the Dataset (using Subset, random_split)
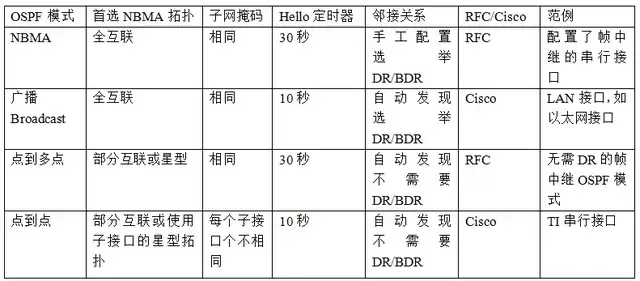
OSPF网络类型
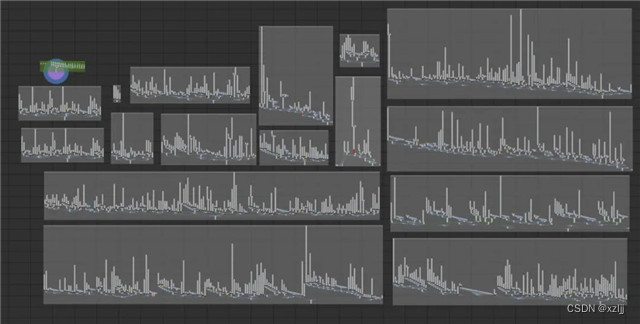
如何使用Houdini进行程序化优化?
腾讯内部技术:《轩辕传奇》服务器架构演变
UE4动画雨滴材质制作教程
【UiPath2022+C#】UiPath变量和参数
PoE视频监控解决方案
随机推荐
教你如何封装功能组件和页面组件
【UiPath2022+C#】UiPath 循环
网络信息安全运营方法论 (下)
leetCode刷题之第31题
Unity huatuo 革命性热更系列1.2 huatuo热更环境安装与示例项目
PID详解
函数在开发环境中的应用(简易实例)
LeetCode刷题之第55题
每日一题-下一个排列-0723
C语言入门笔记 —— 初识
C语言查看大小端(纯代码)
【ts】typescript高阶:映射类型与keyof
Contextual non-local alignment of full-scale representations
网络信息安全运营方法论 (上)
C语言入门笔记 —— 分支与循环
(oj)原地移除数组中所有的元素val、删除排序数组中的重复项、合并两个有序数组
三、自动配置源码分析
【UiPath2022+C#】UiPath 数据操作
LeetCode刷题之第33题
Leetcode刷题——对链表进行插入排序