当前位置:网站首页>Three methods for extracting facial features
Three methods for extracting facial features
2022-08-05 10:50:00 【HUAWEI CLOUD】
@[toc]
第一种方法 直接使用dlib.
安装dlib方法:
https://blog.csdn.net/hhhhhhhhhhwwwwwwwwww/article/details/121470556
思路:
1、使用dlib.get_frontal_face_detector()方法检测人脸的位置.
2、使用 dlib.shape_predictor()方法得到人脸的关键点.
3、使用dlib.face_recognition_model_v1()方法提取特征.
新建face_embedding1.py,插入代码:
import dlib,numpyimport cv2# 人脸关键点检测器predictor_path = "shape_predictor_68_face_landmarks.dat"# 人脸识别模型、提取特征值face_rec_model_path = "dlib_face_recognition_resnet_model_v1.dat"predictor_path是恋人关键点检测器模型的路径.
face_rec_model_path是提取人脸特征的路径.
# 加载模型detector = dlib.get_frontal_face_detector() #人脸检测sp = dlib.shape_predictor(predictor_path) #关键点检测facerec = dlib.face_recognition_model_v1(face_rec_model_path)# 编码分别初始化人脸检测、关键点检测、特征编码方法.
image_path='train_images/11.jpg'image = cv2.imread(image_path)image = cv2.cvtColor(image, cv2.COLOR_BGR2RGB)# 人脸检测dets = detector(image, 1)if len(dets)==1: print('检测到人脸')shape = sp(image, dets[0])# 关键点# 提取特征face_descriptor = facerec.compute_face_descriptor(image, shape)#获取到128位的编码v = numpy.array(face_descriptor)print(v)读取图片.然后将图片转为RGB格式.
检测人脸.
获取人脸的68个关键点.
获取128位人脸编码.
使用感受: 使用dlib.get_frontal_face_detector()检测人脸效果一般,模糊的人脸检测不出来.速度上也是比较慢.
第二种方法 使用深度学习方法查找人脸,dlib提取特征.
思路:
这种方法使用 cv2自带的dnn.readNetFromCaffe方法,加载深度学习模型实现人脸的检测.然后继续使用dlib提取人脸特征.
新建face_embedding2.py,插入代码:
import dlib,numpyimport cv2# 人脸关键点检测器predictor_path = "shape_predictor_68_face_landmarks.dat"# 人脸识别模型、提取特征值face_rec_model_path = "dlib_face_recognition_resnet_model_v1.dat"prototxt_path = 'deploy.proto.txt'model_path = 'res10_300x300_ssd_iter_140000_fp16.caffemodel'导入需要的包.
定义模型的路径.
net = cv2.dnn.readNetFromCaffe(prototxt_path, model_path)sp = dlib.shape_predictor(predictor_path) #关键点检测facerec = dlib.face_recognition_model_v1(face_rec_model_path)# 编码初始化人脸检测模型、关键点检测模型、人脸特征提取模型.
image_path='train_images/11.jpg'image = cv2.imread(image_path)image = cv2.cvtColor(image, cv2.COLOR_BGR2RGB)(h, w) = image.shape[:2]blob = cv2.dnn.blobFromImage(cv2.resize(image, (300, 300)), 1.0, (300, 300), (104.0, 177.0, 123.0))net.setInput(blob)detections = net.forward()startX, startY, endX, endY = 0, 0, 0, 0for i in range(0, detections.shape[2]): # extract the confidence (i.e., probability) associated with the # prediction confidence = detections[0, 0, i, 2] # filter out weak detections by ensuring the `confidence` is # greater than the minimum confidence if confidence > 0.5: # compute the (x, y)-coordinates of the bounding box for the # object box = detections[0, 0, i, 3:7] * numpy.array([w, h, w, h]) (startX, startY, endX, endY) = box.astype("int") breakrect = dlib.rectangle(startX, startY, endX, endY)这部分的代码主要是人脸检测逻辑.
读取图片,并将其改为RGB格式.
获取图片的大小.
初始化blob.
net.forward()计算人脸的位置.
遍历检测结果
如果置信度大于0.5,则认为是合格的人脸.
计算出人脸的坐标.
将坐标转为dlib.rectangle对象.
shape = sp(image, rect)print(shape)# 提取特征face_descriptor = facerec.compute_face_descriptor(image, shape)#获取到128位的编码v = numpy.array(face_descriptor)print(v)计算人脸的关键点.
提取人脸的特征.
使用感受:使用深度学习模型提取人脸特征,无论速度还是准确率都有很大的提高,即使很模糊的图像依然能检测到.
第三种使用insightface提取人脸特征
InsightFace 是一个开源的 2D&3D 深度人脸分析工具箱,其中高效地实现了丰富多样的人脸识别、人脸检测和人脸对齐算法,并且针对训练和部署进行了优化,在多项算法测评、比赛获得优胜.
安装InsightFace
pip install insightfacepip install onnxruntime-gpu==1.9.0 注意:onnxruntime安装1.9以下的版本.
提取特征
新建face_embedding3.py 插入代码:
import insightfaceimport cv2model = insightface.app.FaceAnalysis()model.prepare(ctx_id=0, det_thresh=0.45)face_img = cv2.imread('train_images/11.jpg')res = model.get(face_img)print('embedding: ', res[0].embedding) 初始化FaceAnalysis()模型.
设置置信度位0.45.
读取图片
使用模型预测.
打印人脸特征res[0].embedding.
除了能人脸特征外,还有一些其他的属性,比如:bbox、kps、landmark_3d_68、landmark_2d_106、age、gender .可以通过res[0].keys()查看.
使用感受:速度比较慢,精度还行.
完整的代码和模型:
https://download.csdn.net/download/hhhhhhhhhhwwwwwwwwww/85345364
边栏推荐
- SQL Outer Join Intersection, Union, Difference Query
- js hijacks the array push method
- 例题 可达性统计+bitset的使用
- Oracle 19.3 restart 环境
- 自定义过滤器和拦截器实现ThreadLocal线程封闭
- Header file search rules when compiling with GCC
- FPGA: Basic Getting Started Button Controlling LED Lights
- Getting started with Polkadot parachain development, this article is enough
- [Office] Collection of Microsoft Office download addresses (offline installation and download of Microsoft's official original version)
- STM32 entry development: write XPT2046 resistive touch screen driver (analog SPI)
猜你喜欢
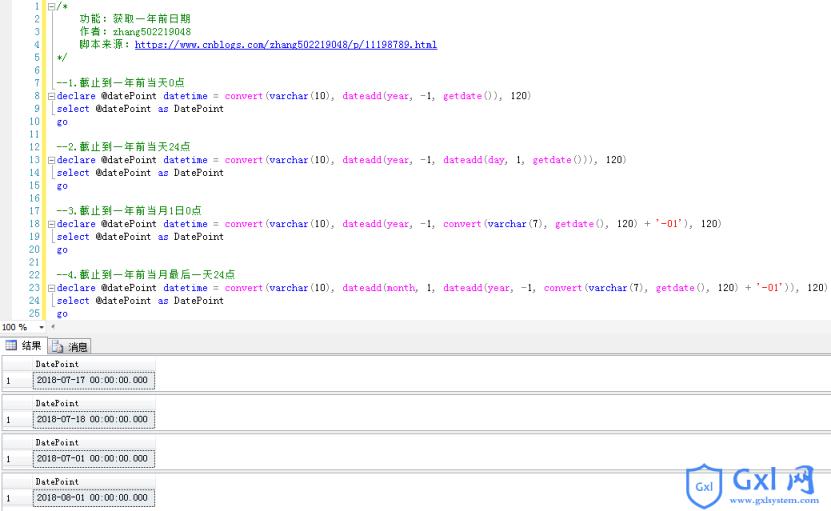
sqlserver编写通用脚本实现获取一年前日期的方法
012_SSS_ Improving Diffusion Model Efficiency Through Patching
SQL外连接之交集、并集、差集查询
化繁为简!阿里新产亿级流量系统设计核心原理高级笔记(终极版)
FPGA: Use of the development environment Vivado
【深度学习】mmclassification mmcls 实战多标签分类任务教程,分类任务
Opencv图像缩放和平移
RT - Thread record (a, RT, RT Thread version - Thread Studio development environment and cooperate CubeMX quick-and-dirty)

Voice-based social software development - making the most of its value
linux下oracle常见操作以及日常积累知识点(函数、定时任务)
随机推荐
七夕来袭!还要做CDH数据迁移怎么办?来看看DistCp
Common operations of oracle under linux and daily accumulation of knowledge points (functions, timed tasks)
自定义过滤器和拦截器实现ThreadLocal线程封闭
结合“xPlus”探讨软件架构的创新与变革
What are the standards for electrical engineering
Data Middle Office Construction (10): Data Security Management
2022杭电多校 第6场 1008.Shinobu Loves Segment Tree 规律题
第五章:redis持久化,包括rdb和aof两种方式[通俗易懂]
第四章:redis 数组结构的set和一些通用命令「建议收藏」
机器学习-基础知识 - Precision, Recall, Sensitivity, Specificity, Accuracy, FNR, FPR, TPR, TNR, F1 Score, Bal
第五章:多线程通信—wait和notify
MMDetection实战:MMDetection训练与测试
Microcontroller: temperature control DS18B20
2022 Huashu Cup Mathematical Modeling Ideas Analysis and Exchange
abc262-D(dp)
例题 可达性统计+bitset的使用
MySQL 中 auto_increment 自动插入主键值
牛刀小试基本语法,Go lang1.18入门精炼教程,由白丁入鸿儒,go lang基本语法和变量的使用EP02
导火索:OAuth 2.0四种授权登录方式必读
产品太多了,如何实现一次登录多产品互通?