当前位置:网站首页>2022-07-06 unity core 9 - 3D animation
2022-07-06 unity core 9 - 3D animation
2022-07-07 08:55:00 【Sugarcane causes bitterness】
List of articles
- One 、3D The use of animation
- Two 、 Animation layering and masking
- 3、 ... and 、 Animation 1D blend
- Four 、 Animation 2D blend
- 5、 ... and 、 Animation sub state machine
- 6、 ... and 、 Animation IK control
- 7、 ... and 、 Animation target matching
- 8、 ... and 、 State machine behavior script
- Nine 、 State machine reuse
- Ten 、 Character controller
One 、3D The use of animation
Use imported 3D Animation :
- Drag the model into the scene
- Add Animator Script
- Create... For it Animator Controller Animation controller ( State machine )
- Will want to use related actions , Drag in Animator Controller Animation controller ( State machine ) window
- stay Animator Controller Animation controller ( State machine ) Window edit animation relationship ( Use the state machine knowledge learned before )
- Code control state switching
( One ) State setting related parameters
We can select a state in the state machine window and set relevant parameters for it , We can call it animation state setting
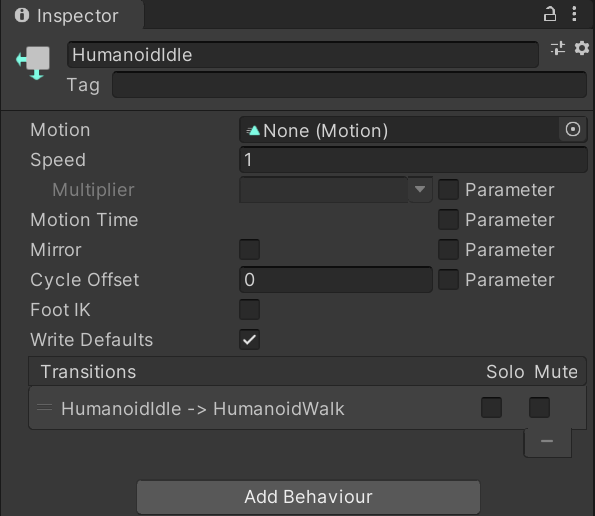
The main settings are the playback speed of the current state and other details
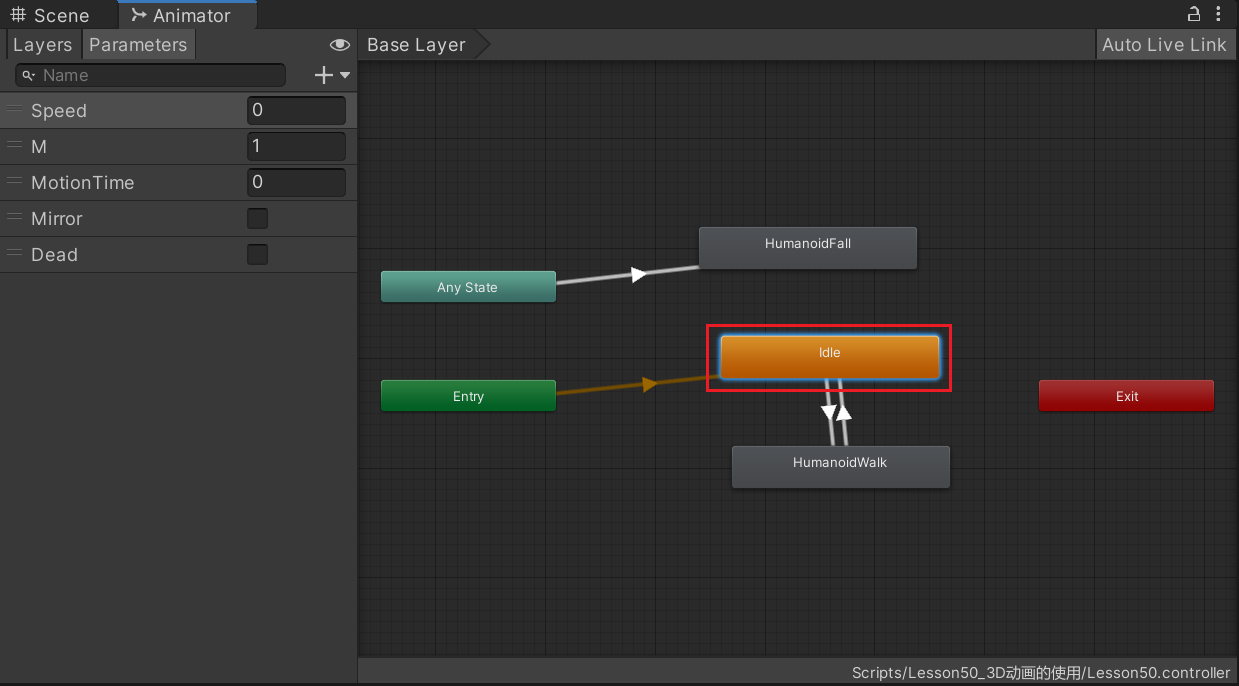
stay Animator Select one of the statuses in the window , Can see Inspector The following parameters in the window :
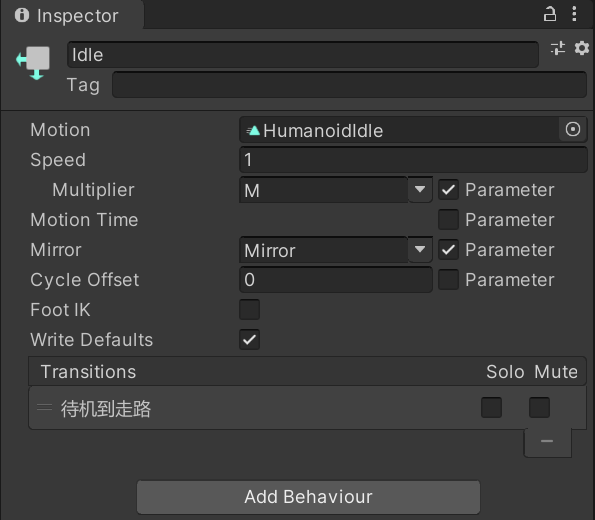
Motion: Animation clips assigned to this state
Speed: The default speed of the animation
Multiplier: Control the multiplier of speed , If you want to use the one that needs to be checked Parameter Select the matching parameters float type
Motion Time: Time for exercise , If you want to use the one that needs to be checked Parameter Select the matching parameters float type
Mirror: Whether to generate an image for the state , Only applicable to human animation , If you want to use with parameters, select the next Parameter Correlation parameters , Parameter is bool type
Cycle Offset: Cycle offset time , If you want to use with parameters, select the next Parameter Correlation parameters , Parameter is float type
Foot IK: Is it followed Foot IK, Applicable to humanoid animation
Write Defaults:AnimatorStates Whether to write back the default value of the non animated attribute for its motion .
Solo / Mute: Only play this transition / Disable transitions
Solo and Mute If you choose ,Mute priority
Add Behaviour: Add state machine behavior script , see 8、 ... and 、 State machine behavior script
( Two ) Connection settings related parameters
We can select an arrow in the state machine window to set relevant parameters , We can call it animation transition setting
The main setting is when switching from one state to another Performance effect and switching conditions
The connection between actions :
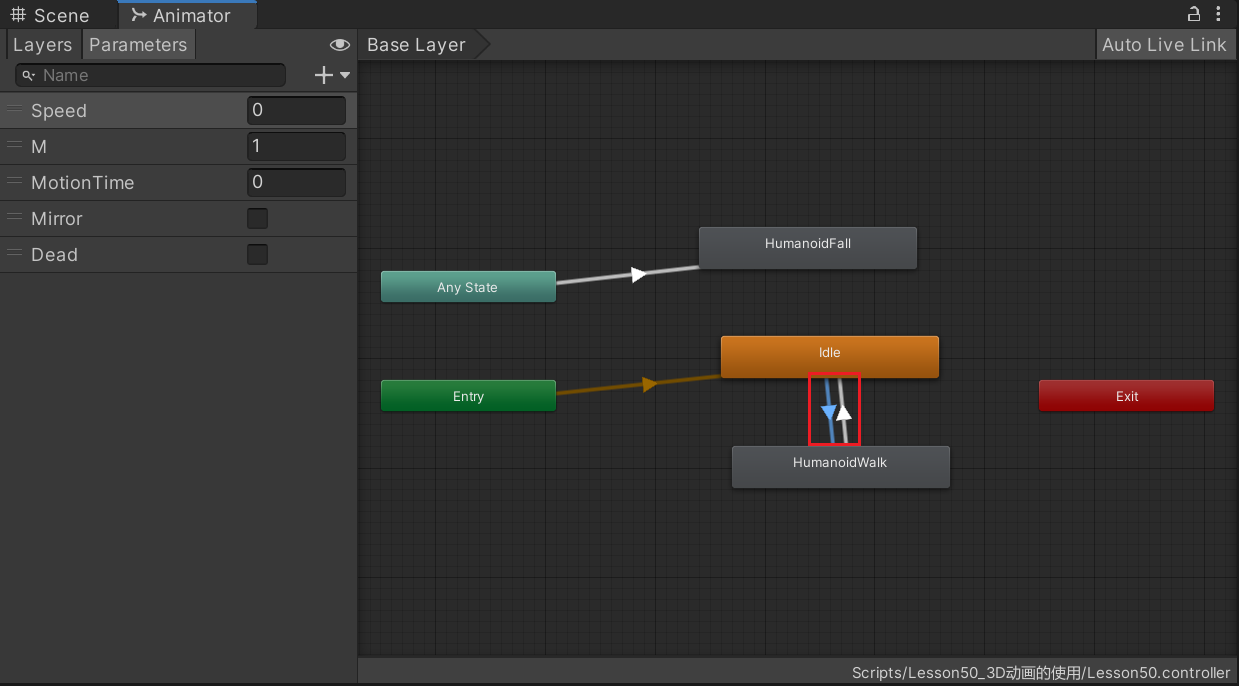
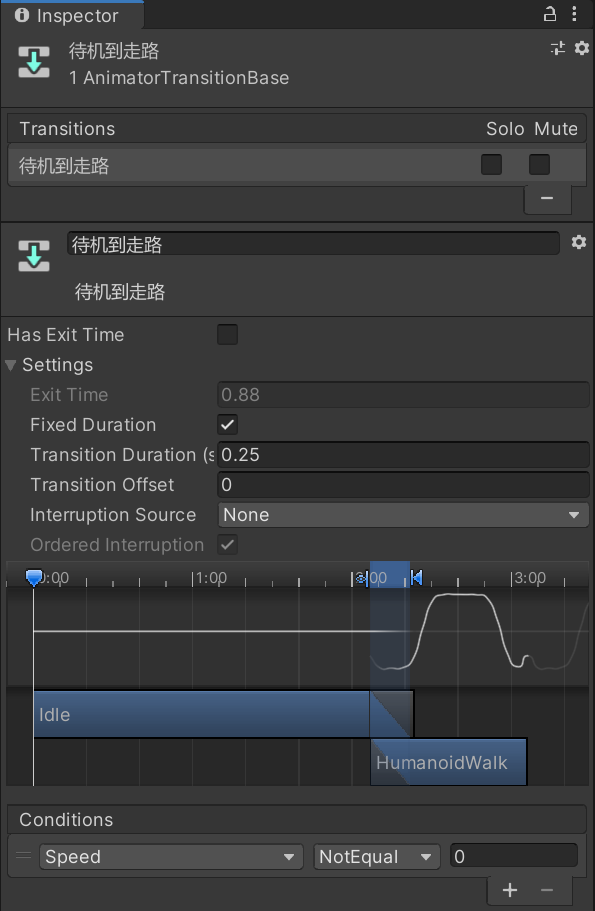
Has Exit Time: Is there an exit time , If you check the , When switching animation , The animation must be played to the bottom Exit Time( percentage ) Time before transition to the next animation
Exit Time: Exit time
When selecting the top Has Exit Time when , This value determines the exact time when the transition takes effect , This value can be greater than 1
If it is less than 1, such as 0.85, When the animation is played 85% When you're animating , Will transition .
If it is greater than 1, such as 4.5, Then the animation will cycle 4.5 Transition to the next animation after second
Fixed Duration: After selection , At the bottom of the Trnaition Duration The transition duration will interpret the transition time in seconds , If you don't choose , Then interpret the transition time in percentage
Transition Duration(s / %): Transition duration , It is equivalent to the duration of transition animation from this state to the next state , Corresponding to the lower two blue arrows wrapping the area
Transition Offset: Time offset of the starting playback of the transition to the target state . If it is 0 Then play from the beginning of the target state , If it is 0.5 Then play from half of the target state
You can understand it as the entry point to the next state
Interruption Source: This transition is interrupted
- None: Don't add any transitions
- Current State: Queue the current state transition
- Next State: Queue the transition of the next state
- Current State Then Next State: Queue the transition of the current state and the transition of the next state in turn
- Next State Then Current State: Queue the transition of the next state and the transition of the current state in turn
Ordered Interruption: Whether the current transition can be interrupted by other transitions without considering the sequence
When selected , When a valid transition or current transition is found , It will interrupt
When not selected , Find an effective transition , It will interrupt
Conditions: Transitional conditions
If there are no transition conditions , Only think about Exit Time
AnyState And the connection between actions :
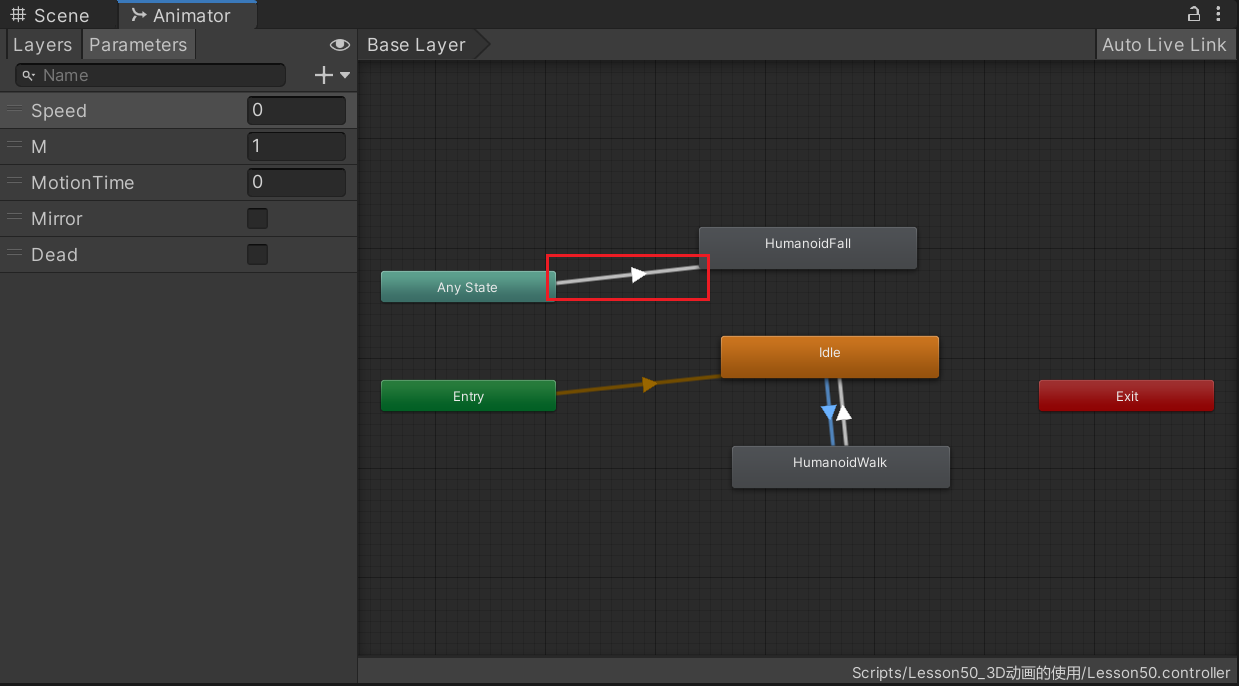
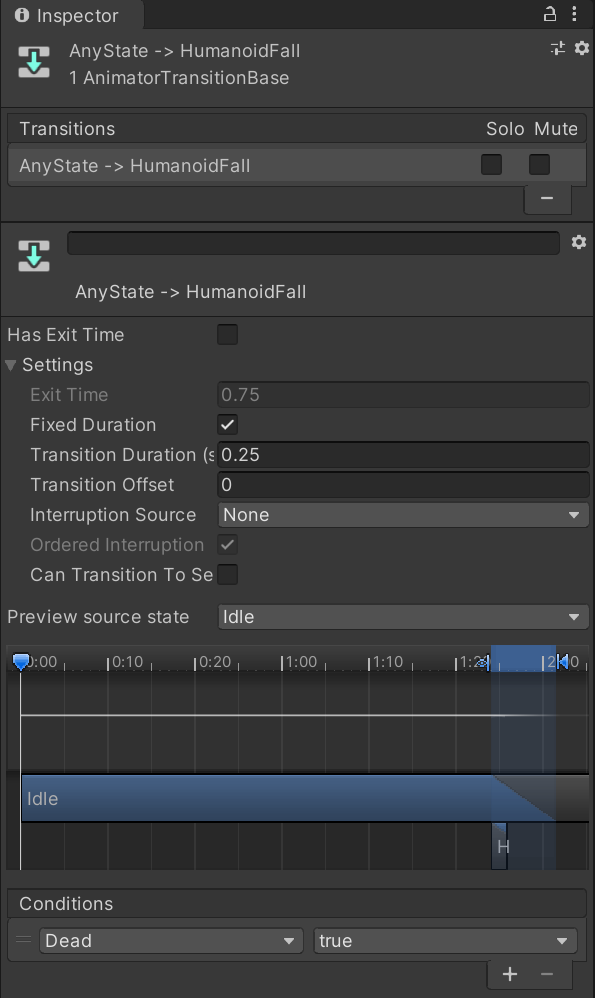
The following parameters are added :
Can Transition To self: Whether you can transition to yourself
Preview source state: Preview various transition states
You can view the transition effect of switching from any state to the current state
Be careful :
Has Exit Time Is it enabled? .
If you want to switch animation instantly, you don't need to wait too much , Cancel this option
Can Transition To self Is it enabled? .
If you want not to interrupt yourself , Cancel this option
Two 、 Animation layering and masking
The role of animation layering :
There will be such a demand in the game , Play the normal animation when the character is healthy 、 Play special animation when the character is in an unhealthy state
For example, the blood volume is lower than a certain limit , Most of the characters' movements will be weak . We can use animation layering to quickly realize such functions
Animation layering is combined with animation mask :
3D We often face such needs in the game , People will shoot when standing 、 People will shoot when they run 、 People will shoot when they squat
Judging from the performance, shooting alone may have 3 Kind of , If you want art students to do 3 Shooting takes time and resources
Can we do this , For example, shooting animation only affects the upper body , The lower body plays standing according to the actual situation , Running , Squat , The combination of animation can be achieved by playing different animations on the upper and lower body
The main purpose of animation layering is to achieve these two purposes :
- Switching between two sets of actions at different levels
- Combine the animation mask to play the two animations together , Improve the diversity of animation , Saving resource
( One ) How to use animation layering
- Create a new animation layer
- Set animation layer parameters
- Set the state machine in this layer ( Be careful : When used with masks, the default state is Null state )
- Create animated masks as needed
stay Animator Window Layer Create a new level in the panel . The new level controls the playback of animation together with the previous level .
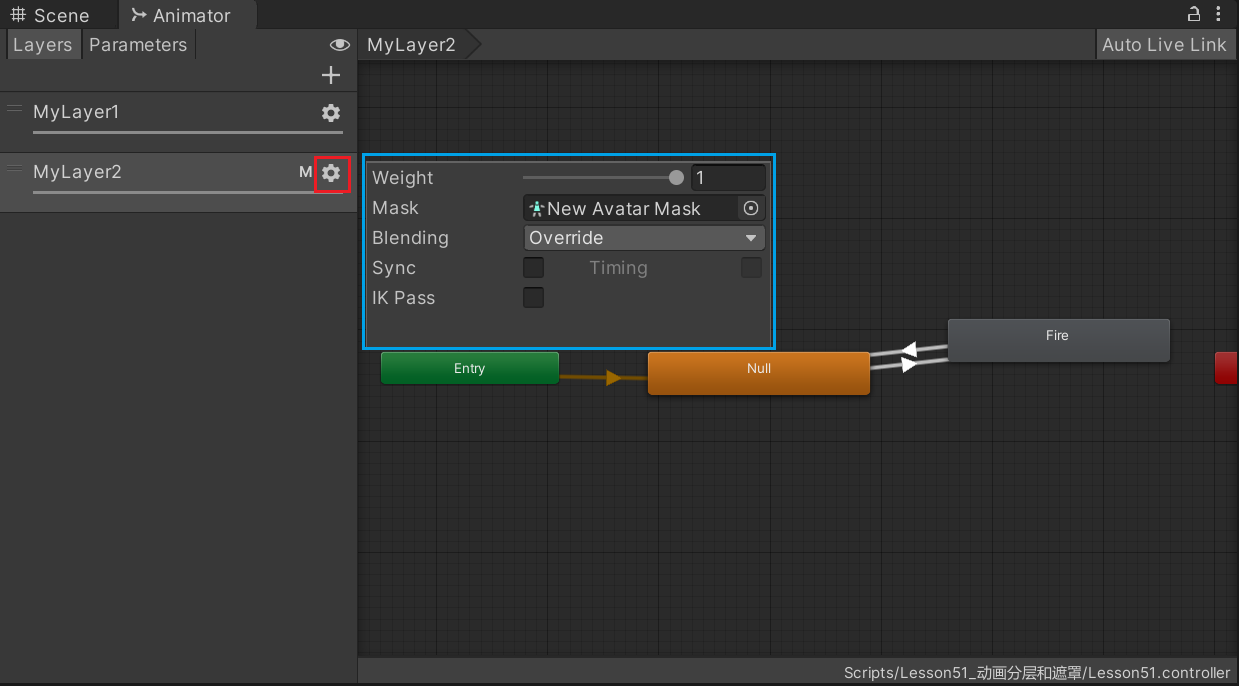
Weight: The weight
When the animation is played at the same time , If the superposition state is selected , The proportion of superposition will be determined according to the weight
Mask: Animation masks , All animation of this layer will only work on the mask , The part outside the mask is not affected by the animation of this layer
establish Avatar Mask :
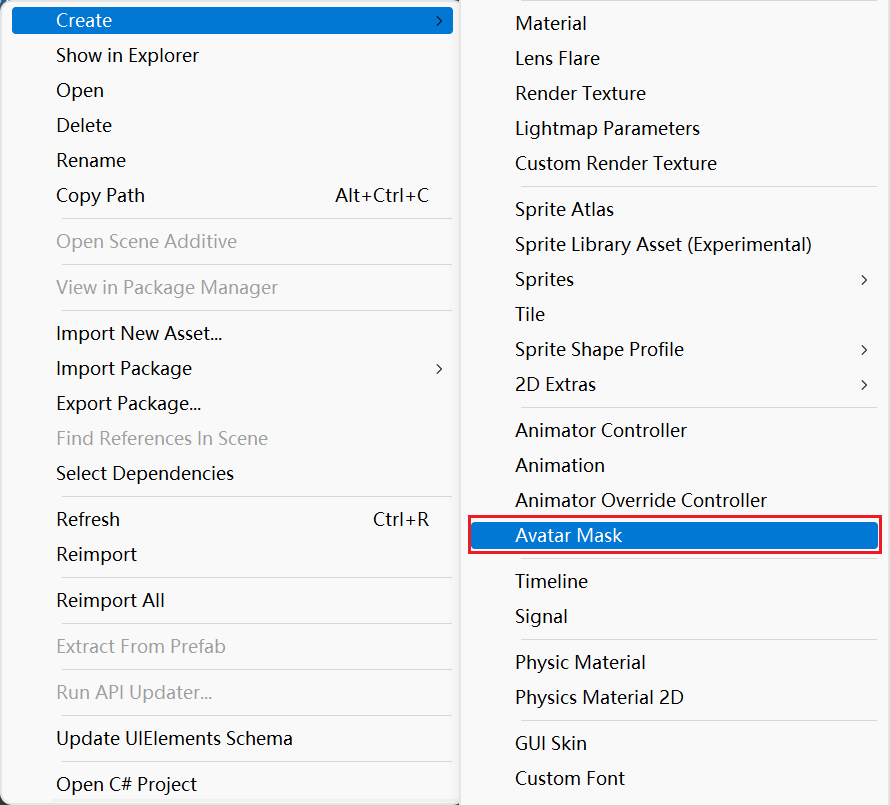
Select the mask part :
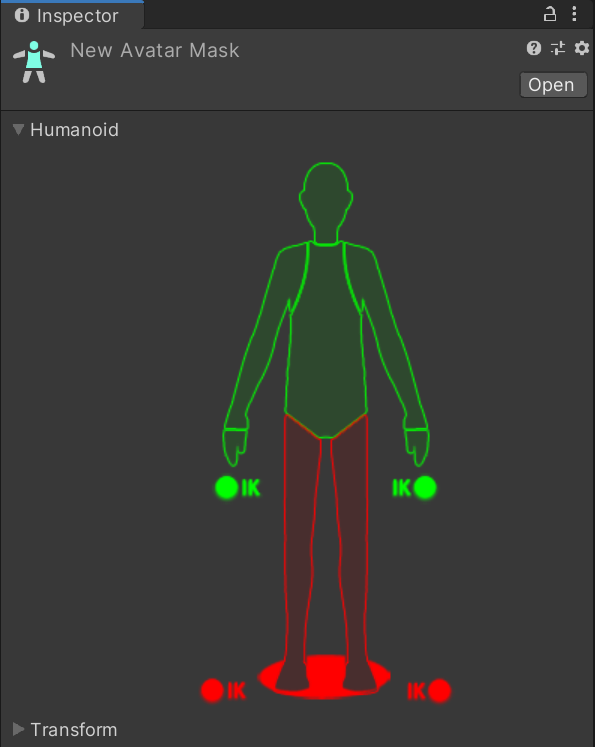
Where green means that the layer applies animation to this area , The red part is not affected by the animation of this layer
Blending: Mixed mode
- Override: Coverage , Ignore the playback of all other layers when playing the animation of this layer
- Additive: How to stack , It will be superimposed and played with the animation of other layers
Sync: Whether to synchronize other layers
It is mainly used to copy state directly from another layer , Make changes in this layer , The setting information of the other layer will be retained , We just need to replace the animation corresponding to the state
It is applicable to actions such as walking and running with standby in normal state , But the action will change when you are injured , We can use the synchronization layer to facilitate our editing
After selection, there will be one more Source Layer Indicates which level of state you want to copy
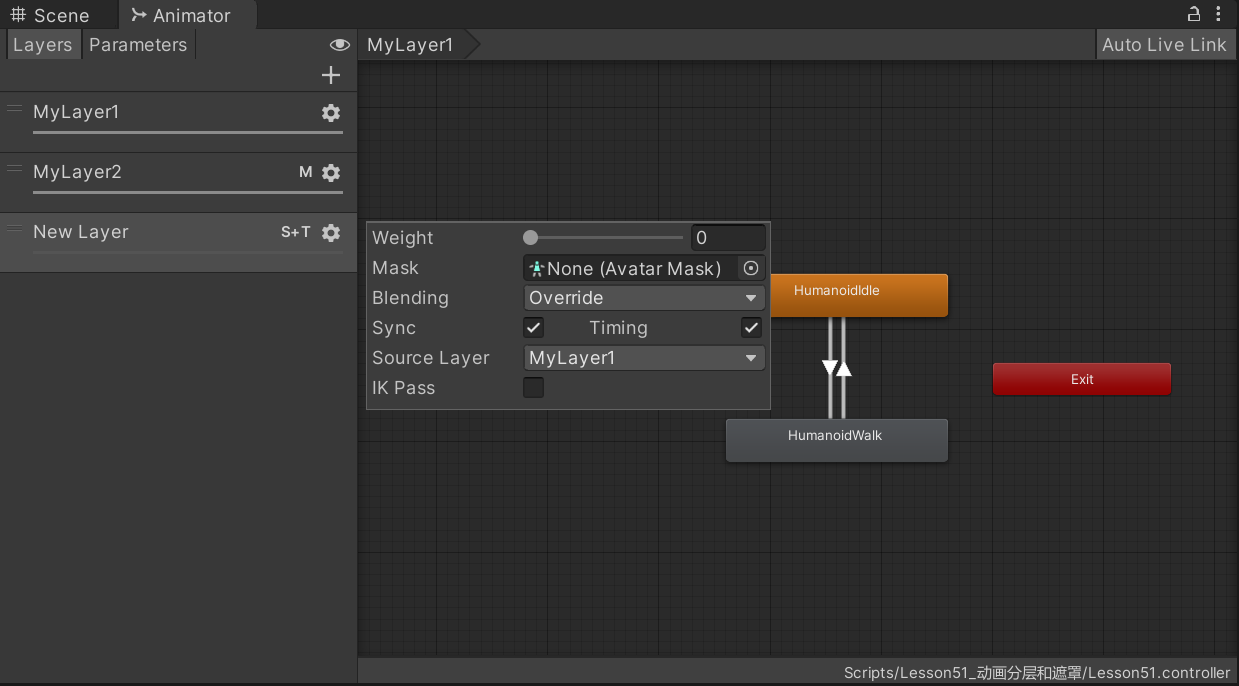
After creation ,New Layer The state of and the transition conditions between States will be and MyLayer1 Exactly the same , Only the animation corresponding to each state of this layer is None, You can replace the new status you need to set by yourself :
Timing: When you choose Sync When synchronizing other layers , This parameter activates
Choose , A compromise scheme will be adopted to adjust the animation duration on the synchronization layer ( Based on weight calculation )
Unchecked , The animation duration will use the original layer as the template
IK Pass: Reverse dynamics , After that, I will explain IK Let's talk about it later
Code control :
private Animator animator;

animator = this.GetComponent<Animator>();
animator.SetLayerWeight(animator.GetLayerIndex("MyLayer2"), 1);
3、 ... and 、 Animation 1D blend
A common function in game animation is to mix two or more similar movements , such as :
Mix walking and running animation according to the speed of the character
Mix the action of tilting left or right according to the turning of the character
You can understand that it is an advanced version of animation transition
The animation transition we learned before is to deal with the transition effect of switching between two different types of actions , Animation blending allows you to merge multiple animations to make the animation blend smoothly
stay Animator Controller window , Right click -> Create State -> From New Blend Tree
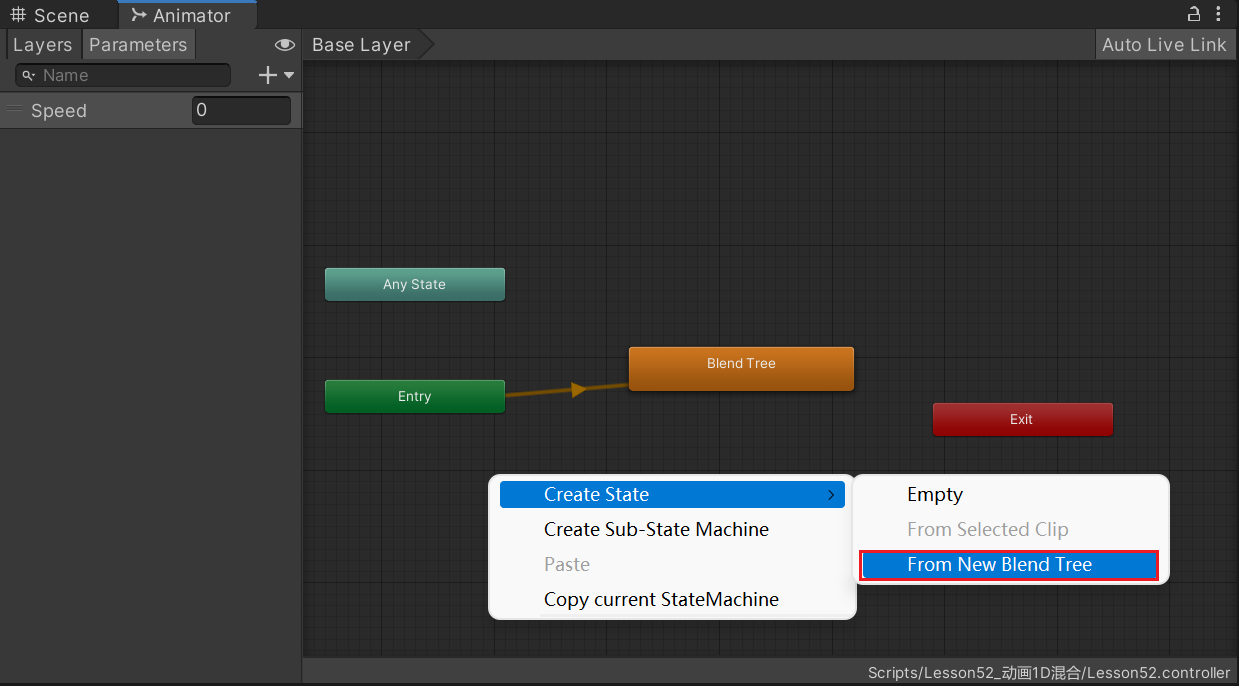
Create good after , double-click Blend Tree Into the hybrid tree , Click to display Inspector panel .
It needs to be Motion Click in the list + No. add at least two action fields to have the following parameter interface , Mixed tree Blend Tree It can also contain hybrid trees :
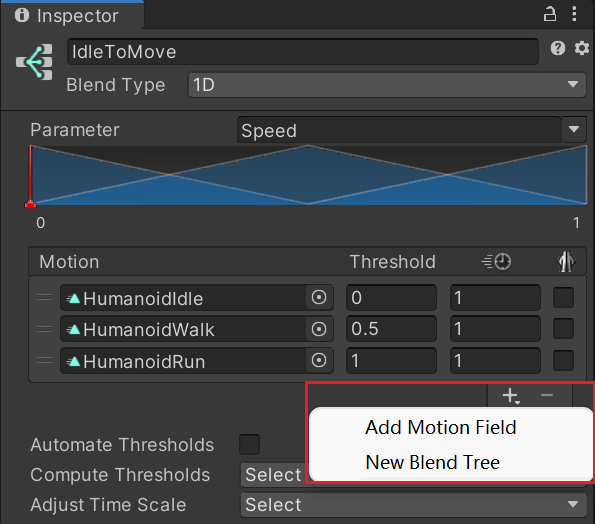
Parameter: Parameters , Parameters used to control mixing , Parameters in the parameter list
Blue image : You can control... Here n Threshold of animation
Motion: Associated animation list , You can change the order with the mouse
Threshold: The critical threshold of the corresponding action When equal to this value, the action weight is the largest ( Play the action completely )
This value can be completely controlled , The range of values is variable
 : Control the playback speed of the action
 The general default is 1, The speed of good action generally does not need to be modified
 : Whether to mirror the action
 Automate Thresholds: Whether to automatically set the threshold , It will average in the range of values
Generally, it is more accurate to uncheck our manual control
Compute Thresholds: How to calculate the threshold
Data will be obtained from the root motion of the animation clip
- Speed: Speed
- Velocity X、Y、Z:xyz The fractional velocity on
- Angular Speed(Rad、Deg): Angular velocity expressed in angle or radian
give an example :
For example, when your animation clip is walking Speed The velocity is 1.5 Units per second , Jogging is 2.3 Units per second , Running fast is 4 Units per second , The threshold will be set and mixed according to these values
Adjust Time Scale: Adjust the time scale
- Homogeneous Speed: Uniform velocity
- Reset Time Scale: Reset the timescale
1D Mixing is to mix sub motions through a parameter
Be careful : When adding actions to the hybrid tree, you need to find animation files to associate
Four 、 Animation 2D blend
1D Blending is to use a parameter to control the blending of animation , The name 1D Because a parameter can be regarded as 1 Dimensional linear
2D Blending can be simply understood as using two parameters to control the blending of animation , The name 2D Because the two parameters can be regarded as 2 Dimensional plane xy The feeling of the shaft
Prior to Inspector Drop down in the window Blend Type list , You can see that there are many different mixing types :
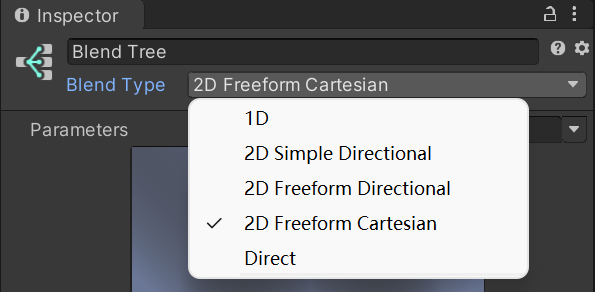
2D Simple Directional:2D Simple orientation mode . Use when motion indicates different directions , Like forward 、 after 、 Left 、 Right walk
2D Freeform Directional:2D Free form orientation pattern . ditto Use when motion indicates different directions , But there can be multiple movements in the same direction , Such as running and walking forward
2D Freeform Cartesian:2D Free form Cartesian coordinate mode . Use when motion does not indicate different directions , For example, walking forward without turning 、 Run forward without turning 、 Go ahead and turn right 、 Run forward and turn right
Direct: Direct mode . Freely control the weight of each node , Generally do facial expressions and actions
stay Animator Of Parameters Create two Float Variable , And in Blend Tree To make a connection
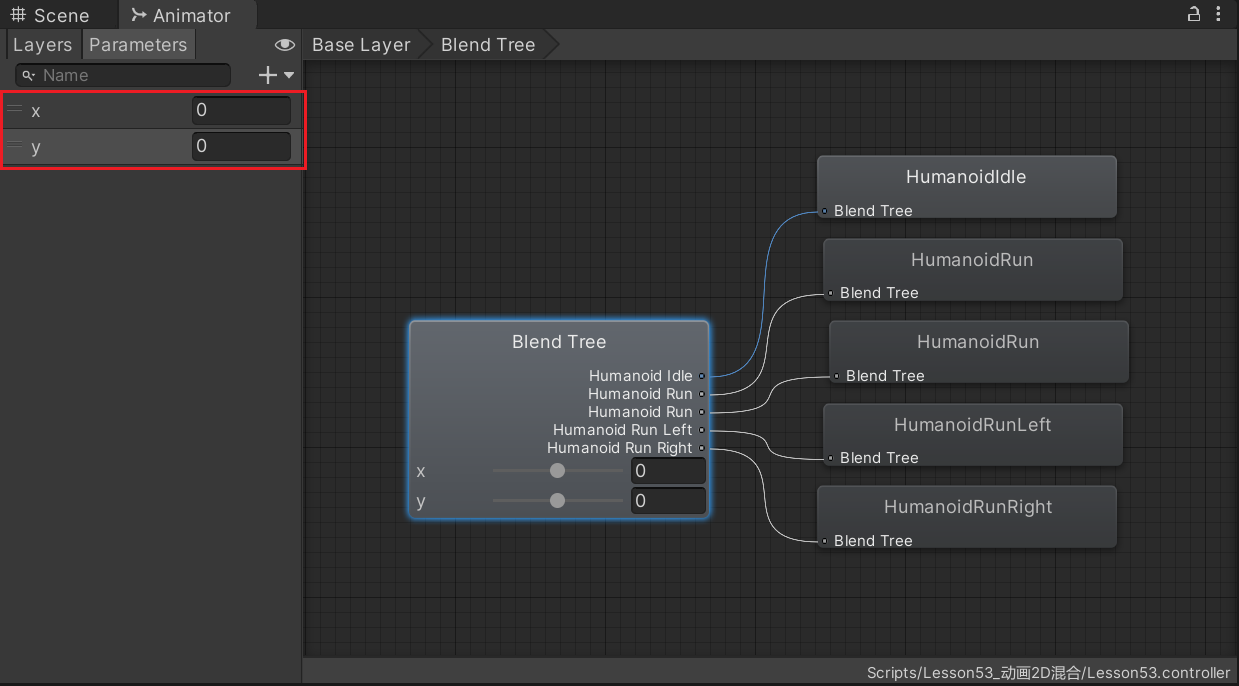
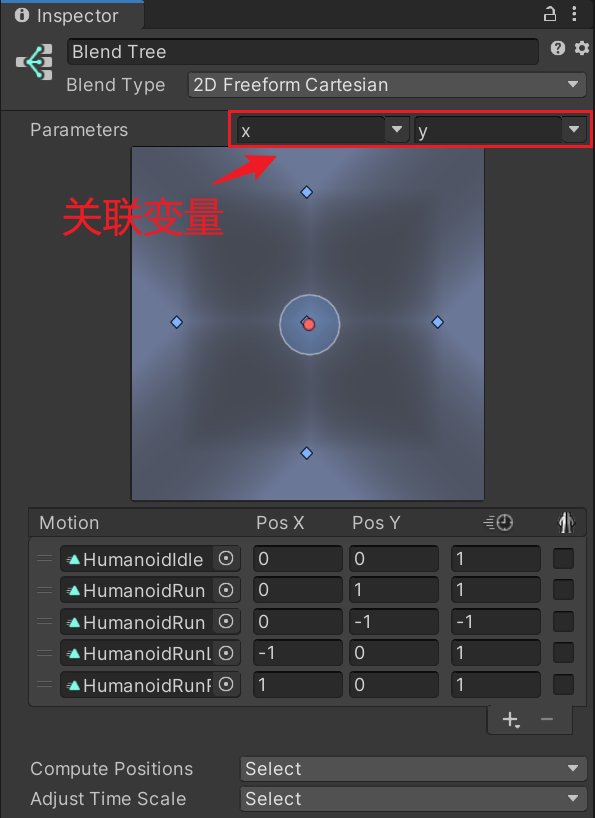
We set up x、y The variable corresponds to PosX、PosY, It is equivalent to the coordinates in the two-dimensional plane . The red dot indicates the current x、y The coordinate corresponding to the value of , Adjust the position of the red dot to preview the current corresponding animation in the lower window :
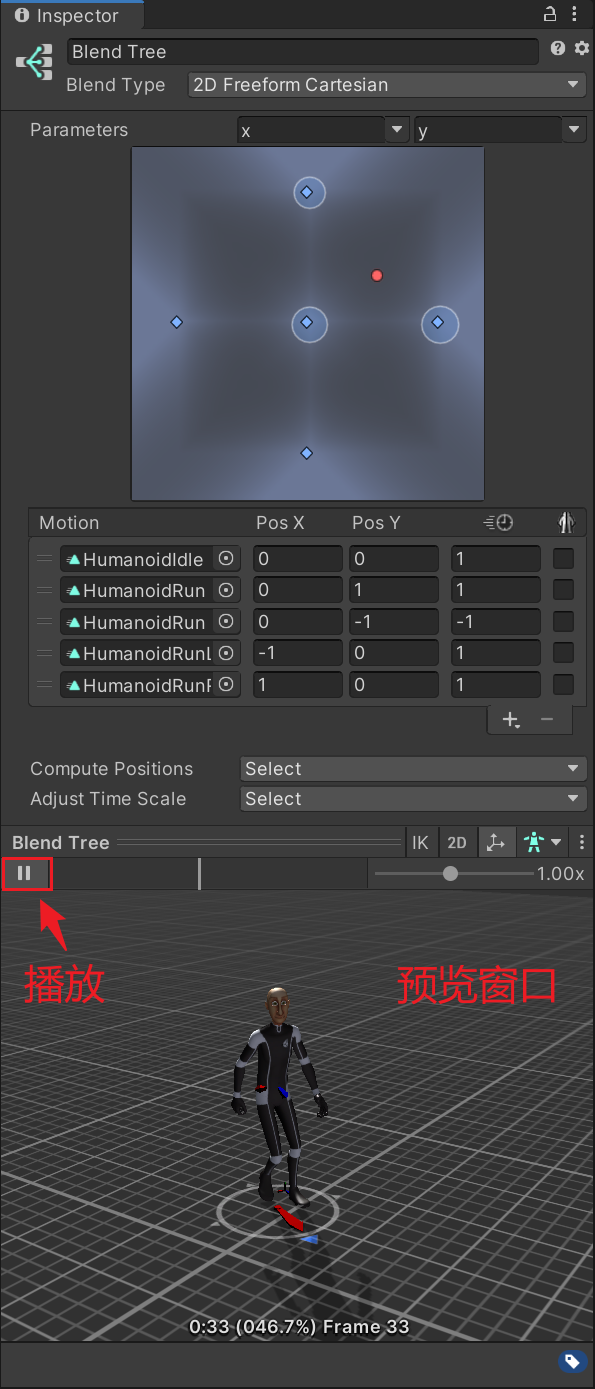
The first three methods are just mixed with different algorithms for different actions , The fourth kind can be fused with multiple parameters
Mixed trees can also be embedded in mixed trees , It is consistent in use , Use selectively according to the actual situation
5、 ... and 、 Animation sub state machine
As the name suggests, there is also a state machine in the state machine , Its main function is that a certain state is a complex state composed of multiple action states
For example, a certain skill is made of 3 A combination of movements , Jump up , attack , Fall
When we release this skill, we will play this continuously 3 An action , Then we can put them into a sub state machine
stay Animator Controller Window , Right click -> Create Sub-State Machine
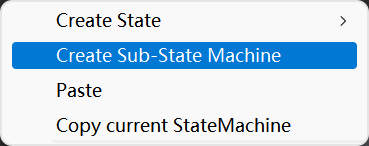
When it's created , It's a diamond like icon , We double-click to enter the sub state machine
The interface of the sub state machine is similar to that of the state machine . The difference is that there is an upper icon (Up Base Layer), Transfer to a state of the upper state machine by connecting this state
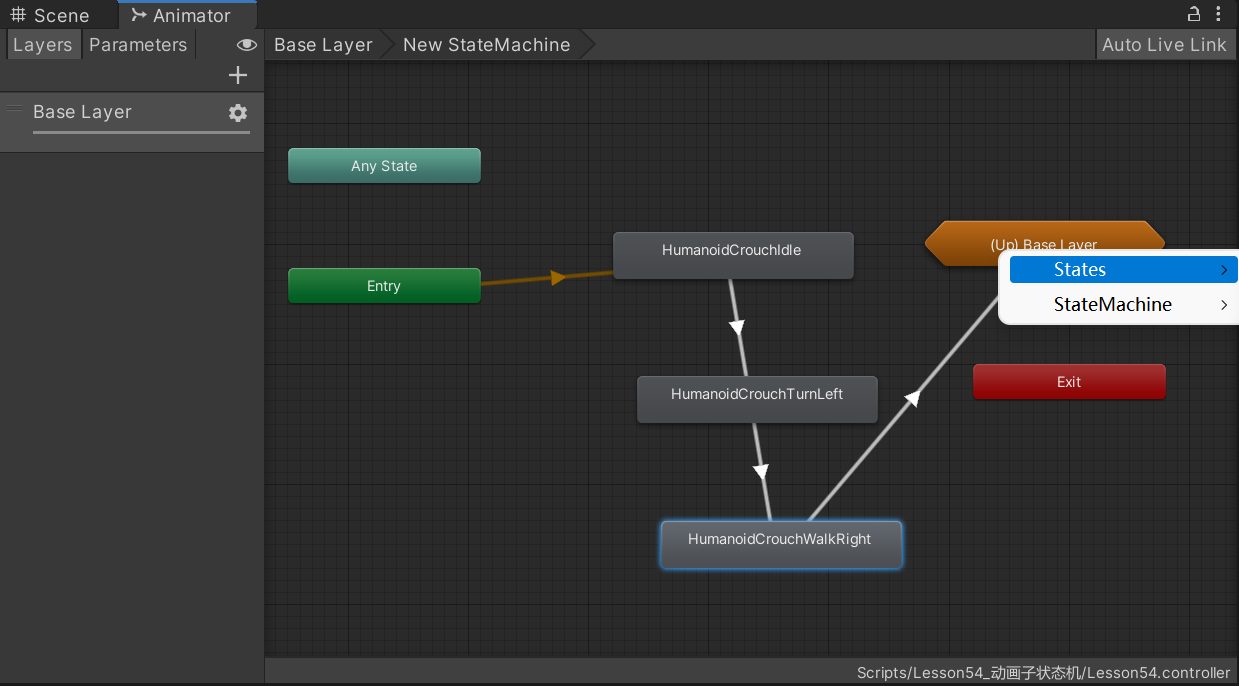
Select a state of the upper layer here

Choose which floor to return to here , The default animation for this layer will be played

6、 ... and 、 Animation IK control
In the hierarchical setting of the state machine , Turn on IK passageway
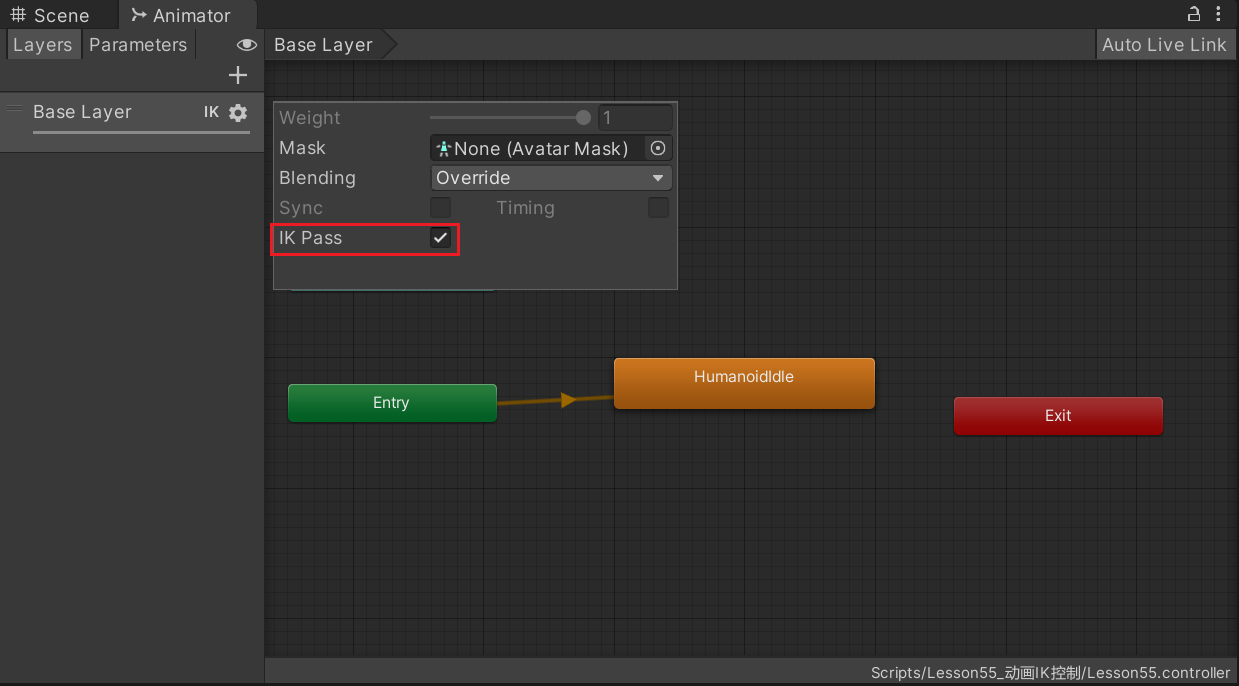
Inherit MonoBehavior In the class ,Unity Defined a IK Callback function :OnAnimatorIK
We can call Unity Provided IK relevant API To control IK
Animator Medium IK relevant API:
- SetLookAtWeight: Set the head IK The weight
- SetLookAtPosition: Set the head IK Look at the position
- SetIKPositionWeight: Set up IK Position weight
- SetIKRotationWeight: Set up IK Rotate weights
- SetIKPosition: Set up IK Corresponding position
- SetIKRotation: Set up IK The corresponding angle
- AvatarIKGoal enumeration : The ends of the limbs IK enumeration
private Animator animator;

public Transform pos;
public Transform pos2;

private void OnAnimatorIK(int layerIndex)
{

    //  Head  IK  relevant
    // weight: LookAt Global weight  0 ~ 1
    // bodyWeight: LookAt  When the weight of the body  0 ~ 1
    // headWeight: LookAt  The weight of the head  0 ~ 1
    // eyesWeight: LookAt  When the weight of glasses  0 ~ 1
    // clampWeight: 0  It means that the character is unrestricted when moving ,1  Indicates that the role is completely fixed and cannot be executed  LookAt,0.5  It means that it can only move half of the range
    animator.SetLookAtWeight(1, 1f, 1f);
    animator.SetLookAtPosition(pos.position);

    // animator.SetIKPositionWeight(AvatarIKGoal.RightFoot, 1);
    animator.SetIKRotationWeight(AvatarIKGoal.RightFoot, 1);
    // animator.SetIKPosition(AvatarIKGoal.RightFoot, pos2.position);
    animator.SetIKRotation(AvatarIKGoal.RightFoot, pos2.rotation);
}

private void OnAnimatorMove()
{

	//  If the animation itself moves , You also need to add your own code to move , It is suggested to add
}
IK Applications in game development
- Pick up an item
- Aim at an object with a gun or bow
About OnAnimatorIK and OnAnimatorMove Understanding of two functions :
We can simply understand that these two functions are two special life cycle functions related to animation , They are Update after LateUpdate Previous call
They will call after the state machine and animation processing of each frame ,OnAnimatorIK stay OnAnimatorMove Previous call
OnAnimatorIK Main treatment in the project IK Movement related logic
OnAnimatorMove It mainly deals with the callback logic of animation movement to modify the root movement
The purpose of their existence is just an additional opportunity , When the animation and state machine logic of each frame are processed, call
7、 ... and 、 Animation target matching
Animation target matching mainly refers to : When the character in the game wants to move with a certain action , After the action is played , The person's hands or feet must fall somewhere
such as : The character needs to jump over the stepping stone or jump and grasp the beam , Then we need action target matching to achieve the desired effect
Unity Medium Animator Corresponding functions are provided to complete this function , The procedure is
Find the position information of action key points ( For example, take-off point , Landing point , A simple understanding is the animation part that may really produce displacement )
Pass key information into MatchTargetAPI in
private void MatchTarget()
{

    //  Parameter one : Target location
    //  Parameter two : Target angle
    //  Parameter 3 : Matching bone position
    //  Parameter 4 : Position angle weight
    //  Parameter 5 : Percentage of starting displacement action
    //  Parameter 6 : Percentage of end displacement action
    animator.MatchTarget(targetPos.position, targetPos.rotation, AvatarTarget.RightFoot, new MatchTargetWeightMask(Vector3.one, 1), 0.4f, 0.64f);
}
among , The displacement action percentage can be viewed here :
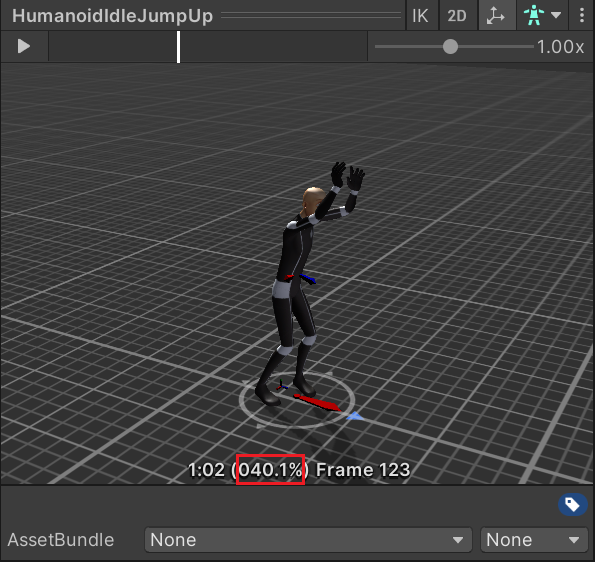
There are some restrictions on the timing of invoking matching animation :
You must ensure that the animation has been switched to the target animation
It must be ensured that the animation is not in the transition stage at the time of call, but is really playing the target animation :
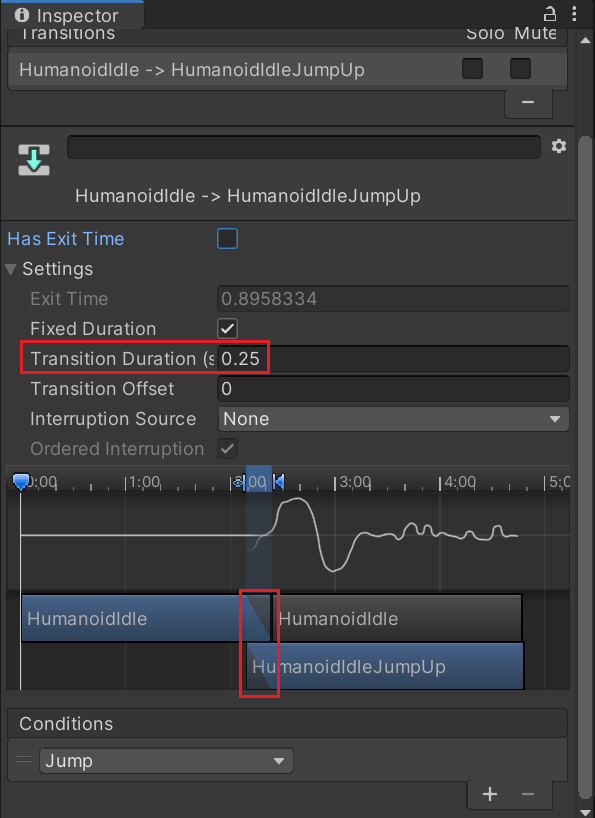
If you find an incorrect match , It is often caused by these two reasons
Need to open Apply Root Motion
The usual way is , Add events to the animation to trigger , The event is added at a certain point after the animation is played
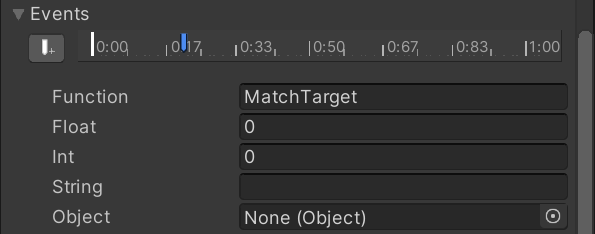
8、 ... and 、 State machine behavior script
State machine behavior script is a special kind of script , Inherit the specified base class , It is mainly used to associate to the state rectangle in the state machine
We can write scripts according to certain rules , When entering 、 sign out 、 We can do some logical processing when we keep in a certain state
The simple explanation is Animator Controller Add a script to a state in the state machine window , Using this script, we can do some special functions . such as :
Play sound when entering or exiting a state
Only detect some logic in some states , For example, whether it touches the ground
Activate and control special effects related to certain States
Create a script inheritance StateMachineBehaviour Base class
Implement specific methods to monitor state behavior
- OnStateEnter: When you enter the State , first Update Call in
- OnStateExit: When exiting the state , the last one Update Call in
- OnStateIK:OnAnimatorIK After the call
- OnStateMove:OnAnimatorMove After the call
- OnStateUpdate: Except for the first and last frames , Every Update On the call
- OnStateMachineEnter: Called when the sub state machine enters , first Update Call in
- OnStateMachineExit: Called when the sub state machine exits , the last one Update Call in
Deal with the corresponding logic
public class Lesson57_StateMachineBehaviour : StateMachineBehaviour
{

    public string stateName; //  You can configure fields to realize the versatility of scripts
    public string musicName;

    public override void OnStateEnter(Animator animator, AnimatorStateInfo stateInfo, int layerIndex) {

        if (stateInfo.IsName(stateName))
            Debug.Log(" Get into HumanoidIdle state ");
    }

    public override void OnStateExit(Animator animator, AnimatorStateInfo stateInfo, int layerIndex) {

        if (stateInfo.IsName("HumanoidIdle"))
            Debug.Log(" sign out HumanoidIdle state ");
    }

    public override void OnStateIK(Animator animator, AnimatorStateInfo stateInfo, int layerIndex) {

        base.OnStateIK(animator, stateInfo, layerIndex);
    }

    public override void OnStateMove(Animator animator, AnimatorStateInfo stateInfo, int layerIndex) {

        base.OnStateMove(animator, stateInfo, layerIndex);
    }

    public override void OnStateUpdate(Animator animator, AnimatorStateInfo stateInfo, int layerIndex) {

        base.OnStateUpdate(animator, stateInfo, layerIndex);
        if (stateInfo.IsName("HumanoidIdle"))
            Debug.Log(" be in HumanoidIdle state ");
    }

    public override void OnStateMachineEnter(Animator animator, int stateMachinePathHash) {

        base.OnStateMachineEnter(animator, stateMachinePathHash);
    }

    public override void OnStateMachineExit(Animator animator, int stateMachinePathHash) {

        base.OnStateMachineExit(animator, stateMachinePathHash);
    }
}
How to choose state machine behavior scripts and animation events :
- State machine behavior scripts are more accurate than animation events , But it is a little troublesome to use
- Choose to use... According to actual needs
Nine 、 State machine reuse
This situation is often encountered in game development :
Yes n Players and n A monster , Their animation state machine behavior is consistent , It's just that the corresponding actions are different
At this time, if we create a state machine for each of their objects to set the state and transition settings, it is undoubtedly a waste of time
So state machine reuse is the solution to this problem , It is mainly used to use common state machine behavior for different objects , Reduce workload , Improve development efficiency
stay Project window , Right click Create
->Animator Override Controller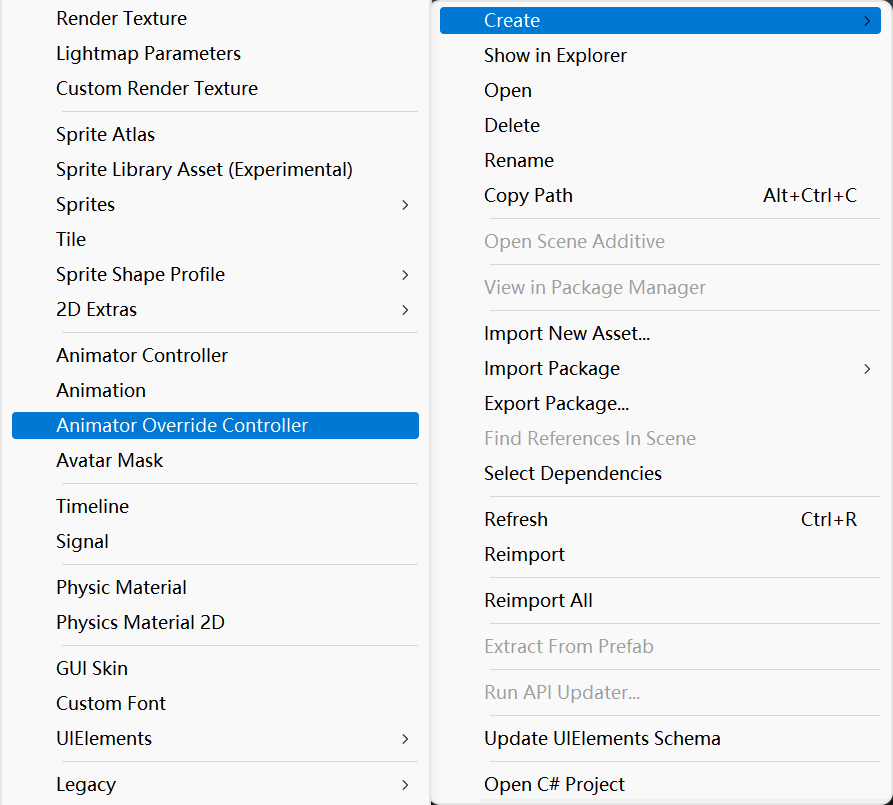
by Animator Override Controller The file in Inspector Window association based Animator Controller file
Associate the required animation
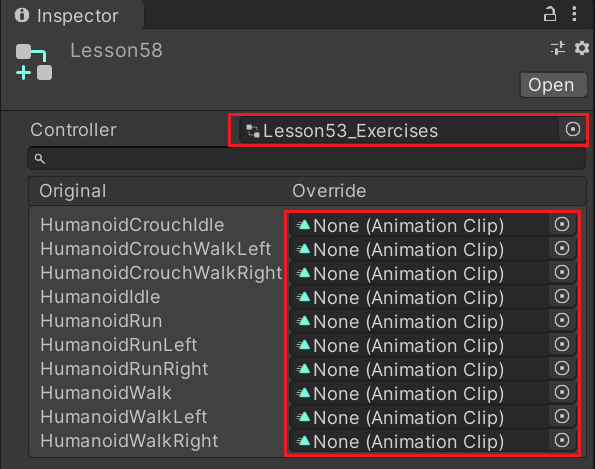
Ten 、 Character controller
The character controller is to make the character subject to collision , But it will not be restrained by rigid bodies
If we use rigid bodies to judge collisions for characters , There may be some strange performances , such as :
Slide down the slope
Without restraint, collision may make you fly
wait
And the character controller will make the character performance more stable ,Unity A role controller script is provided for controlling roles
Be careful : After adding a character controller , No more rigid bodies
- Can detect collision function
- Can detect trigger function
- Can be detected by radiation
Select the role model , stay Inspector Add the following components in the window :
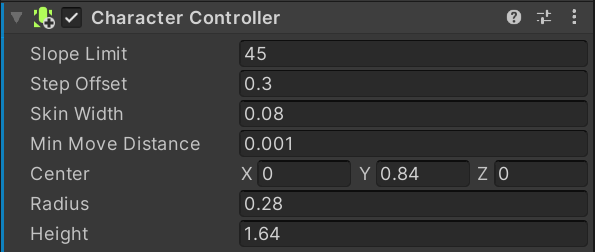
- Slope Limit: Gradient degree limit , Do not go up the slope larger than this value
- Step Offset: Step offset value , The unit is rice. , Only steps below this value can go up , This value cannot be greater than the height of the character controller
- Skin Width: The width of the skin , The two colliders can penetrate each other's largest skin width , Larger values reduce jitter , A small value may cause the character to get stuck , It is recommended to set it to 10%
- MinMoveDistance: Minimum moving distance , Most of the time 0, Can be used to reduce jitter
- Center: The capsule is offset from the center of the model
- Radius: Capsule radius
- Height: Capsule height
Code control :
public class Lesson59 : MonoBehaviour
{

    private CharacterController cc;
    private Animator            animator;

    // Start is called before the first frame update
    void Start() {

        cc       = this.GetComponent<CharacterController>();
        animator = this.GetComponent<Animator>();

        //  Whether it touches the ground
        if (cc.isGrounded) print(" Touching the ground ");

        //  Movement by gravity
        cc.SimpleMove(Vector3.forward * 10 * Time.deltaTime);
        //  Movement not affected by gravity
        cc.Move(Vector3.forward * 10 * Time.deltaTime);
    }

    // Update is called once per frame
    void Update() {

        animator.SetInteger("Speed", (int)Input.GetAxisRaw("Vertical"));
        cc.Move(this.transform.forward * (80 * Time.deltaTime * Input.GetAxisRaw("Vertical")));

        if (cc.isGrounded) print(" Touching the ground ");
    }

    //  When the character controller wants to judge the collision with other colliders , Use this function , It's equivalent to replacing  OnCollisionEnter  function
    private void OnControllerColliderHit(ControllerColliderHit hit) {

        print(hit.collider.gameObject.name);
    }

    //  It's useless for character controller
    //private void OnCollisionEnter(Collision collision)
    //{

    // print(" Collision trigger ");
    //}

    // Triggers can be detected
    private void OnTriggerEnter(Collider other) {

        print(" Trigger trigger ");
    }
}
边栏推荐
- How to add a mask of a target in a picture
- Implement custom memory allocator
- LeetCode 736. Lisp 语法解析
- Problems encountered in the use of go micro
- OpenGL三维图形绘制
- Explain Huawei's application market in detail, and gradually reduce 32-bit package applications and strategies in 2022
- Synchronized underlying principle, volatile keyword analysis
- 【ChaosBlade:节点 CPU 负载、节点网络延迟、节点网络丢包、节点域名访问异常】
- Common operating commands of Linux
- 测试人一定要会的技能:selenium的三种等待方式解读,清晰明了
猜你喜欢

Greenplum6.x-版本变化记录-常用手册

Digital triangle model acwing 275 Pass a note
数据分析方法论与前人经验总结2【笔记干货】

【踩坑】nacos注册一直连接localhost:8848,no available server
UnityShader入门精要个人总结--基础篇(一)
Recommended by Alibaba P8, the test coverage tool - Jacobo is very practical
LED模拟与数字调光
LeetCode 715. Range 模块
![[Yugong series] February 2022 U3D full stack class 005 unity engine view](/img/19/dc1b2f74b9ec5f5808de3049793862.jpg)
[Yugong series] February 2022 U3D full stack class 005 unity engine view

面试题:高速PCB一般布局、布线原则
随机推荐
Why choose cloud native database
Greenplum6.x重新初始化
Database storage - table partition
Greenplum 6.x build_ Environment configuration
OpenGL帧缓冲
Greenplum 6.x common statements
LeetCode 715. Range 模块
Greenplum 6.x build_ install
opencv之图像分割
Shell script for changing the current folder and the file date under the folder
Sign and authenticate API interface or H5 interface
channel. Detailed explanation of queuedeclare parameters
Rapid integration of authentication services - harmonyos platform
Common operating commands of Linux
Greenplum 6.x monitoring software setup
With an annual salary of 50W, Alibaba P8 will come out in person to teach you how to advance from testing
Led analog and digital dimming
最长上升子序列模型 AcWing 1017. 怪盗基德的滑翔翼
Upload an e-office V9 arbitrary file [vulnerability recurrence practice]
Simple use of Xray