当前位置:网站首页>Greenplum 6.x build_ Environment configuration
Greenplum 6.x build_ Environment configuration
2022-07-07 08:46:00 【xcSpark】
Greenplum6.x Set up the server environment configuration
One . Greenplum Database download address
 Download address of commercial version :https://network.pivotal.io/products/pivotal-gpdb
 Community version download address :https://github.com/greenplum-db/gpdb

 Official website :https://greenplum.org/
 chinese :https://greenplum.cn/
github project :https://github.com/greenplum-db/gpdb

https://github.com/greenplum-db/gpdb/blob/master/gpdb-doc/README.md
Two . Environmental statement
Product documentation recommendations 
Storage The only file system that supports running : XFS file system
1. operating system
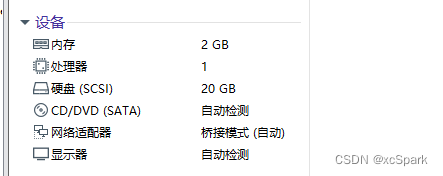
Virtual machine is used here , Low configuration setting .
| Software version | CPU | Memory | Hard disk | The Internet |
|---|---|---|---|---|
| redhat7.9 64 position | 1*1 core | 1*2GB | 1*20GB | Default |
Be careful
1. For installation in Red Hat Enterprise Linux 7.x or 7.3 Previous CentOS 7.x Upper Greenplum database , Operating system problems can lead to Greenplum The database is suspended in the workload .Greenplum The database problem is caused by Linux Caused by kernel errors
2. Not in Greenplum Install anti-virus software on the database host , Because the software may cause additional CPU and IO load , To interfere with Greenplum Operation of database .Greenplum The database server is RHEL/CentOS The system supports TLS edition 1.2, stay Ubuntu The system supports TLS edition 1.3
2. Software
| name | edition | Download address |
|---|---|---|
| System image | rhel-server-7.9-x86_64-dvd.iso | |
| Greenplum database | greenplum-db-6.18.2-rhel7-x86_64.rpm | https://network.pivotal.io/products/vmware-tanzu-greenplum |
| Open JDK 8 | https://adoptopenjdk.net/ | |
| python | ||
| Data connector |
3、 ... and . Cluster planning
| ip | Host name | Alias |
|---|---|---|
| 192.168.0.110 | master | mdw |
| 192.168.0.113 | standby | smdw |
| 192.168.0.111 | segment1 | sdw1 |
| 192.168.0.112 | segment2 | sdw2 |
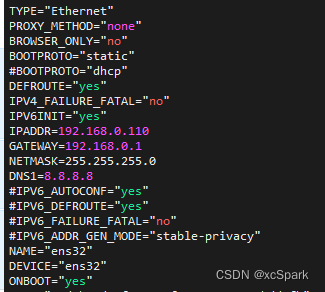
Virtual machine setup modification ip The address is static .
root Users log in to all servers ,ens33 According to the actual situation
vi /etc/sysconfig/network-scripts/ifcfg-ens33
Four . System environmental requirements
Set up redhat7.9 User password root/Greenplum
1. Hardware platform requirements
Greenplum database 6 Use Python 2.7.12, It is included in the product installation ( Instead of installing as a package dependency )
Important note : SSL Only in Greenplum The database is supported on the primary host system . It cannot be used on segmented host systems .
Important note : For all Greenplum Database host system , If SELinux stay Enforcing Enable in mode , be Greenplum Processes and users can default Unconfined Successfully run in context . If you need to add restrictions , Then you must configure according to your security requirements SELinux Context 、 Policies and domains , And test your configuration to ensure that Greenplum The database has no function or performance impact . Again , You should disable or configure firewall software as needed to allow Greenplum Communication between hosts .
2. Capacity estimation
https://docs.vmware.com/en/VMware-Tanzu-Greenplum/6/greenplum-database/GUID-install_guide-capacity_planning.html
1. Calculate the available disk capacity
Number of disks
disk_size * number_of_disks
Calculation RAID、 After formatting :
(raw_capacity * 0.9) / 2 = formatted_disk_space
For best performance , Disk space usage <70%:
formatted_disk_space * 0.7 = usable_disk_space
format RAID Disk array and consider the maximum recommended capacity (usable_disk_space) after , You need to calculate the storage space actually available for user data ( U).
If you use Greenplum Database mirroring to achieve data redundancy , This will double the size of your user data (2 * U).
Greenplum The database also needs to reserve some space as a workspace for active queries . The workspace should be about one-third the size of user data ( working space = U/3):
With mirrors: (2 * U) + U/3 = usable_disk_space

Without mirrors: U + U/3 = usable_disk_space
Guidelines for temporary file space and user data space assume typical analysis workloads . Highly concurrent workloads or queries that require a lot of temporary space can benefit from preserving a larger workspace . Usually , Through appropriate workload management, the overall system throughput can be increased , At the same time, reduce the use of work areas . Besides , Temporary space and user space can be isolated from each other by specifying that they reside in different table spaces .
2. Calculate user data size
Like all databases , Once the raw data is loaded into the database , It will be a little larger . On average, , The original data will be about large on disk after being loaded into the database 1.4 times , But it may be smaller or larger , It depends on the type of data you use 、 Table storage type 、 Compression in the database .
Page overhead - When your data is loaded into Greenplum Database time , It is divided into each 32KB The page of . Each page is 20 Byte page overhead .
Line overhead - In the routine “ Pile up ” Stored in table , Each row of data has 24 Line overhead of bytes .“ Add optimization ” Only 4 Byte line overhead .
Attribute overhead - For the data value itself , The size associated with each attribute value depends on the selected data type . As a general rule , You want to use the smallest possible data type to store data ( Suppose you know the values that a column might have ).
Indexes —— stay Greenplum In the database , Indexes and table data are distributed in segment On a host .Greenplum The default index type in the database is B-tree. Because the size of the index depends on the number of unique values in the index and the data to be inserted , Therefore, it is impossible to calculate the exact size of the index in advance . however , You can use these formulas to roughly estimate the size of the index .
B-tree: unique_values * (data_type_size + 24 bytes)

Bitmap: (unique_values * =number_of_rows * 1 bit * compression_ratio / 8) + (unique_values * 32)
3. Calculate the space requirements of metadata and logs
At every segment On a host , You also need to provide Greenplum Database log files and metadata consider space :
System metadata —— For each running on the host Greenplum database segment example ( Master or mirror ) Or main instance , Estimated approximately 20 MB Used for system directories and metadata .
Prewrite log —— For each running on the host Greenplum database segment( Master or mirror ) Or main instance , Pre write log for (WAL) Allocate space .WAL Be divided into each 64 MB Of segment file .WAL The maximum number of files is :
2 * checkpoint_segments + 1
You can use it to estimate WAL Space needs of .Greenplum Default for database instances checkpoint_segments Set to 8, This means for each on the host segment or master Instance allocation 1088 MB WAL Space .
Greenplum Database log files —— Every segment Both the instance and the primary instance will generate database log files , These files will grow over time . Sufficient space should be allocated for these log files , And some kind of log rotation tool should be used to ensure that the log file does not become too large .
Command center data — Command Center Use a data collection agent with your Greenplum The database instance runs on the same set of hosts , And use the system resources of these hosts . The resource consumption of the data collection agent process on these hosts is very small , Will not significantly affect database performance . The historical data collected by the collection agent is stored in your Greenplum The command center database in the database system . The collected data is distributed like regular database data , So you need to consider Greenplum segment Disk space in the data directory location of the instance . The amount of space required depends on the amount of historical data you want to keep . Historical data will not be automatically truncated .
notes :
1. disk in 70% Better performance can be obtained
2.primary And mirror Take up the same space , At the same time, a certain space should be reserved for caching intermediate results
3. In user data size , Through page 、 That's ok 、 The cost of columns and attributes , After the user data is loaded into the database, it is about 1.4 times
4.GP The database itself takes up less space , Almost negligible
5、 ... and . Configure the system
https://docs.vmware.com/en/VMware-Tanzu-Greenplum/6/greenplum-database/GUID-install_guide-prep_os.html
If there is no special description in the text, it defaults to root The user action
1. Greenplum Database machine naming
| host | Agreed name |
|---|---|
| master | mdw |
| standby master | smdw |
| segment | sdwN,N Integers |
Example :segment The host name is sdw1,sdw2 And so on . For hosts with multiple interfaces , It is recommended to use NIC binding , But when the interface is unbound , The agreement is - Append a dash after the hostname ( ) And number . for example ,sdw1-1 and sdw1-2 yes host Two interface names of sdw1.
Important note : When Greenplum When the database cluster cannot accept data loss , Recommended Greenplum master and segment Mirror image . If mirroring is not enabled , be Greenplum Store only one copy of the data , Therefore, the underlying storage medium provides the only guarantee of data availability and correctness in case of hardware failure .
1.1 edit /etc/hosts
edit /etc/hosts File and make sure it contains participation Greenplum The host name and all interface address names of each machine in the database system .
In order to ensure the follow-up Greenplum Communication between clusters
Use root The user login , All machines need to be modified
vi /etc/hosts
#  Add the following
192.168.0.110 gp-master    mdw
192.168.0.113 gp-smaster   smdw
192.168.0.111 segment1     sdw1
192.168.0.112 segment2     sdw2
1.2 edit hostname( Permanent modification )
Permanently change the host name
root Users log in to all servers , Revision respectively HOSTNAME by mdw,smdw,sdw1,sdw2
vi /etc/sysconfig/network

NETWORKING=yes
HOSTNAME=mdw

# Save and exit
1.3 edit /etc/hostname
root Users log in to all servers
vi /etc/hostname
# The contents of each machine are modified as
mdw,smdw,sdw1,sdw2
# Save and exit

1.4 Restart the network
root Users log in to all servers
# Restart the network
service network restart
# Test if ping through , If in master machine
ping smdw
ping sdw1
ping sdw2
as follows , explain master It is connected with other machines 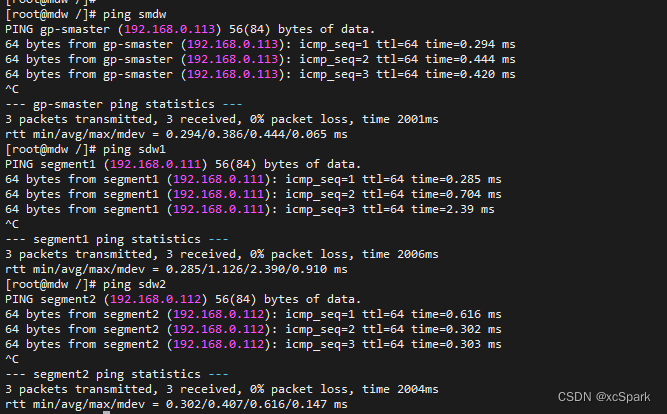
2. Disable or configure SELinux
root Users log in to all servers
#1. With  root  User identity check  SELinux  The state of
sestatus

SELinuxstatus: disabled

#2. If  SELinux  Not disabled , Please edit /etc/selinux/config File disables it
vi /etc/selinux/config
# Modified into disabled
SELINUX=disabled

#3. If the system security service daemon is installed on your system  (SSSD), Please edit  SSSD  Configuration file and will selinux_provider Parameter set to none To prevent even if disabled  SELinux  It may also happen with  SELinux  dependent  SSH  Authentication denied . With  root  Identity editor /etc/sssd/sssd.conf And add this parameter

vi /etc/sssd/sssd.conf
# Modify it as follows
selinux_provider=none

vi /etc/ssh/ssh_config
 modify
StrictHostKeyChecking no

#4. Restart the system to apply any changes you have made and confirm  SELinux  Has been disabled
reboot
3. Disable or configure firewall software
root Users log in to all servers
#1. With  root  User identity check the following status iptables
/usr/sbin/chkconfig --list iptables
# If iptables Ban , Then the command output is :
iptables 0:off 1:off 2:off 3:off 4:off 5:off 6:off

#2. If necessary, , With  root  Run this command as to disable iptables
/usr/sbin/chkconfig iptables off

#3. Check firewall status
systemctl status firewalld
# If firewalld Ban , Then the command output is :
* firewalld.service - firewalld - dynamic firewall daemon
   Loaded: loaded (/usr/lib/systemd/system/firewalld.service; disabled; vendor preset: enabled)
   Active: inactive (dead)

#4. If not disabled , Then use root The user disables the firewall
systemctl stop firewalld.service
systemctl disable firewalld.service

# 5.  After the change, the system needs to be restarted
4. Set the required operating system parameters
Shared memory
Unless the shared memory of the kernel segment It's the right size , otherwise Greenplum The database instance will not work . Most default operating systems install shared memory values for Greenplum The database is set too low . stay Linux On the system , You must also disable OOM( Out of memory ) killer . of Greenplum Information required by database shared memory , see also Greenplum In the database reference guide Greenplum Database server configuration parameters shared_buffers.
The Internet
In large capacity Greenplum On the database system , Some network related tuning parameters must be set to optimize the Greenplum Network connection established by interconnection .
User restrictions
User restrictions are controlled by the user shell Resources available to the started process .Greenplum The database has a higher limit on the number of file descriptors that a single process can open . Default settings may cause some Greenplum Database query failed , Because they will run out of file descriptors needed to process queries .
4.1 edit sysctl.conf
root Users log in to all servers
Set up /etc/sysctl.conf File and reload sysctl -p:
vi /etc/sysctl.conf
According to the current virtual machine situation , The parameters are set as follows
# kernel.shmall = _PHYS_PAGES / 2 # See Shared Memory Pages
kernel.shmall = 232875
# kernel.shmmax = kernel.shmall * PAGE_SIZE
kernel.shmmax = 953856000
kernel.shmmni = 4096
# Operating system usage vm.overcommit_memoryLinux  Kernel parameters to determine how much memory can be allocated to the process . about  Greenplum  database , This parameter should always be set to  2
vm.overcommit_memory = 2 # See Segment Host Memory
#vm.overcommit_ratio It is used for application process  RAM  percentage , The rest is reserved for the operating system .Red Hat Enterprise Linux  The default value on is  50
vm.overcommit_ratio = 95 # See Segment Host Memory

net.ipv4.ip_local_port_range = 10000 65535 # See Port Settings
kernel.sem = 250 2048000 200 8192
kernel.sysrq = 1
kernel.core_uses_pid = 1
kernel.msgmnb = 65536
kernel.msgmax = 65536
kernel.msgmni = 2048
net.ipv4.tcp_syncookies = 1
net.ipv4.conf.default.accept_source_route = 0
net.ipv4.tcp_max_syn_backlog = 4096
net.ipv4.conf.all.arp_filter = 1
net.core.netdev_max_backlog = 10000
net.core.rmem_max = 2097152
net.core.wmem_max = 2097152
#vm.swappiness = 10
vm.swappiness = 0
vm.zone_reclaim_mode = 0
vm.dirty_expire_centisecs = 500
vm.dirty_writeback_centisecs = 100
vm.dirty_background_ratio = 3  #  Memory >64G Set up 0, Otherwise set 3
vm.dirty_ratio = 10            #  Memory >64G Set up 0, Otherwise set 10
#vm.dirty_background_bytes = 1610612736 # 1.5GB  Memory >64G Can be set up , The size depends on the actual situation
#vm.dirty_bytes = 4294967296 # 4GB  Memory >64G Can be set up , The size depends on the actual situation
- To configure vm.min_free_kbytes
Recommended for physical memory 3%
awk 'BEGIN {OFMT = "%.0f";} /MemTotal/ {print "vm.min_free_kbytes =", $2 * .03;}' /proc/meminfo >> /etc/sysctl.conf
bring /etc/sysctl.conf Profile validation , Execute the following command
sysctl -p
5. System resource constraints
root Users log in to all servers
# redhat Edit the following file

mv /etc/security/limits.d/20-nproc.conf /etc/security/limits.d/20-nproc.conf.bak
## Will be covered /etc/security/limits.conf file
According to the current virtual machine situation , The parameters are set as follows
vi /etc/security/limits.conf

* soft nofile 524288
* hard nofile 524288
* soft nproc 131072
* hard nproc 131072
# Core Dump  Set up
gpadmin soft  core unlimited
View command
ulimit -a
about Red Hat Enterprise Linux (RHEL) and CentOS System ,/etc/security/limits.d/90-nproc.conf file (RHEL/CentOS 6) or /etc/security/limits.d/20-nproc.conf file (RHEL/CentOS 7) The parameter values in will override limits.conf Value in file . Make sure that all parameters in the overwrite file are set to the desired values .Linux Modules read values from files , Then from the overlay file pam_limits Read values to set user limits .limits.conf of PAM And user restricted information , see also PAM and pam_limits.
At every Segment Run this... On the host ulimit -u Command to display the maximum number of processes available per user .
6. Core documents
root Users log in to all servers
vi /etc/sysctl.conf

# Enable core file generation to a known location by adding the following line to the following line /etc/sysctl.conf:
kernel.core_pattern=/var/core/core.%h.%t
take effect , Execute the following command
sysctl -p
7. XFS Mount options
root Users log in to all servers
take mount The command and the following are recommended for RHEL and CentOS Systematic XFS Mount options are used together, such as :
rw,nodev,noatime,nobarrier,inode64
XFS Options can also be found in /etc/fstab Set in file . Sample entries in this file fstab Appoint XFS Options .
for example
vi /etc/fstab
#  Add the following information
/dev/data  /data  xfs rw,nodev,noatime,nobarrier,inode64 0 0
/dev/tabdata /tabdata xfs rw,nodev,noatime,nobarrier,inode64 0 0
/dev/tmpdata /tmpdata xfs rw,nodev,noatime,nobarrier,inode64 0 0
Make configuration effective
mount -o remount /data
mount -o remount /tabdata
mount -o remount /tmpdata
View command :mount
8. disk I/O Set up ( Virtual machine construction is skipped here )
root Users log in to all servers
- Set the read ahead value
Format
sudo /sbin/blockdev --getra
sudo /sbin/blockdev --setra
Read ahead of each disk device file ( blockdev) Value should be 16384. To verify the read ahead value of the disk device :
 #  Get value , for example : If there are multiple disks appended
/sbin/blockdev --getra /dev/sda
# obtain 8192
#  Set the value , for example :
/sbin/blockdev --setra 16384 /dev/sda
Be careful : The blockdev --setra Commands are not persistent .
You must ensure that the read ahead value is set when the system restarts . How to set this value will vary depending on your system .
Add the setup command to /etc/rc.d/rc.local file , And set the file to executable , Make the system restart and execute automatically
chmod +x /etc/rc.d/rc.local
- Set disk IO Scheduling strategy
The format is as follows :echo schedulername > /sys/block//queue/scheduler
The suggestion is deadline
echo deadline > /sys/block/sda/queue/scheduler

### Comment not executed  echo mq-deadline > /sys/block/sda/queue/scheduler
Add the setup command to /etc/rc.d/rc.local file , Make the system restart and execute automatically
#  Set the boot to take effect automatically
grubby --update-kernel=ALL --args="elevator=deadline"
grubby --info=ALL


index=0
kernel=/boot/vmlinuz-3.10.0-1160.el7.x86_64
args="ro crashkernel=auto spectre_v2=retpoline rhgb quiet LANG=en_US.UTF-8 elevator=deadline"
root=UUID=9b1f5ca6-a4ef-4e9e-8545-b12ddc4b8347
initrd=/boot/initramfs-3.10.0-1160.el7.x86_64.img
title=Red Hat Enterprise Linux Server (3.10.0-1160.el7.x86_64) 7.9 (Maipo)
index=1
kernel=/boot/vmlinuz-0-rescue-36ea22ddd5ee4bc890a6139c6fe1575e
args="ro crashkernel=auto spectre_v2=retpoline rhgb quiet elevator=deadline"
root=UUID=9b1f5ca6-a4ef-4e9e-8545-b12ddc4b8347
initrd=/boot/initramfs-0-rescue-36ea22ddd5ee4bc890a6139c6fe1575e.img
title=Red Hat Enterprise Linux Server (0-rescue-36ea22ddd5ee4bc890a6139c6fe1575e) 7.9 (Maipo)
index=2
non linux entry
9. Networking ( Virtual machine setup skip here )
The largest transmission unit of the network (MTU) Specify the maximum packets accepted by the network connected device / Frame size ( In bytes ). Jumbo frames contain more than 1500 Byte standard MTU Frame of .
Greenplum Database usage 3 Different species MTU Set up :
Greenplum database gp_max_packet_size Server configuration parameters . The default maximum packet size is 8192. This default value is assumed to be Jumbo frames MTU.
operating system MTU Set up .
Rack switch MTU Set up .
These settings are interrelated , Because they should always be the same or close to the same value , Or in accordance with Greenplum < OS < Switch MTU Order of size .
9000 Is a common support setting for switches , And is recommended for Greenplum The operating system and rack switch of the database host MTU Set up .
10. Transparent Huge Pages (THP) ( virtual machine redhat7.9 Build here skip )
Disable transparent large pages (THP), Because it will reduce Greenplum Database performance .RHEL 6.0 Or later versions are enabled by default THP. stay RHEL 6.x Disable on THP One way to do this is to add parameters transparent_hugepage=never To the kernel commands in the file /boot/grub/grub.conf, namely GRUB Boot loader configuration file .grub.conf This is an example kernel command from the file . For easy reading , The command is on multiple lines :
#grub.conf
kernel /vmlinuz-2.6.18-274.3.1.el5 ro root=LABEL=/
           elevator=deadline crashkernel=[email protected]  quiet console=tty1
           console=ttyS1,115200 panic=30 transparent_hugepage=never
           initrd /initrd-2.6.18-274.3.1.el5.img
#  View the current configuration
cat /sys/kernel/mm/transparent_hugepage/enabled
#  Set up
echo never > /sys/kernel/mm/transparent_hugepage/enabled
Make the system restart take effect automatically
grubby --update-kernel=ALL --args="transparent_hugepage=never"
grubby --info=ALL
11. IPC object removal ( virtual machine redhat7.9 build , Skip here )
Ban RHEL 7.2 or CentOS 7.2 or Ubuntu Of IPC Object delete . Default systemd Set up RemoveIPC=yes It will be deleted when the non system user account is logged out IPC Connect . This can lead to Greenplum Database utility gpinitsystem Failed due to semaphore error . Do one of the following to avoid this problem .
Creating Greenplum The management user will gpadmin When the operating system user account is added to the master node , Create users as system accounts .
Ban RemoveIPC. /etc/systemd/logind.conf stay Greenplum Set this parameter on the database host system .
vi /etc/systemd/logind.conf
#  Revised as follows
RemoveIPC=no
systemd-login The settings take effect after restarting the service or the system . To restart the service , Please use root Run this command as user .
service systemd-logind restart
Restart the servers , Make the disk IO,THP,IPC Configuration takes effect
reboot
12. SSH Connection threshold
root Users log in to all servers
some Greenplum Database management utility , Include gpexpand、gpinitsystem and gpaddmirrors, Use security between systems shell (SSH) Connect to perform their tasks .
root The user action , Edit the following two files
/etc/ssh/sshd_config
/etc/sshd_config
vi  /etc/ssh/sshd_config
#  Set up
MaxStartups 100:30:1000
MaxSessions 200
#  restart
service sshd restart
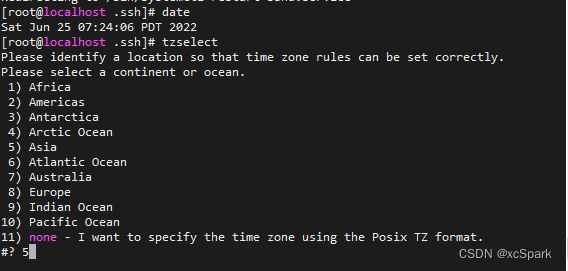
13. Date setting
root Users log in to all servers
# It is confirmed to be the East eighth District
date
# If not, execute as follows
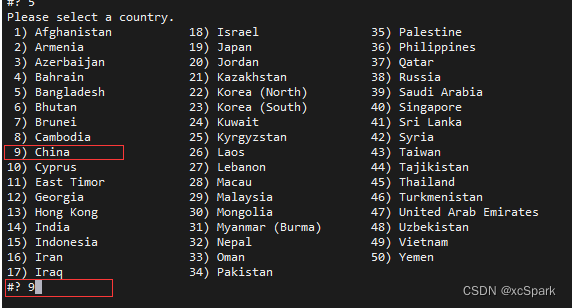
tzselect
# Choose in turn Asia -> China -> Beijing Time -> YES that will do . Be sure to install Greenplum Make sure the time zone is set correctly before , Because in Greenplum After system initialization ,LC_COLLATE、LC_CTYPE The value of can no longer be changed .

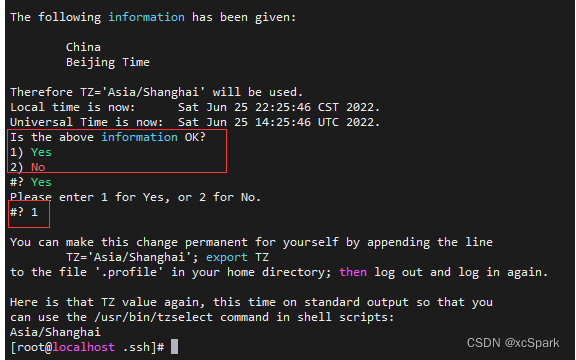
Input date see , If the time is inconsistent with the current time, execute
# Each server performs
cp /usr/share/zoneinfo/Asia/Shanghai /etc/localtime
perhaps
date -s “”
hwclock -w
14. Synchronous system clock
Use NTP( Network time protocol ) To synchronize your Greenplum The system clock on all hosts of the database system .( Reference resources www.ntp.org)
210.72.145.44 It is the national time service center of China
#ntpdate -u ntp.api.bz remarks : Appoint ntp.api.bz( Shanghai ntp The server ) Be careful : Virtual machine building , To ensure that the timing task is set correctly at each startup time , Non virtual machine setup is not set crontab Timing task . Use root The user login ,master The main machine sets the timing task synchronization time
# Virtual machine increases crontab -e  Startup synchronization time
*/5 * * * * /usr/sbin/ntpdate -u ntp.api.bz
- master On a host , With
rootLog in as and edit /etc/ntp.conf file .
xx.xx.xx.xx Express ntp Server address
vi /etc/ntp.conf
#  for example
server xx.xx.xx.xx
- Every Segment On a host , With
rootLog in as and edit /etc/ntp.conf file . Set the first server The parameter points to master host , the second server The parameter points to standby master host
vi /etc/ntp.conf
#  for example
server mdw prefer
server smdw
- standby master On a host , With
rootLog in as and edit the /etc/ntp.conf file
server mdw prefer
server xx.xx.xx
- stay master On a host , Use NTP The daemon synchronizes all Greenplum The system clock on the host .
#gpssh -f hostfile_gpssh_allhosts -v -e 'ntpd'
- View synchronization status
# Start on all hosts ntpd Service and view time synchronization status
systemctl disable chronyd
systemctl enable ntpd
systemctl start ntpd
error : newspaper npt Service does not exist , You need to yum install ntp Related packages
15. Check the file code
root Users log in to all servers
Input
locale perhaps echo $LANG
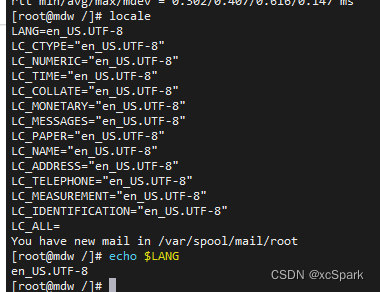
If it is not en_US.UTF-8 The modified
vi /etc/locale.conf

# Set the following
LANG="en_US.UTF-8"
16. establish gpadmin account
Create a dedicated operating system user account on each node to run and manage Greenplum database
Important note : Out-of-service root Users run and manage databases .
gpadmin Users must have access to install and run Greenplum Services and directories required by the database .
Every Greenplum Host computer gpadmin Users must install SSH Key pair , And from any host in the cluster SSH To any other host in the cluster , Without entering a password or password ( be called “ password-less SSH”).
You can choose to grant gpadmin user sudo jurisdiction , So that you can gpadmin Use sudo、ssh/scp and gpssh/gpscp Commands are easy to manage Greenplum All hosts in the database cluster .
1. establish gpadmin Groups and users
root The user to create gpadmin Group and gpadmin user
#  if id Repeat , Then change
groupadd -r -g 10001 gpadmin
useradd gpadmin -r -m -g gpadmin -u 10001
passwd gpadmin

chown -R gpadmin:gpadmin /data
chown -R gpadmin:gpadmin /tabdata
chown -R gpadmin:gpadmin /tmpdata
password gpadmin
Be careful : Make sure gpadmin Users have the same users on each host ID (uid) And groups ID (gid) number , To prevent problems when scripts or services use them to obtain identity or permissions .
2. gpadmin User generated ssh Key pair ( Skip first )
Switch to gpadmin User and generate a SSH Key pair gpadmin
# Switch to gpadmin user
[[email protected] home]# su gpadmin
# Generate key pair
[[email protected] home]$ ssh-keygen -t rsa -b 4096

#  The following prompt keeps hitting enter
Generating public/private rsa key pair.
Enter file in which to save the key (/home/gpadmin/.ssh/id_rsa):
Created directory '/home/gpadmin/.ssh'.
Enter passphrase (empty for no passphrase):
Enter same passphrase again:
#  see
[[email protected] .ssh]$ ls
id_rsa  id_rsa.pub
3. grant gpadmin user sudo Access right ( Skip first )
root User login operation
Before the change 
stay Red Hat or CentOS On , function visudo Cancel the comment below
#%wheel ALL=(ALL) NOPASSWD: ALL
Use this command to gpadmin Add user to group .wheel
usermod -aG wheel gpadmin
perhaps
stay “root ALL=(ALL) ALL” Add later
gpadmin ALL=(ALL) ALL
6、 ... and . Additional explanation
1 Shared memory pages
Greenplum The database uses shared memory postgres Belong to the same postgres The processes of the instance communicate .
| Parameters | meaning | explain |
|---|---|---|
| kernel.shmall | The total amount of shared memory used across the system ( In pages ) | Half of the physical memory |
| kernel.shmmax | The maximum size of a single shared memory segment ( In bytes ) | Half of the physical memory |
Parameter example ( Not recommended )
#  Use operating system variables _PHYS_PAGES and PAGE_SIZE Set parameters
kernel.shmall = ( _PHYS_PAGES / 2)
kernel.shmmax = ( _PHYS_PAGES / 2) * PAGE_SIZE
Calculation method of fixed value writing
$ echo $(expr $(getconf _PHYS_PAGES) / 2)
$ echo $(expr $(getconf _PHYS_PAGES) / 2 \* $(getconf PAGE_SIZE))
** Recommended writing examples **
The host system is installed 1583 GB Memory and return the following values :_PHYS_PAGES = 395903676 and PAGE_SIZE = 4096
kernel.shmall = 197951838
kernel.shmmax = 810810728448
2 segment Host memory
| Parameters | meaning | explain |
|---|---|---|
| vm.overcommit_memory | Linux Kernel parameters to determine how much memory can be allocated to the process | gp Always be 2 |
| vm.overcommit_ratio | It is used for application process RAM percentage , The rest is reserved for the operating system | redhat Default 50 |
3 Port settings
To avoid Greenplum During initialization Greenplum The database has port conflicts with other applications , Please note the port range specified by the operating system parameters net.ipv4.ip_local_port_range. Use gpinitsystem Cluster configuration file initialization Greenplum when , Do not specify Greenplum Database port . for example , If net.ipv4.ip_local_port_range = 10000 65535, take Greenplum The database base port number is set to these values . Example
PORT_BASE = 6000
MIRROR_PORT_BASE = 7000
For the use of Greenplum Database Azure Deploy , Please avoid using ports 65330; Add the following lines to sysctl.conf: Example
net.ipv4.ip_local_reserved_ports=65330
4 system memory
For memory over 64GB Host system , The following settings are recommended : Example
vm.dirty_background_ratio = 0
vm.dirty_ratio = 0
vm.dirty_background_bytes = 1610612736 # 1.5GB
vm.dirty_bytes = 4294967296 # 4GB
For memory 64GB Or fewer host systems , Delete these two parameters and set them vm.dirty_background_bytes Is the following value : Example
vm.dirty_bytesratio
vm.dirty_background_ratio = 3
vm.dirty_ratio = 10
increase vm.min_free_kbytes In order to ensure that PF_MEMALLOC Easily meet requests from network and storage drivers . This is especially important for systems with large amounts of system memory . The default values on these systems are usually too low . Use this awk Command settings vm.min_free_kbytes For the proposed system physical memory 3%:
awk 'BEGIN {OFMT = "%.0f";} /MemTotal/ {print "vm.min_free_kbytes =", $2 * .03;}' /proc/meminfo >> /etc/sysctl.conf
Don't set vm.min_free_kbytes Is higher than the system memory 5%, Otherwise, it may lead to insufficient memory .
边栏推荐
- Greenplum6.x-版本变化记录-常用手册
- 数据分片介绍
- GOLand idea intellij 无法输入汉字
- Quick sorting (detailed illustration of single way, double way, three way)
- What is the method of manual wiring in PCB design in 22protel DXP_ Chengdu electromechanical Development Undertaking
- [Yu Yue education] higher vocational English reference materials of Nanjing Polytechnic University
- PLSQL的安装和配置
- Mock. JS usage details
- [Yu Yue education] C language programming reference of Zhongbei College of Nanjing Normal University
- Three usage scenarios of annotation @configurationproperties
猜你喜欢
A method for quickly viewing pod logs under frequent tests (grep awk xargs kuberctl)

調用華為遊戲多媒體服務的創建引擎接口返回錯誤碼1002,錯誤信息:the params is error
iptables 之 state模块(ftp服务练习)

Opencv learning note 3 - image smoothing / denoising
![[hard core science popularization] working principle of dynamic loop monitoring system](/img/d4/0c0281aec5a4f444528e8cfd401598.jpg)
[hard core science popularization] working principle of dynamic loop monitoring system

数据分片介绍

leetcode134. gas station

JS operation
![[南京大学]-[软件分析]课程学习笔记(一)-introduction](/img/57/bf652b36389d2bf95388d2eb4772a1.png)
[南京大学]-[软件分析]课程学习笔记(一)-introduction
Introduction to data fragmentation
随机推荐
National SMS center number inquiry
Greenplum6.x搭建_环境配置
Implement your own dataset using bisenet
Greenplum6.x监控软件搭建
Implementation method of data platform landing
JS operation
字符串操作
Greenplum6.x常用语句
What are the advantages of commas in conditional statements- What is the advantage of commas in a conditional statement?
AVL balanced binary search tree
Through the "last mile" of legal services for the masses, fangzheng Puhua labor and personnel law self-service consulting service platform has been frequently "praised"
[Chongqing Guangdong education] accounting reference materials of Nanjing University of Information Engineering
In go language, function is a type
数据分析方法论与前人经验总结2【笔记干货】
Composer change domestic image
Opencv learning notes 1 -- several methods of reading images
POJ - 3616 Milking Time(DP+LIS)
POJ - 3784 running medium
使用AGC重签名服务前后渠道号信息异常分析
求有符号数的原码、反码和补码【C语言】