当前位置:网站首页>Call the TensorFlow Objection Detection API for object detection and save the detection results locally
Call the TensorFlow Objection Detection API for object detection and save the detection results locally
2022-08-05 06:11:00 【cql_cqu】
See previous blog“ensorFlow ObjecDetectionAPI在win10系统Anaconda3下的配置”:https://blog.csdn.net/liu_yanxiaobai/article/details/86077459,将环境配置好,Start calling this belowAPIDetect dynamic objects in videos.
我们这里还是在jupyter notebookTest the code in the compiled environment.
首先,通过CMDThe window goes to the configured oneTensorFlow环境(我这里是activate python35),然后进入到TensorFlow API的指定目录(我这里是E:\ProjectTest\PythonTests\CNN_Test\Image-labels-system\TensorFlow-ObjectDetection\models-master),Then enter in this directoryjupyter notebookBring up the web version compilation environment,最后进入research>objection_detection,点击object_detection_tutorial.ipynb,The code can be modified and tested.
1、使用OpenCV的VideoCaptureThe class can call out the local camera or external camera or read the local video,例如:
cap = cv2.VideoCapture(0)#Bring up the local camera
cap = cv2.VideoCapture(1)#Bring up the external camera
ca= = cv2.VideoCapture(“本地视频路径”)#Read in local video
2、在TensorFlowBased on the official source code, add the following code:
import cv2
import numpy as np

Video_Path = "E://Test Sources//car_2.avi"#The video format here seems to be only AVI格式,Otherwise, the video stream after detection cannot be written to local storage,The reason may befourccencoding format
cap = cv2.VideoCapture(Video_Path)#Read in local video
fps = cap.get(cv2.CAP_PROP_FPS)#Set the frame rate of the incoming video
size = (int(cap.get(cv2.CAP_PROP_FRAME_WIDTH)),int(cap.get(cv2.CAP_PROP_FRAME_HEIGHT)))#Set the read video size,(此处注意python2与python3代码不同)
fourcc = cv2.VideoCapture('M','P', '4', '2')#设置视频编码格式
out = cv2.VideoCapture('output.avi', fourcc, fps, size)#Video write format after object detection
3、最后在whileRead the video in a loop(摄像头)帧,利用APIDraw a rectangle for detected dynamic objects and display their categories,Frames of images form a video stream for display,And write the video stream to local save.
with detection_graph.as_default():
    with tf.Session(graph=detection_graph) as sess:
        while True:
            ret, image_np = cap.read()
            # Expand dimensions since the model expects images to have shape: [1, None, None, 3]
            image_np_expanded = np.expand_dims(image_np, axis=0)
            image_tensor = detection_graph.get_tensor_by_name('image_tensor:0')
            # Each box represents a part of the image where a particular object was detected.
            boxes = detection_graph.get_tensor_by_name('detection_boxes:0')
            # Each score represent how level of confidence for each of the objects.
            # Score is shown on the result image, together with the class label.
            scores = detection_graph.get_tensor_by_name('detection_scores:0')
            classes = detection_graph.get_tensor_by_name('detection_classes:0')
            num_detections = detection_graph.get_tensor_by_name('num_detections:0')
            # Actual detection.
            (boxes, scores, classes, num_detections) = sess.run(
                    [boxes, scores, classes, num_detections],
                    feed_dict={image_tensor: image_np_expanded})
            # Visualization of the results of a detection.
            vis_util.visualize_boxes_and_labels_on_image_array(
                    image_np,
                    np.squeeze(boxes),
                    np.squeeze(classes).astype(np.int32),
                    np.squeeze(scores),
                    category_index,
                    use_normalized_coordinates=True,
                    line_thickness=8)

            cv2.imshow('object detection', cv2.resize(image_np, (800,600)))
            out.write(image_np)  ###Write the image frame by frame as a video stream
            if cv2.waitKey(25) & 0xFF == ord('q'):
                cv2.destroyAllWindows()
                break
        cap.release()###释放内存
        out.release()
The full version of the source code is attached as follows:
import numpy as np
import os
import six.moves.urllib as urllib
import sys
import tarfile
import tensorflow as tf
import zipfile

from distutils.version import StrictVersion
from collections import defaultdict
from io import StringIO
from matplotlib import pyplot as plt
from PIL import Image

import cv2
Video_Path = "E://Test Sources//car_2.avi"###The original video here must beAVIThe final test result can be saved locally,其他格式(mp4)不可以,因为fourcc只支持AVI格式编码
cap = cv2.VideoCapture(Video_Path)#When the local camera is called up0
#####Read the video into local save######
fps = cap.get(cv2.CAP_PROP_FPS)
size = (int(cap.get(cv2.CAP_PROP_FRAME_WIDTH)),int(cap.get(cv2.CAP_PROP_FRAME_HEIGHT)))
fourcc = cv2.VideoWriter_fourcc('M', 'P', '4', '2')
out = cv2.VideoWriter('output_car_2.avi', fourcc, fps, size)

# This is needed since the notebook is stored in the object_detection folder.
sys.path.append("..")
from object_detection.utils import ops as utils_ops

if StrictVersion(tf.__version__) < StrictVersion('1.9.0'):
  raise ImportError('Please upgrade your TensorFlow installation to v1.9.* or later!')

%matplotlib inline

from utils import label_map_util
from utils import visualization_utils as vis_util

##模型下载
MODEL_NAME = 'ssd_mobilenet_v1_coco_2017_11_17'
MODEL_FILE = MODEL_NAME + '.tar.gz'
DOWNLOAD_BASE = 'http://download.tensorflow.org/models/object_detection/'

# Path to frozen detection graph. This is the actual model that is used for the object detection.
PATH_TO_FROZEN_GRAPH = MODEL_NAME + '/frozen_inference_graph.pb'

# List of the strings that is used to add correct label for each box.
PATH_TO_LABELS = os.path.join('data', 'mscoco_label_map.pbtxt')
NUM_CLASSES = 90#The types of categories that can be recognized
opener = urllib.request.URLopener()
opener.retrieve(DOWNLOAD_BASE + MODEL_FILE, MODEL_FILE)
tar_file = tarfile.open(MODEL_FILE)
for file in tar_file.getmembers():
  file_name = os.path.basename(file.name)
  if 'frozen_inference_graph.pb' in file_name:
    tar_file.extract(file, os.getcwd())

detection_graph = tf.Graph()
with detection_graph.as_default():
  od_graph_def = tf.GraphDef()
  with tf.gfile.GFile(PATH_TO_FROZEN_GRAPH, 'rb') as fid:
    serialized_graph = fid.read()
    od_graph_def.ParseFromString(serialized_graph)
    tf.import_graph_def(od_graph_def, name='')

category_index = label_map_util.create_category_index_from_labelmap(PATH_TO_LABELS, use_display_name=True)

def load_image_into_numpy_array(image):
  (im_width, im_height) = image.size
  return np.array(image.getdata()).reshape(
      (im_height, im_width, 3)).astype(np.uint8)

with detection_graph.as_default():
    with tf.Session(graph=detection_graph) as sess:
        while True:
            ret, image_np = cap.read()
            # Expand dimensions since the model expects images to have shape: [1, None, None, 3]
            image_np_expanded = np.expand_dims(image_np, axis=0)
            image_tensor = detection_graph.get_tensor_by_name('image_tensor:0')
            # Each box represents a part of the image where a particular object was detected.
            boxes = detection_graph.get_tensor_by_name('detection_boxes:0')
            # Each score represent how level of confidence for each of the objects.
            # Score is shown on the result image, together with the class label.
            scores = detection_graph.get_tensor_by_name('detection_scores:0')
            classes = detection_graph.get_tensor_by_name('detection_classes:0')
            num_detections = detection_graph.get_tensor_by_name('num_detections:0')
            # Actual detection.
            (boxes, scores, classes, num_detections) = sess.run(
                    [boxes, scores, classes, num_detections],
                    feed_dict={image_tensor: image_np_expanded})
            # Visualization of the results of a detection.
            vis_util.visualize_boxes_and_labels_on_image_array(
                    image_np,
                    np.squeeze(boxes),
                    np.squeeze(classes).astype(np.int32),
                    np.squeeze(scores),
                    category_index,
                    use_normalized_coordinates=True,
                    line_thickness=8)

            cv2.imshow('object detection', cv2.resize(image_np, (800,600)))
            out.write(image_np)  ###Write the image frame by frame as a video stream
            if cv2.waitKey(25) & 0xFF == ord('q'):
                cv2.destroyAllWindows()
                break
        cap.release()###释放内存
        out.release()
正常情况下运行,结果会在object_detection文件夹下生成output.avi视频文件(注:If the original video read in is notAVI格式的话,The resulting video stream file may not be opened,所以尽量使用AVIformat file as a test video).
See the video for the test results:http://v.youku.com/v_show/id_XNDA3ODA3MjM0OA==.html?spm=a2hzp.8244740.0.0
The purpose of this article is to document my own learning process,I also hope that it will be helpful to students who are doing the same research in this area,本人水平有限,There may be unclear or inappropriate explanations in the text,欢迎指导交流!
边栏推荐
猜你喜欢


随机推荐
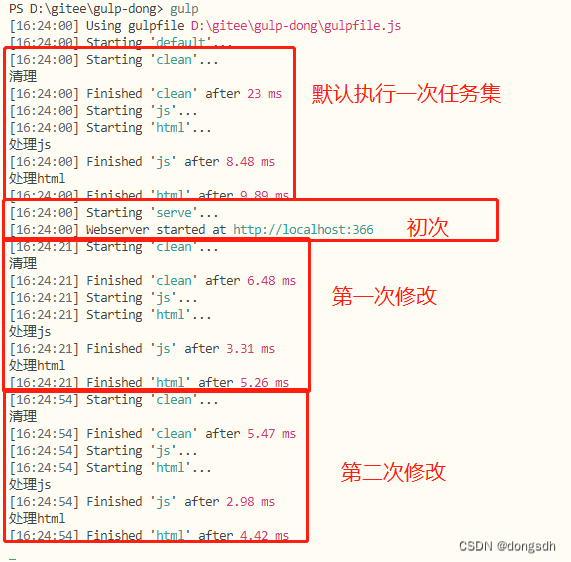
Getting Started 11 Automatically add version numbers
Remembering my first CCF-A conference paper | After six rejections, my paper is finally accepted, yay!
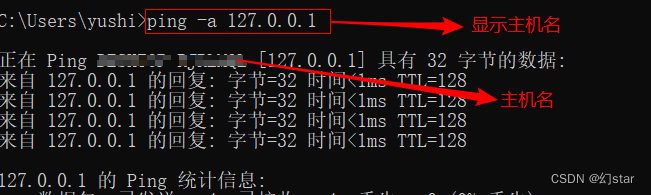
传输层协议(TCP3次握手)
[Paper Intensive Reading] The relationship between Precision-Recall and ROC curves
Cocos Creator开发中的事件响应
每日一题-删除链表的倒数第 N 个结点-0718
ROS视频教程
图片压缩失效问题
Spark源码-任务提交流程之-6.2-sparkContext初始化-TaskScheduler任务调度器
【Day8】磁盘及磁盘的分区有关知识
lvm逻辑卷及磁盘配额
什么是全栈设计师?
【Day8】使用LVM扩容所涉及的命令
洞察互联网大趋势,读完这篇文章你就彻底了解中文域名
每日一题-两数相加-0711
Why can't I add a new hard disk to scan?How to solve?
UE4动画雨滴材质制作教程
Dsf5.0 bounced points determine not return a value
入门文档04 一个任务依赖另外一个任务时,需要按顺序执行
IJCAI 2022|Boundary-Guided Camouflage Object Detection Model BGNet