当前位置:网站首页>Configuration of TensorFlow ObjecDetectionAPI under Anaconda3 of win10 system
Configuration of TensorFlow ObjecDetectionAPI under Anaconda3 of win10 system
2022-08-05 06:09:00 【cql_cqu】
Reference Blog 1: https://blog.csdn.net/zhaoyoulin2016/article/details/80615687
Reference Blog 2: https://blog.csdn.net/Zlase/article/details/78734138
Because it was installed with the Anaconda3 integrated package when python was installed before, the python in Anaconda3 is version 3.6, which is incompatible with tensorflow, so you need to create a python35 environment when using tensorflow. You can refer to Anaconda3 for building tensorflow.material.It is also for this reason that I made an error when adding a path when configuring some modules involved in the API, which will be described in detail below.
I. Installation of TensorFlow
(This step is omitted: you can refer to the blog: https://blog.csdn.net/r1254/article/details/76735740)
Second, download TensorFlowModels
Download link: https://github.com/tensorflow/models
After downloading, unzip it, and the research, samples, official and other folders will appear.Here, you need to add some modules to be used in the later test program to the path, and add the research in the decompressed package and the slim in the folder to the index path.
Method: It should be noted here that if you installed the python3.6 version with Anaconda3 and used TensorFlow to create the python35 environment, you need to go to the python35 folder and add the abovetwo paths.Create a new .pth file in Anaconda3>envs>python35 (the tensorflow environment I created, the name can be different)>Lib>site-packages, .pth fileThe name can be chosen at will, and the absolute paths of research and slim are written in it, as shown below:

Three, install protobuf
Download address: https://github.com/google/protobuf/releases
Some blogs mentioned that the downloaded version is the compressed package of protoc-3.4.0-win32.zip. There may be problems with other versions, and the specific reasons are not known.After decompression, copy protoc.exe in the bin folder to models-master\research. For the sake of safety, add the bin folder to the computer system environment variables (Create a new path in the path under the computer system variable and add ...\bin).
Then enter the computer cmd command window, switch to the TensorFlow environment (use the command activate python35), mine is activate python35.Then enter the research directory in the model-master from the national cd command, and execute the following command:
protoc object_detection/protos/*.proto --python_out=.It is successful if no error is reported after a pause of one or two seconds. After success, some .PROTO files will appear in the models-master>research>object_detection>protos directory.
Then execute the following command in the research>object_detection>builders directory of the cmd command window:
python model_builder_test.pyIf no error is reported, the following result will appear after waiting for more than ten seconds: 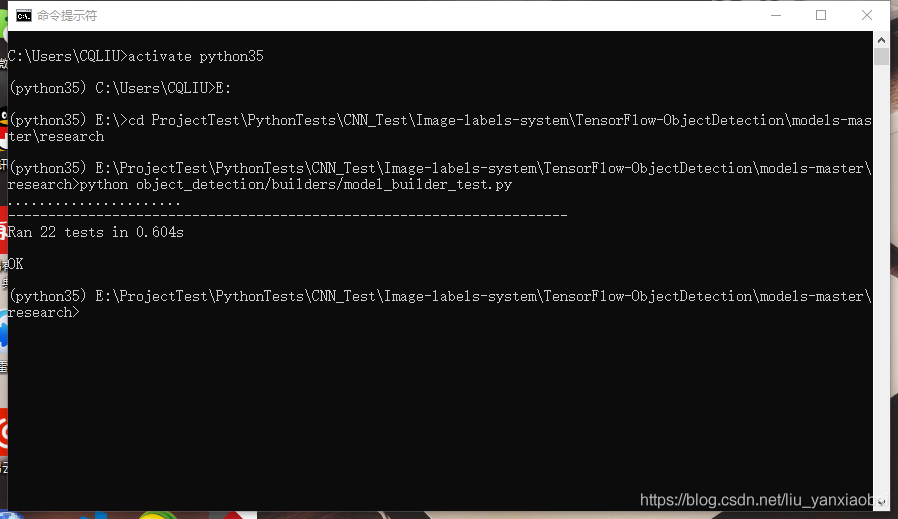
Indicates that the protoc configuration is successful, and the following code testing phase can be performed.
Four, test TensorFlowObjectDetectionAPI
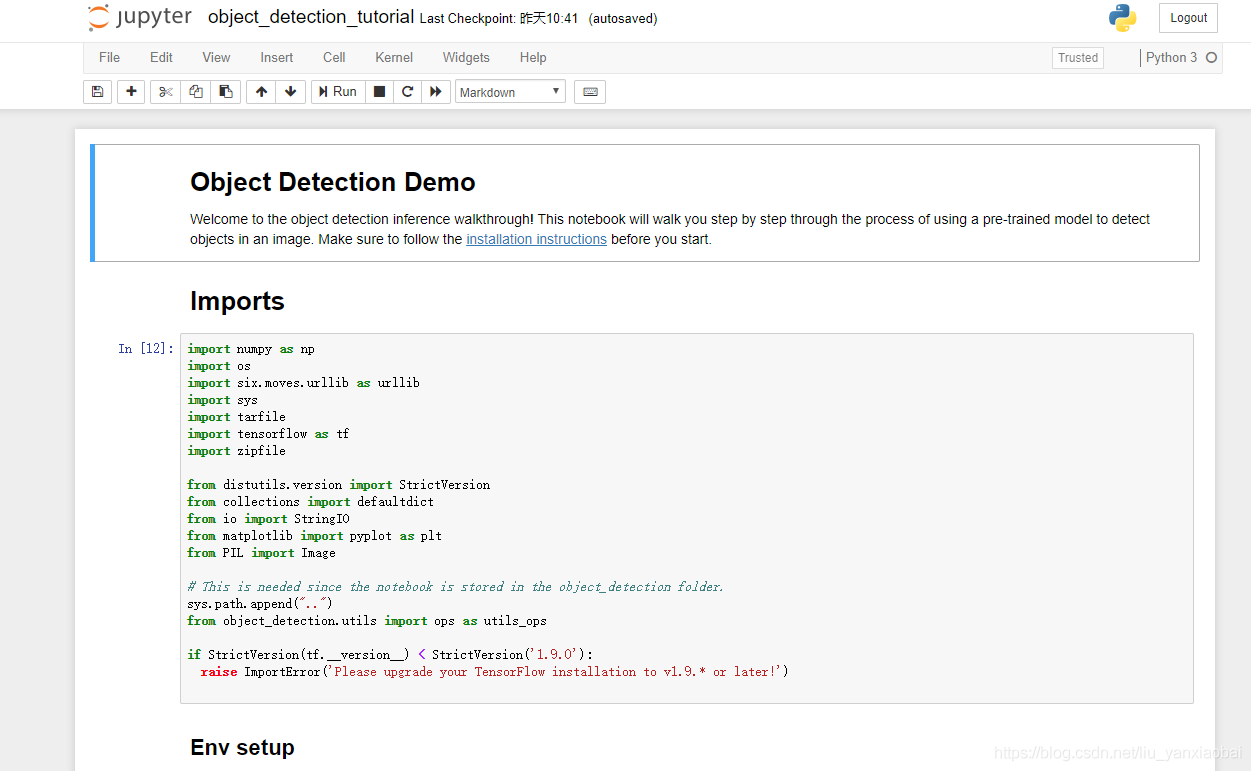
First activate the TensorFlow environment through activate python35 in the cmd command window, then enter the models-master directory, and enter the command jupyter notebook to call up the web version python codeDebug the IDE, enter the research>object_detection directory and find object_detection_tutorial.ipynb, as followsFigure: 

Click object_detection_tutorial.ipynb, the code debugging interface will appear, as shown below:
Then run Run All, wait for the running result, a UserWarning warning may appear in the middle, you can leave it alone, it will not affect the running result.The process will be affected by the network, and it may take a long time to get the result. You can observe the python3 in the upper right corner. It is a hollow circle when it is not running normally, and a solid circle when the program is running. Put the mouse on it to display the kernelbusy.The results are as follows:
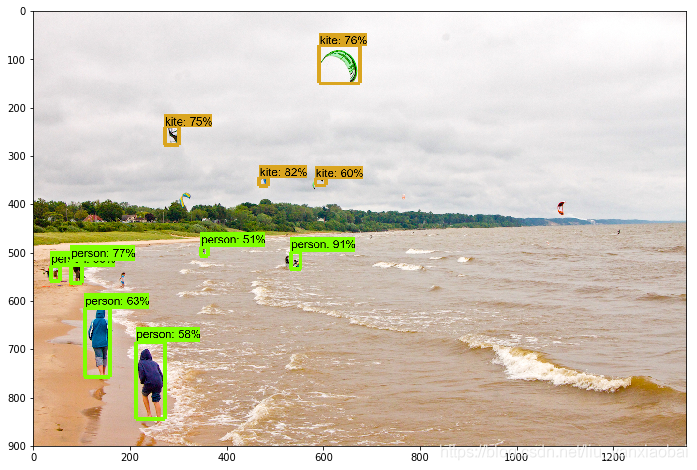
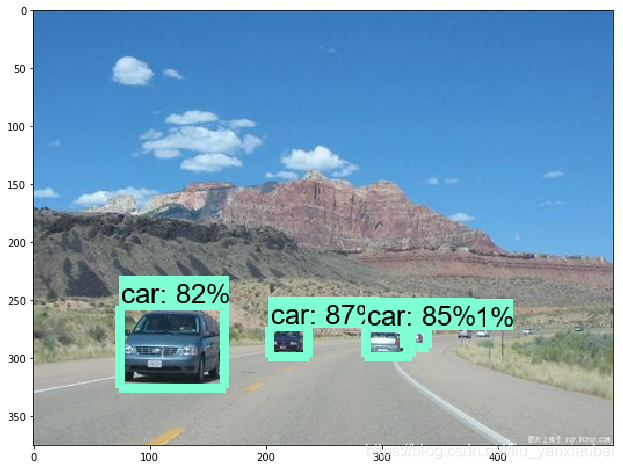
Indicates that the test is successful. The above two pictures are the pictures that come with the number test program. You can replace it with your own pictures for testing. Here I put my own pictures into the program to run, and the results come out.as follows:

The above is for your reference. There may be flaws in the article. Please advise. In the next stage, I plan to use TensorFlow to train the targets in my own road scene. I am currently learning the data processing part of TensorFlow input images.
边栏推荐
- 【Day5】软硬链接 文件存储,删除,目录管理命令
- 来来来,一文让你读懂Cocos Creator如何读写JSON文件
- 每日一题-单调栈
- IJCAI 2022|Boundary-Guided Camouflage Object Detection Model BGNet
- 新一代解析技术——云解析
- huatuo 革命性热更新解决方案系列1·1 为什么这么NB?huatuo革命Unity热更新
- Spark源码-任务提交流程之-6-sparkContext初始化
- 【Day8】磁盘及磁盘的分区有关知识
- 入门文档05-2 使用return指示当前任务已完成
- Contextual non-local alignment of full-scale representations
猜你喜欢
spark算子-map vs mapPartitions算子

Getting Started Document 09 Standalone watch
偷题——腾讯游戏开发面试问题及解答
【UiPath2022+C#】UiPath 循环
![[Paper Intensive Reading] Rich Feature Hierarchies for Accurate Object Detection and Semantic Segmentation (R-CNN)](/img/a7/fc3fe440f5e57362d44ae875b7d436.png)
[Paper Intensive Reading] Rich Feature Hierarchies for Accurate Object Detection and Semantic Segmentation (R-CNN)
【UiPath2022+C#】UiPath 数据操作

【机器学习】1单变量线性回归
UE4动画雨滴材质制作教程
【Day8】磁盘及磁盘的分区有关知识
错误类型:reflection.ReflectionException: Could not set property ‘xxx‘ of ‘class ‘xxx‘ with value ‘xxx‘
随机推荐
【Day8】使用LVM扩容所涉及的命令
每日一题-最长有效括号-0724
Why can't I add a new hard disk to scan?How to solve?
入门文档06 向流(stream)中添加文件
阿里云视频点播
spark源码-任务提交流程之-5-CoarseGrainedExecutorBackend
每日一题-有效的括号-0719
入门文档04 一个任务依赖另外一个任务时,需要按顺序执行
2020,Laya最新中高级面试灵魂32问,你都知道吗?
论那些给得出高薪的游戏公司底气到底在哪里?
单臂路由与三成交换机
D39_欧拉角与四元数
什么?CDN缓存加速只适用于加速静态内容?
【UiPath2022+C#】UiPath 循环
Autoware中安装Yolo3目标检测模块遇到的问题
【UiPath2022+C#】UiPath If条件语句
C语言的一些小常识
每日一题-两数相加-0711
Account and Permission Management
【Day8】(超详细步骤)使用LVM扩容