当前位置:网站首页>Quartz:老而弥坚的开源任务调度框架,用起来够丝滑
Quartz:老而弥坚的开源任务调度框架,用起来够丝滑
2022-06-11 03:35:00 【沉默王二】
大家好,我是二哥呀。定时任务的应用场景其实蛮常见的,比如说:
- 数据备份
- 订单未支付则自动取消
- 定时爬取数据
- 定时推送信息
- 定时发布文章
- 等等(想不出来了,只能等等来凑,,反正只要等的都需要定时,怎么样,这波圆场可以吧)
编程喵实战项目里需要做一个定时发布文章的功能,一开始我想用 Spring Task,于是研究了一番,发现 Spring Task 用起来确实简单,但对于复杂业务却也无能为力。
于是我就把注意力放到了 Quartz 上面,这是一款老而弥坚的开源任务调度框架。

记得我在 14 年开发大宗期货交易平台的时候就用到了它,每天凌晨定时需要统计一波交易数据,生成日报报表,当时配合 Cron 表达式用的。
可惜后来平台稳定了,新的政策出来了,直接把大宗期货交易灭了。于是我发财的机会也随着破灭了。想想都觉得可惜,哈哈哈。

时光荏苒,Quartz 发展到现在,已经可以和 Spring Boot 项目无缝衔接了,今天我们就来实战一把。
Timer
JDK 1.3 就开始支持的一种定时任务的实现方式。内部通过 TaskQueue 的类来存放定时任务,用起来比较简单,但缺陷比较多,比如说一个 Timer 就会起一个线程,任务多了性能就非常差,再比如说如果执行任务期间某个 TimerTask 耗时比较久,就会影响其他任务的调度。
@Slf4j
public class TimerDemo {

    public static void main(String[] args) {

        TimerTask task = new TimerTask() {

            @Override
            public void run() {

                log.debug("当前时间{}线程名称{}", DateTime.now(),
                        Thread.currentThread().getName());
            }
        };
        log.debug("当前时间{}线程名称{}", DateTime.now(),
                Thread.currentThread().getName());
        Timer timer = new Timer("TimerDemo");
        timer.schedule(task,1000L);
    }
}
代码跑起来后的日志如下所示:
13:11:45.268 [main] DEBUG top.springtask.TimerDemo - 当前时间2022-04-27 13:11:45线程名称main
13:11:46.280 [TimerDemo] DEBUG top.springtask.TimerDemo - 当前时间2022-04-27 13:11:46线程名称TimerDemo
ScheduledThreadPoolExecutor
JDK 1.5 开始提供的的定时任务,它继承了 ThreadPoolExecutor,实现了 ScheduledExecutorService 接口,所以支持并发场景下的任务执行。同时,优化了 Timer 的缺陷。不过,由于使用了队列来实现定时器,就有出入队列、调整堆等操作,所以定时不是非常非常准确(吹毛求疵)。
@Slf4j
public class ScheduledThreadPoolExecutorDemo {

    public static void main(String[] args) throws InterruptedException {

        TimerTask task = new TimerTask() {

            @Override
            public void run() {

                log.debug("当前时间{}线程名称{}", DateTime.now(),
                        Thread.currentThread().getName());
            }
        };

        log.debug("当前时间{}线程名称{}", DateTime.now(),
                Thread.currentThread().getName());
        ScheduledExecutorService executorService = Executors.newScheduledThreadPool(3);
        executorService.scheduleAtFixedRate(task, 1000L,1000L, TimeUnit.MILLISECONDS);
        Thread.sleep(1000+1000*4);
        executorService.shutdown();
    }
}
输出结果如下所示:
14:43:41.740 [main] DEBUG top.springtask.ScheduledThreadPoolExecutorDemo - 当前时间2022-04-27 14:43:41线程名称main
14:43:42.752 [pool-1-thread-1] DEBUG top.springtask.ScheduledThreadPoolExecutorDemo - 当前时间2022-04-27 14:43:42线程名称pool-1-thread-1
14:43:43.748 [pool-1-thread-1] DEBUG top.springtask.ScheduledThreadPoolExecutorDemo - 当前时间2022-04-27 14:43:43线程名称pool-1-thread-1
14:43:44.749 [pool-1-thread-2] DEBUG top.springtask.ScheduledThreadPoolExecutorDemo - 当前时间2022-04-27 14:43:44线程名称pool-1-thread-2
14:43:45.749 [pool-1-thread-2] DEBUG top.springtask.ScheduledThreadPoolExecutorDemo - 当前时间2022-04-27 14:43:45线程名称pool-1-thread-2
14:43:46.749 [pool-1-thread-2] DEBUG top.springtask.ScheduledThreadPoolExecutorDemo - 当前时间2022-04-27 14:43:46线程名称pool-1-thread-2
Spring Task
Spring Task 是 Spring 提供的轻量级定时任务工具,也就意味着不需要再添加第三方依赖了,相比其他第三方类库更加方便易用。
好像关于 Spring Task,没有其他废话可说了,我们来直接上手。
第一步,新建配置类 SpringTaskConfig,并添加 @EnableScheduling注解开启 Spring Task。
@Configuration
@EnableScheduling
public class SpringTaskConfig {

}
当然了,也可以不新建这个配置类,直接在主类上添加 @EnableScheduling 注解。
@SpringBootApplication
@EnableScheduling
public class CodingmoreSpringtaskApplication {


	public static void main(String[] args) {

		SpringApplication.run(CodingmoreSpringtaskApplication.class, args);
	}

}
第二步,新建定时任务类 CronTask,使用 @Scheduled 注解注册 Cron 表达式执行定时任务。
@Slf4j
@Component
public class CronTask {

    @Scheduled(cron = "0/1 * * ? * ?")
    public void cron() {

        log.info("定时执行,时间{}", DateUtil.now());
    }
}
启动服务器端,发现每隔一秒钟会打印一次日志,证明 Spring Task 的 cron 表达式形式已经起效了。

默认情况下,@Scheduled 创建的线程池大小为 1,如果想增加线程池大小的话,可以让 SpringTaskConfig 类实现 SchedulingConfigurer 接口,通过 setPoolSize 增加线程池大小。
@Configuration
@EnableScheduling
public class SpringTaskConfig implements SchedulingConfigurer {

    @Override
    public void configureTasks(ScheduledTaskRegistrar taskRegistrar) {

        ThreadPoolTaskScheduler threadPoolTaskScheduler = new ThreadPoolTaskScheduler();

        threadPoolTaskScheduler.setPoolSize(10);
        threadPoolTaskScheduler.setThreadNamePrefix("my-scheduled-task-pool-");
        threadPoolTaskScheduler.initialize();

        taskRegistrar.setTaskScheduler(threadPoolTaskScheduler);
    }
}
服务热部署完成后,会在控制台看到这样的信息:

可以确认自定义线程池大小已经生效了,有的任务用的是线程led-task-pool-3,有的是线程led-task-pool-7,跑时间长了,可以发现 led-task-pool-1 到 led-task-pool-10 的都有。

Spring Task 除了支持 Cron 表达式,还有 fixedRate(固定速率执行)、fixedDelay(固定延迟执行)、initialDelay(初始延迟)三种用法。
/** * fixedRate:固定速率执行。每5秒执行一次。 */
@Scheduled(fixedRate = 5000)
public void reportCurrentTimeWithFixedRate() {

    log.info("Current Thread : {}", Thread.currentThread().getName());
    log.info("Fixed Rate Task : The time is now {}", DateUtil.now());
}

/** * fixedDelay:固定延迟执行。距离上一次调用成功后2秒才执。 */
@Scheduled(fixedDelay = 2000)
public void reportCurrentTimeWithFixedDelay() {

    try {

        TimeUnit.SECONDS.sleep(3);
        log.info("Fixed Delay Task : The time is now {}",DateUtil.now());
    } catch (InterruptedException e) {

        e.printStackTrace();
    }
}

/** * initialDelay:初始延迟。任务的第一次执行将延迟5秒,然后将以5秒的固定间隔执行。 */
@Scheduled(initialDelay = 5000, fixedRate = 5000)
public void reportCurrentTimeWithInitialDelay() {

    log.info("Fixed Rate Task with Initial Delay : The time is now {}", DateUtil.now());
}
不过,fixedRate 有个坑,假如某个方法的定时器设定的固定速率是每5秒执行一次,这个方法现在要执行下面四个任务,四个任务的耗时是:6s、6s、 2s、 3s,任务会如何执行呢(单线程环境下)?
2022-04-27 15:25:52.400  INFO 4343 --- [led-task-pool-1] c.codingmore.component.PublishPostTask   : Fixed Rate Task : The time is now 2022-04-27 15:25:52
2022-04-27 15:25:58.401  INFO 4343 --- [led-task-pool-1] c.codingmore.component.PublishPostTask   : Fixed Rate Task : The time is now 2022-04-27 15:25:58
2022-04-27 15:26:00.407  INFO 4343 --- [led-task-pool-1] c.codingmore.component.PublishPostTask   : Fixed Rate Task : The time is now 2022-04-27 15:26:00
2022-04-27 15:26:04.318  INFO 4343 --- [led-task-pool-1] c.codingmore.component.PublishPostTask   : Fixed Rate Task : The time is now 2022-04-27 15:26:04
第一个任务开始的相对时间是第 0 秒,但由于执行了 6 秒,所以原来应该是第 5 秒执行的任务,延迟到第 6 秒才开始执行,第三个任务延迟了 12 秒,原本应该是第 10 秒执行,第三个任务没有延迟,正常 15 秒后执行。
假如我们使用 @EnableAsync 注解开启多线程环境的话,结果会怎么样呢?
2022-04-27 15:33:01.385  INFO 4421 --- [led-task-pool-1] c.codingmore.component.PublishPostTask   : Fixed Rate Task : The time is now 2022-04-27 15:33:01
2022-04-27 15:33:07.390  INFO 4421 --- [led-task-pool-1] c.codingmore.component.PublishPostTask   : Fixed Rate Task : The time is now 2022-04-27 15:33:07
2022-04-27 15:33:09.391  INFO 4421 --- [led-task-pool-1] c.codingmore.component.PublishPostTask   : Fixed Rate Task : The time is now 2022-04-27 15:33:09
2022-04-27 15:33:13.295  INFO 4421 --- [led-task-pool-1] c.codingmore.component.PublishPostTask   : Fixed Rate Task : The time is now 2022-04-27 15:33:13
关于 Cron 表达式
这里顺带普及一下 Cron 表达式,在定时任务中会经常会遇到。Cron 这个词来源于希腊语 chronos,原意也就是时间。
Cron 表达式是一个含有时间意义的字符串,以 5 个空格隔开,分成 6 个时间元素。举几个例子就一目了然了。
| 示例 | 说明 |
|---|---|
0 15 10 ? * * | 每天上午10:15执行任务 |
0 0 10,14,16 * * ? | 每天10 点、14 点、16 点执行任务 |
0 0 12 ? * 3 | 每个星期三中午 12 点执行任务 |
0 15 10 15 * ? | 每月 15 日上午 10 点 15 执行任务 |
Cron 的语法格式可以总结为:
Seconds Minutes Hours DayofMonth Month DayofWeek
每个时间元素的取值范围,以及可出现的特殊字符如下所示。
| 时间元素 | 取值范围 | 可出现的特殊字符 |
|---|---|---|
| 秒 | [0,59] | *,-/ |
| 分钟 | [0,59] | *,-/ |
| 小时 | [0,59] | *,-/ |
| 日期 | [0,31] | *,-/?LW |
| 月份 | [1,12] | *,-/ |
| 星期 | [1,7] | *,-/?L# |
特殊字符的含义和示例如下所示。
| 特殊字符 | 含义 | 示例 |
|---|---|---|
* | 所有可能的值 | 很好理解,月域中为每个月,星期域中每个星期几 |
, | 枚举的值 | 很好理解,小时域中 10,14,16,就表示这几个小时可选 |
- | 范围 | 很好理解,分钟域中 10-19,就表示 10-19 分钟每隔一分钟执行一次 |
/ | 指定数值的增量 | 很好理解,分钟域中 0/15,就表示每隔 15 分钟执行一次 |
? | 不指定值 | 很好理解,日期域指定了星期域就不能指定值,反之亦然,因为日期域和星期域属于冲突关系 |
L | 单词 Last 的首字母 | 很好理解,日期域和星期域支持,表示月的最后一天或者星期的最后一天 |
W | 除周末以外的工作日 | 很好理解,仅日期域支持 |
# | 每个月的第几个星期几 | 很好理解,仅星期域支持,4#2表示某月的第二个星期四 |
关于 Quartz
Quartz 是一款功能强大的开源的任务调度框架,在 GitHub 上已经累计有 5k+ 的 star 了。小到单机应用,大到分布式,都可以整合 Quartz。
在使用 Quartz 之前,让我们先来搞清楚 4 个核心概念:
- Job:任务,要执行的具体内容。
- JobDetail:任务详情,Job 是它要执行的内容,同时包含了这个任务调度的策略和方案。
- Trigger:触发器,可以通过 Cron 表达式来指定任务执行的时间。
- Scheduler:调度器,可以注册多个 JobDetail 和 Trigger,用来调度、暂停和删除任务。
整合 Quartz
Quartz 存储任务的方式有两种,一种是使用内存,另外一种是使用数据库。内存在程序重启后就丢失了,所以我们这次使用数据库的方式来进行任务的持久化。
第一步,在 pom.xml 文件中添加 Quartz 的 starter。
<dependency>
    <groupId>org.springframework.boot</groupId>
    <artifactId>spring-boot-starter-quartz</artifactId>
    <version>2.6.7</version>
</dependency>
第二步,在 application.yml 添加 Quartz 相关配置,配置说明直接看注释。
spring:
  quartz:
    job-store-type: jdbc # 默认为内存 memory 的方式,这里我们使用数据库的形式
    wait-for-jobs-to-complete-on-shutdown: true # 关闭时等待任务完成
    overwrite-existing-jobs: true # 可以覆盖已有的任务
    jdbc:
      initialize-schema: never # 是否自动使用 SQL 初始化 Quartz 表结构
    properties: # quartz原生配置
      org:
        quartz:
          scheduler:
            instanceName: scheduler # 调度器实例名称
            instanceId: AUTO # 调度器实例ID自动生成
          # JobStore 相关配置
          jobStore:
            class: org.quartz.impl.jdbcjobstore.JobStoreTX # JobStore 实现类
            driverDelegateClass: org.quartz.impl.jdbcjobstore.StdJDBCDelegate # 使用完全兼容JDBC的驱动
            tablePrefix: QRTZ_ # Quartz 表前缀
            useProperties: false # 是否将JobDataMap中的属性转为字符串存储
          # 线程池相关配置
          threadPool:
            threadCount: 25 # 线程池大小。默认为 10 。
            threadPriority: 5 # 线程优先级
            class: org.quartz.simpl.SimpleThreadPool # 指定线程池实现类,对调度器提供固定大小的线程池
Quartz 默认使用的是内存的方式来存储任务,为了持久化,我们这里改为 JDBC 的形式,并且指定 spring.quartz.jdbc.initialize-schema=never,这样我们可以手动创建数据表。因为该值的另外两个选项ALWAYS和EMBEDDED都不太符合我们的要求:
- ALWAYS:每次都初始化
- EMBEDDED:只初始化嵌入式数据库,比如说 H2、HSQL
那手动创建数据表的 SQL 语句去哪里找呢?
为了方便小伙伴们下载,我把它放在了本教程的源码里面了:

如果使用 Intellij IDEA 旗舰版的话,首次打开 SQL 文件的时候会提示你指定数据源。在上图中,我配置了本地的 MySQL 数据库,导入成功后可以在数据库中查看到以下数据表:
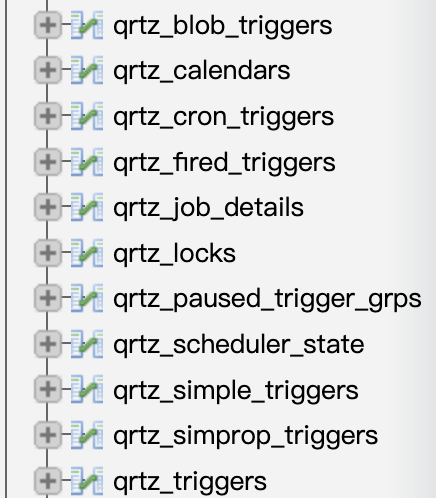
Quartz数据库核心表如下:
| Table Name | Description |
|---|---|
| QRTZ_CALENDARS | 存储Quartz的Calendar信息 |
| QRTZ_CRON_TRIGGERS | 存储CronTrigger,包括Cron表达式和时区信息 |
| QRTZ_FIRED_TRIGGERS | 存储与已触发的Trigger相关的状态信息,以及相联Job的执行信息 |
| QRTZ_PAUSED_TRIGGER_GRPS | 存储已暂停的Trigger组的信息 |
| QRTZ_SCHEDULER_STATE | 存储少量的有关Scheduler的状态信息,和别的Scheduler实例 |
| QRTZ_LOCKS | 存储程序的悲观锁的信息 |
| QRTZ_JOB_DETAILS | 存储每一个已配置的Job的详细信息 |
| QRTZ_JOB_LISTENERS | 存储有关已配置的JobListener的信息 |
| QRTZ_SIMPLE_TRIGGERS | 存储简单的Trigger,包括重复次数、间隔、以及已触的次数 |
| QRTZ_BLOG_TRIGGERS | Trigger作为Blob类型存储 |
| QRTZ_TRIGGER_LISTENERS | 存储已配置的TriggerListener的信息 |
| QRTZ_TRIGGERS | 存储已配置的Trigger的信息 |
剩下的就是对 Quartz 的 scheduler、jobStore 和 threadPool 配置。
第三步,创建任务调度的接口 IScheduleService,定义三个方法,分别是通过 Cron 表达式来调度任务、指定时间来调度任务,以及取消任务。
public interface IScheduleService {

    /** * 通过 Cron 表达式来调度任务 */
    String scheduleJob(Class<? extends Job> jobBeanClass, String cron, String data);

    /** * 指定时间来调度任务 */
    String scheduleFixTimeJob(Class<? extends Job> jobBeanClass, Date startTime, String data);

    /** * 取消定时任务 */
    Boolean cancelScheduleJob(String jobName);
}
第四步,创建任务调度业务实现类 ScheduleServiceImpl,通过Scheduler、CronTrigger、JobDetail的API来实现对应的方法。
@Slf4j
@Service
public class ScheduleServiceImpl implements IScheduleService {

    private String defaultGroup = "default_group";

    @Autowired
    private Scheduler scheduler;
    @Override
    public String scheduleJob(Class<? extends Job> jobBeanClass, String cron, String data) {

        String jobName = UUID.fastUUID().toString();
        JobDetail jobDetail = JobBuilder.newJob(jobBeanClass)
                .withIdentity(jobName, defaultGroup)
                .usingJobData("data", data)
                .build();
        //创建触发器,指定任务执行时间
        CronTrigger cronTrigger = TriggerBuilder.newTrigger()
                .withIdentity(jobName, defaultGroup)
                .withSchedule(CronScheduleBuilder.cronSchedule(cron))
                .build();
        // 调度器进行任务调度
        try {

            scheduler.scheduleJob(jobDetail, cronTrigger);
        } catch (SchedulerException e) {

            log.error("任务调度执行失败{}", e.getMessage());
        }
        return jobName;
    }

    @Override
    public String scheduleFixTimeJob(Class<? extends Job> jobBeanClass, Date startTime, String data) {

        //日期转CRON表达式
        String startCron = String.format("%d %d %d %d %d ? %d",
                DateUtil.second(startTime),
                DateUtil.minute(startTime),
                DateUtil.hour(startTime, true),
                DateUtil.dayOfMonth(startTime),
                DateUtil.month(startTime) + 1,
                DateUtil.year(startTime));
        return scheduleJob(jobBeanClass, startCron, data);
    }

    @Override
    public Boolean cancelScheduleJob(String jobName) {

        boolean success = false;
        try {

            // 暂停触发器
            scheduler.pauseTrigger(new TriggerKey(jobName, defaultGroup));
            // 移除触发器中的任务
            scheduler.unscheduleJob(new TriggerKey(jobName, defaultGroup));
            // 删除任务
            scheduler.deleteJob(new JobKey(jobName, defaultGroup));
            success = true;
        } catch (SchedulerException e) {

            log.error("任务取消失败{}", e.getMessage());
        }
        return success;
    }
}
第五步,定义好要执行的任务,继承 QuartzJobBean 类,实现
executeInternal 方法,这里只定义一个定时发布文章的任务。
@Slf4j
@Component
public class PublishPostJob extends QuartzJobBean {

    @Autowired
    private IScheduleService scheduleService;
    @Autowired
    private IPostsService postsService;

    @Override
    protected void executeInternal(JobExecutionContext jobExecutionContext) throws JobExecutionException {

        Trigger trigger = jobExecutionContext.getTrigger();
        JobDetail jobDetail = jobExecutionContext.getJobDetail();
        JobDataMap jobDataMap = jobDetail.getJobDataMap();
        Long data = jobDataMap.getLong("data");
        log.debug("定时发布文章操作:{}",data);

        // 获取文章的 ID后获取文章,更新文章为发布的状态,还有发布的时间
        boolean success = postsService.updatePostByScheduler(data);

        //完成后删除触发器和任务
        if (success) {

            log.debug("定时任务执行成功,开始清除定时任务");
            scheduleService.cancelScheduleJob(trigger.getKey().getName());
        }
    }
}
第六步,发布文章的接口里 PostsServiceImpl 添加定时发布的任务调度方法。
@Service
public class PostsServiceImpl extends ServiceImpl<PostsMapper, Posts> implements IPostsService {


    private void handleScheduledAfter(Posts posts) {

        // 文章已经保存为草稿了,并且拿到了文章 ID
        // 调用定时任务
        String jobName = scheduleService.scheduleFixTimeJob(PublishPostJob.class, posts.getPostDate(), posts.getPostsId().toString());
        LOGGER.debug("定时任务{}开始执行", jobName);
    }

}
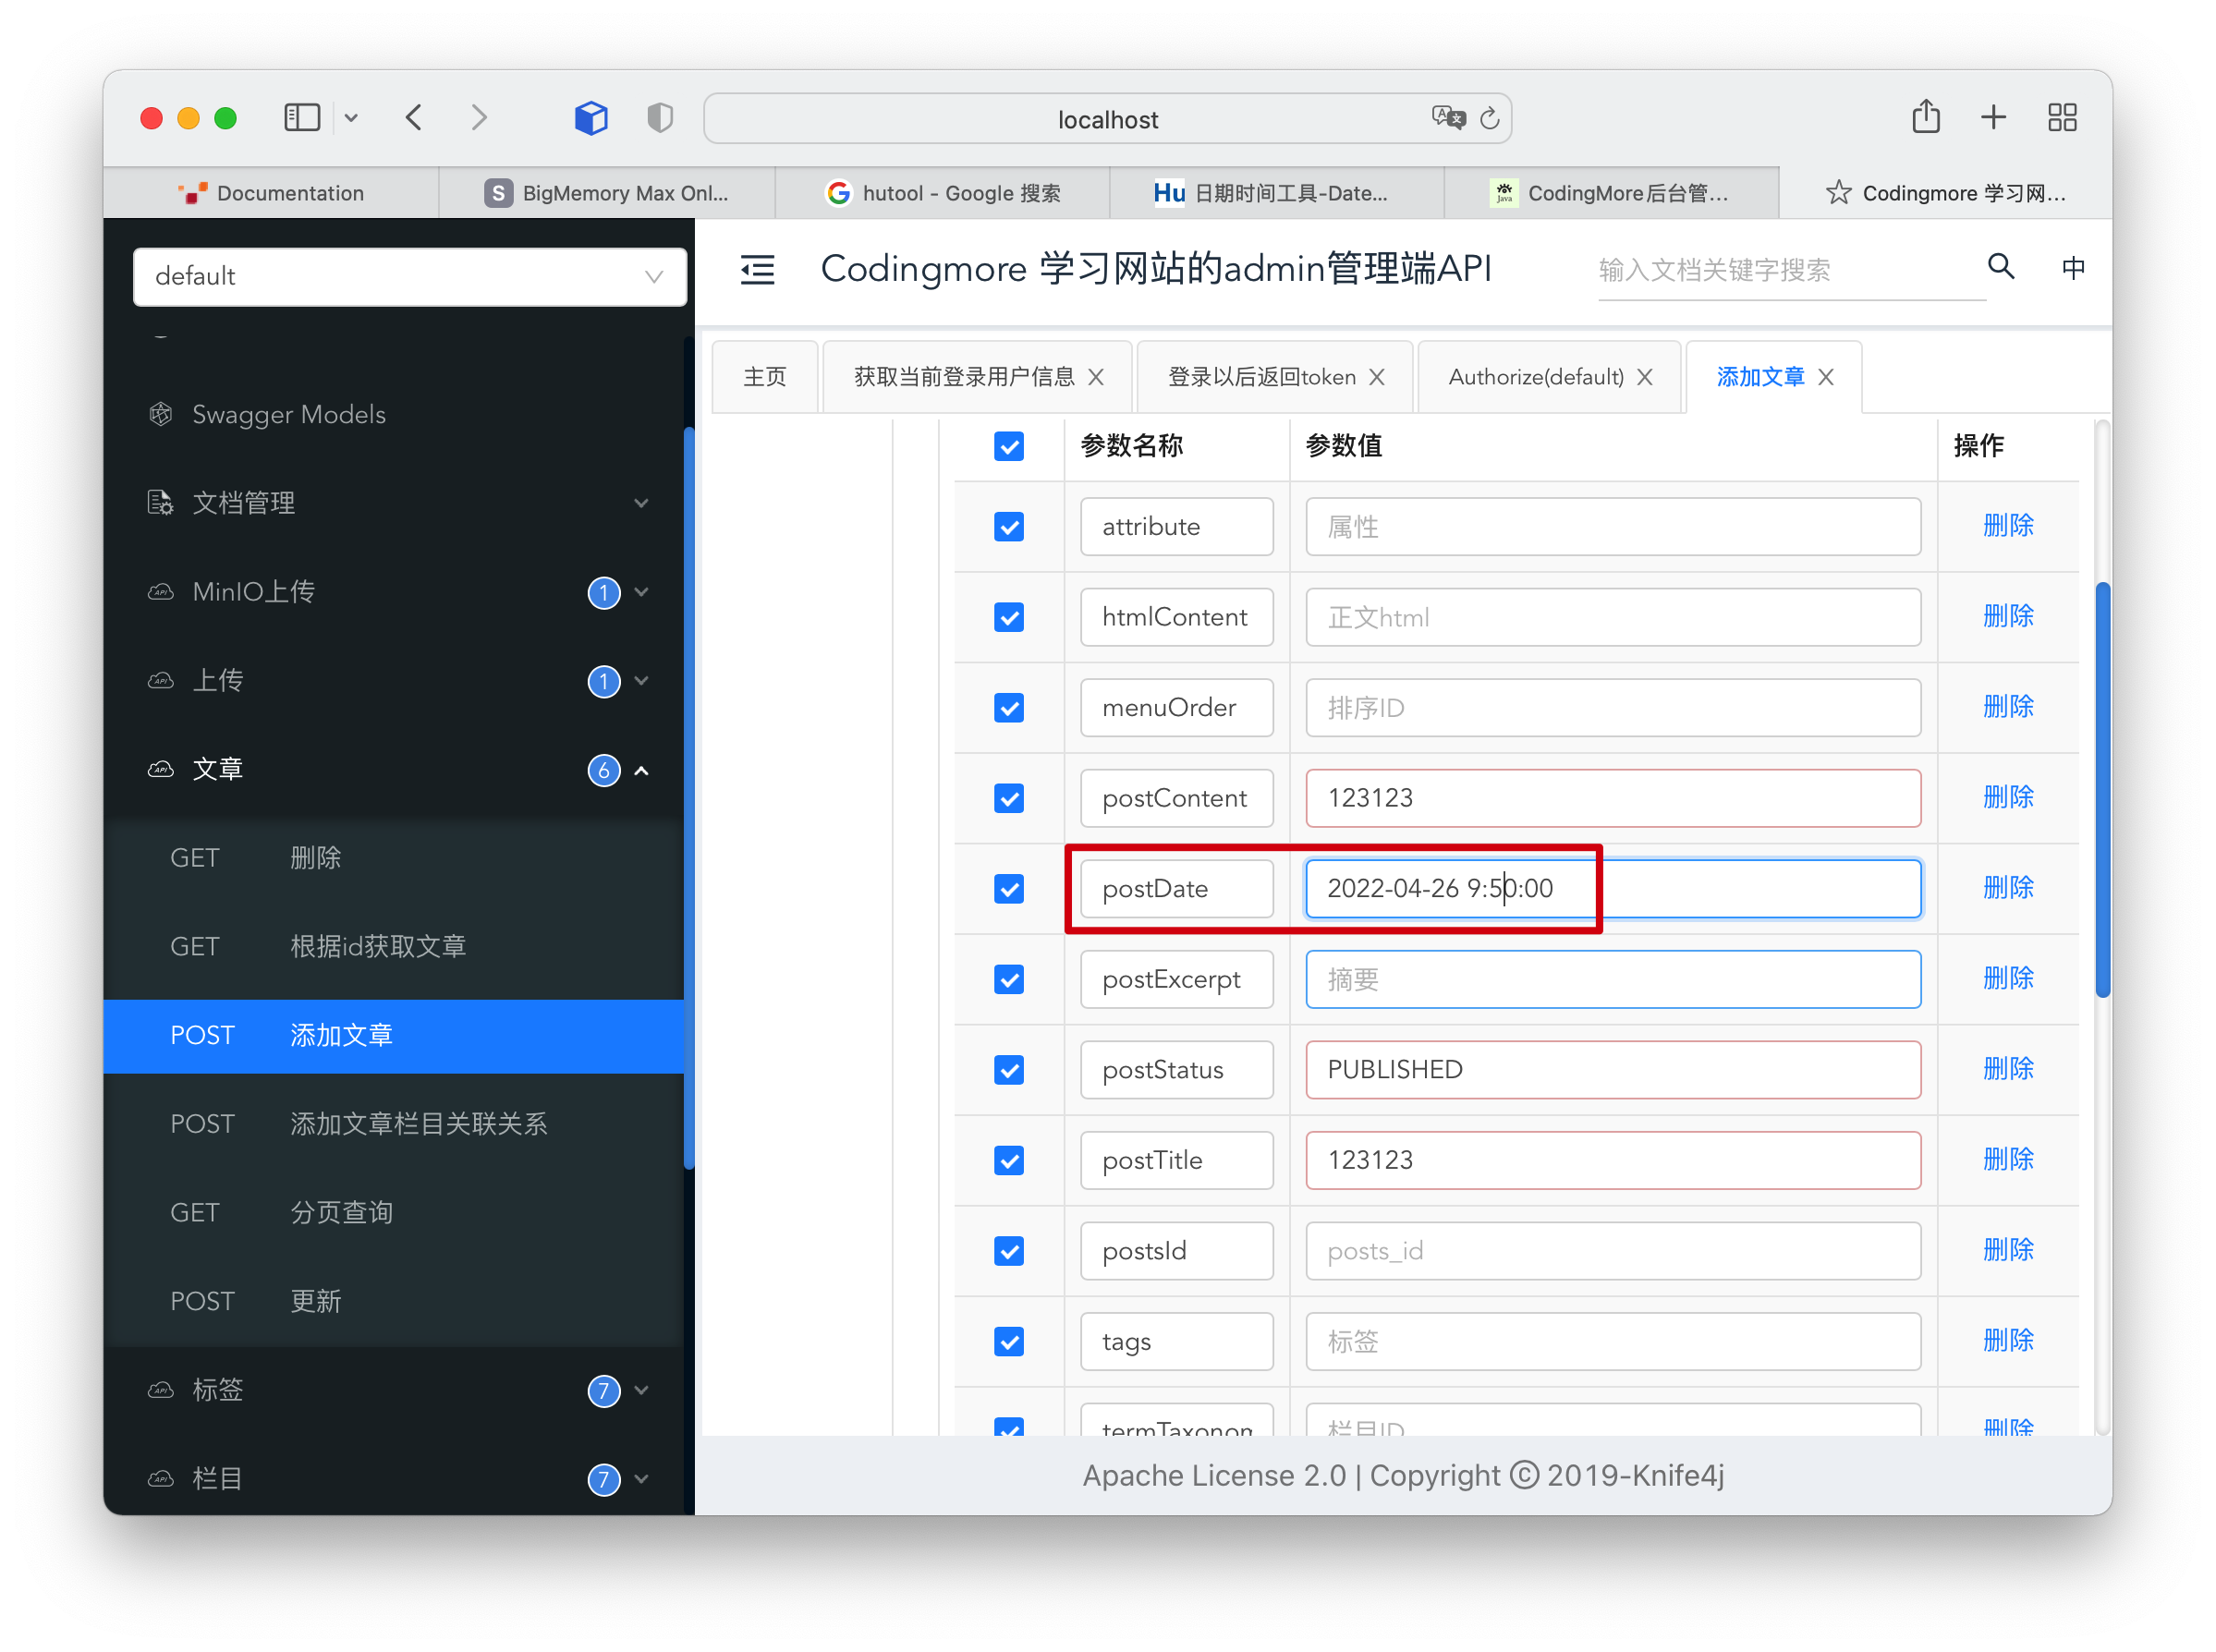
好,我们现在启动服务,通过Swagger 来测试一下,注意设置文章的定时发布时间。
查看 Quartz 的数据表 qrtz_cron_triggers,发现任务已经添加进来了。

qrtz_job_details 表里也可以查看具体的任务详情。

文章定时发布的时间到了之后,在日志里也可以看到 Quartz 的执行日志。

再次查看 Quartz 数据表 qrtz_cron_triggers 和 qrtz_job_details 的时候,也会发现定时任务已经清除了。
整体上来说,Spring Boot 整合 Quartz还是非常丝滑的,配置少,步骤清晰,比 Spring Task 更强大,既能针对内存也能持久化,所以大家在遇到定时任务的时候完全可以尝试一把。
完整的功能在编程喵实战项目中已经实现了,可以把编程喵导入到本地尝试一下。
业务梳理
简单来梳理一下编程喵定时发布文章的业务。
1)用户在发布文章的时候可以选择定时发布,如果选择定时发布,那么就要设置定时发布的时间,暂时规定至少十分钟以后可以定时。
2)当管理端用户选择了定时发布,那么在保存文章的时候,文章状态要先设置为草稿状态,对前端用户是不可见的状态。
3)保存文章的时候通知 Quartz,我有一个任务,你需要在某个规定的时间去执行。
scheduleService.scheduleFixTimeJob(PublishPostJob.class, posts.getPostDate(), posts.getPostsId().toString());
4)Quartz 收到这个通知后,就会在数据库中写入任务,具体的任务是到指定时间把文章从草稿的状态转为发布状态,这时候,前端用户就可以看得见文章了。
// 获取文章的 ID后获取文章,更新文章为发布的状态,还有发布的时间
boolean success = postsService.updatePostByScheduler(data);
同时,将任务清除。
// 暂停触发器
scheduler.pauseTrigger(new TriggerKey(jobName, defaultGroup));
// 移除触发器中的任务
scheduler.unscheduleJob(new TriggerKey(jobName, defaultGroup));
// 删除任务
scheduler.deleteJob(new JobKey(jobName, defaultGroup));
整个过程就完成了。Quartz 是如何实现定时发布文章的呢?其实也是通过 Cron 表达式。
CronTrigger cronTrigger = TriggerBuilder.newTrigger()
                .withIdentity(jobName, defaultGroup)
                .withSchedule(CronScheduleBuilder.cronSchedule(cron))
                .build();
也就是当我们传入一个指定时间后,通过计算,计算出 Cron 表达式。
String startCron = String.format("%d %d %d %d %d ? %d",
                DateUtil.second(startTime),
                DateUtil.minute(startTime),
                DateUtil.hour(startTime, true),
                DateUtil.dayOfMonth(startTime),
                DateUtil.month(startTime) + 1,
                DateUtil.year(startTime));
在 Quartz 中,有两类线程:Scheduler调度线程和任务执行线程。
- 任务执行线程:Quartz不会在主线程(QuartzSchedulerThread)中处理用户的Job。Quartz把线程管理的职责委托给ThreadPool,一般的设置使用SimpleThreadPool。SimpleThreadPool创建了一定数量的WorkerThread实例来使得Job能够在线程中进行处理。WorkerThread是定义在SimpleThreadPool类中的内部类,它实质上就是一个线程。
- QuartzSchedulerThread调度主线程:QuartzScheduler被创建时创建一个QuartzSchedulerThread实例。
源码路径
- 编程喵:https://github.com/itwanger/coding-more
- codingmore-springtask:https://github.com/itwanger/codingmore-learning
- codingmore-quartz:https://github.com/itwanger/codingmore-learning
本文已收录到 GitHub 上星标 2.4k+ 的开源专栏《Java 程序员进阶之路》,据说每一个优秀的 Java 程序员都喜欢她,风趣幽默、通俗易懂。内容包括 Java 基础、Java 并发编程、Java 虚拟机、Java 企业级开发、Java 面试等核心知识点。学 Java,就认准 Java 程序员进阶之路。
https://github.com/itwanger/toBeBetterJavaer
star 了这个仓库就等于你拥有了成为了一名优秀 Java 工程师的潜力。该开源仓库最近又上 GitHub trending 榜单了,看来是大家都非常认可呀!

没有什么使我停留——除了目的,纵然岸旁有玫瑰、有绿荫、有宁静的港湾,我是不系之舟。

边栏推荐
猜你喜欢

Checkbox beautify button selected style

基于SSM框架的学生老师考试管理系统

J. Balanced Tree

OpenGL Chapter 7 basic lighting

多线程四部曲之NSThread

If the source code of the home page module is not separated ----- > nanny level source code analysis (1)

Azure Kubernates Service 更新|提升开发体验和效率

基于SSM框架的连锁超市购物零售后台管理系统
OpenGL第七章 基础光照
![[elt.zip] openharmony paper Club - fast random access string compression](/img/e6/e47046d6e56ca0c2608fc50060eb23.png)
[elt.zip] openharmony paper Club - fast random access string compression
随机推荐
Lua removing elements from a loop in a list
【CNN】|How much position information do convolutional neural networks encode?
SQL | some indicators of the game industry
Using minted to insert highlighted code in texstudio in latex environment
postgresql 语句
If not, use the code generator to generate a set of addition, deletion, modification and query (2)
js实现柯里化
基于SSM框架的连锁超市购物零售后台管理系统
OpenGL错误指南
[数据集]|无人机视角
[elt.zip] openharmony paper Club - fast random access string compression
pmm监控oracle
被“内卷”酸翻的OPPO Reno6
OpenSSL enc encryption and decryption
Solution to the problem of gd32f4 serial port DMA reception
Canvas interactive star animation background JS special effect
LaTex环境下在TexStudio中使用minted插入高亮代码
Student online education and teaching course management system based on SSM framework
Oppo K9 tests "bundling sales" and consumers "earn" or "lose"?
右键 powershell here 功能添加