当前位置:网站首页>Matlab代码生成之SIL/PIL测试
Matlab代码生成之SIL/PIL测试
2022-07-02 06:35:00 【Quikk】
Matlab代码生成之SIL/PIL测试
一、SIL与PIL测试流程
1.SIL(Software in the Loop),使用SIL可以在PC端进行测试生成的代码。 PIL(Processor in the Loop),使用PIL可以在实际目标硬件或指令集模拟器 上运行源代码进行测试。
测试标准:将PIL(SIL)结果与正常模型测试结果进行对比,可以得到生代码的执行效果。
2.需要配置与PC端的直接连接参数
二、Top Model的SIL/PIL仿真
特点:
1.可以直接使用独立的代码接口进行测试
2.可以配置模型从Workspace中加载测试向量和激励输入
3.便捷地在Top model、Normal、SIL、PIL之间进行切换
官方链接:官方链接1
在matlab command window中输入以下命令:
model='rtwdemo_sil_topmodel';
close_system(model,0)    //关闭不保存
open_system(model)		//打开model
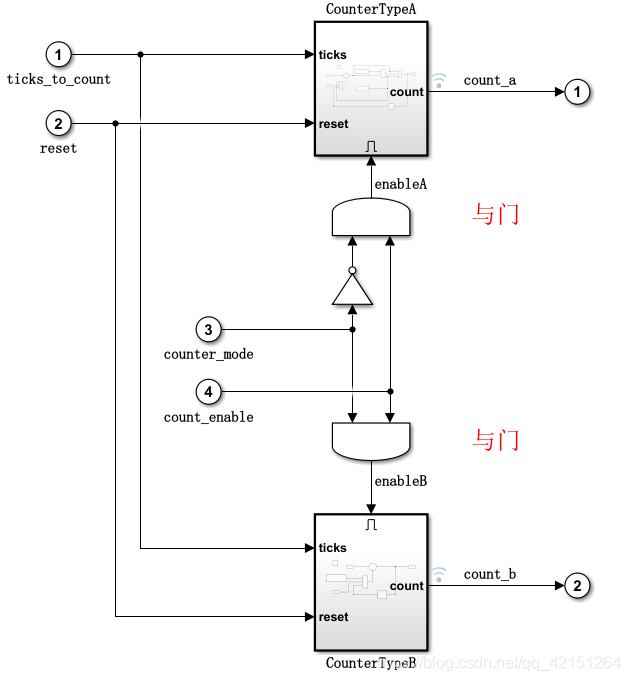
之后在Simulink中打开如下模型:
在matlab command window中输入以下命令:
set_param(gcs, 'RecordCoverage','off');                            /*关闭模型覆盖率记录*/
coverageSettings = get_param(model, 'CodeCoverageSettings');
coverageSettings.CoverageTool='None';							   /*关闭代码覆盖率记录*/
set_param(model, 'CodeCoverageSettings',coverageSettings);
set_param(model, 'CodeExecutionProfiling','off');				  /*关闭执行时间分析*/
[ticks_to_count, reset, counter_mode, count_enable] = ...
    rtwdemo_sil_topmodel_data(T);                                   /*设置输入参数*/

set_param(model, 'LoadExternalInput','on');
set_param(model, 'ExternalInput','ticks_to_count, reset, counter_mode, count_enable');
set_param(model, 'SignalLogging', 'on');
set_param(model, 'SignalLoggingName', 'logsOut');				   /*设置相关参数*/

set_param(model,'SimulationMode','normal')
[~, ~, yout_normal] = sim(model,10);                               /*运行normal 模型(结果存储在yout_normal)*/

set_param(model,'SimulationMode','Software-in-the-Loop (SIL)')
[~, ~, yout_sil] = sim(model,10);                                  /*运行SIL模型(结果存储在yout_sil)*/


fig1 = figure;
subplot(3,1,1), plot(yout_normal), title('Counter Output for Normal Simulation')
subplot(3,1,2), plot(yout_sil), title('Counter Output for SIL Simulation')
subplot(3,1,3), plot(yout_normal-yout_sil), ...
    title('Difference Between Normal and SIL');                       /*绘制图像,观看两者差异*/
模型中有关的设置:

整个模型的执行就是,从外部输入控制参量然后进行执行,然后对比SIL与normal模型下的运行结果进行分析。
三、基于模型的SIL(PIL)测试
model='rtwdemo_sil_modelblock';
open_system(model); /*打开模型*/
coverageSettings = get_param(model, 'CodeCoverageSettings');
coverageSettings.CoverageTool='None';
set_param(model, 'CodeCoverageSettings',coverageSettings);
open_system('rtwdemo_sil_modelblock')
set_param('rtwdemo_sil_modelblock', 'CodeExecutionProfiling','off');
open_system('rtwdemo_sil_counter')
set_param('rtwdemo_sil_counter', 'CodeExecutionProfiling','off');
currentFolder=pwd;
save_system('rtwdemo_sil_counter', fullfile(currentFolder,'rtwdemo_sil_counter.slx'))
/*关闭代码覆盖率、执行时间分析*/
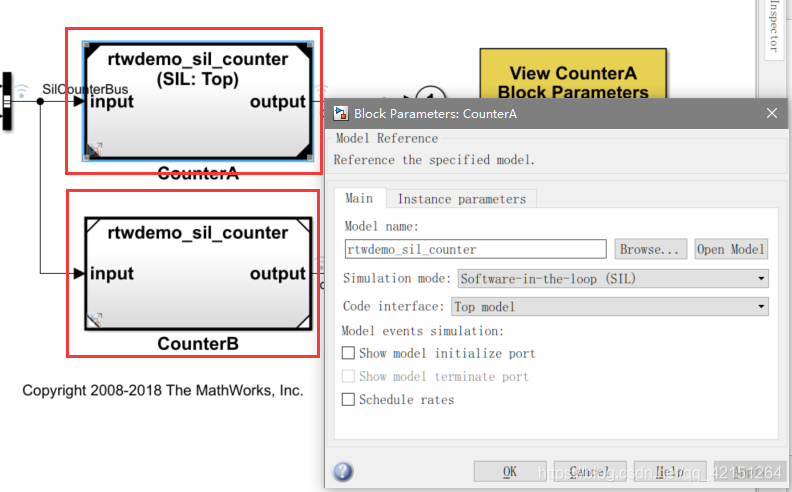
set_param([model '/CounterA'], 'CodeInterface', 'Top model'); /*设置模型的运行方式*/
out = sim(model,20); /*开始运行*/
yout = find(out,'logsOut');
yout_sil = yout.get('counterA').Values.Data;
yout_normal = yout.get('counterB').Values.Data;
fig1 = figure;
subplot(3,1,1), plot(yout_normal), title('Counter Output for Normal Simulation')
subplot(3,1,2), ...
    plot(yout_sil), title('Counter Output for Model Block SIL (Top-Model) Simulation')
subplot(3,1,3), plot(yout_normal-yout_sil), ...
    title('Difference Between Normal and SIL');                   /*绘制图表进行分析*/
这种模式下是normal和SIL(PIL)各自封装成一个测试模块同时执行(如图中的CounterA与CounterB),对比执行后的结果。
四、基于SIL(PIL)控制模块测试
model='rtwdemo_sil_block';
close_system(model,0)
open_system(model)                  /*打开模型*/

out = sim(model,10);
yout_normal = find(out,'yout');
clear out                          /*启动模型*/  这里是normal模型的仿真

set_param(model,'CreateSILPILBlock','SIL');
close_system('untitled',0);
rtwbuild([model '/Controller'])

controllerBlock = [model '/Controller'];
blockPosition = get_param(controllerBlock,'Position');
delete_block(controllerBlock);
add_block('untitled/Controller',[controllerBlock '(SIL)'],...
          'Position', blockPosition);
close_system('untitled',0);
clear controllerBlock blockPosition
之后出现一个新的model构建框:
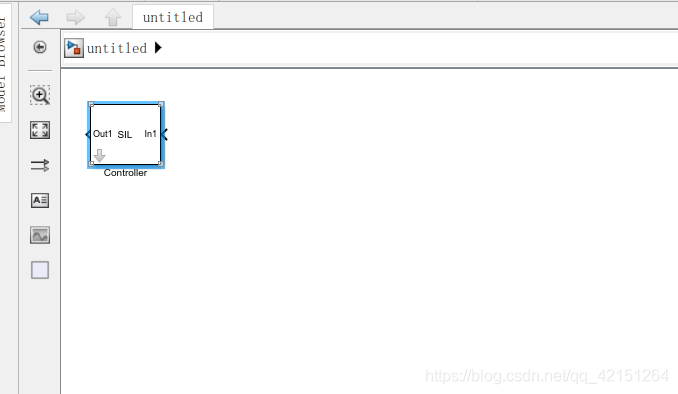
controllerBlock = [model '/Controller'];
blockPosition = get_param(controllerBlock,'Position');
delete_block(controllerBlock); //删除原来模型中的模块
add_block('untitled/Controller',[controllerBlock '(SIL)'],... //将生成的Model替代原来模型中的模块
'Position', blockPosition);
close_system('untitled',0);
clear controllerBlock blockPosition
out = sim(model,10); //启动仿真
machine_precision = eps(single(yout_normal));
tolerance = 4 * machine_precision; //设置仿真容许误差
yout_sil = find(out,'yout');
tout = find(out,'tout');
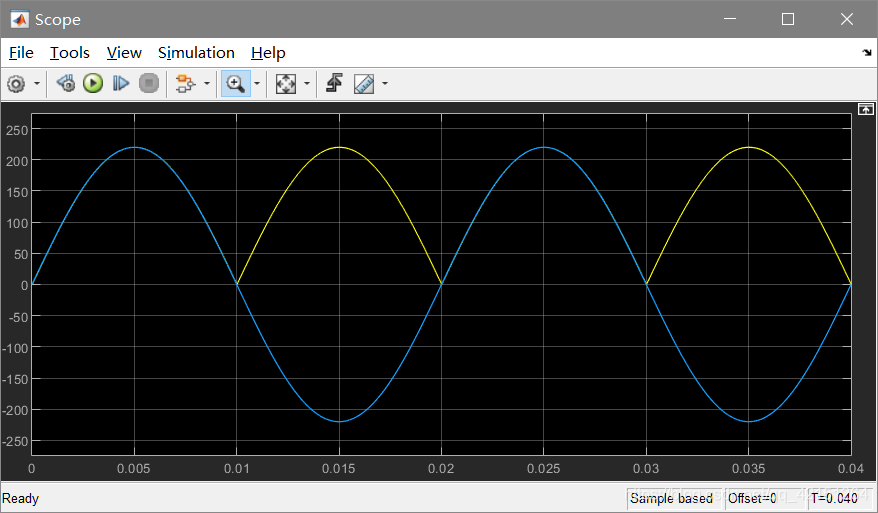
fig1 = figure;
subplot(3,1,1), plot(yout_normal), title('Controller Output for Normal Simulation')
subplot(3,1,2), plot(yout_sil), title('Controller Output for SIL Simulation')
subplot(3,1,3), plot(tout,abs(yout_normal-yout_sil),'g-', tout,tolerance,'r-'), ...
title('Normal and SIL Difference and Error Tolerance'); //绘制图像
close_system(model,0);
if ishandle(fig1), close(fig1), end
clear fig1
simResults={'out','yout_sil','yout_normal','tout','machine_precision'};
save([model '_results'],simResults{:});
clear(simResults{:},'simResults') //关闭图像
五、总结
PIL测试方面,可以验证测试生成代码。C2000的测试与以上相仿,具体说明链接如下:官方链接
边栏推荐
- Beats (filebeat, metricbeat), kibana, logstack tutorial of elastic stack
- Elastic Stack之Beats(Filebeat、Metricbeat)、Kibana、Logstash教程
- 定时线程池实现请求合并
- MySQL error: unblock with mysqladmin flush hosts
- Binary and decimal system of C language
- Pool de connexion redis personnalisé
- ClassFile - Attributes - Code
- Inverter Simulink model -- processor in the loop test (PIL)
- Image recognition - Data Acquisition
- Chrome video download Plug-in – video downloader for Chrome
猜你喜欢

逆变器simulink模型——处理器在环测试(PIL)
2837xd code generation - stateflow (2)

Insight into cloud native | microservices and microservice architecture
Bold prediction: it will become the core player of 5g

保存视频 opencv::VideoWriter

idea查看字节码配置

PI control of three-phase grid connected inverter - off grid mode

上班第一天的报错(AWVS卸载不彻底)

Bugkuctf-web21 (detailed problem solving ideas and steps)

Record the interesting process of using Xray for the first time
随机推荐
Methods of classfile
Read 30 minutes before going to bed every day_ day4_ Files
保存视频 opencv::VideoWriter
Who is better for Beijing software development? How to find someone to develop system software
Required request body is missing: (cross domain problem)
vs+qt 设置应用程序图标
web安全与防御
What are the waiting methods of selenium
YOLO物体识别,生成数据用到的工具
C语言之数据插入
Demand delineation executive summary
分享一篇博客(水一篇博客)
Error reporting on the first day of work (incomplete awvs unloading)
Tinyxml2 reading and modifying files
个人经历&&博客现状
MySql报错:unblock with mysqladmin flush-hosts
2837xd Code Generation - stateflow (4)
MySQL default transaction isolation level and row lock
MySQL error: unblock with mysqladmin flush hosts
Image recognition - data annotation