当前位置:网站首页>Microservice architecture practice: using Jenkins to realize automatic construction
Microservice architecture practice: using Jenkins to realize automatic construction
2022-07-02 17:22:00 【Jue seconds of writing code】
Use Jenkins Automate build
The microservice architecture design of a large platform usually produces many projects , Therefore, there will be many services and applications that need to be deployed , And it needs to be iterated and updated constantly , This is a huge project , So we need to use automated tools , Realize the of each microservice project CICD Workflow .
CICD It's continuous integration (Continuous Integration) And continuous deployment (Continuous Deployment) The general term of , It refers to the construction through automation 、 Testing and deployment , Realize the rapid delivery process of software products that can be recycled .
Jenkins It's based on Java Developed powerful automated construction tools , And there is a very rich plug-in repository , It can well expand and enrich its own functions . therefore ,Jenkins It is a very good tool to realize automatic construction .
single click Jenkins On the front page Plugins Options , You can view the introduction of various plug-ins , Pictured 15-1 Shown .

In this chapter we use Jenkins, combination Maven、Docker、Selenium and JMeter Tools such as , Build an automated facility for sustainable delivery .
Continuous delivery workflow
Start with code submission , Establish a continuous delivery workflow including automatic testing and automatic deployment, as shown in the figure 15-2 Shown .

The steps of this workflow are as follows :
(1) Developers to GitLab Submission code .
(2)GitLab Use WebHook notice Jenkins There are code updates .
(3)Jenkins From the node (Slave) Pull the code , Package and build images .
(4)Jenkins Run the test case using the image built from the node .
(5) If you test (Test) adopt , Push the image to the image warehouse .
(6)Jenkins Update and deploy on the application server .
(7)Jenkins Email the build report to the developer .
After the developer submits the code to the code base , The whole process is automatic . If something goes wrong in the middle , Then the execution of the process is aborted , And inform relevant personnel of the results . The submitted code includes not only the application , It also includes scripts for building images 、 Test case scripts and deployment orchestration scripts, etc .
among , The operation of each step can be completed by using plug-ins or various tools directly on the command line .
for example , Pulling the project code will use Git plug-in unit ; Packaging projects will use Maven; Image building and application deployment can be used directly from the command line Docker or docker-compose; Integration tests can be performed from the command line Selenium、JMeter Wait for the generated script .
below , Let's take a simple case , Presentation and description Jenkins How to use .
Jenkins Installation
The following installation procedure is to MacOS Take an example to illustrate .
because Jenkins need JVM Support for , So please make sure that... Is installed on the machine JDK 1.8 Or above . In order to complete the following automation demonstration , Please make sure that... Is installed in the machine Maven、Git Client and Docker etc. .
open Jenkins Official website , Go to download page , Select the one on the left LTS In the stable version Mac OSX Version to download , Pictured 15-3 Shown .

When the download is complete , Click Install Package “jenkins-2.89.1.pkg” Start installation .
The installation process is relatively simple , Directly click “ continue ” Button , Follow the prompts to use the plug-in recommended by the system . After installation , Open the local... Through the following URL Jenkins Console :
http://localhost:8080After opening it for the first time, you will see the following figure 15-4 The page shown .

According to the figure 15-4 Prompt to open the administrator password file , Copy and paste the password into the password input box , Click... In the lower right corner Continue Button . If the password is verified successfully , The reader will be prompted to create an operator user . After creating the user , To log in Jenkins Console . The welcome interface for new users to log in is shown in the figure 15-5 Shown .

Jenkins Basic configuration
Because of the use of Maven Compile and package , So click... On the welcome screen “ System management ”→“ Global tool configuration ” Options , Pictured 15-6 Shown , open “ Global tool configuration ” Dialog box .

stay “ Global tool configuration ” Dialog box, click “Maven install ” Options , Configure a name , And set up Maven Installation path for , Pictured 15-7 Shown .

Click on the graph 15-6 Medium “ Management plug-in ” Options , Click... From the pop-up dialog box “ Optional plug-ins ” Options , find “Maven Invoker plugin” plug-in unit , Click... After checking “ Direct installation ” Button , Pictured 15-8 Shown .

Be careful , Set up settings.xml The configuration of the repositys When the path , If you are testing locally , It's best to work with IDEA The configuration of is the same , In this way, you will not have to download the dependent package again .
stay Jenkins In the command line configuration of , In order to be able to use Docker and docker-compose, We need to be right about Jenkins Set the system permissions of . because Jenkins Use default user “jenkins” Opening service , Therefore, permission setting is to authorize this user .
Through the following steps , by “jenkins” The user sets a password free configuration , such , stay Jenkins In the command line configuration of , You can use the super administrator's command “sudo” 了 .
stay MacOS In the terminal of , Execute the following command , Switch to super administrator root
Input root Password :
appledeMacBook-Air:/ apples su
Password:
edit “sudoers”, And find the following information :
sh-3.2# vi/etc/sudoers# root and users in group wheel can run anything on any machine as any userrootALL = (ALL) ALL
%admin
ALL- (ALL) ALLAfter the above information , reference root Permission settings for , Add the configuration shown below and save :
jenkins ALL=(ALL) NOPASSWD: ALL
%admin ALL=(ALL) NOPASSWD: ALL
Use “dscl” The command “jenkins” User add admin In user group , This order is equivalent to Linux In the operating system “usermod” command :
sh-3.2# dscl . -append /Groups/admin GroupMembership jenkinsthus , It's done. Jenkins Permission settings for .
Jenkins Automatic deployment instance of
To demonstrate Jenkins Use , Now create an automatic deployment instance .
In this example, a very simple project is used , There is only one main program in the project , The code is as follows
@[email protected]
public class DemoApplication {
public static void main (String[] args){
SpringApplication.run(DemoApplication.class,args) ;
}
@RequestMapping (value = "/")public String index(){
return "Hello world! ";
}
}
After the application starts , Opening the home page will output “Hello World!”.
The following describes the implementation process of this automatic deployment project .
Create tasks
stay Jenkins Click... On the home page “ newly build ” Options , Open the create task page , Pictured 15-9 Shown .

Enter task name “demo”, And select “ Build a free style software project ” Options , single click “ determine ” Button , You can create an empty task , Pictured 15-10 Shown .

Configure tasks
In the figure 15-10 in , single click “ Source code management ” Options , Display as shown in figure 15-11 Dialog shown . In the figure 15-11 The admission “Git Options , Enter... In the address field of the code base “demo” The storage address of the project .

Because this is an open project , So you don't have to set the permission to access the project . If it's a private project , It must be in figure 15-11 Of “Credentials” Configure the user name and password with access to the item in .
Click on the graph 15-11 Medium “ Build trigger ” Options , stay “ Build trigger ” Check... In the dialog box “Poll SCM” Options , Configure a schedule for scheduled tasks , Pictured 15-12 Shown .

chart 15-12 Schedule in “00 20***”, At the end of every day 20:00 Execute task construction on the dot . In this example, timed tasks are not used .
Next , Use Maven Configure the packaging of the project . single click “ structure ” Options , stay “ Add build steps ” Select... From the drop-down list “Invoke top-level Maven targets” Options , Pictured 15-13 Shown .

among , stay “Maven Version” Select the previously installed Maven, stay “Goals” Enter the following packing command :
clean packageConfigure the operation commands for creating images and deploying , I'll use Dockerfile and docker-compose.yml, These two files have been included in the project docker Directory .
Dockerfile  The contents of are as follows :
FROM java:8
VOLUME/tmp
ADDdemo-0.0.1-SNAPSHOT.jar app.jar
RUN bash  One c'touch /app.jar'EXPOSE8080
ENTRYPOINT
, "/app.jar"]
["java", "-Djava.security.egd=file:/dev/./urandom", "-jar
docker-compose.yml The deployment script in is as follows :
demo:
build:ports:
"8888:8080"
single click “ structure ” Options , stay “ Add build steps ” Select... From the drop-down list “Execute shell” Options , stay “Command" Enter the following command in :
cd /Users/Shared/Jenkins/Home/workspace/demo /docker
cp -f ../target/demo-0.0.1-SNAPSHOT .jar
sudo /usr/local/bin/docker-compose down --rmi all
sudo /usr/local/bin/docker-compose up -d
These commands are used directly on the host Docker And other tools to deploy applications , That is, stop the running container first , Then delete the container and image , Finally, redeploy , Pictured 15-14 Shown .

Perform tasks
When performing tasks manually , First click the name of the task , Return to the task home page . Then click... In the left menu on the first page of the task “ Build immediately ” Options can be , Pictured 15-15 Shown .

During the execution of the task , It will output information in the console , The output log of a complete execution process is as follows
Started by user mr.csj
Building in workspace /Users/Shared/Jenkins/Home/workspace/demo>git rev-parse --is-inside-work-tree # timeout=10
Fetching changes from the remote Git repository
>git config remote.origin.url https://gitee.com/chenshaojian/demo.git #timeout=10
Fetching upstream changes from https://gitee.com/chenshaojian/demo.git>git --version # timeout=10
>git fetch --tags --progress https://gitee.com/chenshaojian/demo.git+refs/heads/* :refs/remotes/origin/*
>git rev-parse refs/remotes/origin/master^ { commit] # timeout=10
>git rev-parse refs/remotes/origin/origin/master"{ commit}# timeout=10Checking out Revision 1b0348a999cee3a1920b1b20576b54e58a50ab2
(refs/remotes/origin/master)
>git config core.sparsecheckout # timeout=10
>git checkout-f 1b0348a999cee3a1920b1b2c576b54e58a50ab2Commit message: "add docker-compose"
>git rev-list 8791f0a371ab67a83d1005197744475de5f177df # timeout=10[demo]$/Users/apple/apache-maven-3.5.0/bin/mvn clean package
[INFO]Scanning for projects. . .
[INFO]
[INFO]-------------
[INFO] Building demo 0.0.1-SNAPSHOT[INFO]
[INFO]
[INFO]--- maven-clean-plugin:2.6.1:clean (default-clean)& demo ---[INFO] Deleting /Users/Shared/Jenkins/Home/workspace/demo/target
[INFO]
[INFO] ---maven-resources-plugin:2.6:resources (default-resources)& demo -[INFO] Using 'UTF-8' encoding to copy filtered resources.
[INFO]Copying 1 resource
[INEO]Copying 0 resource[INFO]
[INFO] --- maven-compiler-plugin:3.1:compile (default-compile)  demo ---[ INFO] Changes detected - recompiling the module!
[INFO] Compiling 1 source file to
/Users/Shared/Jenkins/Home/workspace/demo/target/classes[INEO]
[INFO] --- maven-resources-plugin:2.6:testResources (default-testResources) edemo ---
[INFO] Using 'UTF-8'encoding to copy filtered resources.[INFO] skip non existing resourceDirectory
/Users/Shared/Jenkins/Home/workspace/demo/src/test/resources[INFO]
[INFO] --- maven-compiler-plugin:3.1:testCompile (default-testCompile)Cdemo
[INFO] Changes detected - recompiling the module!
[INFO] Compiling 1 source file to
/Users/Shared/Jenkins/Home/workspace/demo/target/test-classes[INEO]
[ INFO] ---maven-surefire-plugin:2.20:test (default-test) C demo ---[INFO] Tests are skipped.
[INFO]
[INFO] --- maven-jar-plugin:2.6:jar (default-jar) demo --[INFO] Building jar:
/Users/Shared/Jenkins/Home/workspace/demo/target/demo-0.0.1-SNAPSHOT.jar[INFO]
[INFO] --- spring-boot-maven-plugin:1.5.8.RELEA.SE:repackage (default)  demo
[INFO]
[INEO] BUILD SUCCESS[INFO]
[INFO]Total time: 5.095 s
[INFO] Finished at: 2017-10-30T16:18:18+08:00[INFO] Final Memory:29M/182M
[INFO]
[demo]$ /bin/sh -xe/Users/Shared/Jenkins/tmp/jenkins4696633078670494346.sh
+cd /Users/Shared/ Jenkins/Home/workspace/demo/docker+ cp -f ../target/demo-0.0.1-SNAPSHOT.jar .
+ sudo /usr/local/bin/docker-compose down --rmi allRemoving image docker_demo
Failed to remove image for service demo:404 Client Error: Not Found ("No suchimage: docker_demo: latest")
+ sudo /usr/local/bin/docker-compose up -dBuilding demo
Step 1/6 : FROM java: 8
--->d23bdf 5b1b1b
Step 2/6:VOLUME /tmp---> Using cache
--->64c36a425bbf
Step 3/6: ADD demo-0.0.1-SNAPSHOT.jar app.jar--->1788813d23d2
step 4/6:RUN bash-c 'touch /app.jar'---> Running in e4cfd4447b78
--->2c44a754963b
Removing intermediate container e4cfd4447b78Step 5/6 :EXPOSE 8080
---> Running in 95b96954618e---> 8bc53f642637
Removing intermediate container 95b96954618e
Step 6/6:ENTRYPOINT java-Djava.security.egd=file:/dev/./urandom-jar/app.: One -->Running in al92a418f4f1
--->3a27629ceba9
Removing intermediate container a192a4184f1Successfully built 3a27629ceba9
Successfully tagged docker demo: latest
Image for service demo was built because it did not already exist. To rebuithis image you must use `docker-compose build' or 'docker-compose up --buildCreating docker demo_1..
Creating docker_demo_1-[1A-[2K
Creating docker demo 1 ... One [ 32mdone-[Om--[1BFinished:sUCCESS
You can see from the output log of the console that the build has been successfully completed . At this time , We can open the homepage of the application through the following website :
http://localhost:8888We can see our expected results , The output “Hello World!”, Pictured 15-16 Shown .

In the output log of this section , There is an error prompt as shown below :
+ sudo /usr/local /bin/docker-compose down --rmi allRemoving image docker demo
Failed to remove image for service demo:404 Client Error:Not Found ("No suchimage: docker demo: latest")
The reason for this error prompt is that when building for the first time , There is no image that can be removed , But this does not affect the execution of the whole construction process .
Now verify the automatic deployment effect of project update . First, the output results of the project main program “Hello World ! ” Change it to “Hello Jerkins! ”, Then submit the code . When it's done , And then Jenkins Middle click “ Build immediately ” Options , After building , Refresh the browser that accesses the application , You can see the picture 15-17 Effect shown .

Check the output log of the console again , Now? , The command to remove the image no longer displays errors , Instead, the results shown below are output , Indicates a container that has stopped running , And remove the original container and image :
+ sudo /usr/local/bin/docker-compose down--rmi all
Stopping docker demo 1 ...
-[1A-[2K
Stopping docker demo 1 ... -[32mdone-[ Om-[1BRemoving docker demo 1 ...
 One -[1A[2K
Removing docker demo 1 ...-[32mdone-[ Om One [1BRemoving image docker demo
Here is just a simple demonstration of automatic deployment , In practical use , It can be done through scheduled tasks , Or in combination with WebHook Code submission notification for , Implement automatic deployment . in addition , You can also use Selenium、JMeter And other tools to generate test scripts , Add the function of automatic test .
Summary
This chapter describes how to use automated build tools Jenkins Design the workflow of continuous delivery , And a simple example demonstrates the implementation process of automatic deployment . In this example , We use Git Pull the code 、 Use Maven Package the program 、 Use Docker Create images and update and deploy applications . From this example, we can see Jenkins Powerful scalability .
Through the study of this chapter , I believe that readers can according to the actual situation , Establish a perfect automation infrastructure , So as to realize the automatic construction process of integrated testing and continuous deployment in microservice publishing .
The content of this article is the actual combat of microservice architecture : Use Jenkins Automate build
- The next article is about reading general source code mybatis Source details : The meaning of reading source code 、 Method ;
- Friends who think the article is good can forward this article and pay attention to Xiaobian ;
- Thank you for your support !
边栏推荐
- Does digicert SSL certificate support Chinese domain name application?
- Domestic relatively good OJ platform [easy to understand]
- linux安装postgresql + patroni 集群问题
- Schoolbag novel multithreaded crawler [easy to understand]
- Meanings of SNAT, DNAT and masquerade in iptables
- 剑指 Offer 25. 合并两个排序的链表
- Un an à dix ans
- Ap和F107数据来源及处理
- 【Leetcode】14. 最長公共前綴
- 默认浏览器设置不了怎么办?
猜你喜欢

【Leetcode】13. 罗马数字转整数
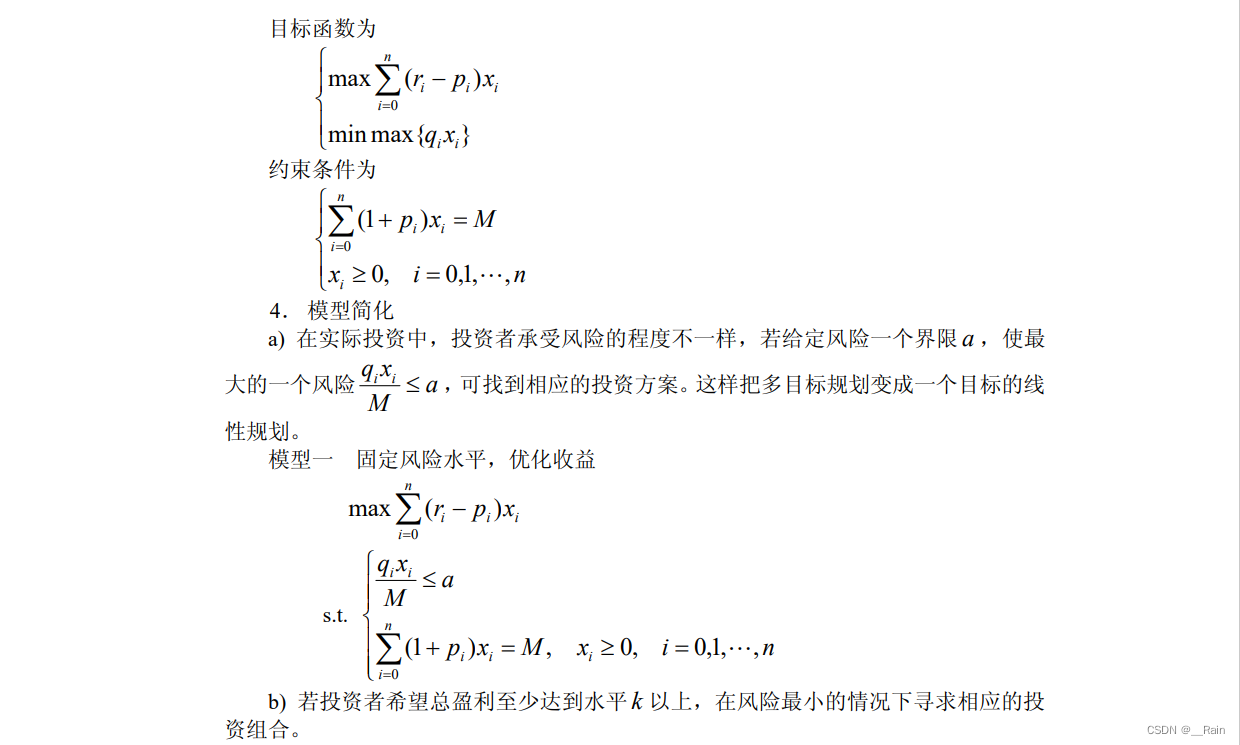
线性规划例题 投资的收益与风险

Soul, a social meta universe platform, rushed to Hong Kong stocks: Tencent is a shareholder with an annual revenue of 1.28 billion
社交元宇宙平台Soul冲刺港股:年营收12.8亿 腾讯是股东
![[shutter] dart data type (dynamic data type)](/img/6d/60277377852294c133b94205066e9e.jpg)
[shutter] dart data type (dynamic data type)

Configure MySQL under Linux to authorize a user to access remotely, which is not restricted by IP

The computer comes with software to make the background color of the picture transparent (matting white background)
Listing of chaozhuo Aviation Technology Co., Ltd.: raising 900million yuan, with a market value of more than 6billion yuan, becoming the first science and technology innovation board enterprise in Xia

寒门再出贵子:江西穷县考出了省状元,做对了什么?
超卓航科上市:募资9亿市值超60亿 成襄阳首家科创板企业
随机推荐
Sword finger offer 21 Adjust the array order so that odd numbers precede even numbers
Use the API port of the bridge of knowledge and action to provide resources for partners to access
【征文活动】亲爱的开发者,RT-Thread社区喊你投稿啦
剑指 Offer 26. 树的子结构
Green bamboo biological sprint Hong Kong stocks: loss of more than 500million during the year, tiger medicine and Beijing Yizhuang are shareholders
ssb门限_SSB调制「建议收藏」
871. 最低加油次数
traceroute命令讲解
linux安装postgresql + patroni 集群问题
Learning Weekly - total issue 60 - 25th week of 2022
Briefly introduce the use of base64encoder
寒门再出贵子:江西穷县考出了省状元,做对了什么?
IP地址转换地址段
Introduce the scrollintoview() method attribute in detail
一年頂十年
The impact of telecommuting on all aspects of our experience | community essay solicitation
What if the default browser cannot be set?
【Leetcode】14. 最長公共前綴
A few lines of code to complete RPC service registration and discovery
< IV & gt; H264 decode output YUV file