当前位置:网站首页>Day115. Shangyitong: Background user management: user lock and unlock, details, authentication list approval
Day115. Shangyitong: Background user management: user lock and unlock, details, authentication list approval
2022-08-02 01:41:00 【Firework Youth·】
目录
一、后台用户管理
We finished in front of the user login、用户认证与就诊人,Now we need to put these information in our platform management system for unified management.
1、用户列表
1. 后端接口
1. 分析接口
*参数:page、limit、UserInfoQueryVo
*返回值:Ipage (mysql Use of corn for bean,Ipage Interface only corn bean)

2. 添加分页插件
@Configuration
@EnableTransactionManagement
//@MapperScan("com.atguigu.yygh.user.mapper") Start the class has been added to the
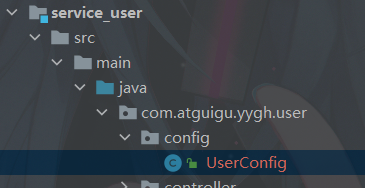
public class UserConfig {
//分页插件
@Bean
public PaginationInterceptor paginationInterceptor() {
return new PaginationInterceptor();
}
}3. userController 实现
@Api(tags = "用户管理接口")
@RestController
@RequestMapping("/admin/user")
public class UserController {
@Autowired
private UserInfoService userInfoService;
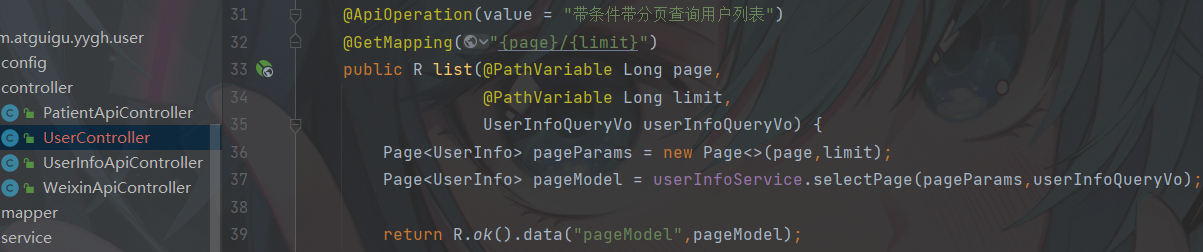
@ApiOperation(value = "With conditions with paging query user list")
@GetMapping("{page}/{limit}")
public R list(@PathVariable Long page,
@PathVariable Long limit,
UserInfoQueryVo userInfoQueryVo) {
Page<UserInfo> pageParams = new Page<>(page,limit);
Page<UserInfo> pageModel = userInfoService.selectPage(pageParams,userInfoQueryVo);
return R.ok().data("pageModel",pageModel);
}
}4. service 方法实现,Modified methods to translate
    //With conditions with paging query user list
    @Override
    public Page<UserInfo> selectPage(Page<UserInfo> pageParams, UserInfoQueryVo userInfoQueryVo) {
        //1.取出查询条件
        String name = userInfoQueryVo.getKeyword(); //用户名称
        Integer status = userInfoQueryVo.getStatus();//用户状态
        Integer authStatus = userInfoQueryVo.getAuthStatus(); //认证状态
        String createTimeBegin = userInfoQueryVo.getCreateTimeBegin(); //开始时间
        String createTimeEnd = userInfoQueryVo.getCreateTimeEnd(); //结束时间
        //2.Check air conditional encapsulation
        QueryWrapper<UserInfo> wrapper = new QueryWrapper<>();
        if(!StringUtils.isEmpty(name)) {
            wrapper.like("name",name);
        }
        if(!StringUtils.isEmpty(status)) {
            wrapper.eq("status",status);
        }
        if(!StringUtils.isEmpty(authStatus)) {
            wrapper.eq("auth_status",authStatus);
        }
        if(!StringUtils.isEmpty(createTimeBegin)) {
            wrapper.ge("create_time",createTimeBegin);
        }
        if(!StringUtils.isEmpty(createTimeEnd)) {
            wrapper.le("create_time",createTimeEnd);
        }
        //3.分页查询
        Page<UserInfo> pageModel = baseMapper.selectPage(pageParams, wrapper);

        //4.翻译字段(状态值)
        pageModel.getRecords().stream().forEach(item->{
            //emoji Head analytical tools
            item.setNickName(EmojiParser.parseToUnicode(item.getNickName()));
            this.packUserInfo(item);
        });

        return pageModel;
    }
    //翻译相关字段
    private UserInfo  packUserInfo(UserInfo userInfo){
        String statusNameByStatus = AuthStatusEnum.getStatusNameByStatus(userInfo.getAuthStatus());
        userInfo.getParam().put("authStatusString",statusNameByStatus);

        String statusString = userInfo.getStatus().intValue()==0 ?"锁定" : "正常";
        userInfo.getParam().put("statusString",statusString);
        return userInfo;
    }
5. swagger 测试

2. 前端实现
1. Review the background implementation steps

2. 添加路由 - 用户管理
在 src/router/index.js 文件添加路由
{
path: '/user',
component: Layout,
redirect: '/user/userInfo/list',
name: 'userInfo',
meta: { title: '用户管理', icon: 'table' },
alwaysShow: true,
children: [
{
path: 'userInfo/list',
name: '用户列表',
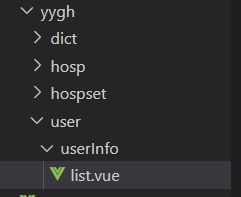
component: () => import('@/views/yygh/user/userInfo/list'),
meta: { title: '用户列表', icon: 'table' }
}
]
},3. 新建页面,添加页面元素
<template>
    <div class="app-container">
        <!--查询表单-->
        <el-form :inline="true" class="demo-form-inline">
            <el-form-item>
                <el-input v-model="searchObj.keyword" placeholder="姓名" />
            </el-form-item>

            <el-form-item label="创建时间">
                <el-date-picker v-model="searchObj.createTimeBegin" type="datetime" placeholder="选择开始时间"
                    value-format="yyyy-MM-dd HH:mm:ss" default-time="00:00:00" />
            </el-form-item>
            至
            <el-form-item>
                <el-date-picker v-model="searchObj.createTimeEnd" type="datetime" placeholder="选择截止时间"
                    value-format="yyyy-MM-dd HH:mm:ss" default-time="00:00:00" />
            </el-form-item>

            <el-button type="primary" icon="el-icon-search" @click="fetchData()">查询</el-button>
            <el-button type="default" @click="resetData()">清空</el-button>
        </el-form>

        <!-- 列表 -->
        <el-table v-loading="listLoading" :data="list" stripe style="width: 100%">

            <el-table-column label="序号" width="70" align="center">
                <template slot-scope="scope">
                    {
   { (page - 1) * limit + scope.$index + 1 }}
                </template>
            </el-table-column>

            <el-table-column prop="phone" label="手机号" />
            <el-table-column prop="nickName" label="昵称" />
            <el-table-column prop="name" label="姓名" />
            <el-table-column label="状态" prop="param.statusString" />
            <el-table-column label="认证状态" prop="param.authStatusString" />
            <el-table-column prop="createTime" label="创建时间" />

            <el-table-column label="操作" width="200" align="center">
            </el-table-column>
        </el-table>

        <!-- 分页组件 -->
        <el-pagination :current-page="page" :total="total" :page-size="limit" :page-sizes="[5, 10, 20, 30, 40, 50, 100]"
            style="padding: 30px 0; text-align: center;" layout="sizes, prev, pager, next, jumper, ->, total, slot"
            @current-change="fetchData" @size-change="changeSize" />
    </div>
</template>
4. 新建API接口
创建/api/yygh/userinfo.js
import request from '@/utils/request'

const api_name = '/admin/user'

export default {

    getPageList(page, limit, searchObj) {
        return request({
            url: `${api_name}/${page}/${limit}`,
            method: 'get',
            params: searchObj
        })
    }
}
5. JS实现
<script>
    import userApi from '@/api/yygh/userinfo'
    export default {
        data() {
            return {
                listLoading: true, // 数据是否正在加载
                list: null, // banner列表
                total: 0, // 数据库中的总记录数
                page: 1, // 默认页码
                limit: 10, // 每页记录数
                searchObj: {} // 查询表单对象
            }
        },
        created() {
            this.fetchData()
        },
        methods: {
            //分页查询
            fetchData(page=1){
                this.page = page
                userApi.getPageList(this.page,this.limit,this.searchObj)
                .then(response=>{
                    this.list = response.data.pageModel.records
                    this.total = response.data.pageModel.total
                    this.listLoading = false
                })
            },
            //清空
            resetData(){
                this.searchObj = {}
                this.fetchData()
            },
            //切换每页记录数
            changeSize(size){
                this.limit = size
                this.fetchData()
            }
        }
    }
</script>
6. 测试

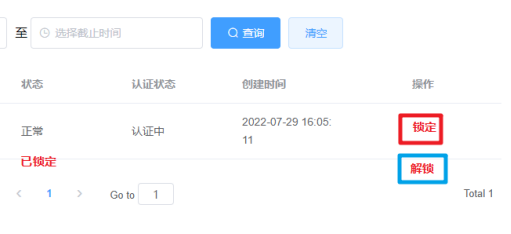
2、锁定与解锁
1、后端接口
1. 分析接口
*参数:id,status
*返回值:R.ok()
2. controller实现
    @ApiOperation(value = "用户锁定与解锁")
    @GetMapping("lock/{userId}/{status}")
    public R lock(
            @PathVariable("userId") Long userId,
            @PathVariable("status") Integer status){
        userInfoService.lock(userId, status);
        return R.ok();
    }
3. service实现
    //用户锁定与解锁
    @Override
    public void lock(Long userId, Integer status) {
        if(status.intValue() == 0 || status.intValue() == 1) {
            UserInfo userInfo = this.getById(userId);
            userInfo.setStatus(status);
            this.updateById(userInfo);
        }
    }
2、前端对接
1. 确认入口
2. 添加API方法
    //用户锁定与解锁
    lock(id, status) {
        return request({
            url: `${api_name}/lock/${id}/${status}`,
            method: 'get'
        })
    }
3. 添加页面元素
    <el-table-column label="操作" width="200" align="center">
        <template slot-scope="scope">
            <el-button v-if="scope.row.status == 1" type="primary" size="mini" @click="lock(scope.row.id, 0)">锁定
            </el-button>
            <el-button v-if="scope.row.status == 0" type="danger" size="mini" @click="lock(scope.row.id, 1)">
                取消锁定</el-button>
        </template>
    </el-table-column>
4. 实现JS
    //用户锁定与解锁
    lock(id, status) {
        userApi.lock(id, status).then(response => {
            this.$message({
                type: "success",
                message: "操作成功!",
            });
            this.fetchData()
        })
    }
5. 测试

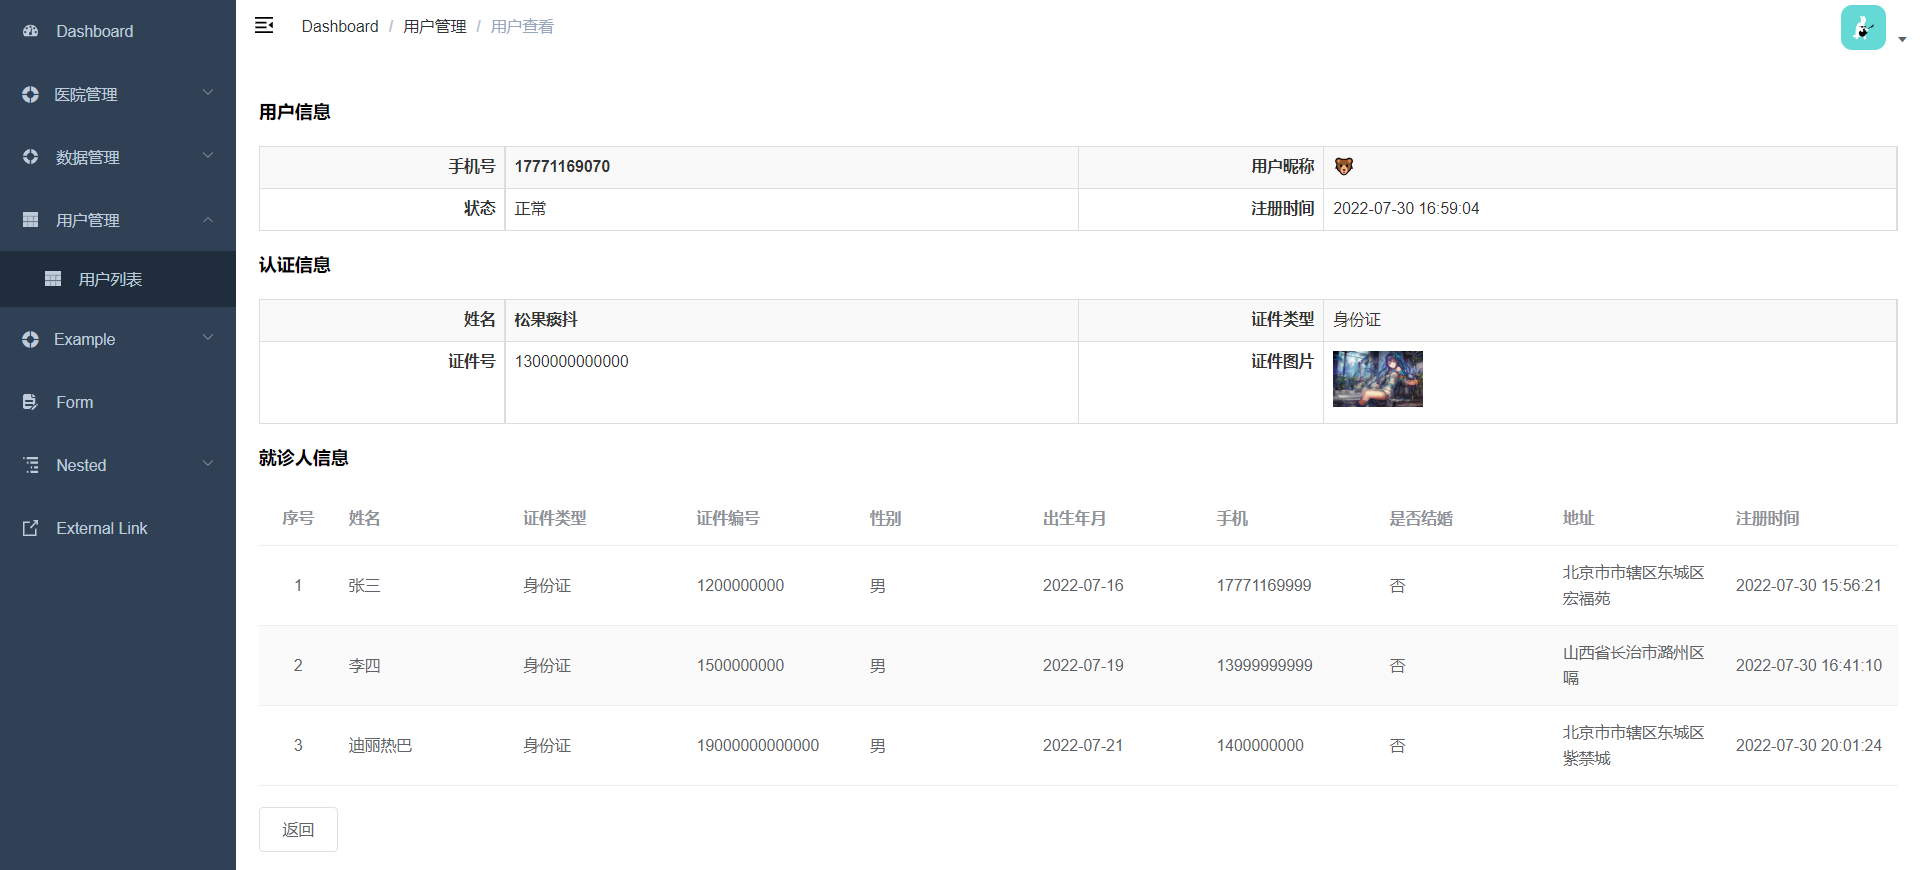
3、用户详情
详情展示用户信息、Users of patient information
1、后端接口
1. 分析接口
*参数:userId
*返回值:map (用户信息,Patient information collection)
2. controller实现
    @ApiOperation(value = "用户详情")
    @GetMapping("show/{userId}")
    public R show(@PathVariable Long userId) {
        Map<String,Object> map = userInfoService.show(userId);
        return R.ok().data(map);
    }
3. service实现
    //用户详情
    @Override
    public Map<String, Object> show(Long userId) {
        //1.根据用户id查询用户信息,翻译字段
        UserInfo userInfo = this.packUserInfo(baseMapper.selectById(userId));
        //emoji Head analytical tools
        userInfo.setNickName(EmojiParser.parseToUnicode(userInfo.getNickName()));
        //2.根据用户id查询就诊人信息
        List<Patient> patientList = patientService.findAllUserId(userId);

        //3.封装map返回
        HashMap<String, Object> map = new HashMap<>();
        map.put("userInfo",userInfo);
        map.put("patientList",patientList);
        return map;
    }
4. 测试

2、前端对接
1. 确认入口,添加页面元素
        <router-link :to="'/user/userInfo/show/'+scope.row.id">
            <el-button type="primary" size="mini">查看</el-button>
        </router-link>
2. 添加隐藏路由
      {
        path: 'userInfo/show/:id',
        name: '用户查看',
        component: () => import('@/views/yygh/user/userInfo/show'),
        meta: { title: '用户查看' },
        hidden: true
      }
3. 新建页面,添加页面元素

<template>
    <div class="app-container">
        <h4>用户信息</h4>
        <table class="table table-striped table-condenseda table-bordered" width="100%">
            <tbody>
                <tr>
                    <th width="15%">手机号</th>
                    <td width="35%"><b>{
   { userInfo.phone }}</b></td>
                    <th width="15%">用户昵称</th>
                    <td width="35%">{
   { userInfo.nickName }}</td>
                </tr>
                <tr>
                    <th>状态</th>
                    <td>{
   { userInfo.status == 0 ? '锁定' : '正常' }}</td>
                    <th>注册时间</th>
                    <td>{
   { userInfo.createTime }}</td>
                </tr>
            </tbody>
        </table>
        <h4>认证信息</h4>
        <table class="table table-striped table-condenseda table-bordered" width="100%">
            <tbody>
                <tr>
                    <th width="15%">姓名</th>
                    <td width="35%"><b>{
   { userInfo.name }}</b></td>
                    <th width="15%">证件类型</th>
                    <td width="35%">{
   { userInfo.certificatesType }}</td>
                </tr>
                <tr>
                    <th>证件号</th>
                    <td>{
   { userInfo.certificatesNo }}</td>
                    <th>证件图片</th>
                    <td><img :src="userInfo.certificatesUrl" width="80px"></td>
                </tr>
            </tbody>
        </table>
        <h4>就诊人信息</h4>
        <el-table v-loading="listLoading" :data="patientList" stripe style="width: 100%">
            <el-table-column label="序号" width="70" align="center">
                <template slot-scope="scope">
                    {
   { scope.$index + 1 }}
                </template>
            </el-table-column>

            <el-table-column prop="name" label="姓名" />
            <el-table-column prop="param.certificatesTypeString" label="证件类型" />
            <el-table-column prop="certificatesNo" label="证件编号" />
            <el-table-column label="性别">
                <template slot-scope="scope">
                    {
   { scope.row.sex == 1 ? '男' : '女' }}
                </template>
            </el-table-column>
            <el-table-column prop="birthdate" label="出生年月" />
            <el-table-column prop="phone" label="手机" />
            <el-table-column label="是否结婚">
                <template slot-scope="scope">
                    {
   { scope.row.isMarry == 1 ? '时' : '否' }}
                </template>
            </el-table-column>
            <el-table-column prop="param.fullAddress" label="地址" />
            <el-table-column prop="createTime" label="注册时间" />
        </el-table>
        <br>
        <el-row>
            <el-button @click="back">返回</el-button>
        </el-row>
    </div>
</template>
4. 添加API方法
    //用户详情
    show(id) {
        return request({
            url: `${api_name}/show/${id}`,
            method: 'get'
        })
    }
5. JS实现
<script>
    import userApi from '@/api/yygh/userinfo'
    export default {
        // 定义数据
        data() {
            return {
                //Hidden routing method to obtain parametersparams,问号传参
                id: this.$route.params.id,
                userInfo: {}, // 会员信息
                patientList: [] // 就诊人列表
            }
        },
        // 当页面加载时获取数据
        created() {
            this.fetchDataById()
        },
        methods: {
            //根据id查询会员记录
            fetchDataById() {
                userApi.show(this.id).then(response => {
                    this.userInfo = response.data.userInfo
                    this.patientList = response.data.patientList
                })
            },
            //返回
            back() {
                window.history.back(-1)
            }
        }
    }
</script>
6. 测试
4、List and approval function
1、认证列表
User authentication list interface is consistent with the user list,只是默认加了一个认证状态搜索条件:authStatus
1. Confirm that the user authentication list interface
2. Add the routing menu
      {
        path: 'userInfo/authList',
        name: '认证审批列表',
        component: () => import('@/views/yygh/user/userInfo/authList'),
        meta: { title: '认证审批列表', icon: 'table' }
      }
3. 创建页面、添加元素
<template>
    <div class="app-container">
        <!--查询表单-->
        <el-form :inline="true" class="demo-form-inline">
            <el-form-item>
                <el-input v-model="searchObj.keyword" placeholder="姓名/手机"/>
            </el-form-item>

            <el-form-item label="创建时间">
                <el-date-picker
                    v-model="searchObj.createTimeBegin"
                    type="datetime"
                    placeholder="选择开始时间"
                    value-format="yyyy-MM-dd HH:mm:ss"
                    default-time="00:00:00"
                    />
            </el-form-item>
            至
            <el-form-item>
                <el-date-picker
                    v-model="searchObj.createTimeEnd"
                    type="datetime"
                    placeholder="选择截止时间"
                    value-format="yyyy-MM-dd HH:mm:ss"
                    default-time="00:00:00"
                    />
            </el-form-item>

            <el-button type="primary" icon="el-icon-search" @click="fetchData()">查询</el-button>
            <el-button type="default" @click="resetData()">清空</el-button>
        </el-form>

        <!-- 列表 -->
        <el-table
        v-loading="listLoading"
        :data="list"
        stripe
            style="width: 100%">

            <el-table-column
            label="序号"
            width="70"
            align="center">
                <template slot-scope="scope">
                        {
   { (page - 1) * limit + scope.$index + 1 }}
                </template>
            </el-table-column>

            <el-table-column prop="name" label="姓名"/>
            <el-table-column prop="certificatesType" label="证件类型"/>
            <el-table-column prop="certificatesNo" label="证件号"/>
            <el-table-column prop="createTime" label="创建时间"/>

            <el-table-column label="操作" width="250" align="center">
                <template slot-scope="scope">
                    <router-link :to="'/user/userInfo/show/'+scope.row.id">
                        <el-button type="primary" size="mini">查看</el-button>
                    </router-link>
                </template>
            </el-table-column>
        </el-table>

        <!-- 分页组件 -->
        <el-pagination
            :current-page="page"
            :total="total"
            :page-size="limit"
            :page-sizes="[5, 10, 20, 30, 40, 50, 100]"
            style="padding: 30px 0; text-align: center;"
            layout="sizes, prev, pager, next, jumper, ->, total, slot"
            @current-change="fetchData"
            @size-change="changeSize"
            />
    </div>
</template>
<script>
import userInfoApi from '@/api/yygh/userinfo'

export default {

// 定义数据
data() {
    return {
        listLoading: true, // 数据是否正在加载
        list: null, // banner列表
        total: 0, // 数据库中的总记录数
        page: 1, // 默认页码
        limit: 10, // 每页记录数
        searchObj: {
            authStatus: 1
        } // 查询表单对象
    }
},

// 当页面加载时获取数据
created() {
    this.fetchData()
},

methods: {
    // 调用api层获取数据库中的数据
    fetchData(page = 1) {
        console.log('翻页...' + page)
        // 异步获取远程数据(ajax)
        this.page = page
        userInfoApi.getPageList(this.page, this.limit, this.searchObj).then(
                response => {
            this.list = response.data.pageModel.records
            this.total = response.data.pageModel.total
            // 数据加载并绑定成功
            this.listLoading = false
        }
      )
    },

    // 当页码发生改变的时候
    changeSize(size) {
        console.log(size)
        this.limit = size
        this.fetchData(1)
    },

    // 重置查询表单
    resetData() {
        console.log('重置查询表单')
        this.searchObj = {}
        this.fetchData()
    }
  }
}
</script>
2、审批
1. controller
    @ApiOperation(value = "认证审批")
    @GetMapping("approval/{userId}/{authStatus}")
    public R approval(@PathVariable Long userId,@PathVariable Integer authStatus) {
        userInfoService.approval(userId,authStatus);
        return R.ok();
    }
2. service
//认证审批  2通过  -1不通过
@Override
public void approval(Long userId, Integer authStatus) {
    if(authStatus.intValue()==2 || authStatus.intValue()==-1) {
        UserInfo userInfo = baseMapper.selectById(userId);
        userInfo.setAuthStatus(authStatus);
        baseMapper.updateById(userInfo);
    }
}
3. API接口方法
    //认证审批
    approval(id, authStatus) {
        return request({
            url: `${api_name}/approval/${id}/${authStatus}`,
            method: 'get'
        })
    }
4. 添加页面元素 - 审批按钮
    <el-table-column label="操作" width="250" align="center">
        <template slot-scope="scope">
            <router-link :to="'/user/userInfo/show/'+scope.row.id">
                <el-button type="primary" size="mini">查看</el-button>
            </router-link>

            <el-button type="primary" size="mini" @click="approval(scope.row.id, 2)">通过</el-button>
            <el-button type="danger" size="mini" @click="approval(scope.row.id, -1)">不通过</el-button>
        </template>
    </el-table-column>
5. JS实现
            //用户审批
            approval(id, authStatus) {
                userInfoApi.approval(id, authStatus).then(response => {
                    this.$message({
                        type: "success",
                        message: "操作成功!",
                    });
                    this.fetchData()
                })
            }
6. 测试

边栏推荐
猜你喜欢
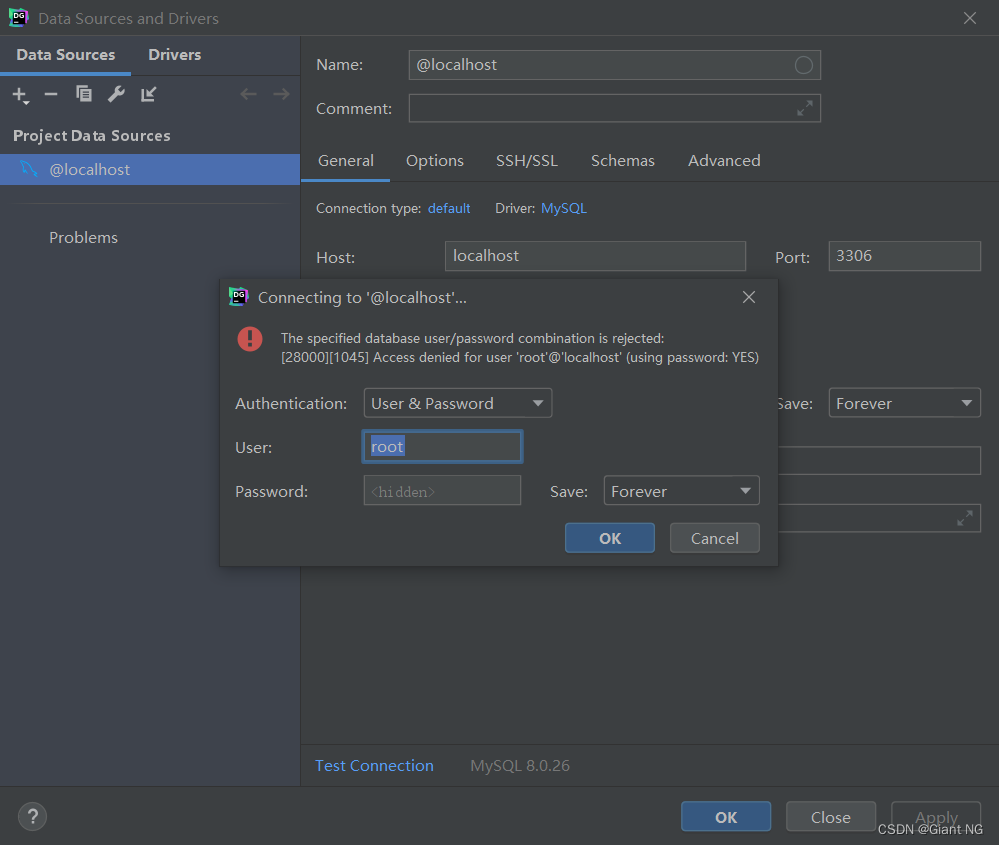
datagrip 报错 “The specified database userpassword combination is rejected...”的解决方法

字节给我狠狠上了一课:危机来的时候你连准备时间都没有...

创新项目实战之智能跟随机器人原理与代码实现
【Brush the title】Family robbery
flex布局中使用flex-wrap实现换行

飞桨助力航天宏图PIE-Engine地球科学引擎构建

记录一次数组转集合出现错误的坑点,尽量使用包装类型数组进行转换

5年自动化测试经验的一些感悟:做UI自动化一定要跨过这10个坑

Go语学习笔记 - gorm使用 - gorm处理错误 Web框架Gin(十)

大话西游无法登陆解决
随机推荐
C语言实验六 一维数组程序设计
IDEA找不到Database解决方法
6-25漏洞利用-irc后门利用
Byte taught me a hard lesson: When a crisis comes, you don't even have time to prepare...
Kubernetes — 核心资源对象 — Controller
安全(1)
About MySQL data insertion (advanced usage)
IDEA版Postman插件Restful Fast Request,细节到位,功能好用
Flask gets post request parameters
外包干了三年,废了...
go版本升级
3个月测试员自述:4个影响我职业生涯的重要技能
go泛型使用方法
kubernetes之服务发现
【刷题篇】打家劫舍
flowable工作流所有业务概念
一本适合职场新人的好书
大话西游无法登陆解决
去经营企业吧
FlinkSQL CDC实现同步oracle数据到mysql