当前位置:网站首页>【内网开发日记】用websocket手搓一个聊天软件
【内网开发日记】用websocket手搓一个聊天软件
2022-07-31 05:18:00 【安东你的下巴呢】
用websocket手搓一个聊天软件
1. 又是内网开发的问题
最近,不知道出于什么考量,公司突然开始禁止使用飞秋、内网通等等内网通讯工具。大家一下回到了通讯基本靠吼的原始阶段。但这难不倒我们勤奋的工人阶级,既然不让用现成的通讯工具,我们就来自己做一个聊天软件。
2. 要做什么功能
本着实用至上的原则,先来梳理一下这个软件需要什么功能。
首先,最基础的功能,它得能发送文字,比如复制的代码、url、账号密码等等。其次,还得能发送文件,比如日志文件、美工做的图、需要发布的程序包之类。这两个功能足够应付大部分的使用场景了。
3. 开发聊天功能
要做聊天功能,结合现有的资源(之前拷贝到内网的依赖包),我选择用websocket来实现,先来引入需要的依赖:
    <parent>
        <artifactId>spring-boot-starter-parent</artifactId>
        <groupId>org.springframework.boot</groupId>
        <version>2.4.3</version>
    </parent>

    <dependencies>
        <dependency>
            <groupId>org.springframework.boot</groupId>
            <artifactId>spring-boot-starter-web</artifactId>
        </dependency>

        <dependency>
            <groupId>org.springframework.boot</groupId>
            <artifactId>spring-boot-starter-websocket</artifactId>
        </dependency>
    </dependencies>
然后给它取一个好听的名字abaaba阿巴阿巴,再选一个信号比较好的端口10086,增加上spring boot项目的启动类和配置文件application.yml
@SpringBootApplication
public class AbaabaApplication {

    public static void main(String[] args) {

        SpringApplication.run(AbaabaApplication.class);
    }
}
# application.yml
server:
  port: 10086
然后增加配置类开启websocket服务
@Configuration
public class WebSocketConfig {

    @Bean
    public ServerEndpointExporter serverEndpointExporter() {

        return new ServerEndpointExporter();
    }
}
接下来就是主角了,websocket的服务类
@Component
@ServerEndpoint("/abaaba")
public class WebSocketServer {


    @OnOpen
    public void onOpen(Session session) {

        //开启连接时触发
        System.out.println("[" + session.getId() + "]连接了我的服务");
    }

    @OnMessage
    public void onMessage(String message, Session session) {

        //接收到消息时触发
        System.out.println("[" + session.getId() + "]发送了消息:" + message);
    }

    @OnClose
    public void onClose(Session session) {

        //关闭连接时触发
        System.out.println("[" + session.getId() + "]断开了连接");
    }

    @OnError
    public void onError(Session session, Throwable error) {

        // 发生异常时触发
        System.out.println("[" + session.getId() + "]发生了错误:" + error.getMessage());
    }
}
这里对websocket的open 、messgae、close、error事件做了监听,当事件被触发的时候,就会执行对应方法的内容。
这样一个可以接受连接,能接收消息的服务端雏形就有了,我们来写一个页面测试一下
<html>
<head>
    <title>abaaba</title>
    <meta charset="utf-8"/>
</head>
<body>
<div class="content">
    <div class="top">
        <p>连接WebSocket</p>
        <div class="btn">
            <input id="ip" type="text" value="127.0.0.1">
            <button id="connect" onclick="connect();">连接</button>
            <button id="close" onclick="disconnect();" style="display: none">断开</button>
        </div>
    </div>
    <div class="chat" id="chat" style="display: none">
        <div class="record">
            <ul id="record">
                <li>====== abaaba聊天 ======</li>
            </ul>
        </div>
        <div class="send">
            <input id="msg" type="text"/>
            <button id="send" onclick="send();">发送</button>
        </div>
    </div>
</div>
</body>
<script> var socket; function connect() {
       let ip = document.getElementById("ip").value; socket = new WebSocket("ws://" + ip + ":10086/abaaba"); socket.onopen = function () {
       document.getElementById("chat").style.display = ""; document.getElementById("close").style.display = ""; document.getElementById("connect").style.display = "none"; } socket.onmessage = function (msg) {
       let name = msg.origin.replace("ws://", "").replace(":10086", ""); addMsg("[" + name + "]: " + msg.data); } socket.onclose = function () {
       document.getElementById("chat").style.display = "none"; document.getElementById("close").style.display = "none"; document.getElementById("connect").style.display = ""; } socket.onerror = function () {
       alert("连接发生错误"); } } function send() {
       let msg = document.getElementById("msg").value; socket.send(msg); addMsg("[你]:" + msg); document.getElementById("msg").value = ""; } function addMsg(msg) {
       let li = document.createElement("li"); li.innerText = msg; document.getElementById("record").appendChild(li); } function disconnect() {
       socket.close(); } </script>
</html>

点击连接按钮,可以看到服务端输出了连接信息:

输入消息并发送,可以看到服务端输出了发送的消息:

点击断开,服务端输出了断开连接的信息:
这样就实现了网页发送消息到服务端,接下来实现服务端发送消息到网页。来给WebSocketServer增加一亿点细节:
@Component
@ServerEndpoint("/abaaba")
public class WebSocketServer {


    // 当前正在进行的聊天
    public static String CURRENT_IP = "";

    // 所有的聊天
    public static final ConcurrentHashMap<String, Session> WEBSOCKET_SESSION_MAP = new ConcurrentHashMap<>();

    @OnOpen
    public void onOpen(Session session) throws IOException {

        //开启连接时触发
        String ip = WebSocketUtil.getIp(session);
        System.out.println("[" + ip + "]开启了聊天");
        WEBSOCKET_SESSION_MAP.put(ip, session);
        System.out.println("====现在共有" + WEBSOCKET_SESSION_MAP.size() + "个聊天====");
        session.getBasicRemote().sendText("开始聊天");
        CURRENT_IP = ip;
    }

    @OnMessage
    public void onMessage(String message, Session session) {

        //接收到消息时触发
        String ip = WebSocketUtil.getIp(session);
        System.out.println("[" + ip + "] 发送给 [你]:" + message);
        CURRENT_IP = ip;
    }

    @OnClose
    public void onClose(Session session) {

        //关闭连接时触发
        String ip = WebSocketUtil.getIp(session);
        System.out.println("[" + ip + "] 结束了聊天");
        WEBSOCKET_SESSION_MAP.remove(ip);
        System.out.println("====现在共有" + WEBSOCKET_SESSION_MAP.size() + "个聊天====");
        if (WEBSOCKET_SESSION_MAP.size() > 0) {

            CURRENT_IP = WEBSOCKET_SESSION_MAP.keys().nextElement();
            System.out.println("正在与[" + CURRENT_IP + "]聊天");
        } else {

            CURRENT_IP = "";
        }
    }

    @OnError
    public void onError(Session session, Throwable error) {

        // 发生异常时触发
        System.out.println("[" + session.getId() + "]发生了错误:" + error.getMessage());
    }
}
顺便,因为使用session.getId()来对会话做标识容易让人分不清楚(谁是[0]啊?),把它换成用IP来标识会话,解析IP的代码参考了这位大佬的文章,并做了一点改动。
public class WebSocketUtil {

    public static String getIp(Session session) {

        InetSocketAddress address = (InetSocketAddress) getFieldInstance(session.getAsyncRemote(), "base#socketWrapper#socket#sc#remoteAddress");
        return address.getAddress().toString().replaceAll("/", "");
    }

    private static Object getFieldInstance(Object obj, String fieldPath) {

        String[] fields = fieldPath.split("#");
        for (String field : fields) {

            obj = getField(obj, obj.getClass(), field);
            if (obj == null) {

                return null;
            }
        }
        return obj;
    }

    private static Object getField(Object obj, Class<?> clazz, String fieldName) {

        for (; clazz != Object.class; clazz = clazz.getSuperclass()) {

            try {

                Field field = clazz.getDeclaredField(fieldName);
                field.setAccessible(true);
                return field.get(obj);
            } catch (NoSuchFieldException | IllegalAccessException ignored) {

            }
        }
        return null;
    }
}
接下来需要增加一个服务端的输入入口,继续本着实用至上的原则,做成直接在控制台输入,按回车发送。只需要在项目启动类里增加一个循环去不停的读取控制台输入,然后发送给正在进行的聊天即可。
@SpringBootApplication
public class AbaabaApplication {

    public static void main(String[] args) {

        SpringApplication.run(AbaabaApplication.class);

        Scanner scanner = new Scanner(System.in);
        while (true) {

            String msg = scanner.nextLine();
            if (WebSocketServer.CURRENT_IP != null && !"".equals(WebSocketServer.CURRENT_IP)) {

                try {

                    WebSocketServer.WEBSOCKET_SESSION_MAP.get(WebSocketServer.CURRENT_IP).getBasicRemote().sendText(msg);
                    System.out.println("[你] 发送给 [" + WebSocketServer.CURRENT_IP + "]:" + msg);
                } catch (IOException e) {

                    System.out.println("消息\"" + msg + "\"发送失败");
                }
            } else {

                System.out.println("当前没有可用的聊天");
            }
        }
    }
}
再来测试一下:


运行的很完美!但是,当多个聊天同时进行的时候,现在还不能手动切换到其它聊天,所以借鉴下linux的命令,再给启动类增加一些细节:
@SpringBootApplication
public class AbaabaApplication {

    public static void main(String[] args) {

        SpringApplication.run(AbaabaApplication.class);
        List<String> chatList = null;

        Scanner scanner = new Scanner(System.in);
        while (true) {

            String msg = scanner.nextLine();
            if (msg.startsWith("ls")) {

                chatList = new ArrayList<>(WebSocketServer.WEBSOCKET_SESSION_MAP.keySet());
                for (int i = 0; i < chatList.size(); i++) {

                    if (chatList.get(i).equals(WebSocketServer.CURRENT_IP)) {

                        System.out.print("->");
                    }
                    System.out.print("[" + (i + 1) + "]: " + chatList.get(i) + " ");
                }
                System.out.println();
            } else if (msg.startsWith("su")) {

                if (chatList == null) {

                    System.out.println("请先使用[ls]命令查看聊天列表");
                } else {

                    String[] s = msg.split(" ");
                    if (s.length < 2) {

                        System.out.println("指令错误");
                    } else {

                        int i = Integer.parseInt(s[1]);
                        if (i <= chatList.size() && i > 0) {

                            WebSocketServer.CURRENT_IP = chatList.get(i - 1);
                            System.out.println("正在与[" + WebSocketServer.CURRENT_IP + "]聊天");
                        } else {

                            System.out.println("指令错误");
                        }
                    }
                }
            } else {

                if (WebSocketServer.CURRENT_IP != null && !"".equals(WebSocketServer.CURRENT_IP)) {

                    try {

                        WebSocketServer.WEBSOCKET_SESSION_MAP.get(WebSocketServer.CURRENT_IP).getBasicRemote().sendText(msg);
                        System.out.println("[你] 发送给 [" + WebSocketServer.CURRENT_IP + "]:" + msg);
                    } catch (IOException e) {

                        System.out.println("消息\"" + msg + "\"发送失败");
                    }
                } else {

                    System.out.println("当前没有可用的聊天");
                }
            }
        }
    }
}

开启两个聊天测试一下,很完美!这样聊天功能就完成了。
4. 开发文件传输功能
4.1 上传
文件上传功能很简单,写一个处理文件请求的Controller即可
@RestController
@RequestMapping("/upload")
public class FileController {

    @PostMapping
    public String upload(MultipartFile file) {

        String filePath = "D:\\makabaka\\upload";
        File localFile = new File(filePath + File.separator + file.getOriginalFilename());
        try {

            file.transferTo(localFile);
        } catch (IOException e) {

            e.printStackTrace();
            return "上传失败";
        }
        return "上传成功";
    }
}
顺便修改上传文件大小限制(springboot 默认是 1MB,不够用),在application.yml中增加
# application.yml
spring:
  servlet:
    multipart:
      enabled: true
      max-file-size: 1000MB
      max-request-size: 1000MB
最后在页面上增加个上传的表单,在连接和断开时控制显示和隐藏。
<div id="upload" class="upload" style="display: none">
    <p>传输文件</p>
    <form enctype="multipart/form-data" method="post" id="uploadForm" target="_blank">
        <input type="file" name="file" id="file"/>
        <input type="submit" name="提交"/>
    </form>
</div>
function connect() {

    let ip = document.getElementById("ip").value;
    socket = new WebSocket("ws://" + ip + ":10086/abaaba");

    document.getElementById("uploadForm").setAttribute("action", "http://" + ip + ":10086/upload");

    socket.onopen = function () {

        document.getElementById("chat").style.display = "";
        document.getElementById("upload").style.display = "";
        document.getElementById("close").style.display = "";
        document.getElementById("connect").style.display = "none";
    }

    socket.onmessage = function (msg) {

        let name = msg.origin.replace("ws://", "").replace(":10086", "");
        addMsg("[" + name + "]: " + msg.data);
    }

    socket.onclose = function () {

        document.getElementById("chat").style.display = "none";
        document.getElementById("upload").style.display = "none";
        document.getElementById("close").style.display = "none";
        document.getElementById("connect").style.display = "";
    }

    socket.onerror = function () {

        alert("连接发生错误");
    }
}
4.2 下载
下载功能就更加简单了,使用ResoucreHandler把下载请求映射到本地路径的一个文件夹,这个文件夹下的文件就可以通过url下载了。
@Configuration
public class WebMvcConfig implements WebMvcConfigurer {

    @Override
    public void addResourceHandlers(ResourceHandlerRegistry registry) {

        registry.addResourceHandler("/download/**").addResourceLocations("file:D:/makabaka/download/");
    }
}
4.3 测试一下
我们找一个典型的使用场景来模拟测试一下


5. 源码
源码已经上传到了我的github。喜欢的朋友可以帮我点个星星~
边栏推荐
- 浏览器中的画中画(Picture-in-Picture)API
- Solution for MySQL The table is full
- About iframe
- 浅谈音视频开发入门基础及进阶资源分享
- Rejection sampling note
- 安装显卡过程中遇到问题汇总
- Learning and understanding of ROS service programming
- C语言对文件的操作(完整版)
- 力扣刷题.快乐数
- mPEG-DSPE 178744-28-0 Methoxy-polyethylene glycol-phosphatidylethanolamine linear PEG phospholipids
猜你喜欢

【Latex】TexLive+VScode+SumatraPDF 配置LaTex编辑环境

Cholesterol-PEG-Acid CLS-PEG-COOH Cholesterol-Polyethylene Glycol-Carboxyl Modified Peptides
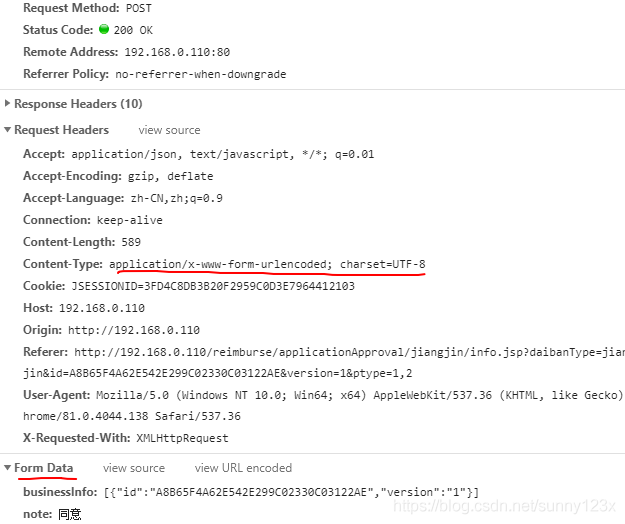
四种常见的POST提交数据方式

科研试剂Cholesterol-PEG-Maleimide,CLS-PEG-MAL,胆固醇-聚乙二醇-马来酰亚胺
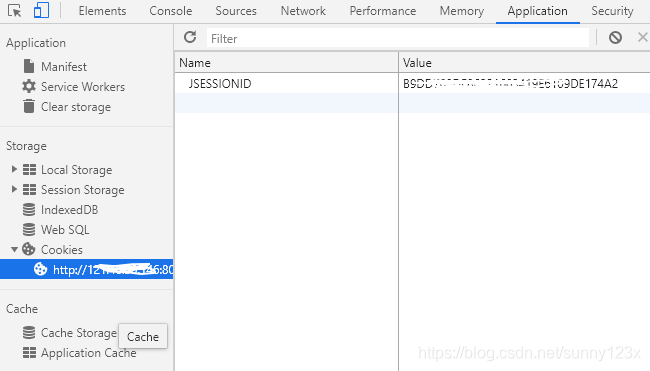
会话和饼干,令牌

Learning and understanding of ROS service programming

浅谈音视频开发入门基础及进阶资源分享

在 AWS 上从零开始设置 Incredibuild 构建系统

化学试剂磷脂-聚乙二醇-氨基,DSPE-PEG-amine,CAS:474922-26-4
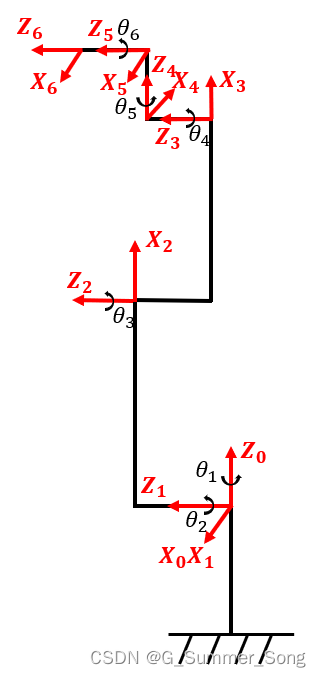
UR3机器人运动学分析之正运动学分析
随机推荐
mPEG-DMPE 甲氧基-聚乙二醇-双肉豆蔻磷脂酰乙醇胺用于形成隐形脂质体
Pytorch Daily Practice - Predicting Surviving Passengers on the Titanic
IDEA overview and installation and debugging
C语言静态变量static
钉钉企业内部-H5微应用开发
wangeditor编辑器内容传至后台服务器存储
解决nx安装 jtop问题
2022 SQL big factory high-frequency practical interview questions (detailed analysis)
Tensorflow related list
Wlan实验(ENSP)
测试CSDN积分需求
变更管理与 DevOps —— 二者同时进行吗?
超详细!!!让你通透数组!!!初学复习不迷路!!
IDEA控制台不能输入信息的解决方法
WIN10,配置adb环境
解决background-size:cover时图片铺满但显示不完整?
衡量 DevOps 成功与否的重要度量指标
Log jar package conflict, and its solution
Learning and understanding of ROS service programming
About iframe