当前位置:网站首页>Application of OpenGL gllightfv function and related knowledge of light source
Application of OpenGL gllightfv function and related knowledge of light source
2022-07-07 10:29:00 【my_ angle2016】
First introduced OpenGL Simple lighting model , Its reflected light can be divided into three components : Ambient reflected light , Diffuse light , The mirror reflects light . Is that you want to achieve a lighting effect , These three components need to be set , The sum of the three reaches the lighting effect you want .
1. The ambient light , Simply put, it is light in the environment , It seems to come from all directions
2. Diffuse reflection , From one direction , Light shines on objects , It radiates evenly in all directions , No matter where the viewpoint is , Objects are all equally bright .
3. Specular light , From a particular direction , And reflect it in the other direction .
glLightfv The function prototype :void glLightfv( Light source name , type , assignment );
There are four main types : The color of the light source ---AMBIENT、DIFFUSE、SPECULAR And light source location ---POSITION
among DIFFUSE The parameters of are closely related to the color of the light source , Generally, simple lighting models only set DIFFUSE It's enough
GLfloat light0_diffuse[]= { 1.0, 0.0, 0, 1.0};
glLightfv(GL_LIGHT0, GL_DIFFUSE, light0_diffuse);
The following is the code of assignment :
GLfloat light0_ambient[]= { 0.2, 0.2, 0.2, 1.0 };
GLfloat light0_diffuse[]= { 1.0, 0.0, 0, 1.0};
GLfloat light0_specular[] = { 1.0, 0, 0, 1.0 };
glLightfv(GL_LIGHT0, GL_AMBIENT, light0_ambient);
glLightfv(GL_LIGHT0, GL_DIFFUSE, light0_diffuse);
glLightfv(GL_LIGHT0, GL_SPECULAR,light0_specular);
Set the light source position
GLfloat light0_position[] = { 1.0, 1.0, 1.0, 0.0 };

glLightfv(GL_LIGHT0, GL_POSITION,light0_position);
Turn on the light source
glEnable(GL_LIGHTING);
glEnable(GL_LIGHT0);
glEnable(GL_DEPTH_TEST);
glEnable(GL_LIGHTING); Indicates the main switch for starting the lighting glEnable(GL_LIGHT0);// open 0 Signal light source
glEnable(GL_DEPTH_TEST);// Open depth buffer , draw 3D When using images
Complete code
#include "stdafx.h"
#include <GL/glut.h>
#include "math.h"
void reshape(int w,int h)
{
	glViewport(0,0,(GLsizei)w,(GLsizei)h);
	glMatrixMode(GL_PROJECTION);
	glLoadIdentity();
	if(w<h)
	glOrtho(-1.5, 1.5, -1.5,1.5 * (GLfloat)h / (GLfloat)w, -1.5,1.5);
	else
		glOrtho(-1.5* (GLfloat)w / (GLfloat)h, 1.5, -1.5,1.5, -1.5,1.5 );
		glMatrixMode(GL_MODELVIEW);
		glLoadIdentity();
}

void init ()
{
glClearColor(1.0,1.0,1.0,0.0);
glColor3f(1.0,1.0,0.0);
GLfloat light0_ambient[]= { 0.2, 0.2, 0.2, 1.0 };
GLfloat light0_diffuse[]= { 1.0, 0.0, 0, 1.0};// Red point light source
GLfloat light0_specular[] = { 1.0, 0, 0, 1.0 };
GLfloat light0_position[] = { 1.0, 1.0, 1.0, 0.0 };
glLightfv(GL_LIGHT0, GL_AMBIENT, light0_ambient);
glLightfv(GL_LIGHT0, GL_DIFFUSE, light0_diffuse);
glLightfv(GL_LIGHT0, GL_SPECULAR,light0_specular);
glLightfv(GL_LIGHT0, GL_POSITION,light0_position);
glShadeModel(GL_SMOOTH);// Smooth coloring , Transition color effect
glEnable(GL_LIGHTING);// Start lighting , Main switch
glEnable(GL_LIGHT0);// open 0 Signal light source
glEnable(GL_DEPTH_TEST);

}
void display(void)
{
	glClear(GL_COLOR_BUFFER_BIT|GL_DEPTH_BUFFER_BIT);
	glutSolidTeapot(0.5);
	glFlush();
}
int main(int argc, char* argv[])
{
	glutInit(&argc,argv);
	glutInitWindowPosition(200,200);
    glutInitWindowSize(500,500);
	glutCreateWindow("001");
	init();
	glutDisplayFunc(display);
	glutReshapeFunc(reshape);
	glutMainLoop();
	return 0;
}
Running results

We found that the color of the teapot was covered by the set light , Its own color ( yellow ) It doesn't show . Here we introduce a new function --- Color material function glEnable(GL_COLOR_MATERIAL); It ensures that the graphic color can be preserved after the light effect is turned on . Put it in init Function .
The effect of adding tea pot is as follows

In fact, the light source is the basis of all lighting effects , Nothing can be said without a light source .OpenGL We can set up 8 A light source , Their numbers are GL_LIGHT0、GL_LIGHT1、……、GL_LIGHT7. It is equivalent to having 8 The SUNS , But the position of each sun 、 The direction and the light it emits can be completely different . therefore ,OpenGL When we set the light source , The main thing is to set its color 、 Location 、 Direction and other properties . in addition ,OpenGL Any light source in the can emit ambient light of different intensity 、 Scattered light 、 The mirror reflects light , These aspects together determine the color of the light source .
We go through glLightfv( Light source number , Light source characteristics , Parameter data ) To set the light source . among , The light source number can be GL_LIGHT0、GL_LIGHT1、……、GL_LIGHT7 common 8 It's worth . Light source characteristics are mainly desirable GL_AMBIENT( Set the ambient light properties of the light source , The default value is (0,0,0,1))、GL_DIFFUSE( Set the scattered light attribute of the light source , The default value is (1,1,1,1))、GL_SPECULAR( Set the specular light properties of the light source , The default value is (1,1,1,1))、GL_POSITION( Set the position of the light source , The default value is (0,0,1,0)). The format of parameter data should be array , That is, the vector form in Mathematics .
The following code , We will completely set the properties of a light source :
GLfloat Va[]={0.4,0.4,0.4,1};           // Light source ambient light intensity array
GLfloat Vd[]={0.6,0.6,0.6,1};           // Light source scattered light intensity array
GLfloat Vs[]={0.6,0.6,0.6,1};           // Light source specular light intensity array
GLfloat Vp[]={1,1,1,1};             // Array of light source positions
glLightfv(GL_LIGHT0,GL_AMBIENT,Va); // Set up 0 Ambient light properties of No. 1 light source
glLightfv(GL_LIGHT0,GL_DIFFUSE,Vd); // Set up 0 Scattered light attribute of No. 1 light source
glLightfv(GL_LIGHT0,GL_SPECULAR,Vs);    // Set up 0 Specular light attribute of No. 1 light source
glLightfv(GL_LIGHT0,GL_POSITION,Vp);    // Set up 0 The position attribute of the light source
The property of the light source is set , And call glEnable(GL_LIGHT0) To turn on the light . It's equivalent to buying a flashlight 、 Install the battery ( Set light source ), But if you don't turn on the switch ( Turn on the power ), Flashlights don't work .
in addition , about GL_POSITION, Its position array (x,y,z,w) Defines the position of the light source in space . But why three-dimensional space is needed 4 How much is it ? In fact, homogeneous coordinates are used here , When w≠0 when , It means that the light source is in space (x,y,z) It's about , The light source at this time is called a fixed-point light source ; When w=0 when , According to the properties of homogeneous coordinates , It means that the light source is located at infinity , At this time, the light source is called a directional light source , All the lights are almost equal to each other , Like the sun . Its light direction is from point (x,y,z) Point to (0,0,0).
Will be the first 2 Make the following modifications to the cube example in Chapter . The modified void __fastcall TForm1::OpenGL1 GLPaint(TObject *Sender) The code at is as follows ( The rest is the same ):
void __fastcall TForm1::OpenGL1GLPaint(TObject *Sender)
{
  glEnable(GL_DEPTH_TEST);          // Hidden surface elimination
  glClear(GL_DEPTH_BUFFER_BIT); // Clear window color

  const GLfloat glfLightAmbient1[4] = {0.1, 0.1, 0.1, 1.0};
  const GLfloat glfLightAmbient2[4] = {0.4, 0.4, 0.4, 1.0};
  const GLfloat glfLightDiffuse1[4] = {0, 0.8, 0.8, 1.0};
  const GLfloat glfLightDiffuse2[4] = {0.8, 0.8, 0.8, 1.0};
  const GLfloat glfLightSpecular1[4] = {0, 0.8, 0.8, 1.0};
  const GLfloat glfLightSpecular2[4] = {0.8, 0.8, 0.8, 1.0};
  const GLfloat glPosition1[4]={0,0,1,0};
  const GLfloat glPosition2[4]={0.6,0.6,-0.6,1};
  glLightfv(GL_LIGHT0, GL_AMBIENT,  glfLightAmbient1);
  glLightfv(GL_LIGHT0, GL_DIFFUSE,  glfLightDiffuse1);
  glLightfv(GL_LIGHT0, GL_SPECULAR, glfLightSpecular1);
  glLightfv(GL_LIGHT0,GL_POSITION,glPosition1);
  glLightfv(GL_LIGHT1, GL_AMBIENT,  glfLightAmbient2);
  glLightfv(GL_LIGHT1, GL_DIFFUSE,  glfLightDiffuse2);
  glLightfv(GL_LIGHT1, GL_SPECULAR, glfLightSpecular2);
  glLightfv(GL_LIGHT1,GL_POSITION,glPosition2);
  glLightModeli(GL_LIGHT_MODEL_TWO_SIDE,GL_TRUE);// Light on both sides
      glEnable(GL_LIGHTING);// Turn on lighting
      glEnable(GL_LIGHT0);
      glEnable(GL_LIGHT1);// Turn on the light
      glEnable(GL_COLOR_MATERIAL);// Enable color tracking
      glColorMaterial(GL_FRONT,GL_AMBIENT_AND_DIFFUSE);
// The material environment color and scattering color of the front of the object , track glColor Set the color ( Relatively awkward ,
 In fact, it's about making OpenGL according to glColor The set color automatically sets the reflection intensity of the object )

  glShadeModel(GL_FLAT);// Set the color fill mode
   glBegin(GL_QUAD_STRIP) ;
     glVertex3f(i,-i,i);
     glVertex3f(i,-i,-i);
     glColor3f(1,0,0);
     glVertex3f(-i,-i,i);
     glVertex3f(-i,-i,-i);
     glColor3f(0,1,0);
     glVertex3f(-i,i,i);
     glVertex3f(-i,i,-i);
     glColor3f(0,0,1);
     glVertex3f(i,i,i);
     glVertex3f(i,i,-i);
     glColor3f(1,1,0);
     glVertex3f(i,-i,i);
     glVertex3f(i,-i,-i);
   glEnd();
   glBegin(GL_QUADS);
     glVertex3f(i,-i,i);
     glVertex3f(-i,-i,i);
     glVertex3f(-i,i,i);
     glColor3f(1,0,1);
     glVertex3f(i,i,i);

     glVertex3f(i,-i,-i);
     glVertex3f(-i,-i,-i);
     glVertex3f(-i,i,-i);
     glColor3f(0,1,1);
     glVertex3f(i,i,-i);
   glEnd();

      glDisable(GL_LIGHTING);// Turn off the light
      glDisable(GL_LIGHT0);// close 0 Signal light source
      glDisable(GL_LIGHT1); // close 1 Signal light source
} 边栏推荐
- 2022.7.4DAY596
- Study summary of postgraduate entrance examination in July
- 搭建物联网硬件通信技术几种方案
- IPv4套接字地址结构
- 深入分析ERC-4907协议的主要内容,思考此协议对NFT市场流动性意义!
- Guid primary key
- How to cancel automatic saving of changes in sqlyog database
- P1031 [NOIP2002 提高组] 均分纸牌
- XML configuration file parsing and modeling
- CONDA creates virtual environment offline
猜你喜欢

Guide de signature du Code Appx
Trajectory planning for multi-robot systems: Methods and applications 综述阅读笔记
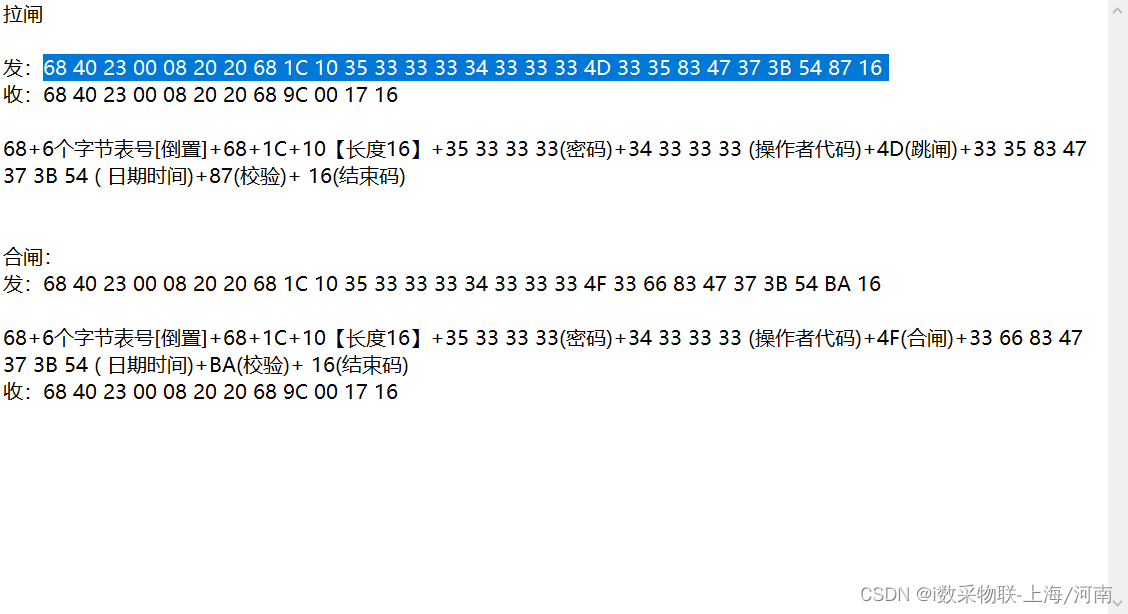
电表远程抄表拉合闸操作命令指令

使用U2-Net深层网络实现——证件照生成程序

Chris Lattner, père de llvm: Pourquoi reconstruire le logiciel d'infrastructure ai
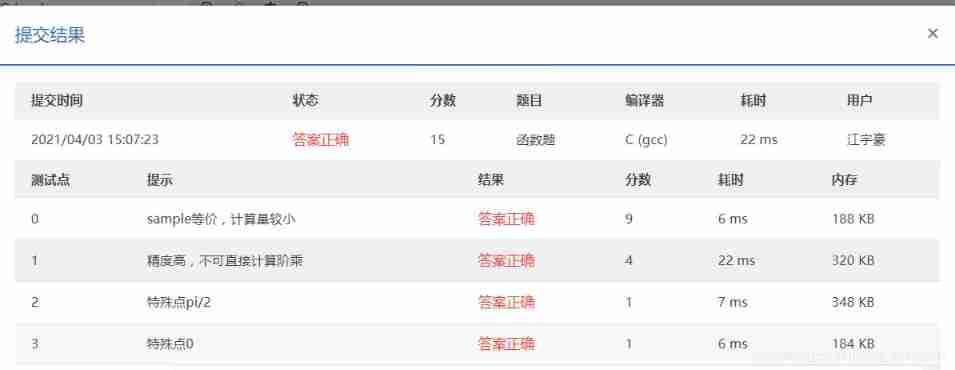
01 use function to approximate cosine function (15 points)
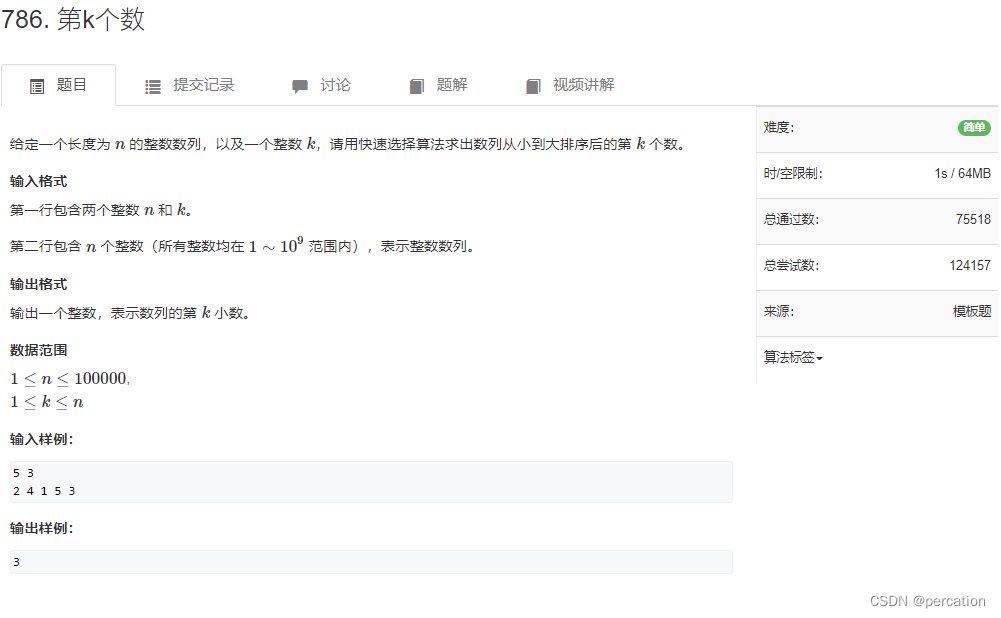
【acwing】786. 第k个数

String formatting

Programming features of ISP, IAP, ICP, JTAG and SWD
leetcode-560:和为 K 的子数组
随机推荐
ArcGIS operation: converting DWG data to SHP data
学习记录——高精度加法和乘法
BigDecimal value comparison
Appx代码签名指南
IDA中常见快捷键
STM32 ADC and DMA
AHB bus in stm32_ Apb2 bus_ Apb1 bus what are these
Kotlin realizes wechat interface switching (fragment exercise)
leetcode-304:二维区域和检索 - 矩阵不可变
The method of word automatically generating directory
555电路详解
Some properties of leetcode139 Yang Hui triangle
Study summary of postgraduate entrance examination in July
Word自动生成目录的方法
深入分析ERC-4907协议的主要内容,思考此协议对NFT市场流动性意义!
Slurm资源管理与作业调度系统安装配置
SolidWorks工程图中添加中心线和中心符号线的办法
IPv4套接字地址结构
OpenGL glLightfv 函数的应用以及光源的相关知识
Guid primary key