当前位置:网站首页>13 医疗挂号系统_【 微信登录】
13 医疗挂号系统_【 微信登录】
2022-07-06 09:05:00 【向涛歌学习】
登录需求
登录需求
- 登录采取弹出层的形式
- 登录方式:
- 手机号码+手机验证码
- 微信扫描
- 无注册界面,第一次登录根据手机号判断系统是否存在,如果不存在则自动注册
- 微信扫描登录成功必须绑定手机号码,即:第一次扫描成功后绑定手机号,以后登录扫描直接登录成功
- 网关统一判断登录状态,如何需要登录,页面弹出登录层
微信登录
1、OAuth2
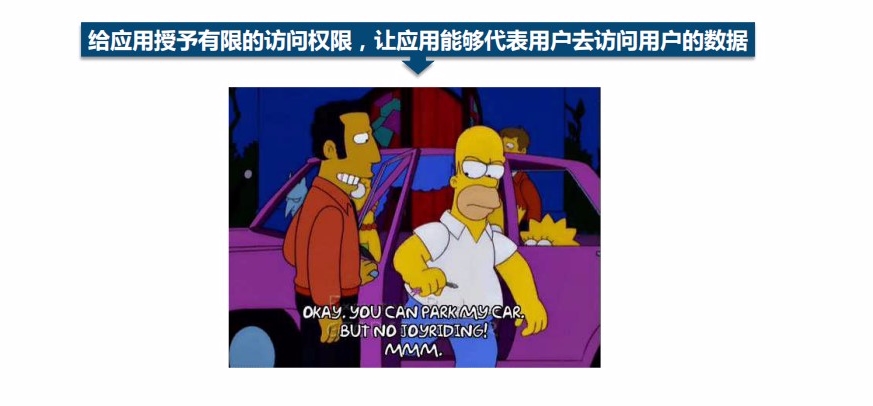
OAuth2解决什么问题
1.1.1 开放系统间授权
照片拥有者想要在云冲印服务上打印照片,云冲印服务需要访问云存储服务上的资源

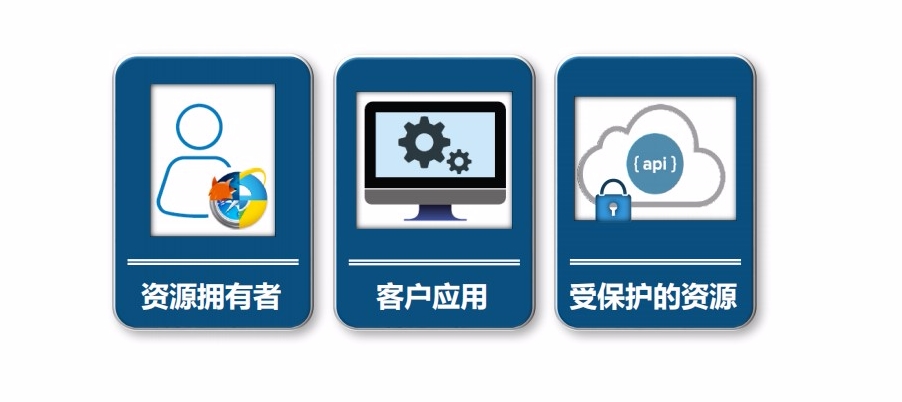
1.1.2图例
资源拥有者:照片拥有者
客户应用:云冲印
受保护的资源:照片
1.1.3方式一:用户名密码复制
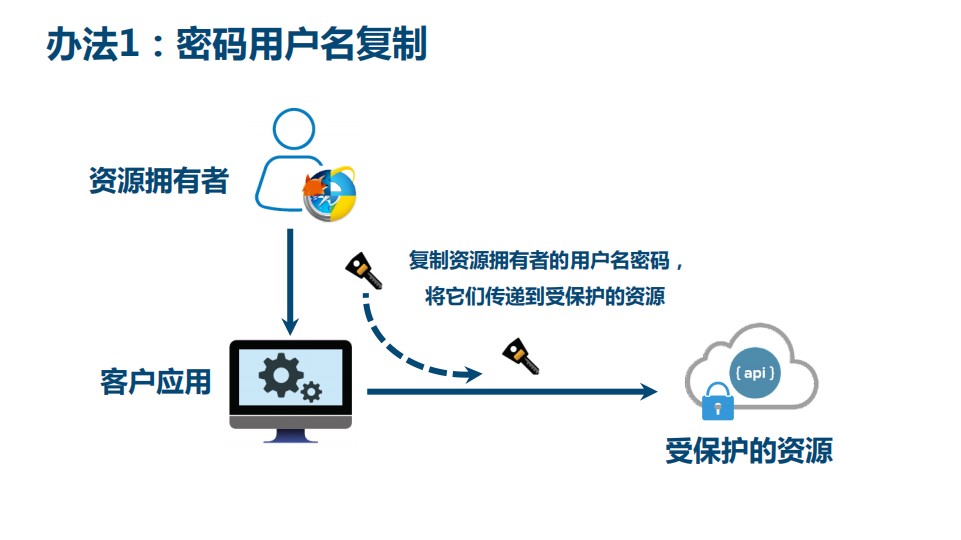
用户将自己的"云存储"服务的用户名和密码,告诉"云冲印",后者就可以读取用户的照片了。这样的做法有以下几个严重的缺点。
(1)"云冲印"为了后续的服务,会保存用户的密码,这样很不安全。
(2)Google不得不部署密码登录,而我们知道,单纯的密码登录并不安全。
(3)"云冲印"拥有了获取用户储存在Google所有资料的权力,用户没法限制"云冲印"获得授权的范围和有效期。
(4)用户只有修改密码,才能收回赋予"云冲印"的权力。但是这样做,会使得其他所有获得用户授权的第三方应用程序全部失效。
(5)只要有一个第三方应用程序被破解,就会导致用户密码泄漏,以及所有被密码保护的数据泄漏。
总结:
将受保护的资源中的用户名和密码存储在客户应用的服务器上,使用时直接使用这个用户名和密码登录
适用于同一公司内部的多个系统,不适用于不受信的第三方应用
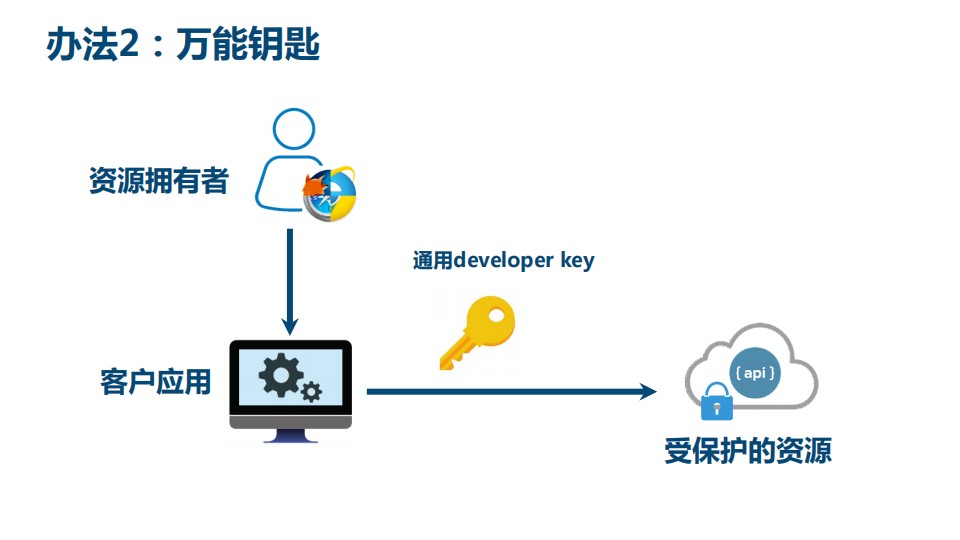
1.1.4方式二:通用开发者key
适用于合作商或者授信的不同业务部门之间
1.1.5方式三:颁发令牌
接近OAuth2方式,需要考虑如何管理令牌、颁发令牌、吊销令牌,需要统一的协议,因此就有了OAuth2协议
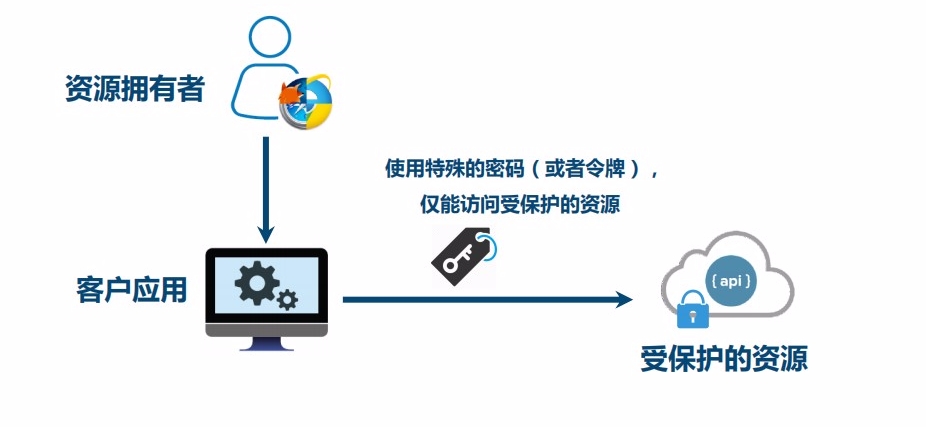
令牌类比仆从钥匙
1.2 OAuth2最简向导
1.2.1 OAuth主要角色
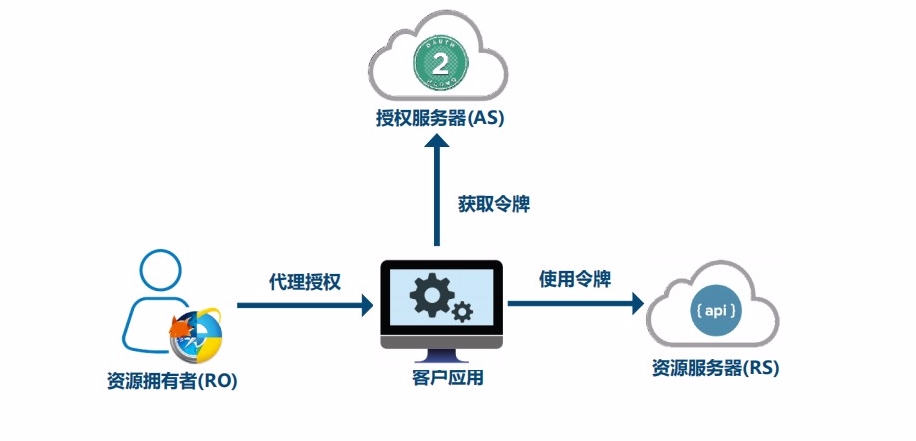
1.2.2最简向导
川崎高彦:OAuth2领域专家,开发了一个OAuth2 sass服务,OAuth2 as Service,并且做成了一个公司
在融资的过程中为了向投资人解释OAuth2是什么,于是写了一篇文章,《OAuth2最简向导》
1.3 OAuth2的应用
1.3.1 微服务安全
OAuth2解决单点登录问题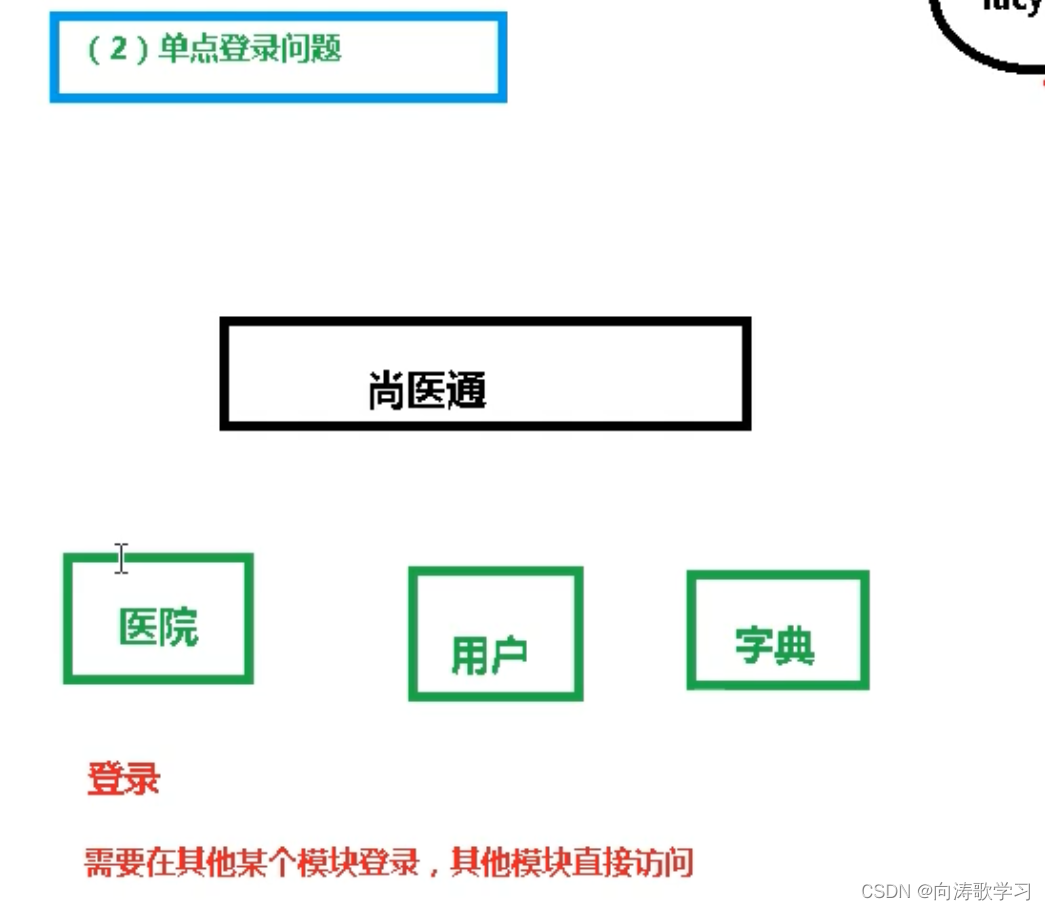
现代微服务中系统微服务化以及应用的形态和设备类型增多,不能用传统的登录方式
核心的技术不是用户名和密码,而是token,由AuthServer颁发token,用户使用token进行登录

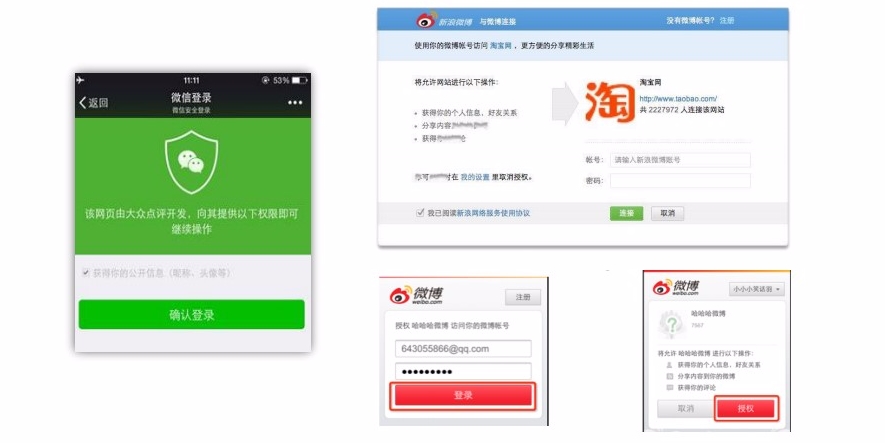
1.3.2 社交登录
2、微信登录介绍
2.1 前期准备
1、注册
微信开放平台:https://open.weixin.qq.com
2、邮箱激活
3、完善开发者资料
4、开发者资质认证
准备营业执照,1-2个工作日审批、300元
5、创建网站应用
提交审核,7个工作日审批
6、内网穿透
ngrok的使用
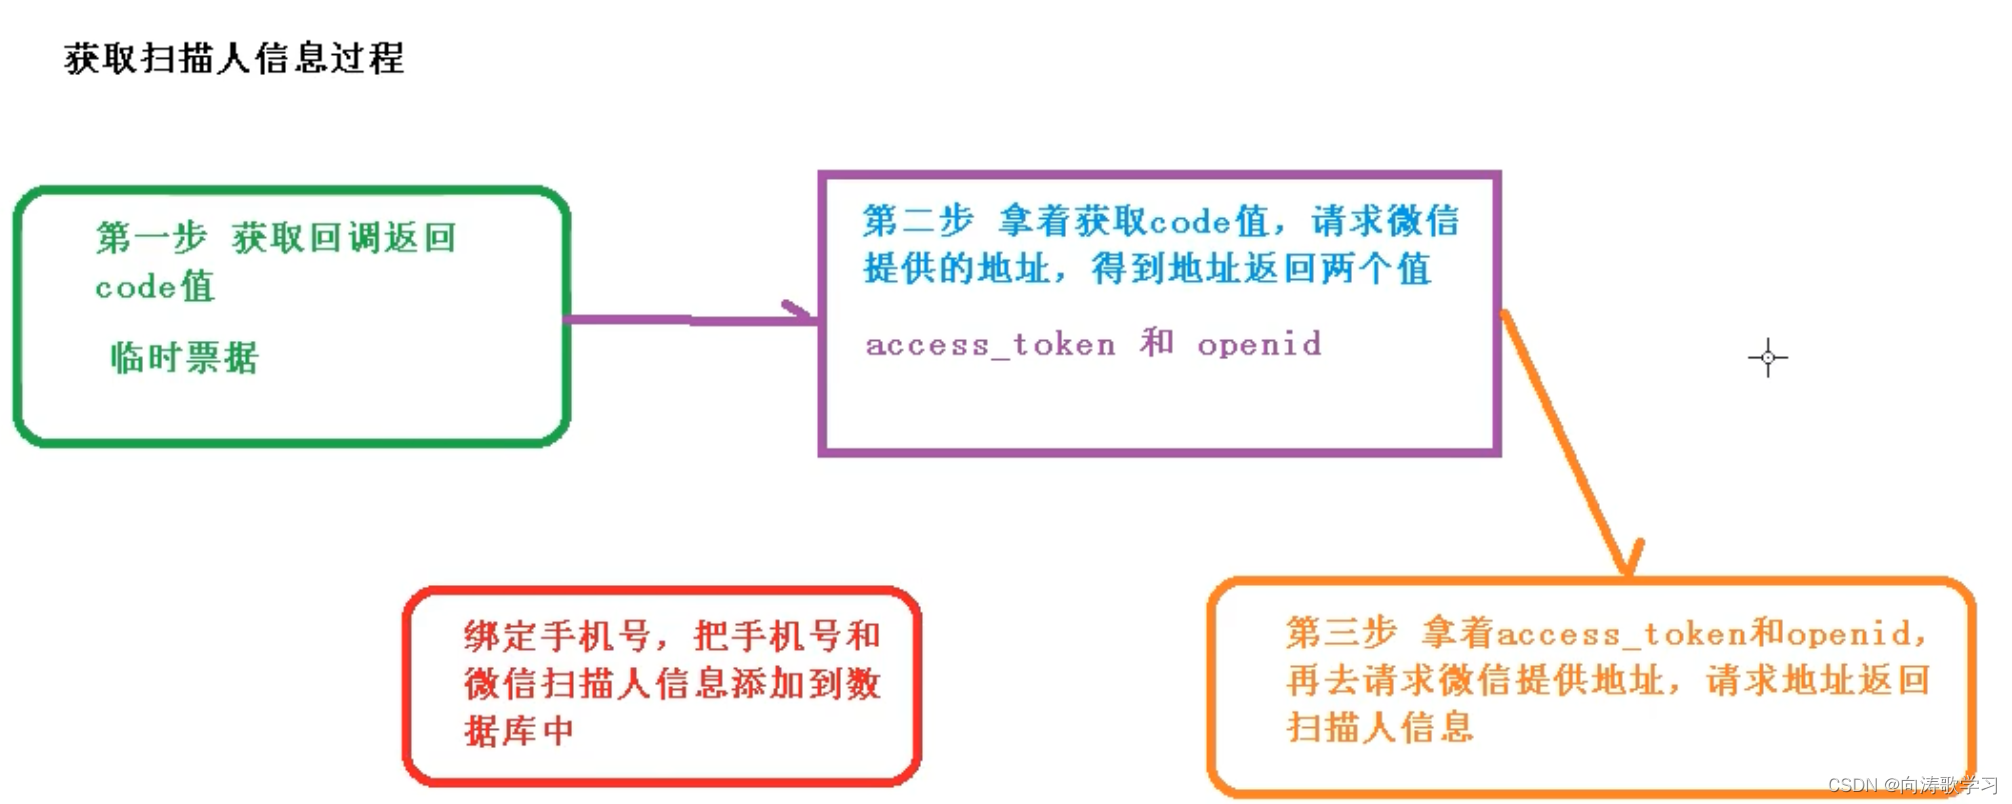
2.2 授权流程
获取access_token时序图
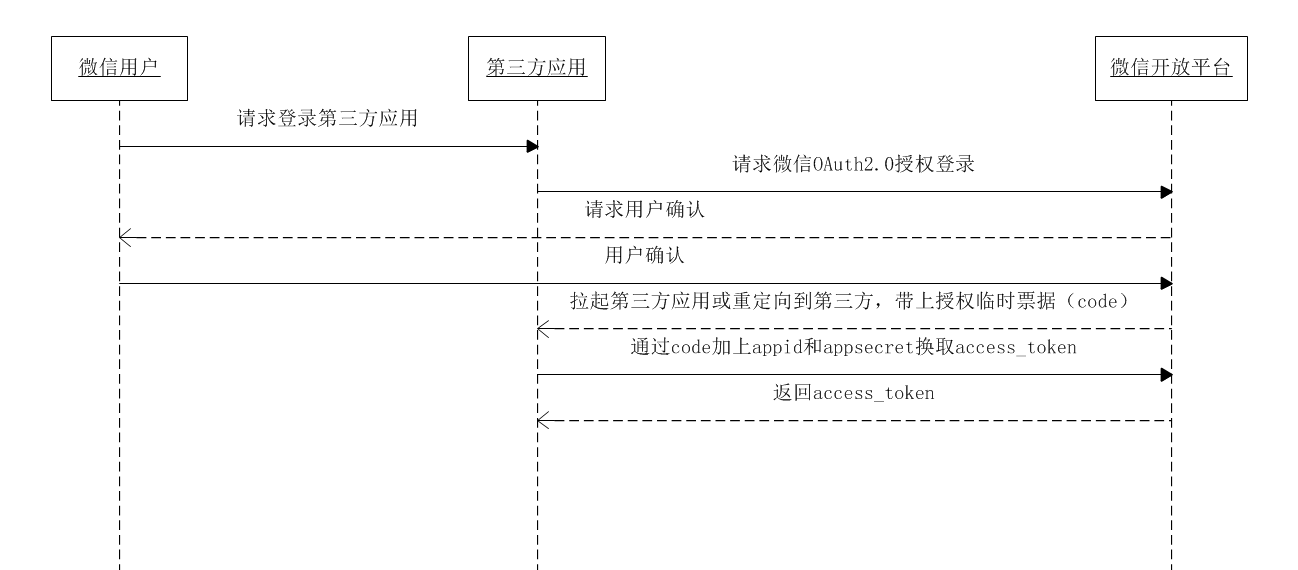
第一步:请求CODE(生成授权URL)
第二步:通过code获取access_token(开发回调URL)
3、服务器端开发
操作模块:service-user
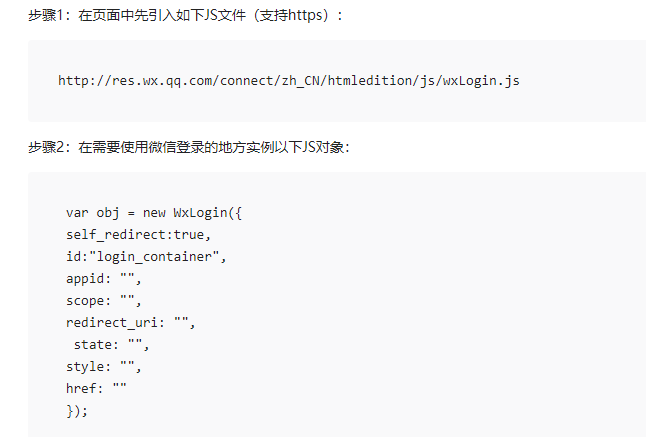
说明:微信登录二维码我们是以弹出层的形式打开,不是以页面形式,所以做法是不一样的,参考如下链接,上面有相关弹出层的方式
https://developers.weixin.qq.com/doc/oplatform/Website_App/WeChat_Login/Wechat_Login.html
如图:
因此我们的操作步骤为:
第一步我们通过接口把对应参数返回页面;
第二步在头部页面启动打开微信登录二维码;
第三步处理登录回调接口;
第四步回调返回页面通知微信登录层回调成功
第五步如果是第一次扫描登录,则绑定手机号码,登录成功
接下来我们根据步骤,一步一步实现
3.1 返回微信登录参数
3.1.1 添加配置
在application-dev.yml添加配置
wx.open.app_id=wxed9954c01bb89b47
wx.open.app_secret=a7482517235173ddb4083788de60b90e
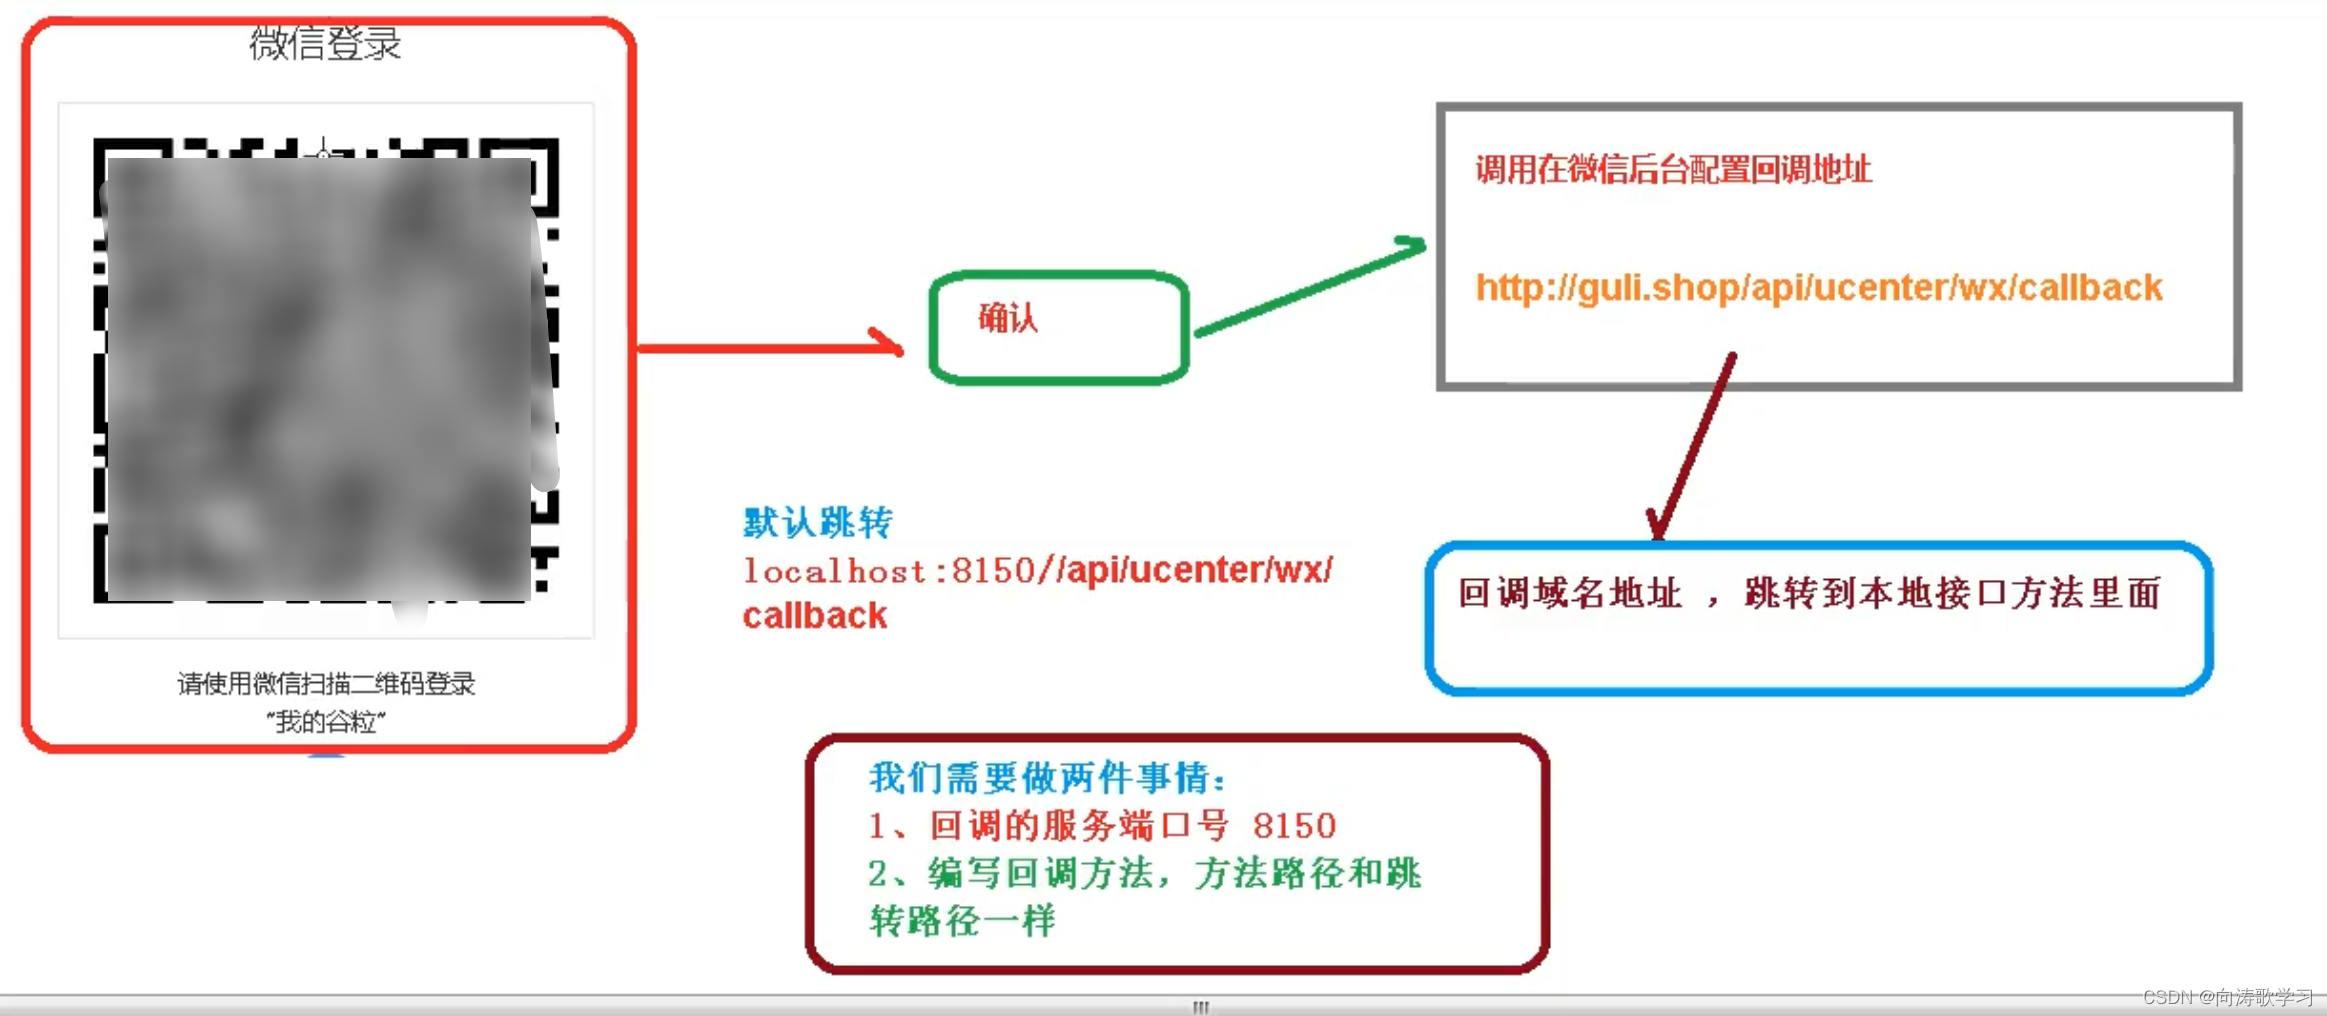
wx.open.redirect_url=http://guli.shop/api/ucenter/wx/callback
yygh.baseUrl=http://localhost:3000
3.1.2 添加配置类
@Component
public class ConstantPropertiesUtil implements InitializingBean {


    @Value("${wx.open.app_id}")
    private String appId;

    @Value("${wx.open.app_secret}")
    private String appSecret;

    @Value("${wx.open.redirect_url}")
    private String redirectUrl;

    @Value("${yygh.baseUrl}")
    private String yyghBaseUrl;

    public static String WX_OPEN_APP_ID;
    public static String WX_OPEN_APP_SECRET;
    public static String WX_OPEN_REDIRECT_URL;

    public static String YYGH_BASE_URL;

    @Override
    public void afterPropertiesSet() throws Exception {

        WX_OPEN_APP_ID = appId;
        WX_OPEN_APP_SECRET = appSecret;
        WX_OPEN_REDIRECT_URL = redirectUrl;
        YYGH_BASE_URL = yyghBaseUrl;
    }
}
3.1.3 添加接口
添加com.atguigu.yygh.user.api.WeixinApiController 类
@Controller
@RequestMapping("/api/ucenter/wx")
public class WeixinApiController {


    @Autowired
    private UserInfoService userInfoService;
    @Autowired
    private RedisTemplate redisTemplate;

    /** * 获取微信登录参数 */
    @GetMapping("getLoginParam")
    @ResponseBody
    public Result genQrConnect(HttpSession session) throws UnsupportedEncodingException {

        String redirectUri = URLEncoder.encode(ConstantPropertiesUtil.WX_OPEN_REDIRECT_URL, "UTF-8");
        Map<String, Object> map = new HashMap<>();
        map.put("appid", ConstantPropertiesUtil.WX_OPEN_APP_ID);
        map.put("redirectUri", redirectUri);
        map.put("scope", "snsapi_login");
        map.put("state", System.currentTimeMillis()+"");//System.currentTimeMillis()+""
        return Result.ok(map);
    }
}
3.2 前端显示登录二维码
3.2.1 封装api请求
创建/api/user/wexin.js文件
import request from '@/utils/request'

const api_name = `/api/ucenter/wx`

export default {

  getLoginParam() {

    return request({

      url: `${
      api_name}/getLoginParam`,
      method: `get`
    })
  }
}
3.2.2 修改组件
修改layouts/myheader.vue文件,添加微信二维码登录逻辑
1、引入api
import weixinApi from '@/api/weixin'
2、引入微信js
  mounted() {

    // 注册全局登录事件对象
    window.loginEvent = new Vue();
    // 监听登录事件
    loginEvent.$on('loginDialogEvent', function () {

      document.getElementById("loginDialog").click();
    })
    // 触发事件,显示登录层:loginEvent.$emit('loginDialogEvent')
    //初始化微信js
    const script = document.createElement('script')
    script.type = 'text/javascript'
    script.src = 'https://res.wx.qq.com/connect/zh_CN/htmledition/js/wxLogin.js'
    document.body.appendChild(script)

    // 微信登录回调处理
    let self = this;
    window["loginCallback"] = (name,token, openid) => {

      self.loginCallback(name, token, openid);
    }
  },
3、实例化微信JS对象
添加微信登录方法
loginCallback(name, token, openid) {

    // 打开手机登录层,绑定手机号,改逻辑与手机登录一致
    if(openid != null) {

       this.userInfo.openid = openid
       this.showLogin()
    } else {

       this.setCookies(name, token)
    }
},

weixinLogin() {

  this.dialogAtrr.showLoginType = 'weixin'

  weixinApi.getLoginParam().then(response => {

    var obj = new WxLogin({

      self_redirect:true,
      id: 'weixinLogin', // 需要显示的容器id
      appid: response.data.appid, // 公众号appid wx*******
      scope: response.data.scope, // 网页默认即可
      redirect_uri: response.data.redirect_uri, // 授权成功后回调的url
      state: response.data.state, // 可设置为简单的随机数加session用来校验
      style: 'black', // 提供"black"、"white"可选。二维码的样式
      href: '' // 外部css文件url,需要https
    })
  })
},
说明:微信登录方法已绑定weixinLogin(),查看页面
- 测试
刷新页面,查看效果
3.3 处理微信回调
3.3.1 添加httpclient工具类
添加com.atguigu.yygh.user.util.HttpClientUtils类
public class HttpClientUtils {


   public static final int connTimeout=10000;
   public static final int readTimeout=10000;
   public static final String charset="UTF-8";
   private static HttpClient client = null;

   static {

      PoolingHttpClientConnectionManager cm = new PoolingHttpClientConnectionManager();
      cm.setMaxTotal(128);
      cm.setDefaultMaxPerRoute(128);
      client = HttpClients.custom().setConnectionManager(cm).build();
   }

   public static String postParameters(String url, String parameterStr) throws ConnectTimeoutException, SocketTimeoutException, Exception{

      return post(url,parameterStr,"application/x-www-form-urlencoded",charset,connTimeout,readTimeout);
   }

   public static String postParameters(String url, String parameterStr,String charset, Integer connTimeout, Integer readTimeout) throws ConnectTimeoutException, SocketTimeoutException, Exception{

      return post(url,parameterStr,"application/x-www-form-urlencoded",charset,connTimeout,readTimeout);
   }

   public static String postParameters(String url, Map<String, String> params) throws ConnectTimeoutException,
         SocketTimeoutException, Exception {

      return postForm(url, params, null, connTimeout, readTimeout);
   }

   public static String postParameters(String url, Map<String, String> params, Integer connTimeout,Integer readTimeout) throws ConnectTimeoutException,
         SocketTimeoutException, Exception {

      return postForm(url, params, null, connTimeout, readTimeout);
   }

   public static String get(String url) throws Exception {

      return get(url, charset, null, null);
   }

   public static String get(String url, String charset) throws Exception {

      return get(url, charset, connTimeout, readTimeout);
   }

   /** * 发送一个 Post 请求, 使用指定的字符集编码. * * @param url * @param body RequestBody * @param mimeType 例如 application/xml "application/x-www-form-urlencoded" a=1&b=2&c=3 * @param charset 编码 * @param connTimeout 建立链接超时时间,毫秒. * @param readTimeout 响应超时时间,毫秒. * @return ResponseBody, 使用指定的字符集编码. * @throws ConnectTimeoutException 建立链接超时异常 * @throws SocketTimeoutException 响应超时 * @throws Exception */
   public static String post(String url, String body, String mimeType,String charset, Integer connTimeout, Integer readTimeout)
         throws ConnectTimeoutException, SocketTimeoutException, Exception {

      HttpClient client = null;
      HttpPost post = new HttpPost(url);
      String result = "";
      try {

         if (StringUtils.isNotBlank(body)) {

            HttpEntity entity = new StringEntity(body, ContentType.create(mimeType, charset));
            post.setEntity(entity);
         }
         // 设置参数
         Builder customReqConf = RequestConfig.custom();
         if (connTimeout != null) {

            customReqConf.setConnectTimeout(connTimeout);
         }
         if (readTimeout != null) {

            customReqConf.setSocketTimeout(readTimeout);
         }
         post.setConfig(customReqConf.build());

         HttpResponse res;
         if (url.startsWith("https")) {

            // 执行 Https 请求.
            client = createSSLInsecureClient();
            res = client.execute(post);
         } else {

            // 执行 Http 请求.
            client = HttpClientUtils.client;
            res = client.execute(post);
         }
         result = IOUtils.toString(res.getEntity().getContent(), charset);
      } finally {

         post.releaseConnection();
         if (url.startsWith("https") && client != null&& client instanceof CloseableHttpClient) {

            ((CloseableHttpClient) client).close();
         }
      }
      return result;
   }


   /** * 提交form表单 * * @param url * @param params * @param connTimeout * @param readTimeout * @return * @throws ConnectTimeoutException * @throws SocketTimeoutException * @throws Exception */
   public static String postForm(String url, Map<String, String> params, Map<String, String> headers, Integer connTimeout,Integer readTimeout) throws ConnectTimeoutException,
         SocketTimeoutException, Exception {


      HttpClient client = null;
      HttpPost post = new HttpPost(url);
      try {

         if (params != null && !params.isEmpty()) {

            List<NameValuePair> formParams = new ArrayList<NameValuePair>();
            Set<Entry<String, String>> entrySet = params.entrySet();
            for (Entry<String, String> entry : entrySet) {

               formParams.add(new BasicNameValuePair(entry.getKey(), entry.getValue()));
            }
            UrlEncodedFormEntity entity = new UrlEncodedFormEntity(formParams, Consts.UTF_8);
            post.setEntity(entity);
         }

         if (headers != null && !headers.isEmpty()) {

            for (Entry<String, String> entry : headers.entrySet()) {

               post.addHeader(entry.getKey(), entry.getValue());
            }
         }
         // 设置参数
         Builder customReqConf = RequestConfig.custom();
         if (connTimeout != null) {

            customReqConf.setConnectTimeout(connTimeout);
         }
         if (readTimeout != null) {

            customReqConf.setSocketTimeout(readTimeout);
         }
         post.setConfig(customReqConf.build());
         HttpResponse res = null;
         if (url.startsWith("https")) {

            // 执行 Https 请求.
            client = createSSLInsecureClient();
            res = client.execute(post);
         } else {

            // 执行 Http 请求.
            client = HttpClientUtils.client;
            res = client.execute(post);
         }
         return IOUtils.toString(res.getEntity().getContent(), "UTF-8");
      } finally {

         post.releaseConnection();
         if (url.startsWith("https") && client != null
               && client instanceof CloseableHttpClient) {

            ((CloseableHttpClient) client).close();
         }
      }
   }

   /** * 发送一个 GET 请求 */
   public static String get(String url, String charset, Integer connTimeout,Integer readTimeout)
         throws ConnectTimeoutException,SocketTimeoutException, Exception {


      HttpClient client = null;
      HttpGet get = new HttpGet(url);
      String result = "";
      try {

         // 设置参数
         Builder customReqConf = RequestConfig.custom();
         if (connTimeout != null) {

            customReqConf.setConnectTimeout(connTimeout);
         }
         if (readTimeout != null) {

            customReqConf.setSocketTimeout(readTimeout);
         }
         get.setConfig(customReqConf.build());

         HttpResponse res = null;

         if (url.startsWith("https")) {

            // 执行 Https 请求.
            client = createSSLInsecureClient();
            res = client.execute(get);
         } else {

            // 执行 Http 请求.
            client = HttpClientUtils.client;
            res = client.execute(get);
         }

         result = IOUtils.toString(res.getEntity().getContent(), charset);
      } finally {

         get.releaseConnection();
         if (url.startsWith("https") && client != null && client instanceof CloseableHttpClient) {

            ((CloseableHttpClient) client).close();
         }
      }
      return result;
   }

   /** * 从 response 里获取 charset */
   @SuppressWarnings("unused")
   private static String getCharsetFromResponse(HttpResponse ressponse) {

      // Content-Type:text/html; charset=GBK
      if (ressponse.getEntity() != null  && ressponse.getEntity().getContentType() != null && ressponse.getEntity().getContentType().getValue() != null) {

         String contentType = ressponse.getEntity().getContentType().getValue();
         if (contentType.contains("charset=")) {

            return contentType.substring(contentType.indexOf("charset=") + 8);
         }
      }
      return null;
   }

   /** * 创建 SSL连接 * @return * @throws GeneralSecurityException */
   private static CloseableHttpClient createSSLInsecureClient() throws GeneralSecurityException {

      try {

         SSLContext sslContext = new SSLContextBuilder().loadTrustMaterial(null, new TrustStrategy() {

            public boolean isTrusted(X509Certificate[] chain,String authType) throws CertificateException {

               return true;
            }
         }).build();

         SSLConnectionSocketFactory sslsf = new SSLConnectionSocketFactory(sslContext, new X509HostnameVerifier() {


            @Override
            public boolean verify(String arg0, SSLSession arg1) {

               return true;
            }

            @Override
            public void verify(String host, SSLSocket ssl)
                  throws IOException {

            }

            @Override
            public void verify(String host, X509Certificate cert)
                  throws SSLException {

            }

            @Override
            public void verify(String host, String[] cns,
                           String[] subjectAlts) throws SSLException {

            }
         });
         return HttpClients.custom().setSSLSocketFactory(sslsf).build();

      } catch (GeneralSecurityException e) {

         throw e;
      }
   }
}
3.3.2 添加回调接口获取access_token
在WeixinApiController 类添加回调方法
/** * 微信登录回调 * * @param code * @param state * @return */
@RequestMapping("callback")
public String callback(String code, String state) {

    //获取授权临时票据
    System.out.println("微信授权服务器回调。。。。。。");
    System.out.println("state = " + state);
    System.out.println("code = " + code);

    if (StringUtils.isEmpty(state) || StringUtils.isEmpty(code)) {

        log.error("非法回调请求");
        throw new YyghException(ResultCodeEnum.ILLEGAL_CALLBACK_REQUEST_ERROR);
    }

    //使用code和appid以及appscrect换取access_token
    StringBuffer baseAccessTokenUrl = new StringBuffer()
            .append("https://api.weixin.qq.com/sns/oauth2/access_token")
            .append("?appid=%s")
            .append("&secret=%s")
            .append("&code=%s")
            .append("&grant_type=authorization_code");

    String accessTokenUrl = String.format(baseAccessTokenUrl.toString(),
            ConstantPropertiesUtil.WX_OPEN_APP_ID,
            ConstantPropertiesUtil.WX_OPEN_APP_SECRET,
            code);

    String result = null;
    try {

        result = HttpClientUtils.get(accessTokenUrl);
    } catch (Exception e) {

        throw new YyghException(ResultCodeEnum.FETCH_ACCESSTOKEN_FAILD);
    }

    System.out.println("使用code换取的access_token结果 = " + result);

    JSONObject resultJson = JSONObject.parseObject(result);
    if(resultJson.getString("errcode") != null){

        log.error("获取access_token失败:" + resultJson.getString("errcode") + resultJson.getString("errmsg"));
        throw new YyghException(ResultCodeEnum.FETCH_ACCESSTOKEN_FAILD);
    }

    String accessToken = resultJson.getString("access_token");
    String openId = resultJson.getString("openid");
    log.info(accessToken);
    log.info(openId);

    //根据access_token获取微信用户的基本信息
    //先根据openid进行数据库查询
   // UserInfo userInfo = userInfoService.getByOpenid(openId);
    // 如果没有查到用户信息,那么调用微信个人信息获取的接口
   // if(null == userInfo){

        //如果查询到个人信息,那么直接进行登录
        //使用access_token换取受保护的资源:微信的个人信息
        String baseUserInfoUrl = "https://api.weixin.qq.com/sns/userinfo" +
                "?access_token=%s" +
                "&openid=%s";
        String userInfoUrl = String.format(baseUserInfoUrl, accessToken, openId);
        String resultUserInfo = null;
        try {

            resultUserInfo = HttpClientUtils.get(userInfoUrl);
        } catch (Exception e) {

            throw new YyghException(ResultCodeEnum.FETCH_USERINFO_ERROR);
        }
        System.out.println("使用access_token获取用户信息的结果 = " + resultUserInfo);

        JSONObject resultUserInfoJson = JSONObject.parseObject(resultUserInfo);
        if(resultUserInfoJson.getString("errcode") != null){

            log.error("获取用户信息失败:" + resultUserInfoJson.getString("errcode") + resultUserInfoJson.getString("errmsg"));
            throw new YyghException(ResultCodeEnum.FETCH_USERINFO_ERROR);
        }

        //解析用户信息
        String nickname = resultUserInfoJson.getString("nickname");
        String headimgurl = resultUserInfoJson.getString("headimgurl");

        UserInfo userInfo = new UserInfo();
        userInfo.setOpenid(openId);
        userInfo.setNickName(nickname);
        userInfo.setStatus(1);
        userInfoService.save(userInfo);
   // }

    Map<String, Object> map = new HashMap<>();
    String name = userInfo.getName();
    if(StringUtils.isEmpty(name)) {

        name = userInfo.getNickName();
    }
    if(StringUtils.isEmpty(name)) {

        name = userInfo.getPhone();
    }
    map.put("name", name);
    if(StringUtils.isEmpty(userInfo.getPhone())) {

        map.put("openid", userInfo.getOpenid());
    } else {

        map.put("openid", "");
    }
    String token = JwtHelper.createToken(userInfo.getId(), name);
    map.put("token", token);
    return "redirect:" + ConstantPropertiesUtil.YYGH_BASE_URL + "/weixin/callback?token="+map.get("token")+"&openid="+map.get("openid")+"&name="+URLEncoder.encode((String)map.get("name"));
}
3.3.3 获取用户信息
3.3.3.1 根据openid查询用户是否已注册
1、UserInfoService类添加接口
/** * 根据微信openid获取用户信息 * @param openid * @return */
UserInfo getByOpenid(String openid);
2、UserInfoServiceImpl类添加接口实现
@Override
public UserInfo getByOpenid(String openid) {

return userInfoMapper.selectOne(new QueryWrapper<UserInfo>().eq("openid", openid));
}
3.3.3.2 根据access_token获取用户信息
@Autowired
private UserInfoService userInfoService;
@RequestMapping("callback")
public String callback(String code, String state) {

//获取授权临时票据
...

//根据access_token获取微信用户的基本信息
    //先根据openid进行数据库查询
UserInfo userInfo = userInfoService.getByOpenid(openId);
// 如果没有查到用户信息,那么调用微信个人信息获取的接口
if(null == userInfo){

//如果查询到个人信息,那么直接进行登录
        //使用access_token换取受保护的资源:微信的个人信息
String baseUserInfoUrl = "https://api.weixin.qq.com/sns/userinfo"+
"?access_token=%s"+
"&openid=%s";
        String userInfoUrl = String.format(baseUserInfoUrl, accessToken, openId);
        String resultUserInfo = null;
try {

            resultUserInfo = HttpClientUtils.get(userInfoUrl);
        } catch (Exception e) {

throw new YyghException(ResultCodeEnum.FETCH_USERINFO_ERROR);
        }
        System.out.println("使用access_token获取用户信息的结果 = "+ resultUserInfo);

        JSONObject resultUserInfoJson = JSONObject.parseObject(resultUserInfo);
if(resultUserInfoJson.getString("errcode") != null){

log.error("获取用户信息失败:"+ resultUserInfoJson.getString("errcode") + resultUserInfoJson.getString("errmsg"));
throw new YyghException(ResultCodeEnum.FETCH_USERINFO_ERROR);
        }

//解析用户信息
String nickname = resultUserInfoJson.getString("nickname");
        String headimgurl = resultUserInfoJson.getString("headimgurl");

        userInfo = new UserInfo();
        userInfo.setOpenid(openId);
        userInfo.setNickName(nickname);
        userInfo.setStatus(1);
userInfoService.save(userInfo);
    }

    Map<String, Object> map = new HashMap<>();
    String name = userInfo.getName();
if(StringUtils.isEmpty(name)) {

        name = userInfo.getNickName();
    }
if(StringUtils.isEmpty(name)) {

        name = userInfo.getPhone();
    }
    map.put("name", name);
if(StringUtils.isEmpty(userInfo.getPhone())) {

        map.put("openid", userInfo.getOpenid());
    } else {

        map.put("openid", "");
    }
    String token = JwtHelper.createToken(userInfo.getId(), name);
    map.put("token", token);
return "redirect:"+ ConstantPropertiesUtil.YYGH_BASE_URL + "/weixin/callback?token="+map.get("token")+"&openid="+map.get("openid")+"&name="+URLEncoder.encode((String)map.get("name"));
}
说明:我们根据返回openid判断是否需要绑定手机号码,如果需要绑定,那么我们要根据openid用户用户信息,然后更新上手机号码
3.4 回调返回页面
操作:yygh-site
说明:我们只期望返回一个空页面,然后跟登录层通信就可以了,其实就是一个过渡页面,所以我们要给这个过渡页面定义一个空模板
3.4.1定义空模块
添加空模板组件:/layouts/empty.vue
<template>
<div>
<nuxt/>
</div>
</template>
3.4.2回调返回页面
根据返回路径/weixin/cakkback,我们创建组件/weixin/cakkback.vue
<template>
  <!-- header -->
  <div>
  </div>
  <!-- footer -->
</template>
<script>
export default {
  layout: "empty",
  data() {
    return {
    }
  },
  mounted() {
    let token = this.$route.query.token
    let name = this.$route.query.name
    let openid = this.$route.query.openid
    // 调用父vue方法
    window.parent['loginCallback'](name, token, openid)
  }
}
</script>
说明:在页面我们就能够接收到返回来的参数
3.4.3 父组件定义回调方法
在myheader.vue添加方法
  mounted() {
    // 注册全局登录事件对象
    window.loginEvent = new Vue();
    // 监听登录事件
    loginEvent.$on('loginDialogEvent', function () {
      document.getElementById("loginDialog").click();
    })
    // 触发事件,显示登录层:loginEvent.$emit('loginDialogEvent')
    //初始化微信js
    const script = document.createElement('script')
    script.type = 'text/javascript'
    script.src = 'https://res.wx.qq.com/connect/zh_CN/htmledition/js/wxLogin.js'
    document.body.appendChild(script)

    // 微信登录回调处理
    let self = this;
    window["loginCallback"] = (name,token, openid) => {
      self.loginCallback(name, token, openid);
    }
  },

loginCallback(name, token, openid) {
      // 打开手机登录层,绑定手机号,改逻辑与手机登录一致
      if(openid != '') {
        this.userInfo.openid = openid
        this.showLogin()
      } else {
        this.setCookies(name, token)
      }
    },
3.5 服务器绑定手机号码
页面绑定手机号码会把openid传递过来,我们根据openid找到用户信息,然后绑定手机号码
修改UserInfoServiceImpl类登录方法
@Override
public Map<String, Object> login(LoginVo loginVo) {

    String phone = loginVo.getPhone();
    String code = loginVo.getCode();

//校验参数
if(StringUtils.isEmpty(phone) ||
            StringUtils.isEmpty(code)) {

throw new YyghException(ResultCodeEnum.PARAM_ERROR);
    }

//校验校验验证码
String mobleCode = redisTemplate.opsForValue().get(phone);
if(!code.equals(mobleCode)) {

throw new YyghException(ResultCodeEnum.CODE_ERROR);
    }

//绑定手机号码
UserInfo userInfo = null;
if(!StringUtils.isEmpty(loginVo.getOpenid())) {

        userInfo = this.getByOpenid(loginVo.getOpenid());
if(null != userInfo) {

            userInfo.setPhone(loginVo.getPhone());
this.updateById(userInfo);
        } else {

throw new YyghException(ResultCodeEnum.DATA_ERROR);
        }
    }

//userInfo=null 说明手机直接登录
if(null == userInfo) {

        QueryWrapper<UserInfo> queryWrapper = new QueryWrapper<>();
        queryWrapper.eq("phone", phone);
        userInfo = userInfoMapper.selectOne(queryWrapper);
if(null == userInfo) {

            userInfo = new UserInfo();
            userInfo.setName("");
            userInfo.setPhone(phone);
            userInfo.setStatus(1);
this.save(userInfo);
        }
 }

//校验是否被禁用
if(userInfo.getStatus() == 0) {

throw new YyghException(ResultCodeEnum.LOGIN_DISABLED_ERROR);
    }

//记录登录
UserLoginRecord userLoginRecord = new UserLoginRecord();
    userLoginRecord.setUserId(userInfo.getId());
    userLoginRecord.setIp(loginVo.getIp());
userLoginRecordMapper.insert(userLoginRecord);

//返回页面显示名称
Map<String, Object> map = new HashMap<>();
    String name = userInfo.getName();
if(StringUtils.isEmpty(name)) {

        name = userInfo.getNickName();
    }
if(StringUtils.isEmpty(name)) {

        name = userInfo.getPhone();
    }
    map.put("name", name);
    String token = JwtHelper.createToken(userInfo.getId(), name);
    map.put("token", token);
return map;
}
3.6 myheader.vue完整代码
<template>
<div class="header-container">
<div class="wrapper">
<!-- logo -->
<div class="left-wrapper v-link selected">
<img style="width: 50px" width="50" height="50" src="~assets/images/logo.png">
<span class="text">尚医通 预约挂号统一平台</span>
</div>
<!-- 搜索框 -->
<div class="search-wrapper">
<div class="hospital-search animation-show">
<el-autocomplete
class="search-input small"
prefix-icon="el-icon-search"
v-model="state"
:fetch-suggestions="querySearchAsync"
placeholder="点击输入医院名称"
@select="handleSelect"
>
<span slot="suffix" class="search-btn v-link highlight clickable selected">搜索 </span>
</el-autocomplete>
</div>
</div>
<!-- 右侧 -->
<!-- 右侧 -->
<div class="right-wrapper">
<span class="v-link clickable">帮助中心</span>
<span v-if="name == ''" class="v-link clickable" @click="showLogin()" id="loginDialog">登录/注册</span>
<el-dropdown v-if="name != ''" @command="loginMenu">
<span class="el-dropdown-link">
{
{ name }}<i class="el-icon-arrow-down el-icon--right"></i>
</span>
<el-dropdown-menu class="user-name-wrapper" slot="dropdown">
<el-dropdown-item command="/user">实名认证</el-dropdown-item>
<el-dropdown-item command="/order">挂号订单</el-dropdown-item>
<el-dropdown-item command="/patient">就诊人管理</el-dropdown-item>
<el-dropdown-item command="/logout" divided>退出登录</el-dropdown-item>
</el-dropdown-menu>
</el-dropdown>
</div>
</div>
<!-- 登录弹出层 -->
<el-dialog :visible.sync="dialogUserFormVisible" style="text-align: left;" top="50px" :append-to-body="true" width="960px" @close="closeDialog()">
<div class="container">
<!-- 手机登录 #start -->
<div class="operate-view" v-if="dialogAtrr.showLoginType === 'phone'">
<div class="wrapper" style="width: 100%">
<div class="mobile-wrapper" style="position: static;width: 70%">
<span class="title">{
{ dialogAtrr.labelTips }}</span>
<el-form>
<el-form-item>
<el-input v-model="dialogAtrr.inputValue" :placeholder="dialogAtrr.placeholder" :maxlength="dialogAtrr.maxlength" class="input v-input">
<span slot="suffix" class="sendText v-link" v-if="dialogAtrr.second > 0">{
{ dialogAtrr.second }}s </span>
<span slot="suffix" class="sendText v-link highlight clickable selected" v-if="dialogAtrr.second == 0" @click="getCodeFun()">重新发送 </span>
</el-input>
</el-form-item>
</el-form>
<div class="send-button v-button" @click="btnClick()"> {
{ dialogAtrr.loginBtn }}</div>
</div>
<div class="bottom">
<div class="wechat-wrapper" @click="weixinLogin()"><span
class="iconfont icon"></span></div>
<span class="third-text"> 第三方账号登录 </span></div>
</div>
</div>
<!-- 手机登录 #end -->
<!-- 微信登录 #start -->
<div class="operate-view" v-if="dialogAtrr.showLoginType === 'weixin'" >
<div class="wrapper wechat" style="height: 400px">
<div>
<div id="weixinLogin"></div>
</div>
<div class="bottom wechat" style="margin-top: -80px;">
<div class="phone-container">
<div class="phone-wrapper" @click="phoneLogin()"><span
class="iconfont icon"></span></div>
<span class="third-text"> 手机短信验证码登录 </span></div>
</div>
</div>
</div>
<!-- 微信登录 #end -->
<div class="info-wrapper">
<div class="code-wrapper">
<div><img src="//img.114yygh.com/static/web/code_login_wechat.png" class="code-img">
<div class="code-text"><span class="iconfont icon"></span>微信扫一扫关注
</div>
<div class="code-text"> “快速预约挂号”</div>
</div>
<div class="wechat-code-wrapper"><img
src="//img.114yygh.com/static/web/code_app.png"
class="code-img">
<div class="code-text"> 扫一扫下载</div>
<div class="code-text"> “预约挂号”APP</div>
</div>
</div>
<div class="slogan">
<div>xxxxxx官方指定平台</div>
<div>快速挂号 安全放心</div>
</div>
</div>
</div>
</el-dialog>
</div>
</template>
<script>
import cookie from 'js-cookie'
import Vue from 'vue'
import userInfoApi from '@/api/userInfo'
import smsApi from '@/api/msm'
import hospitalApi from '@/api/hosp'
import weixinApi from '@/api/weixin'
const defaultDialogAtrr = {
showLoginType: 'phone', // 控制手机登录与微信登录切换
labelTips: '手机号码', // 输入框提示
inputValue: '', // 输入框绑定对象
placeholder: '请输入您的手机号', // 输入框placeholder
maxlength: 11, // 输入框长度控制
loginBtn: '获取验证码', // 登录按钮或获取验证码按钮文本
sending: true, // 是否可以发送验证码
second: -1, // 倒计时间 second>0 : 显示倒计时 second=0 :重新发送 second=-1 :什么都不显示
clearSmsTime: null // 倒计时定时任务引用 关闭登录层清除定时任务
}
export default {
data() {
return {
userInfo: {
phone: '',
code: '',
openid: ''
},
dialogUserFormVisible: false,
// 弹出层相关属性
dialogAtrr:defaultDialogAtrr,
name: '' // 用户登录显示的名称
}
},
created() {
this.showInfo()
},
mounted() {
// 注册全局登录事件对象
window.loginEvent = new Vue();
// 监听登录事件
loginEvent.$on('loginDialogEvent', function () {
document.getElementById("loginDialog").click();
})
// 触发事件,显示登录层:loginEvent.$emit('loginDialogEvent')
//初始化微信js
const script = document.createElement('script')
script.type = 'text/javascript'
script.src = 'https://res.wx.qq.com/connect/zh_CN/htmledition/js/wxLogin.js'
document.body.appendChild(script)
// 微信登录回调处理
let self = this;
window["loginCallback"] = (name,token, openid) => {
self.loginCallback(name, token, openid);
}
},
methods: {
loginCallback(name, token, openid) {
// 打开手机登录层,绑定手机号,改逻辑与手机登录一致
if(openid != '') {
this.userInfo.openid = openid
this.showLogin()
} else {
this.setCookies(name, token)
}
},
// 绑定登录或获取验证码按钮
btnClick() {
// 判断是获取验证码还是登录
if(this.dialogAtrr.loginBtn == '获取验证码') {
this.userInfo.phone = this.dialogAtrr.inputValue
// 获取验证码
this.getCodeFun()
} else {
// 登录
this.login()
}
},
// 绑定登录,点击显示登录层
showLogin() {
this.dialogUserFormVisible = true
// 初始化登录层相关参数
this.dialogAtrr = { ...defaultDialogAtrr }
},
// 登录
login() {
this.userInfo.code = this.dialogAtrr.inputValue
if(this.dialogAtrr.loginBtn == '正在提交...') {
this.$message.error('重复提交')
return;
}
if (this.userInfo.code == '') {
this.$message.error('验证码必须输入')
return;
}
if (this.userInfo.code.length != 6) {
this.$message.error('验证码格式不正确')
return;
}
this.dialogAtrr.loginBtn = '正在提交...'
userInfoApi.login(this.userInfo).then(response => {
console.log(response.data)
// 登录成功 设置cookie
this.setCookies(response.data.name, response.data.token)
}).catch(e => {
this.dialogAtrr.loginBtn = '马上登录'
})
},
setCookies(name, token) {
cookie.set('token', token, { domain: 'localhost' })
cookie.set('name', name, { domain: 'localhost' })
window.location.reload()
},
// 获取验证码
getCodeFun() {
if (!(/^1[34578]\d{9}$/.test(this.userInfo.phone))) {
this.$message.error('手机号码不正确')
return;
}
// 初始化验证码相关属性
this.dialogAtrr.inputValue = ''
this.dialogAtrr.placeholder = '请输入验证码'
this.dialogAtrr.maxlength = 6
this.dialogAtrr.loginBtn = '马上登录'
// 控制重复发送
if (!this.dialogAtrr.sending) return;
// 发送短信验证码
this.timeDown();
this.dialogAtrr.sending = false;
smsApi.sendCode(this.userInfo.phone).then(response => {
this.timeDown();
}).catch(e => {
this.$message.error('发送失败,重新发送')
// 发送失败,回到重新获取验证码界面
this.showLogin()
})
},
// 倒计时
timeDown() {
if(this.clearSmsTime) {
clearInterval(this.clearSmsTime);
}
this.dialogAtrr.second = 60;
this.dialogAtrr.labelTips = '验证码已发送至' + this.userInfo.phone
this.clearSmsTime = setInterval(() => {
--this.dialogAtrr.second;
if (this.dialogAtrr.second < 1) {
clearInterval(this.clearSmsTime);
this.dialogAtrr.sending = true;
this.dialogAtrr.second = 0;
}
}, 1000);
},
// 关闭登录层
closeDialog() {
if(this.clearSmsTime) {
clearInterval(this.clearSmsTime);
}
},
showInfo() {
let token = cookie.get('token')
if (token) {
this.name = cookie.get('name')
console.log(this.name)
}
},
loginMenu(command) {
if('/logout' == command) {
cookie.set('name', '', {domain: 'localhost'})
cookie.set('token', '', {domain: 'localhost'})
//跳转页面
window.location.href = '/'
} else {
window.location.href = command
}
},
handleSelect(item) {
window.location.href = '/hospital/' + item.hoscode
},
weixinLogin() {
this.dialogAtrr.showLoginType = 'weixin'
weixinApi.getLoginParam().then(response => {
var obj = new WxLogin({
self_redirect:true,
id: 'weixinLogin', // 需要显示的容器id
appid: response.data.appid, // 公众号appid wx*******
scope: response.data.scope, // 网页默认即可
redirect_uri: response.data.redirectUri, // 授权成功后回调的url
state: response.data.state, // 可设置为简单的随机数加session用来校验
style: 'black', // 提供"black"、"white"可选。二维码的样式
href: '' // 外部css文件url,需要https
})
})
},
phoneLogin() {
this.dialogAtrr.showLoginType = 'phone'
this.showLogin()
}
}
}
</script>
边栏推荐
- 《ASP.NET Core 6框架揭秘》样章发布[200页/5章]
- Constants and pointers
- Nc17 longest palindrome substring
- June brush question 02 - string
- 068. Find the insertion position -- binary search
- C#/. Net phase VI 01C Foundation_ 01: running environment, process of creating new C program, strict case sensitivity, meaning of class library
- Defensive C language programming in embedded development
- MapReduce instance (VIII): Map end join
- docker MySQL解决时区问题
- tn-c为何不可用2p断路器?
猜你喜欢
Selection of software load balancing and hardware load balancing
MapReduce instance (VII): single table join

CANoe下载地址以及CAN Demo 16的下载与激活,并附录所有CANoe软件版本
Download address of canoe, download and activation of can demo 16, and appendix of all canoe software versions
MapReduce working mechanism
【深度學習】語義分割-源代碼匯總
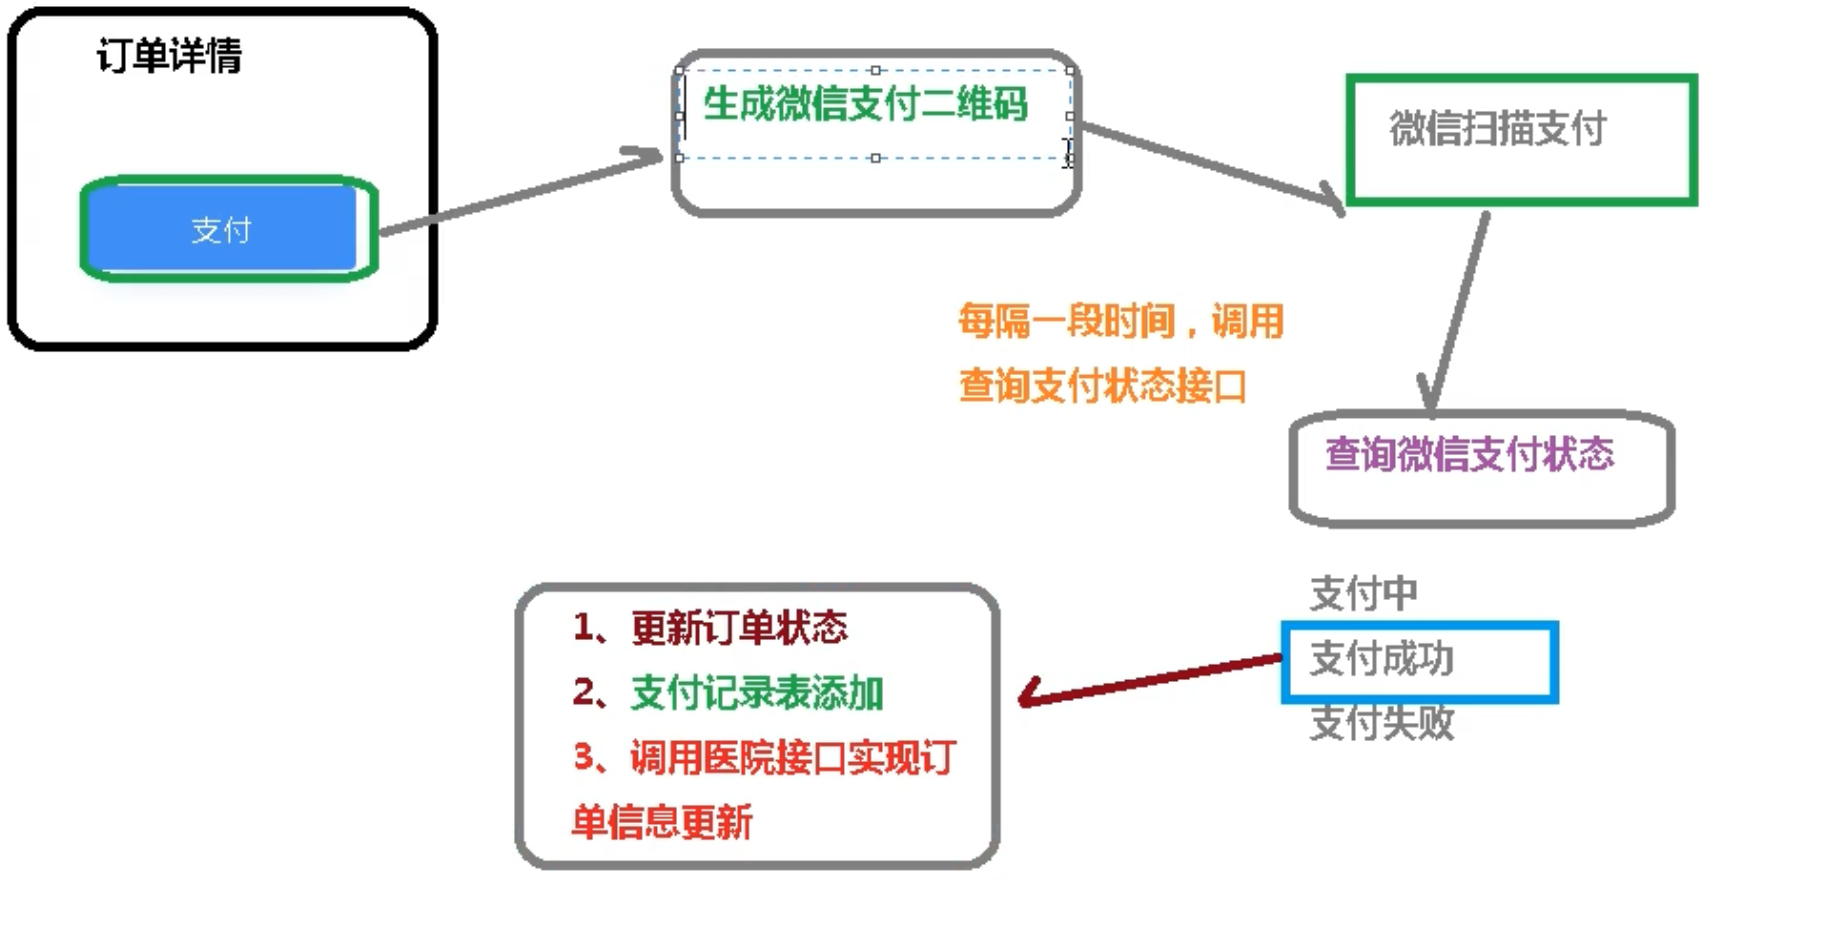
17 医疗挂号系统_【微信支付】

MapReduce instance (V): secondary sorting
![[one click] it only takes 30s to build a blog with one click - QT graphical tool](/img/f0/52e1ea33a5abfce24c4a33d107ea05.jpg)
[one click] it only takes 30s to build a blog with one click - QT graphical tool
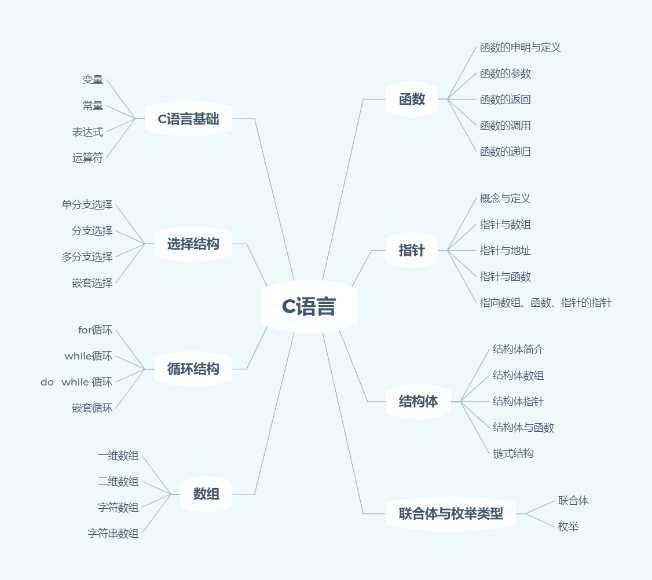
大学C语言入门到底怎么学才可以走捷径
随机推荐
C杂讲 文件 初讲
Contest3145 - the 37th game of 2021 freshman individual training match_ B: Password
Cooperative development in embedded -- function pointer
June brush question 02 - string
CANoe不能自动识别串口号?那就封装个DLL让它必须行
CAPL script pair High level operation of INI configuration file
[CV] target detection: derivation of common terms and map evaluation indicators
Vs All comments and uncomments
Tianmu MVC audit I
Control the operation of the test module through the panel in canoe (Advanced)
[flask] crud addition and query operation of data
寶塔的安裝和flask項目部署
Keep these four requirements in mind when learning single chip microcomputer with zero foundation and avoid detours
Zsh configuration file
068. Find the insertion position -- binary search
Webrtc blog reference:
五月刷题27——图
嵌入式中的合作开发--函数指针
C杂讲 浅拷贝 与 深拷贝
docker MySQL解决时区问题