当前位置:网站首页>STM32 encapsulates the one key configuration function of esp8266: realize the switching between AP mode and sta mode, and the creation of server and client
STM32 encapsulates the one key configuration function of esp8266: realize the switching between AP mode and sta mode, and the creation of server and client
2022-07-07 04:54:00 【Hua Weiyun】
One 、 Introduction to hardware environment
1. ESP8266 : Using the module of anxinco , Model is ESP12F
2. STM32 : use STM32F103C8T6
3. Programming software : use Keil5

ESP8266 Download address of relevant software used in programming and debugging :

Two 、ESP8266 Debugging and operation effect of communication
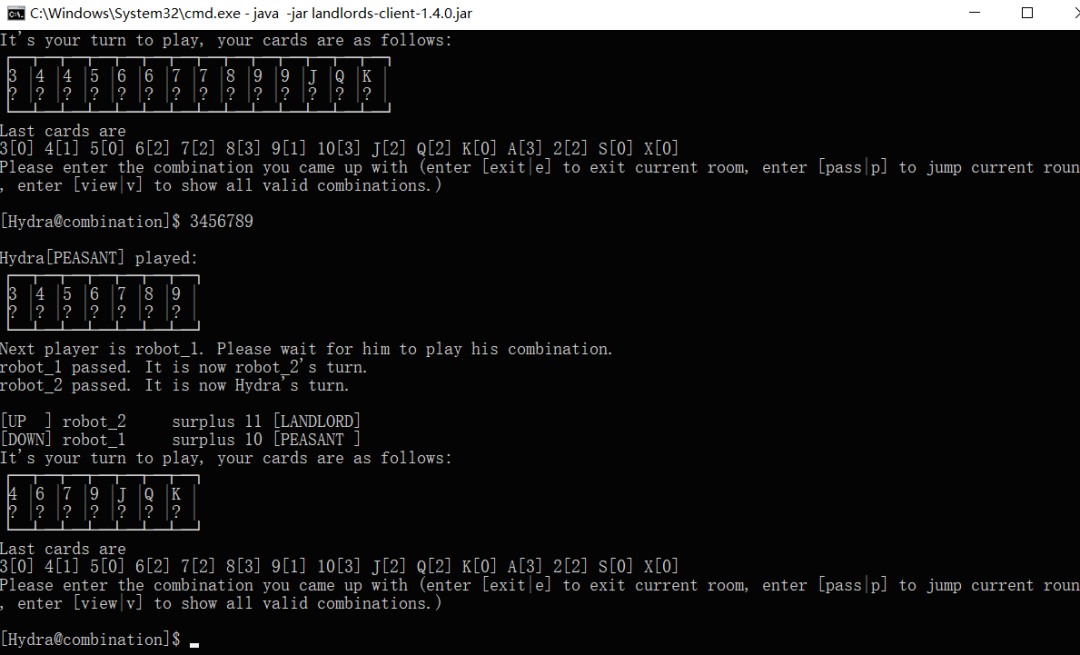
The following pictures show ESP8266 configure AP+TCP Server mode , Computer connection ESP8266 After the hot spot , Data communication . The effect of communication is , Click the Internet of things control system software on the computer , Realize the control of LED Lights and buzzers , Photosensitive data detected on the development board 、 Temperature data 、RC522 The card swiping data is transmitted to the computer software for display .---- LAN communication 


3、 ... and 、 Introduction to hardware wiring and code technology
Hardware connection : The core code will be posted below , On the current development board ,ESP8266 Connect to STM32F103C8T6 Serial port 3 On .
The code is divided into the following parts :
(1) STM32 The serial port receiving in the program adopts timer + Receive data in the form of receive interrupt , In this way, you can receive indefinite length data , Convenient next with ESP8266 communicate .
(2). ESP8266 Driver code : The code implements STA+TCP One click configuration function of the client ,AP+TCP One click configuration function of the server , You want to configure ESP8266 Just call the corresponding function to pass in parameters .
Four 、 The core code part
4.1 ESP8266.c Code
#include "esp8266.h"u8 ESP8266_IP_ADDR[16]; //255.255.255.255u8 ESP8266_MAC_ADDR[18]; // Hardware address /* The functionality : ESP8266 Command sending function return value :0 It means success 1 It means failure */u8 ESP8266_SendCmd(char *cmd){ u8 i,j; for(i=0;i<10;i++) // Number of tests -- Number of times the command was sent { USARTx_StringSend(USART3,cmd); for(j=0;j<100;j++) // Waiting time { delay_ms(50); if(USART3_RX_FLAG) { USART3_RX_BUFFER[USART3_RX_CNT]='\0'; USART3_RX_FLAG=0; USART3_RX_CNT=0; if(strstr((char*)USART3_RX_BUFFER,"OK")) { return 0; } } } } return 1;}/* The functionality : ESP8266 Return value of hardware initialization detection function :0 It means success 1 It means failure */u8 ESP8266_Init(void){ // Exit through mode USARTx_StringSend(USART3,"+++"); delay_ms(50); return ESP8266_SendCmd("AT\r\n");}/* The functionality : One click configuration WIFI by AP+TCP Server mode function parameters :char *ssid Created hotspot name char *pass Create a new hotspot password ( least 8 position )u16 port The created server port number function returns the value : 0 It means success Other values represent the corresponding error value */u8 ESP8266_AP_TCP_Server_Mode(char *ssid,char *pass,u16 port){ char *p; u8 i; char ESP8266_SendCMD[100]; // Combine commands in the sending process /*1. Test the hardware */ if(ESP8266_SendCmd("AT\r\n"))return 1; /*2. Close back display */ if(ESP8266_SendCmd("ATE0\r\n"))return 2; /*3. Set up WIFI Pattern */ if(ESP8266_SendCmd("AT+CWMODE=2\r\n"))return 3; /*4. Reset */ ESP8266_SendCmd("AT+RST\r\n"); delay_ms(1000); delay_ms(1000); delay_ms(1000); /*5. Close back display */ if(ESP8266_SendCmd("ATE0\r\n"))return 5; /*6. Set up WIFI Of AP Mode parameters */ sprintf(ESP8266_SendCMD,"AT+CWSAP=\"%s\",\"%s\",1,4\r\n",ssid,pass); if(ESP8266_SendCmd(ESP8266_SendCMD))return 6; /*7. Open multiple connections */ if(ESP8266_SendCmd("AT+CIPMUX=1\r\n"))return 7; /*8. Set the server port number */ sprintf(ESP8266_SendCMD,"AT+CIPSERVER=1,%d\r\n",port); if(ESP8266_SendCmd(ESP8266_SendCMD))return 8; /*9. Query local IP Address */ if(ESP8266_SendCmd("AT+CIFSR\r\n"))return 9; // extract IP Address p=strstr((char*)USART3_RX_BUFFER,"APIP"); if(p) { p+=6; for(i=0;*p!='"';i++) { ESP8266_IP_ADDR[i]=*p++; } ESP8266_IP_ADDR[i]='\0'; } // extract MAC Address p=strstr((char*)USART3_RX_BUFFER,"APMAC"); if(p) { p+=7; for(i=0;*p!='"';i++) { ESP8266_MAC_ADDR[i]=*p++; } ESP8266_MAC_ADDR[i]='\0'; } // Print general information USART1_Printf(" At present WIFI Pattern :AP+TCP The server \n"); USART1_Printf(" At present WIFI Hot spot name :%s\n",ssid); USART1_Printf(" At present WIFI Hot code :%s\n",pass); USART1_Printf(" At present TCP Server port number :%d\n",port); USART1_Printf(" At present TCP The server IP Address :%s\n",ESP8266_IP_ADDR); USART1_Printf(" At present TCP The server MAC Address :%s\n",ESP8266_MAC_ADDR); return 0;}/* The functionality : TCP The sending function in server mode sends instructions : */u8 ESP8266_ServerSendData(u8 id,u8 *data,u16 len){ u8 i,j,n; char ESP8266_SendCMD[100]; // Combine commands in the sending process for(i=0;i<10;i++) { sprintf(ESP8266_SendCMD,"AT+CIPSEND=%d,%d\r\n",id,len); USARTx_StringSend(USART3,ESP8266_SendCMD); for(j=0;j<10;j++) { delay_ms(50); if(USART3_RX_FLAG) { USART3_RX_BUFFER[USART3_RX_CNT]='\0'; USART3_RX_FLAG=0; USART3_RX_CNT=0; if(strstr((char*)USART3_RX_BUFFER,">")) { // Continue sending data USARTx_DataSend(USART3,data,len); // Wait for the data to be sent successfully for(n=0;n<200;n++) { delay_ms(50); if(USART3_RX_FLAG) { USART3_RX_BUFFER[USART3_RX_CNT]='\0'; USART3_RX_FLAG=0; USART3_RX_CNT=0; if(strstr((char*)USART3_RX_BUFFER,"SEND OK")) { return 0; } } } } } } } return 1;}/* The functionality : To configure WIFI by STA Pattern +TCP Client mode function parameters :char *ssid Created hotspot name char *pass Create a new hotspot password ( least 8 position )char *p The server to which you will connect IP Address u16 port The port number of the server to be connected u8 flag 1 Indicates that transparent transmission mode is enabled 0 Indicates the return value of the function that turns off the transparent mode :0 It means success Other values indicate the corresponding error */u8 ESP8266_STA_TCP_Client_Mode(char *ssid,char *pass,char *ip,u16 port,u8 flag){ char ESP8266_SendCMD[100]; // Combine commands in the sending process // Exit through mode //USARTx_StringSend(USART3,"+++"); //delay_ms(50); /*1. Test the hardware */ if(ESP8266_SendCmd("AT\r\n"))return 1; /*2. Close back display */ if(ESP8266_SendCmd("ATE0\r\n"))return 2; /*3. Set up WIFI Pattern */ if(ESP8266_SendCmd("AT+CWMODE=1\r\n"))return 3; /*4. Reset */ ESP8266_SendCmd("AT+RST\r\n"); delay_ms(1000); delay_ms(1000); delay_ms(1000); /*5. Close back display */ if(ESP8266_SendCmd("ATE0\r\n"))return 5; /*6. Configure the to be connected WIFI hot spot information */ sprintf(ESP8266_SendCMD,"AT+CWJAP=\"%s\",\"%s\"\r\n",ssid,pass); if(ESP8266_SendCmd(ESP8266_SendCMD))return 6; /*7. Set up a single connection */ if(ESP8266_SendCmd("AT+CIPMUX=0\r\n"))return 7; /*8. Configure the to connect TCP server information */ sprintf(ESP8266_SendCMD,"AT+CIPSTART=\"TCP\",\"%s\",%d\r\n",ip,port); if(ESP8266_SendCmd(ESP8266_SendCMD))return 8; /*9. Turn on transmission mode */ if(flag) { if(ESP8266_SendCmd("AT+CIPMODE=1\r\n"))return 9; // Turn on if(ESP8266_SendCmd("AT+CIPSEND\r\n"))return 10; // Start penetrating if(!(strstr((char*)USART3_RX_BUFFER,">"))) { return 11; } // If you want to quit sending : "+++" } // Print general information USART1_Printf(" At present WIFI Pattern :STA+TCP client \n"); USART1_Printf(" Currently connected WIFI Hot spot name :%s\n",ssid); USART1_Printf(" Currently connected WIFI Hot code :%s\n",pass); USART1_Printf(" Currently connected TCP Server port number :%d\n",port); USART1_Printf(" Currently connected TCP The server IP Address :%s\n",ip); return 0;}/* The functionality : TCP The sending function in client mode sends instructions : */u8 ESP8266_ClientSendData(u8 *data,u16 len){ u8 i,j,n; char ESP8266_SendCMD[100]; // Combine commands in the sending process for(i=0;i<10;i++) { sprintf(ESP8266_SendCMD,"AT+CIPSEND=%d\r\n",len); USARTx_StringSend(USART3,ESP8266_SendCMD); for(j=0;j<10;j++) { delay_ms(50); if(USART3_RX_FLAG) { USART3_RX_BUFFER[USART3_RX_CNT]='\0'; USART3_RX_FLAG=0; USART3_RX_CNT=0; if(strstr((char*)USART3_RX_BUFFER,">")) { // Continue sending data USARTx_DataSend(USART3,data,len); // Wait for the data to be sent successfully for(n=0;n<200;n++) { delay_ms(50); if(USART3_RX_FLAG) { USART3_RX_BUFFER[USART3_RX_CNT]='\0'; USART3_RX_FLAG=0; USART3_RX_CNT=0; if(strstr((char*)USART3_RX_BUFFER,"SEND OK")) { return 0; } } } } } } } return 1;}4.2 ESP8266.h
#ifndef _ESP8266_H#define _ESP8266_H#include "stm32f10x.h"#include "usart.h"#include "delay.h"// Function declaration u8 ESP8266_Init(void);u8 ESP8266_SendCmd(char *cmd);u8 ESP8266_AP_TCP_Server_Mode(char *ssid,char *pass,u16 port);u8 ESP8266_ServerSendData(u8 id,u8 *data,u16 len);u8 ESP8266_STA_TCP_Client_Mode(char *ssid,char *pass,char *ip,u16 port,u8 flag);u8 ESP8266_ClientSendData(u8 *data,u16 len);#endif4.3 Serial port part code
/* The functionality : A serial port 1 Initialize hardware connection : PA9(TX) and PA10(RX)*/void USART1_Init(u32 baud){ /*1. Turn on the clock */ RCC->APB2ENR|=1<<14; //USART1 The clock RCC->APB2ENR|=1<<2; //PA RCC->APB2RSTR|=1<<14; // Turn on the reset clock RCC->APB2RSTR&=~(1<<14);// Stop reset /*2. To configure GPIO The mode of mouth */ GPIOA->CRH&=0xFFFFF00F; GPIOA->CRH|=0x000008B0; /*3. Configure baud rate */ USART1->BRR=72000000/baud; /*4. Configure core registers */ USART1->CR1|=1<<5; // Turn on receive interrupt STM32_SetPriority(USART1_IRQn,1,1); // Set interrupt priority USART1->CR1|=1<<2; // Turn on receiving USART1->CR1|=1<<3; // Start sending USART1->CR1|=1<<13;// Turn on the serial port function }/* The functionality : A serial port 3 Initialize hardware connection : PB10(TX) and PB11(RX)*/void USART3_Init(u32 baud){ /*1. Turn on the clock */ RCC->APB1ENR|=1<<18; //USART3 The clock RCC->APB2ENR|=1<<3; //PB RCC->APB1RSTR|=1<<18; // Turn on the reset clock RCC->APB1RSTR&=~(1<<18);// Stop reset /*2. To configure GPIO The mode of mouth */ GPIOB->CRH&=0xFFFF00FF; GPIOB->CRH|=0x00008B00; /*3. Configure baud rate */ USART3->BRR=36000000/baud; /*4. Configure core registers */ USART3->CR1|=1<<5; // Turn on receive interrupt STM32_SetPriority(USART3_IRQn,1,1); // Set interrupt priority USART3->CR1|=1<<2; // Turn on receiving USART3->CR1|=1<<3; // Start sending USART3->CR1|=1<<13;// Turn on the serial port function }u8 USART3_RX_BUFFER[USART3_RX_LENGTH]; // Save buffer for receiving data u32 USART3_RX_CNT=0; // The currently received data length u8 USART3_RX_FLAG=0; //1 Indicates that the data is received 0 It means that the reception is not completed // A serial port 3 The interrupt service function of void USART3_IRQHandler(void){ u8 data; // Receive interrupt if(USART3->SR&1<<5) { TIM3->CNT=0; // Clear the counter TIM3->CR1|=1<<0; // Turn on timer 3 data=USART3->DR; // Read serial data // if(USART3_RX_FLAG==0) // Judge whether the last data has been processed { // Determine whether you can continue to receive if(USART3_RX_CNT<USART3_RX_LENGTH) { USART3_RX_BUFFER[USART3_RX_CNT++]=data; } else // Can't receive , Out of storage , Force indicates that the reception is complete { USART3_RX_FLAG=1; } } }}/* The functionality : String send */void USARTx_StringSend(USART_TypeDef *USARTx,char *str){ while(*str!='\0') { USARTx->DR=*str++; while(!(USARTx->SR&1<<7)){} }}/* The functionality : Data sending */void USARTx_DataSend(USART_TypeDef *USARTx,u8 *data,u32 len){ u32 i; for(i=0;i<len;i++) { USARTx->DR=*data++; while(!(USARTx->SR&1<<7)){} }}/* The functionality : Format print function */char USART1_PRINTF_BUFF[1024];void USART1_Printf(char *fmt,...){ va_list ap; /*1. Initialize the formal parameter list */ va_start(ap,fmt); /*2. Extract deformable parameter data */ vsprintf(USART1_PRINTF_BUFF,fmt,ap); /*3. end , Release space */ va_end(ap); /*4. Output data to serial port 1*/ USARTx_StringSend(USART1,USART1_PRINTF_BUFF); //USART1_Printf("%d%s",123,454656); //int data=va_arg(ap,int);}4.4 Timer part code
/* The functionality : Configure timer 3 Function parameter : psc Preassigned frequency counter arr Reload value */void TIMER3_Init(u16 psc,u16 arr){ /*1. Turn on the clock */ RCC->APB1ENR|=1<<1; // Turn on timer 3 The clock of RCC->APB1RSTR|=1<<1;// Turn on timer 3 Reset the clock RCC->APB1RSTR&=~(1<<1);// off timer 3 Reset the clock /*2. Configure core registers */ TIM3->PSC=psc-1; TIM3->ARR=arr; TIM3->DIER|=1<<0; // Turn on update interrupt STM32_SetPriority(TIM3_IRQn,1,1); // Set interrupt priority // TIM3->CR1|=1<<0; // Turn on timer 3}/* The functionality : Timer 3 Interrupt service function */void TIM3_IRQHandler(void){ if(TIM3->SR&1<<0) { TIM3->SR&=~(1<<0); USART3_RX_FLAG=1; // Indicates that the reception is complete TIM3->CR1&=~(1<<0); // off timer 3 }}4.5 Main function call part (STA+TCP client ) Example
int main(){ u8 key,cnt=0; LED_Init(); BEEP_Init(); KEY_Init(); USART1_Init(115200); USART3_Init(115200);// A serial port -WIFI TIMER3_Init(72,20000); // Timeout time 20ms USART1_Printf(" Initializing WIFI One moment please .\n"); if(ESP8266_Init()) { USART1_Printf("ESP8266 Hardware detection error .\n"); } else { USART1_Printf("WIFI:%d\n",ESP8266_STA_TCP_Client_Mode("ChinaNet-wbyw","12345678","192.168.101.6",8088,1)); } while(1) { if(USART3_RX_FLAG) { USART3_RX_BUFFER[USART3_RX_CNT]='\0'; USART1_Printf("%s",USART3_RX_BUFFER); USART3_RX_CNT=0; USART3_RX_FLAG=0; } key=KEY_Scan(0); if(key==2) { USARTx_StringSend(USART3,"AT+GMR\r\n"); // View version information } else if(key==3) { USARTx_StringSend(USART3,"12345ABCD"); } else if(key==4) // Exit through mode { USARTx_StringSend(USART3,"+++"); } else if(key==5) // send out AT { USARTx_StringSend(USART3,"AT+CIPSTATUS\r\n"); // View status information } }}4.6 Main function call part (AP+TCP The server ) Example
int main(){ u8 key; LED_Init(); BEEP_Init(); KEY_Init(); USART1_Init(115200); USART3_Init(115200);// A serial port -WIFI TIMER3_Init(72,20000); // Timeout time 20ms USART1_Printf(" Initializing WIFI One moment please .\n"); // initialization WIFI Hardware if(ESP8266_Init())USART1_Printf("WIFI Hardware error .\n"); else { // To configure WIFI The pattern of USART1_Printf("WIFI Configuration status :%d\n",ESP8266_AP_TCP_Server_Mode("esp8266_666","12345678",8088)); } while(1) { if(USART3_RX_FLAG) { USART3_RX_BUFFER[USART3_RX_CNT]='\0'; USART1_Printf("%s",USART3_RX_BUFFER); USART3_RX_CNT=0; USART3_RX_FLAG=0; } key=KEY_Scan(0); if(key==2) { ESP8266_ServerSendData(0,(u8*)"1234567890",10); } else if(key==3) { ESP8266_ServerSendData(0,(u8*)"abcd",4); } }}边栏推荐
- Comment les tests de logiciels sont - ils effectués sur le site Web? Testez la stratégie!
- AI表现越差,获得奖金越高?纽约大学博士拿出百万重金,悬赏让大模型表现差劲的任务
- Programmers go to work fishing, so play high-end!
- System framework of PureMVC
- [line segment tree practice] recent requests + area and retrieval - array modifiable + my schedule I / III
- 一图看懂!为什么学校教了你Coding但还是不会的原因...
- Structure actual training camp | after class homework | module 6
- 深入解析Kubebuilder
- What is JVM? What are the purposes of JVM tuning?
- JS input and output
猜你喜欢
Camera calibration (I): robot hand eye calibration

A line of R code draws the population pyramid
程序员上班摸鱼,这么玩才高端!
Gavin teacher's perception of transformer live class - rasa project actual combat e-commerce retail customer service intelligent business dialogue robot microservice code analysis and dialogue experim
Oracle -- 视图与序列

树与图的深度优先遍历模版原理
01机器学习相关规定

MySQL forgot how to change the password
Break the memory wall with CPU scheme? Learn from PayPal to expand the capacity of aoteng, and the volume of missed fraud transactions can be reduced to 1/30

Have you got the same "artifact" of cross architecture development praised by various industry leaders?
随机推荐
【实践出真理】import和require的引入方式真的和网上说的一样吗
Oracle -- 视图与序列
Vscode 如何使用内置浏览器?
Gpt-3 is a peer review online when it has been submitted for its own research
树与图的深度优先遍历模版原理
日常工作中程序员最讨厌哪些工作事项?
In depth analysis of kubebuilder
mpf2_ Linear programming_ CAPM_ sharpe_ Arbitrage Pricin_ Inversion Gauss Jordan_ Statsmodel_ Pulp_ pLU_ Cholesky_ QR_ Jacobi
谈谈讲清楚这件事的重要性
九章云极DataCanvas公司摘获「第五届数字金融创新大赛」最高荣誉!
ESG Global Leaders Summit | Intel Wang Rui: coping with global climate challenges with the power of science and technology
食堂用户菜品关系系统(C语言课设)
Comment les tests de logiciels sont - ils effectués sur le site Web? Testez la stratégie!
[line segment tree practice] recent requests + area and retrieval - array modifiable + my schedule I / III
Programmers go to work fishing, so play high-end!
mpf2_线性规划_CAPM_sharpe_Arbitrage Pricin_Inversion Gauss Jordan_Statsmodel_Pulp_pLU_Cholesky_QR_Jacobi
Run the command once per second in Bash- Run command every second in Bash?
什么是Web3
Two methods of chromosome coordinate sequencing
Structure actual training camp | after class homework | module 6