当前位置:网站首页>Microservice - Nacos registration center and configuration center
Microservice - Nacos registration center and configuration center
2022-07-03 15:35:00 【crysw】
1. Nacos What is it?
Nacos It is a dynamic service discovery that is easier to build cloud native applications 、 Configuration management and service management platform . The first four letters are Naming and Configuration The first two letters of , final s by Service.( Nacos: Dynamic Naming and Configuration Service )
From above Nacos The name decomposition shows that , Nacos Namely Registry Center + Configuration center The combination of , namely Nacos = Eureka+ Spring Cloud Config + Spring Cloud Bus. replace Eureka Be a service registry , replace Spring Cloud Config Be a service configuration center .
→Nacos Of GitHub Open source
→Nacos Official website
→Spring Cloud Alibaba Nacos Discovery
→Spring Cloud Alibaba Nacos Config
Compare with other service registries :
2. Nacos Installation and operation
Nacos download , You can tags Choose the version you need in the , Let's say 1.1.4 Version as an example :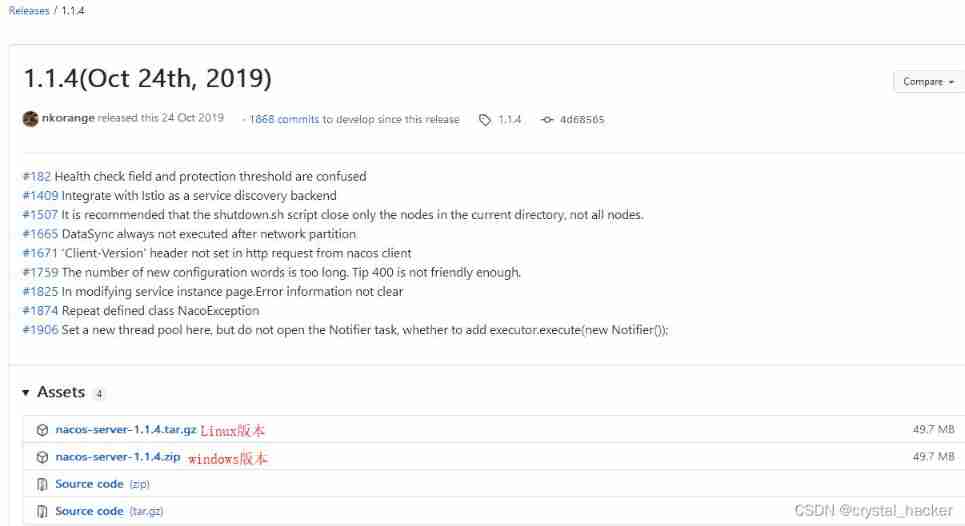
I downloaded it here first Windows edition , decompression Nacos Installation package , Direct operation bin In the catalog startup.cmd.
startup.cmd -m standalone, It is not specified that the default is single instance .
View startup log , It can be seen that it is running in a single instance .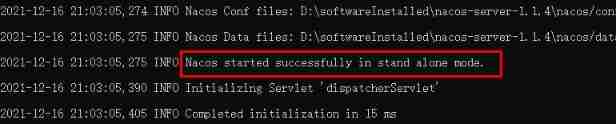
After the command runs successfully, you can directly access http://localhost:8848/nacos ( The account password defaults to nacos/nacos)
After successful login , View the results page .
3. Nacos As a service registry
Create a service provider module cloudalibaba-provider-payment-9001.
3.1 rely on
The parent project pom introduce SpringCloudAlibaba
<dependencyManagement>
	<!--spring cloud alibaba 2.1.0.RELEASE-->
	<dependency>
		<groupId>com.alibaba.cloud</groupId>
		<artifactId>spring-cloud-alibaba-dependencies</artifactId>
		<version>2.1.0.RELEASE</version>
		<type>pom</type>
		<scope>import</scope>
	</dependency>
</dependencyManagement>
Oneself pom File dependency
<?xml version="1.0" encoding="UTF-8"?>
<project xmlns="http://maven.apache.org/POM/4.0.0" xmlns:xsi="http://www.w3.org/2001/XMLSchema-instance" xsi:schemaLocation="http://maven.apache.org/POM/4.0.0 http://maven.apache.org/xsd/maven-4.0.0.xsd">
    <parent>
        <artifactId>atguigu-cloud-2020</artifactId>
        <groupId>com.atguigu.springcloud</groupId>
        <version>1.0-SNAPSHOT</version>
    </parent>
    <modelVersion>4.0.0</modelVersion>

    <artifactId>cloudalibaba-provider-payment-9001</artifactId>

    <dependencies>
        <!--SpringCloud ailibaba nacos  Registry Center  -->
        <dependency>
            <groupId>com.alibaba.cloud</groupId>
            <artifactId>spring-cloud-starter-alibaba-nacos-discovery</artifactId>
        </dependency>
        <!-- SpringBoot Integrate Web Components  -->
        <dependency>
            <groupId>org.springframework.boot</groupId>
            <artifactId>spring-boot-starter-web</artifactId>
        </dependency>
        <dependency>
            <groupId>org.springframework.boot</groupId>
            <artifactId>spring-boot-starter-actuator</artifactId>
        </dependency>
        <!-- Everyday use jar Package configuration -->
        <dependency>
            <groupId>org.springframework.boot</groupId>
            <artifactId>spring-boot-devtools</artifactId>
            <scope>runtime</scope>
            <optional>true</optional>
        </dependency>
        <dependency>
            <groupId>org.projectlombok</groupId>
            <artifactId>lombok</artifactId>
            <optional>true</optional>
        </dependency>
        <dependency>
            <groupId>org.springframework.boot</groupId>
            <artifactId>spring-boot-starter-test</artifactId>
            <scope>test</scope>
        </dependency>
    </dependencies>
</project>
3.2 Writing configuration files
server:
  port: 9001
spring:
  application:
    name: nacos-payment-provider
  cloud:
    nacos:
      discovery:
        server-addr: 127.0.0.1:8848 # To configure Nacos Address
management:
  endpoints:
    web:
      exposure:
        include: '*'
3.3 Write the startup class
adding annotations @EnableDiscoveryClient Open the configuration of service discovery .
package com.atguigu.springcloud;

import org.springframework.boot.SpringApplication;
import org.springframework.boot.autoconfigure.SpringBootApplication;
import org.springframework.cloud.client.discovery.EnableDiscoveryClient;

@SpringBootApplication
@EnableDiscoveryClient //  Open the service discovery configuration
public class PaymentMain9001 {


    public static void main(String[] args) {

        SpringApplication.run(PaymentMain9001.class);
    }
}
3.3 To write controller
package com.atguigu.springcloud.controller;

import org.springframework.beans.factory.annotation.Value;
import org.springframework.web.bind.annotation.GetMapping;
import org.springframework.web.bind.annotation.PathVariable;
import org.springframework.web.bind.annotation.RestController;

@RestController
public class PaymentController {


    @Value("${server.port}")
    private String serverPort;

    // http://localhost:9001/payment/nacos/1
    @GetMapping(value = "/payment/nacos/{id}")
    public String getPayment(@PathVariable("id") Integer id) {

        return "nacos registry, serverPort: " + serverPort + "\t id" + id;
    }
}
3.4 test
Start the service , Sign in nacos Console view , The service has been successfully registered .
visit http://localhost:9001/payment/nacos/1, Data returned successfully . nacos Service registry + Service providers 9001 all OK 了 .
4. Create a consumer module
To demonstrate nacos Load balancing of , reference 9001 newly build 9002 modular . cloudalibaba-provider-payment-9002
Create a consumer module , cloudalibaba-consumer-nacos-order-83.
4.1 rely on
<?xml version="1.0" encoding="UTF-8"?>
<project xmlns="http://maven.apache.org/POM/4.0.0" xmlns:xsi="http://www.w3.org/2001/XMLSchema-instance" xsi:schemaLocation="http://maven.apache.org/POM/4.0.0 http://maven.apache.org/xsd/maven-4.0.0.xsd">
    <parent>
        <artifactId>atguigu-cloud-2020</artifactId>
        <groupId>com.atguigu.springcloud</groupId>
        <version>1.0-SNAPSHOT</version>
    </parent>
    <modelVersion>4.0.0</modelVersion>

    <artifactId>cloudalibaba-consumer-nacos-order-83</artifactId>

    <dependencies>
        <!--SpringCloud ailibaba nacos -->
        <dependency>
            <groupId>com.alibaba.cloud</groupId>
            <artifactId>spring-cloud-starter-alibaba-nacos-discovery</artifactId>
        </dependency>
        <!--  Introduce your own definition of api General package , have access to Payment payment Entity -->
        <dependency>
            <groupId>com.atguigu.springcloud</groupId>
            <artifactId>cloud-api-commons</artifactId>
            <version>${project.version}</version>
        </dependency>
        <!-- SpringBoot Integrate Web Components  -->
        <dependency>
            <groupId>org.springframework.boot</groupId>
            <artifactId>spring-boot-starter-web</artifactId>
        </dependency>
        <dependency>
            <groupId>org.springframework.boot</groupId>
            <artifactId>spring-boot-starter-actuator</artifactId>
        </dependency>
        <!-- Everyday use jar Package configuration -->
        <dependency>
            <groupId>org.springframework.boot</groupId>
            <artifactId>spring-boot-devtools</artifactId>
            <scope>runtime</scope>
            <optional>true</optional>
        </dependency>
        <dependency>
            <groupId>org.projectlombok</groupId>
            <artifactId>lombok</artifactId>
            <optional>true</optional>
        </dependency>
        <dependency>
            <groupId>org.springframework.boot</groupId>
            <artifactId>spring-boot-starter-test</artifactId>
            <scope>test</scope>
        </dependency>
    </dependencies>
</project>
4.2 Write the configuration
application.yaml
server:
  port: 83
spring:
  application:
    name: nacos-order-consumer
  cloud:
    nacos:
      discovery:
        server-addr: 127.0.0.1:8848 #  To configure nacos Address
# The name of the micro service the consumer is going to visit ( Successfully registered nacos Micro service providers of )
service-url:
  nacos-user-service: http://nacos-payment-provider
Write configuration classes , Instantiation RestTemplate , add to @LoadBalanced Enable load balancing configuration .( built-in Ribbon).
package com.atguigu.springcloud.alibaba.config;

import org.springframework.cloud.client.loadbalancer.LoadBalanced;
import org.springframework.context.annotation.Bean;
import org.springframework.context.annotation.Configuration;
import org.springframework.web.client.RestTemplate;

@Configuration
public class ApplicationContextBean {


    @Bean
    @LoadBalanced  //  Enable load balancing configuration
    public RestTemplate restTemplate() {

        return new RestTemplate();
    }
}
4.3 Write the startup class
package com.atguigu.springcloud.alibaba;

import org.springframework.boot.SpringApplication;
import org.springframework.boot.autoconfigure.SpringBootApplication;
import org.springframework.cloud.client.discovery.EnableDiscoveryClient;

@SpringBootApplication
@EnableDiscoveryClient
public class OrderNacosMain83 {

    public static void main(String[] args) {

        SpringApplication.run(OrderNacosMain83.class);
    }
}
4.4 To write controller
package com.atguigu.springcloud.alibaba.controller;

import org.springframework.beans.factory.annotation.Value;
import org.springframework.web.bind.annotation.GetMapping;
import org.springframework.web.bind.annotation.PathVariable;
import org.springframework.web.bind.annotation.RestController;
import org.springframework.web.client.RestTemplate;

import javax.annotation.Resource;

@RestController
public class OrderNacosController {


    @Resource
    private RestTemplate restTemplate;

    @Value("${service-url.nacos-user-service}")
    private String serverURL;

    // http://localhost:83/consumer/payment/nacos/13
    @GetMapping("/consumer/payment/nacos/{id}")
    public String paymentInfo(@PathVariable("id") Long id) {

        return restTemplate.getForObject(serverURL + "/payment/nacos/" + id, String.class);
    }
}
4.5 test
Start the service provider 9001, 9002 ; Start the consumer module , Get into nacos View the list of services on the console .
visit http://localhost:83/consumer/payment/nacos/13 , The service consumer calls the service provider remotely , Ask several more times , Complete load balancing verification .

4.6 Load balancing
Why? Nacos Support load balancing ?
because spring-cloud-starter-alibaba-nacos-discovery Built in Ribbon.
5. Nacos As configuration center
5.1 Basic configuration
5.1.1 Configuration center client preparation
Create one based on nacos Implemented configuration center client :cloudalibaba-config-nacos-client-3377
pom Dependency file :
<?xml version="1.0" encoding="UTF-8"?>
<project xmlns="http://maven.apache.org/POM/4.0.0" xmlns:xsi="http://www.w3.org/2001/XMLSchema-instance" xsi:schemaLocation="http://maven.apache.org/POM/4.0.0 http://maven.apache.org/xsd/maven-4.0.0.xsd">
    <parent>
        <artifactId>atguigu-cloud-2020</artifactId>
        <groupId>com.atguigu.springcloud</groupId>
        <version>1.0-SNAPSHOT</version>
    </parent>
    <modelVersion>4.0.0</modelVersion>

    <artifactId>cloudalibaba-config-nacos-client-3377</artifactId>

    <dependencies>
        <!--nacos-config-->
        <dependency>
            <groupId>com.alibaba.cloud</groupId>
            <artifactId>spring-cloud-starter-alibaba-nacos-config</artifactId>
        </dependency>
        <!--nacos-discovery-->
        <dependency>
            <groupId>com.alibaba.cloud</groupId>
            <artifactId>spring-cloud-starter-alibaba-nacos-discovery</artifactId>
        </dependency>
        <!--web + actuator-->
        <dependency>
            <groupId>org.springframework.boot</groupId>
            <artifactId>spring-boot-starter-web</artifactId>
        </dependency>
        <dependency>
            <groupId>org.springframework.boot</groupId>
            <artifactId>spring-boot-starter-actuator</artifactId>
        </dependency>
        <!-- General basic configuration -->
        <dependency>
            <groupId>org.springframework.boot</groupId>
            <artifactId>spring-boot-devtools</artifactId>
            <scope>runtime</scope>
            <optional>true</optional>
        </dependency>
        <dependency>
            <groupId>org.projectlombok</groupId>
            <artifactId>lombok</artifactId>
            <optional>true</optional>
        </dependency>
        <dependency>
            <groupId>org.springframework.boot</groupId>
            <artifactId>spring-boot-starter-test</artifactId>
            <scope>test</scope>
        </dependency>
    </dependencies>
</project>
To write bootstrap.yml The configuration file
server:
  port: 3377
spring:
  application:
    name: nacos-config-client
  cloud:
    nacos:
      discovery:
        server-addr: 127.0.0.1:8848 # nacos Address of Registration Center
      config:
        server-addr: 127.0.0.1:8848 # nacos Configure center address
        file-extension: yaml # Appoint yaml Format configuration
        #group: TEST_GROUP
        #namespace: d1d90afc-fecd-46ee-86fd-eca0973f232d

##  Format of remote configuration center configuration file  ej: nacos-config-client-dev.yaml
# # ${spring.application.name}-${spring.profiles.active}.${spring.cloud.nacos.config.file-extension}
To write application.yml The configuration file
spring:
  profiles:
    active: dev #  Represents the development environment  dev test prod
Why do I need two profiles ?
Nacos Same as spring cloud config equally , At project initialization , Make sure to pull the configuration from the configuration center first , After pulling the configuration , To ensure the normal operation of the project
start-up .springboot There is a priority order for the loading of configuration files in ,bootstrap Priority over application.
Write the main startup class , add to @EnableDiscoveryClient Annotations enable service discovery configuration .
package com.atguigu.springcloud.alibaba;

import org.springframework.boot.SpringApplication;
import org.springframework.boot.autoconfigure.SpringBootApplication;
import org.springframework.cloud.client.discovery.EnableDiscoveryClient;

@SpringBootApplication
@EnableDiscoveryClient
public class NacosConfigClientMain3377 {

    public static void main(String[] args) {

        SpringApplication.run(NacosConfigClientMain3377.class);
    }
}
To write controller, Add... In the controller class @RefreshScope Annotation enables the configuration under the current class to support Nacos Dynamic refresh of .
package com.atguigu.springcloud.alibaba.controller;

import org.springframework.beans.factory.annotation.Value;
import org.springframework.cloud.context.config.annotation.RefreshScope;
import org.springframework.web.bind.annotation.GetMapping;
import org.springframework.web.bind.annotation.RestController;

@RestController
@RefreshScope
public class ConfigClientController {

    @Value("${config.info}")
    private String configInfo;

    // http://localhost:3377/config/info
    @GetMapping("/config/info")
    public String getConfigInfo() {

        return configInfo;
    }
}
adopt Spring Cloud Primary annotation
@RefreshScopeImplement automatic configuration update .
5.1.2 Nacos Configuration rules of
Nacos Official website manual
Nacos in dataId The composition format of , As well as SpringBoot Matching rules for configuration files :
The final formula :${spring.application.name}-${spring.profiles.active}.${spring.cloud.nacos.config.file-extension}
above application.yml The configuration file specifies spring.profiles.active.
spring:
  profiles:
    active: dev #  Represents the development environment  dev test prod
bootstrap.yml The configuration file specifies spring.application.name and spring.cloud.nacos.config.file-extension
spring:
  application:
    name: nacos-config-client
  cloud:
    nacos:
      discovery:
        server-addr: 127.0.0.1:8848 # nacos Address of Registration Center
      config:
        server-addr: 127.0.0.1:8848 # nacos Configure center address
        file-extension: yaml # Appoint yaml Format configuration
Illustration :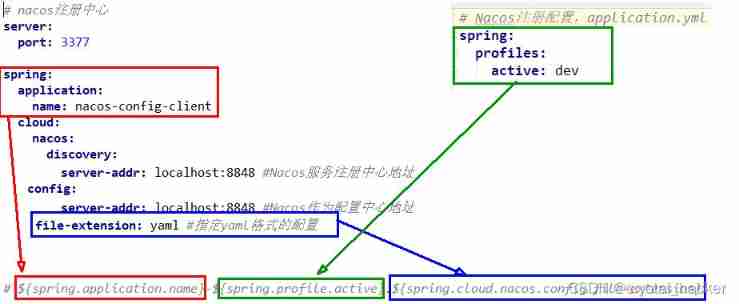
5.1.3 stay nacos Add configuration in
Get into nacos Console , choice Configuration list
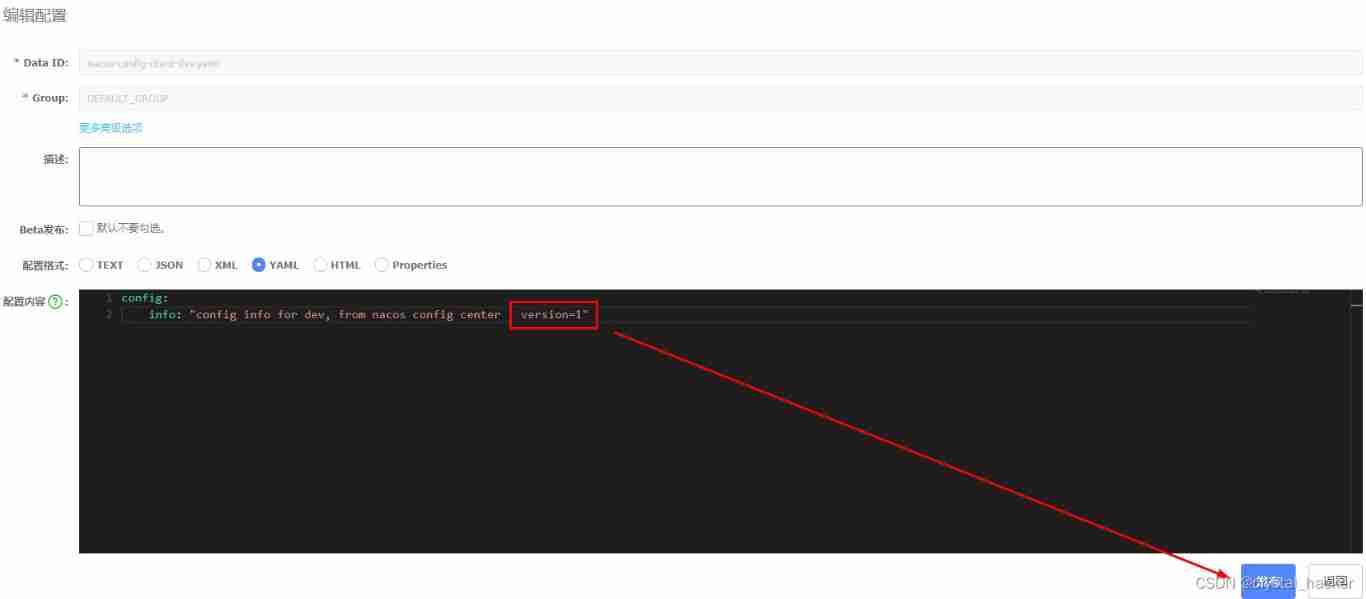
Define the name of the configuration file as nacos-config-client-dev.yaml
Click the right side. + No. edit the name and configuration information of the configuration file to be added , And then publish it to Nacos Configuration center .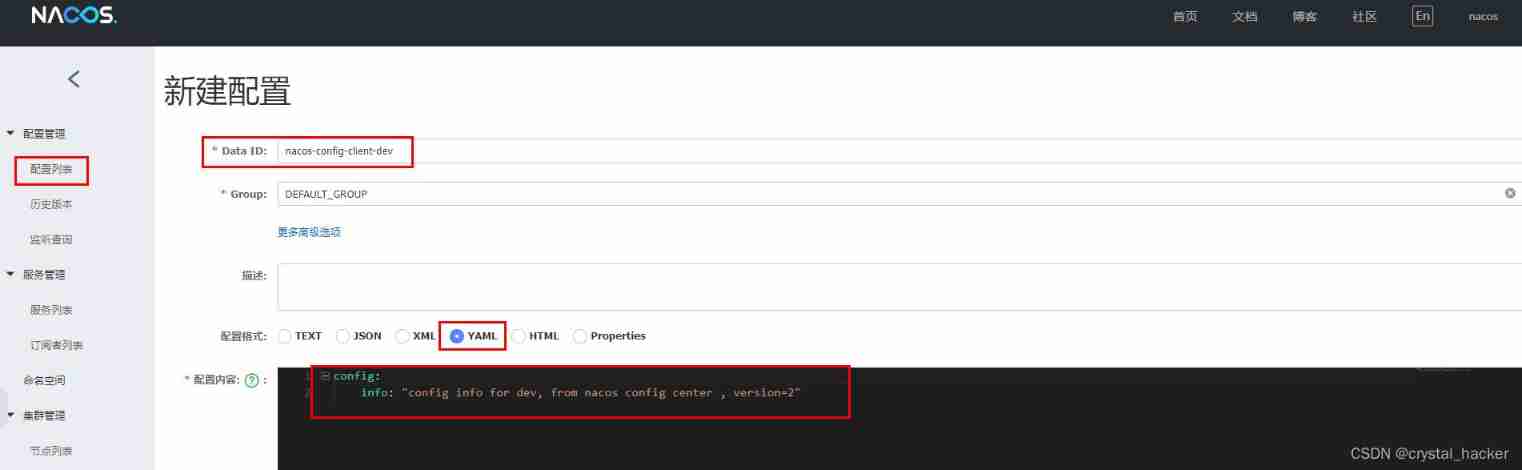
Publish to Nacos After configuration center , It can be downloaded from Configuration list See the configuration file just added .
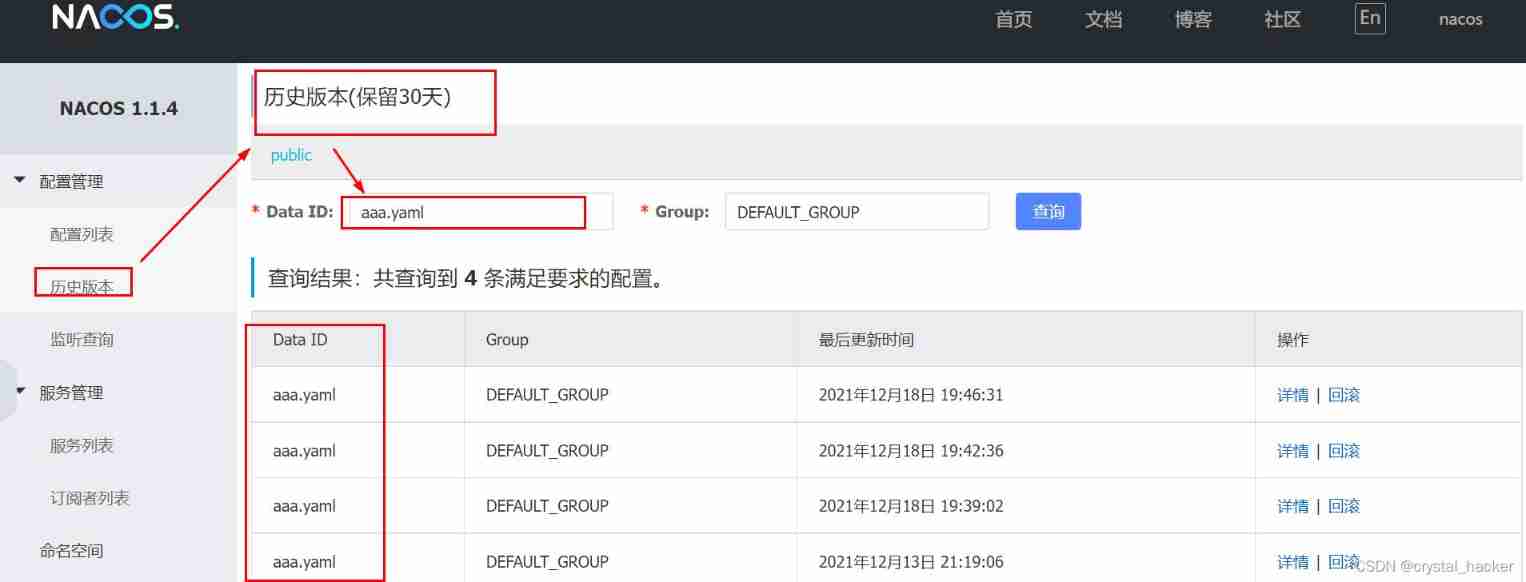
5.1.4 Historical configuration
Nacos The historical version of the configuration file is recorded , Default hold 30 God , In addition, there is a one click rollback function , The rollback operation will trigger the configuration update .
5.1.5 test
Start the configuration center client application . Confirm that before starting nacos Configuration center - The configuration management column has corresponding yaml Configuration information .nacos-config-client-dev.yaml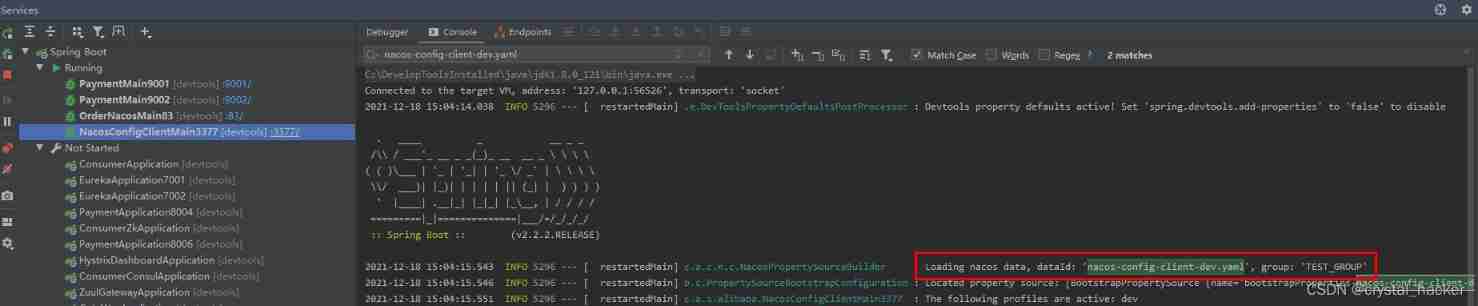
visit http://localhost:3377/config/info, View configuration information , Consistent with the configuration information added above , Successfully obtained the configuration information of the configuration center .
modify Nacos Configuration center nacos-config-client-dev.yaml Configuration content .

visit http://localhost:3377/config/info, View configuration information , It is found that the configuration has been automatically updated .
5.1.6 The problem is
problem 1
In actual development , Usually a system will have dev, test, prod Isochronous environment , How to ensure that the service can correctly read Nacos What about the configuration file content of the corresponding environment ?
problem 2
A large-scale distributed microservice system will have many microservice subprojects , Each micro service project will have corresponding dev, test, prod Environment, etc , How to manage these micro service configurations ?
below Classification configuration The configuration file management scheme of multi environment and multi project will be recorded in detail in this chapter .
5.2 Classification configuration
5.2.1 Nacos Graphical configuration management
Namespace 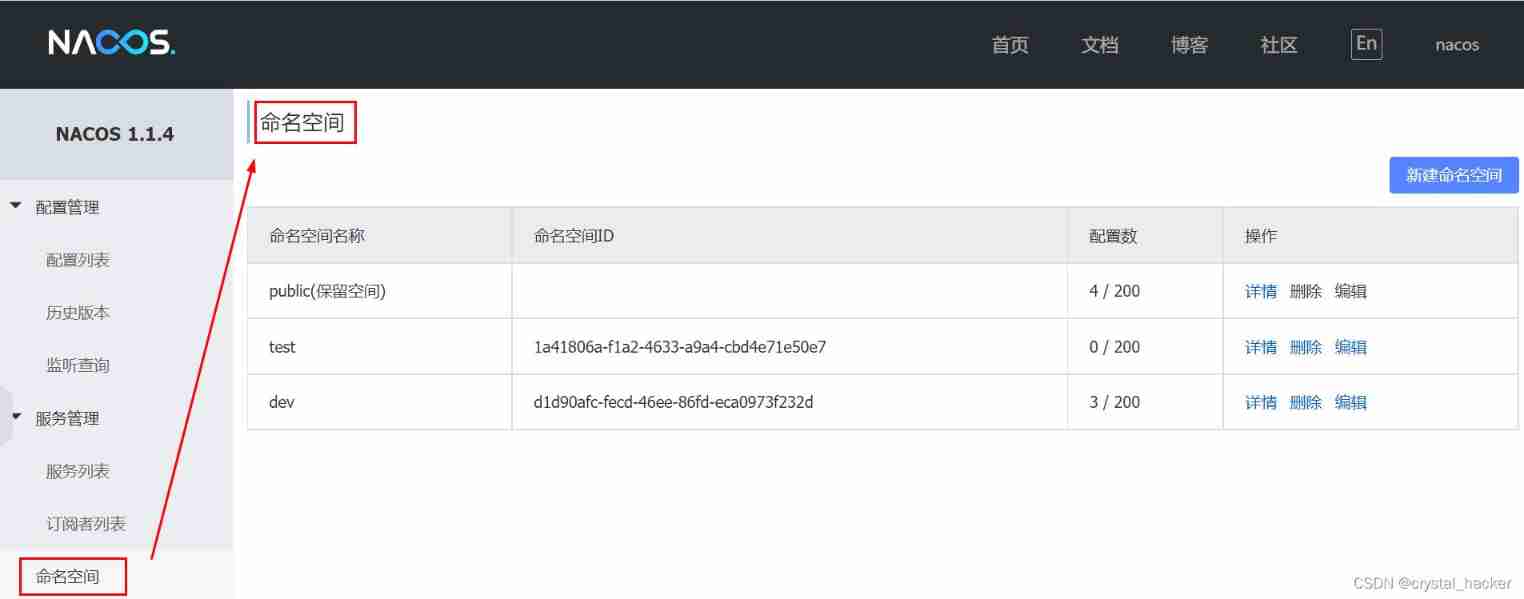
DataId + Group + Namespace 
5.2.2 Relationship is introduced
Namespace + Group + DataId What is the relationship between the three ? Why is it designed this way? ?
The outermost namespace Can be used to differentiate deployment environments ,Group and DataID Logically distinguish between two target objects , similar Java Inside package Package name and class name .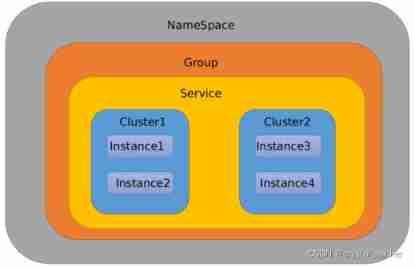
By default :
Namespace=public,Group=DEFAULT_GROUP, Default Cluster yes DEFAULT
Nacos The default namespace is public,Namespace It is mainly used to realize isolation . For example, we now have three environments : Development 、 test 、 Production environment , We can create three Namespace, Different Namespace It's isolated .
Group The default is DEFAULT_GROUP,Group Different micro services can be divided into the same group .
Service Micro services ; One Service It can contain more than one Cluster( colony ),Nacos Default Cluster yes DEFAULT,Cluster Is a virtual partition of a specified microservice . For example, for disaster recovery , take Service Microservices are deployed in Hangzhou computer room and Guangzhou computer room respectively , Then you can give it to Hangzhou computer room Service Microservice has a cluster name (HZ), For Guangzhou machine room Service Microservice has a cluster name (GZ), We can also make micro services in the same computer room call each other as much as possible , To improve performance .
And finally Instance, This is an example of microservice .
5.2.3 DataID programme
Appoint spring.profiles.active And configuration files DataID To read different configuration files in different environments , Use Default space (public) + Default group (DEFAULT_GROUP) + newly build dev and test Two DataID Combination of .
newly build dev To configure DataID
newly build test Configured DataID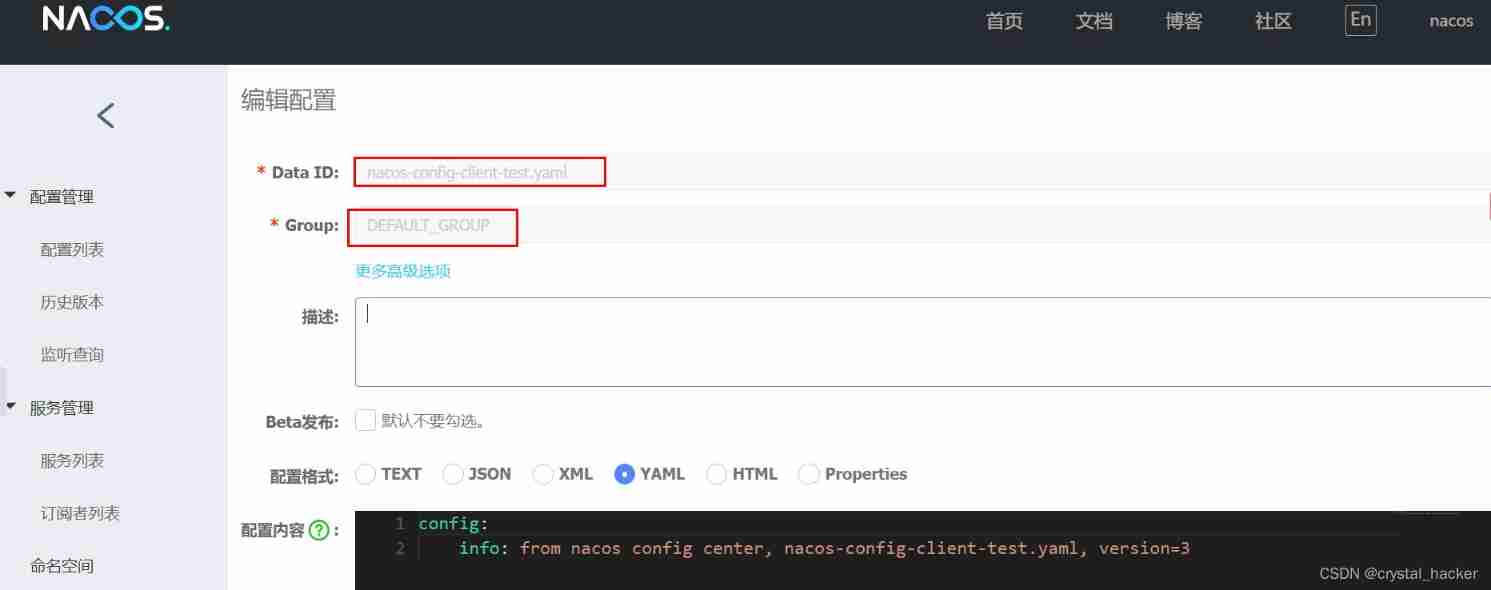
When the addition is complete , View the configuration list .
adopt spring.profiles.active Property to read the multi environment configuration file .
spring:
  profiles:
    active: dev #  Represents the development environment  dev test prod ,  The configuration of which environment will be read
test
visit http://localhost:3377/config/info
modify spring.profiles.active=test , Revisit http://localhost:3377/config/info, What you read is test The configuration content of the environment .
5.2.4 Group programme
adopt Group Achieve environmental differentiation ( Default DEFAULT_GROUP) . newly build DEV_GROUP, TEST_GROUP. For testing convenience , I recreate the configuration file .
newly build DEV_GROUP Group Profile nacos-config-client-info.yaml
newly build TEST_GROUP Group Profile nacos-config-client-info.yaml
After creation , View the configuration list .
bootstrap.yml Add the configuration spring.cloud.nacos.config.group=DEV_GROUP or TEST_GROUP To specify groups .
spring:
  application:
    name: nacos-config-client
  cloud:
    nacos:
      discovery:
        server-addr: 127.0.0.1:8848 # nacos Address of Registration Center
      config:
        server-addr: 127.0.0.1:8848 # nacos Configure center address
        file-extension: yaml # Appoint yaml Format configuration
        group: DEV_GROUP
application.yml Modify the configuration spring.profiles.active=info Specify the environment .
spring:
  profiles:
    active: info #  Represents the development environment  dev test prod info
test
visit http://localhost:3377/config/info , What you really read is DEV_GROUP Configuration content .
modify spring.cloud.nacos.config.group=TEST_GROUP, Revisit http://localhost:3377/config/info, Read TEST Group configuration .
5.2.5 Namespace programme
Namespace The default is public, Cannot delete .
newly build dev and tes The namespace of 
The creation is complete namespace after , go back to Configuration Management - Configuration list see .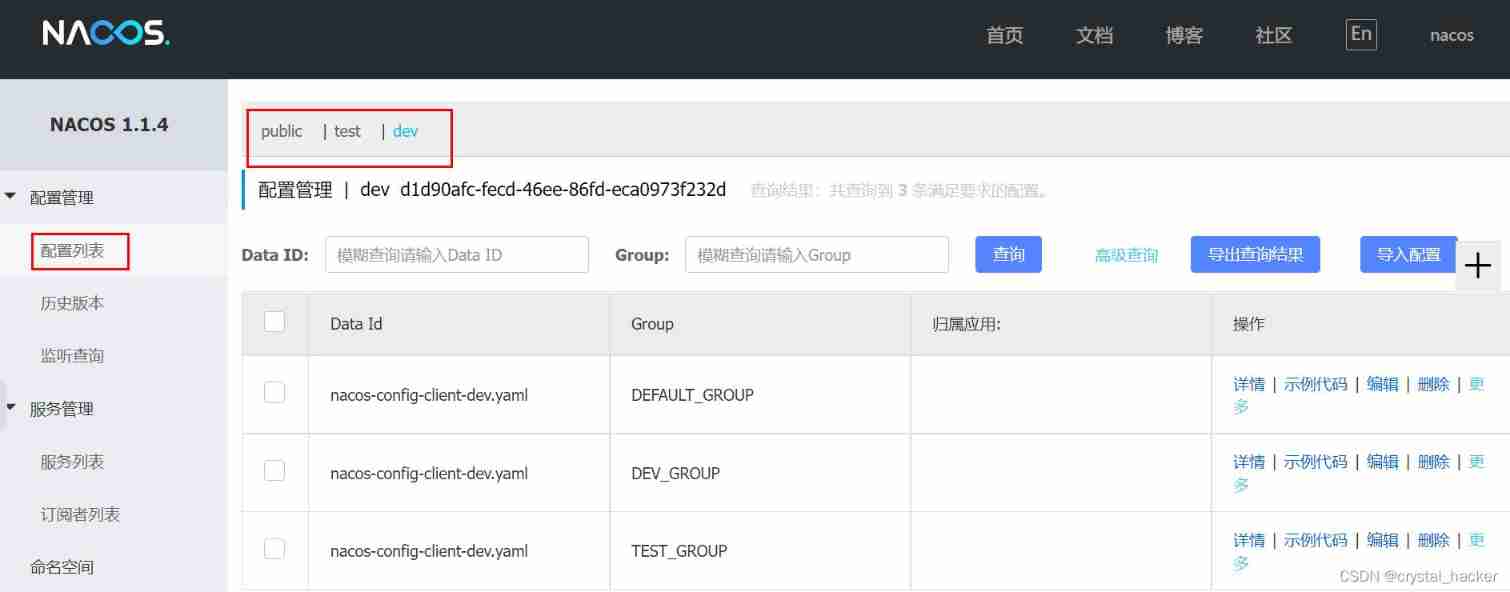
Service management - List of services Also synchronously updated the created namespace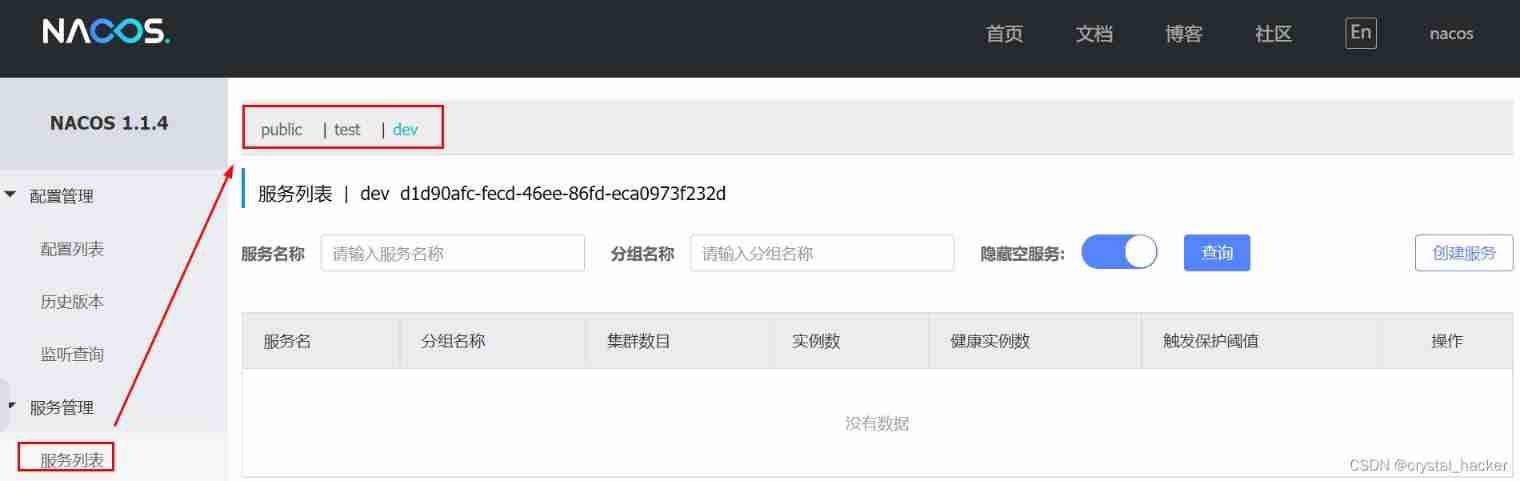
stay dev Of namespace Now create the configuration files of three groups . nacos-config-client-dev.yaml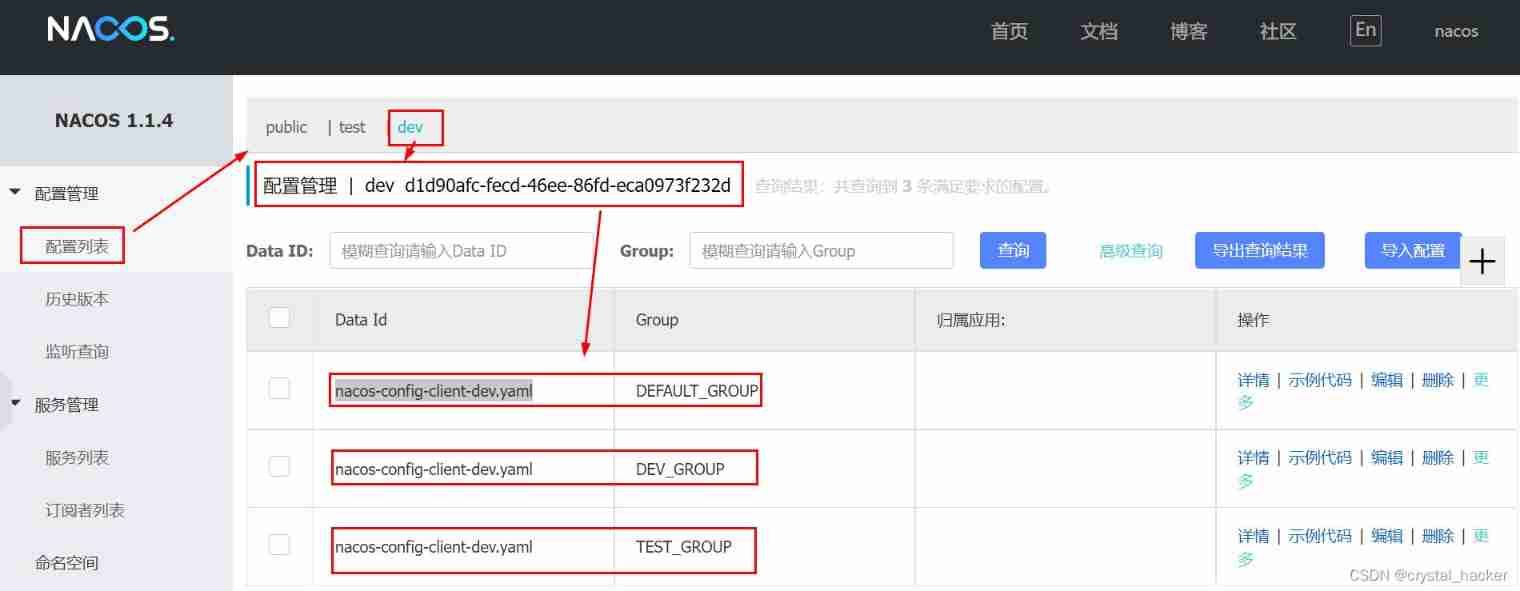
bootstrap.yml Add configuration... To the file spring.cloud.config.namespace To specify the namespace .
spring:
  application:
    name: nacos-config-client
  cloud:
    nacos:
      discovery:
        server-addr: 127.0.0.1:8848 # nacos Address of Registration Center
      config:
        server-addr: 127.0.0.1:8848 # nacos Configure center address
        file-extension: yaml # Appoint yaml Format configuration
        group: TEST_GROUP
        namespace: d1d90afc-fecd-46ee-86fd-eca0973f232d
application.yml File modification configuration is dev
spring:
  profiles:
    active: dev #  Represents the development environment  dev test prod info
test
visit http://localhost:3377/config/info, Read dev Namespace test Group configuration content .
6. Nacos Clustering and persistent configuration ( important )
6.1 Website shows
Official website architecture diagram 
After the above figure is :
Nacos By default, embedded database is used to store data . therefore , If you start multiple default configurations Nacos node , There are consistency problems with data storage . To solve this problem ,Nacos Centralized storage is adopted to support cluster deployment , Currently only supported MySQL The storage .Nacos Three deployment modes of 
6.2 Nacos Persistent configuration
I close Nacos After service , Restart , Get into Nacos The console still has those configuration files created before , It means that these configuration files are persisted to a certain location on the machine . Nacos The default embedded database is derby, Can be in nacos Open source pom file Check that the dependency package contains derby database .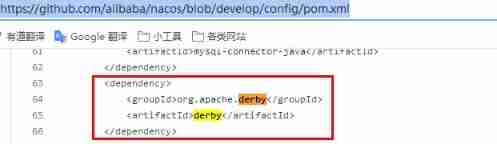
derby Switch to mysql database
First, in the /nacos/conf In the directory nacos-mysql.sql Script , And on this machine mysql Client execution script , initialization nacos_config database .
View the execution results , Already there. nacos_config Database and related database tables .
then , stay /nacos/conf In the directory application.properties file , Add the following at the end of the file :
# switch datasource
spring.datasource.platform=mysql

db.num=1
db.url.0=jdbc:mysql://127.0.0.1:3306/nacos_config?characterEncoding=utf8&connectTimeout=1000&socketTimeout=3000&autoReconnect=true
db.user=root
db.password=root
Restart again Nacos service , Get into Nacos Console , You can see a new empty record interface , It used to be derby Configuration records for . So far, it has been switched to mysql database .
The configuration file and configuration information created later will be persisted to the local mysql In the database .
Show me , I create a nacos-config-client-dev.yaml Configuration file for .
When I'm done , see Configuration list , There are already created nacos-config-client-dev.yaml The configuration file .
At this point, it has been persisted to the local mysql Database , Let's check that the configuration information data of the local persistence exists config_info In the table .
The configuration file of historical version exists his_config_info In the table .
6.3 Linux edition Nacos+MySQL Production environment configuration
It is expected that at least , 1 individual Nginx + 3 individual Nacos Registry Center + 1 individual mysql
6.3.1 Linux edition Nacos Download and install
Nacos download , download Linux edition . You can also download Nacos The source code is built and deployed by itself jar package .
need JDK1.8+, 64bit Of Linux System , Maven 3.2.x Environmental Science , 3 Or 3 More than Nacos Only nodes can form a cluster .
Linux The system can use its own virtual machine to complete , Reference blog VMWare install CentOs7 System and use
When the download is complete , Extract to the specified directory .
tar -xvf nacos-1.1.4.tar.gz /usr/local/nacos-1.1.4
6.3.2 Use docker install mysql
##  install docker
yum install docker
##  start-up docker
systemctl start docker
##  stop it docker
systemctl stop docker
##  Set power on self start
systemctl enable docker
##  Search for mysql Mirror image
docker search mysql
##  download mysql Mirror image
docker pull mysql:5.7
##  Check out the downloaded mysql Mirror image
docker images mysql
stay Docker Run under MySQL service
##  Run the first mysql01 Containers ,  Connect the local port 3306 Mapping to mysql01 Container of 3306 port
docker run --name mysql01 -p 3306:3306 -e MYSQL_ROOT_PASSWORD=123456 -d mysql:5.7
##  Run the second one mysql02 Containers ,  Connect the local port 3307 Mapping to mysql01 Container of 3306 port
docker run --name mysql02 -p 3307:3306 -e MYSQL_ROOT_PASSWORD=123456 -d mysql:5.7
##  View the running container
docker ps -a
##  stop it mysql01 Containers
docker stop mysql01
##  start-up mysql01 Containers
docker start mysql01
##  Delete mysql01 Containers
docker rm mysql01
##  Get into mysql01 Containers
docker exec -it mysql01 /bin/bash
6.3.3 Nacos Switch to Mysql
stay /nacos/conf Get under the directory nacos Database script .
mysql client (navicat) After connecting, execute the above nacos-mysql.sql Script .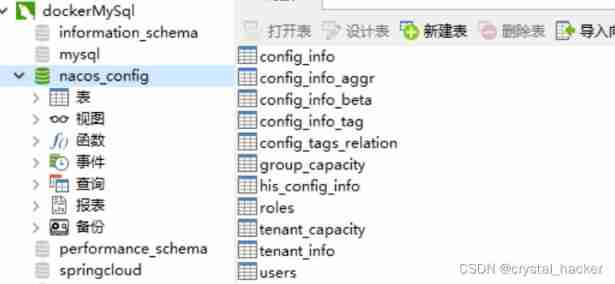
Modify the configuration file
#  Copy a sample configuration for modification
cp /usr/local/nacos-1.1.4/conf/application.properties.example  /usr/local/nacos-1.1.4/conf/application.properties
vi /usr/local/nacos-1.1.4/conf/application.properties
application.properties Add the following to the last side of the file :
#  Switch to a mysql database
spring.datasource.platform=mysql

db.num=1
db.url.0=jdbc:mysql://http://192.168.65.129:3306/nacos_config?characterEncoding=utf8&connectTimeout=1000&socketTimeout=3000&autoReconnect=true
db.user=root
db.password=123456
6.3.4 To configure Nacos colony
/nacos/conf Copy a sample cluster configuration file under the directory to make modifications .
cp cluster.conf.example  cluster.conf
#  Check the current machine address
hostname -i
#  Add cluster configuration
vi cluster.conf
stay cluster.conf Add three to the file Nacos Cluster server ( I use three ports of one machine to simulate three Nacos service ).
192.168.65.129:3333
192.168.65.129:4444
192.168.65.129:5555
6.3.5 Modify startup script
The startup of the stand-alone version at ordinary times , All are ./startup.sh that will do . The cluster mode needs to be modified /nacos/bin Start the script in the directory startup.sh
Cluster start , We hope to be similar to other software shell command , Pass different port numbers to start different nacos example .
command :./startup.sh -p 3333 Indicates that the boot port number is 3333 Of nacos Server instance , And the last step cluster.conf The configuration is consistent .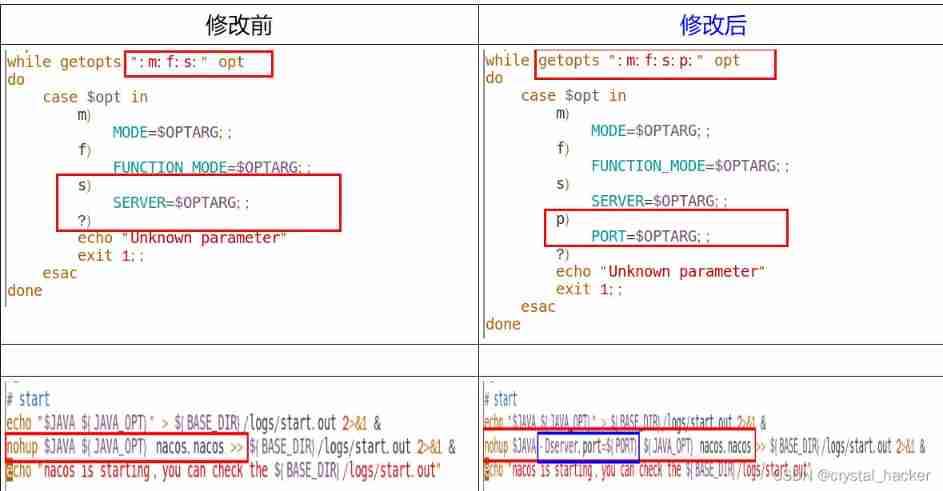
Start three machines respectively according to the specified port nacos example .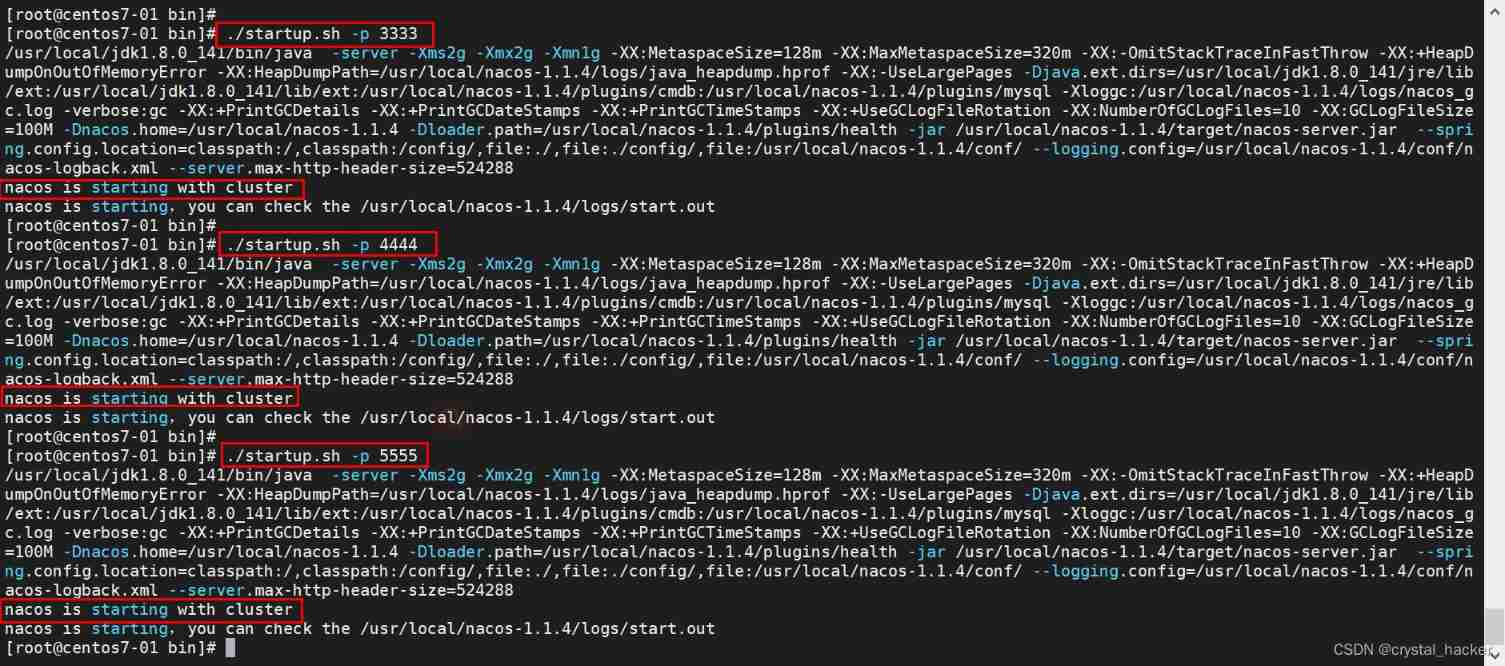
Use ps -ef|grep nacos|grep -v grep|wc -l Command to view enabled nacos Number of clusters . You can see three .
6.3.6 Nginx Download and install
LINUX install nginx The detailed steps /usr/local/nginx/conf Backup under Directory nginx.conf
cp nginx.conf nginx.conf.bak
modify nginx.conf To configure , add to nacos Agent for
#gzip  on;
upstream cluster{
   #  Configure the load balancing address ,
   #  When accessing  http://ip:1111/nacos when ,  It will be forwarded to one of them Nacos service , such as   http://ip:3333/nacos
	server 127.0.0.1:3333;
	server 127.0.0.1:4444;
	server 127.0.0.1:5555;
}

server {
  #  Modify the listening port to 1111
	listen       1111;
	server_name  localhost;

	#charset koi8-r;

	#access_log  logs/host.access.log  main;

	location / {
		#root   html;
		#index  index.html index.htm;
		#  add to nacos The agent of the cluster
		proxy_pass http://cluster;
	}

	# set site favicon
	location /favicon.ico {
		root html;
	}
}
6.3.7 test
adopt Nginx visit nacos, request http://192.168.65.129:1111/nacos/#/login
Modify the configuration of the microservice Application
server:
  port: 9002
spring:
  application:
    name: nacos-payment-provider
  cloud:
    nacos:
      discovery:
        server-addr: 192.168.65.129:1111 # nacos Address of Registration Center
Start the microservice Application , see nacos Service list of the console , Has successfully registered to Nacos In the cluster .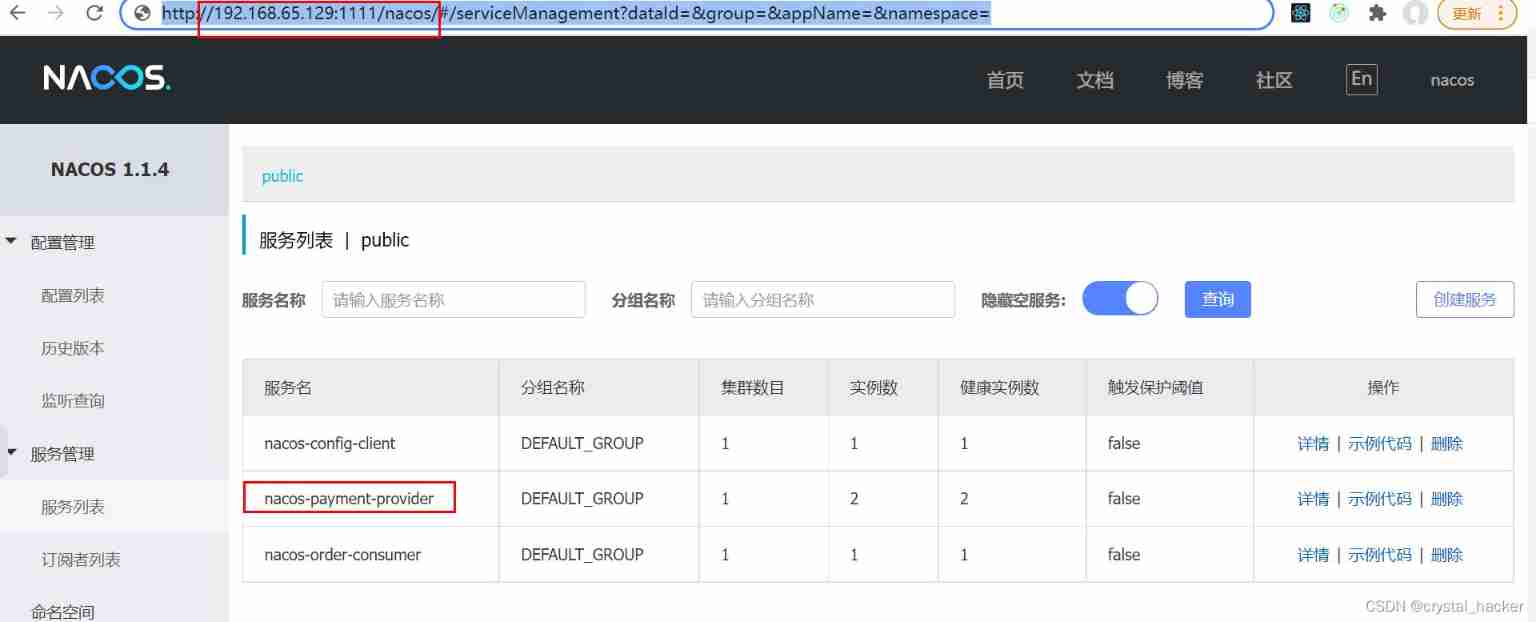
6.3.8 Summary of cluster high availability
thus , It's done Nacos High availability of clusters , adopt Nginx Load balancing to available Nacos Service get the instance of micro service to be called remotely .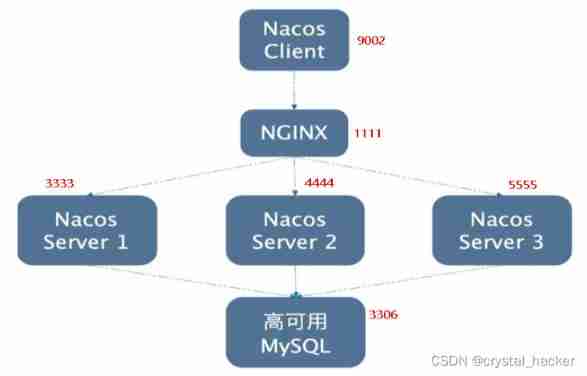
Personal blog
Welcome to personal blog : https://www.crystalblog.xyz/
Alternate address : https://wang-qz.gitee.io/crystal-blog/
边栏推荐
- Reading notes of "micro service design" (Part 2)
- CString getbuffer and releasebuffer instructions
- Popular understanding of random forest
- Calibre LVL
- Creation and destruction of function stack frames
- Unity function - unity offline document download and use
- Redis lock Optimization Practice issued by gaobingfa
- The wonderful use of do{}while()
- VC下Unicode和ANSI互转,CStringW和std::string互转
- C语言刷题~Leetcode与牛客网简单题
猜你喜欢

求字符串函数和长度不受限制的字符串函数的详解

Redis cache penetration, cache breakdown, cache avalanche solution

Introduction, use and principle of synchronized
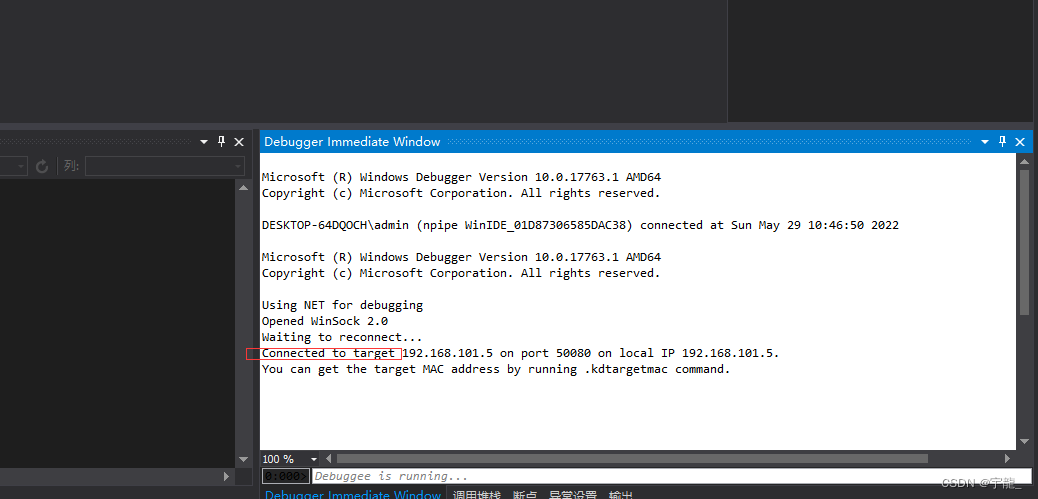
Vs2017 is driven by IP debugging (dual machine debugging)

视觉上位系统设计开发(halcon-winform)-1.流程节点设计
Subclass hides the function with the same name of the parent class
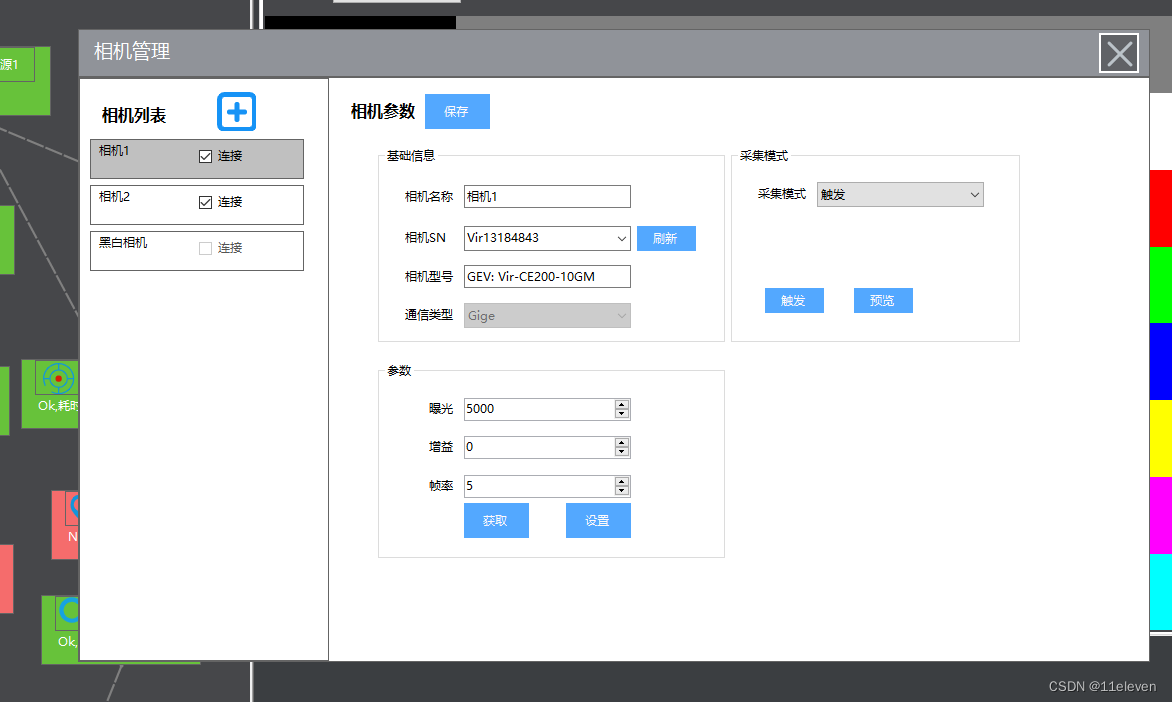
Visual upper system design and development (Halcon WinForm) -5 camera
![[probably the most complete in Chinese] pushgateway entry notes](/img/5a/6dcb75f5d713ff513ad6842ff53cc3.png)
[probably the most complete in Chinese] pushgateway entry notes

北京共有产权房出租新规实施的租赁案例
Intelij idea efficient skills (III)
随机推荐
Unityshader - materialcapture material capture effect (Emerald axe)
Popular understanding of random forest
Subclass hides the function with the same name of the parent class
Vs2017 is driven by IP debugging (dual machine debugging)
Digital image processing -- popular Canny edge detection
Kubernetes vous emmène du début à la fin
《微服务设计》读书笔记(上)
CString中使用百分号
Tensorflow realizes verification code recognition (I)
Visual upper system design and development (Halcon WinForm) -5 camera
C language brush questions ~leetcode and simple questions of niuke.com
App mobile terminal test [5] file writing and reading
SQL server installation location cannot be changed
Microservice API gateway zuul
视觉上位系统设计开发(halcon-winform)-1.流程节点设计
Summary of concurrent full knowledge points
Secsha system 1- login function
App移动端测试【5】文件的写入、读取
Halcon and WinForm study section 2
QT use qzxing to generate QR code