当前位置:网站首页>自动化运维利器ansible基础
自动化运维利器ansible基础
2022-07-06 09:34:00 【唐僧骑白马】
一、ansible介绍及安装
1、介绍
Ansible 是一个 IT 自动化工具。它能配置系统、部署软件、编排更复杂的 IT 任务,如连续部署或零停机时间滚动更新。
Ansible 用 Python 编写,尽管市面上已经有很多可供选择的配置管理解决方案(例如 Salt、Puppet、Chef等),但它们各有优劣,而Ansible的特点在于它的简洁。让 Ansible 在主流的配置管理系统中与众不同的一点便是,它并不需要你在想要配置的每个节点上安装自己的组件。同时提供的另一个优点,如果需要的话,你可以在不止一个地方控制你的整个基础架构。
2、工作原理
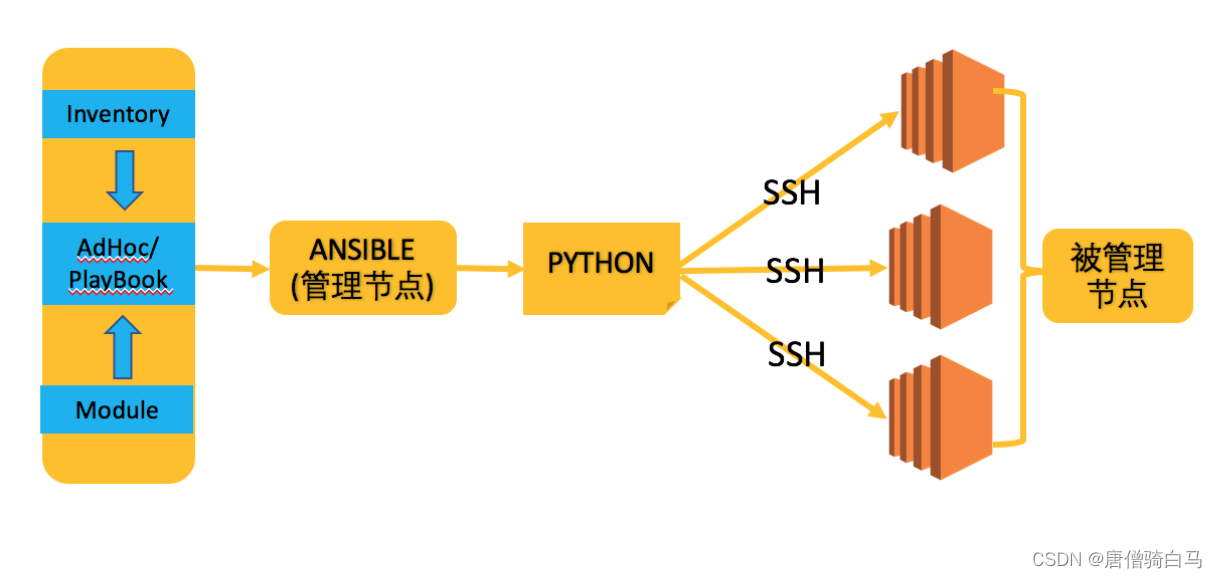
在ANSIBLE 管理体系中,存在"管理节点" 和 “被管理节点” 两种⻆色。
被管理节点通常被称为"资产"
在管理节点上,Ansible将 AdHoc 或 PlayBook 转换为Python脚本。并通过SSH将这些Python 脚本传递到被管理服务器上。在被管理服务器上依次执行,并实时的将结果返回给管理节点。
3、如何安装
3.1 先决条件
管理节点
- 确保存在OpenSSH确保Python 版本 >= 2.6确保安装ansible千锋云计算学院
被管理节点
- 确保存在OpenSSH确保Python 版本 >= 2.4 //若为2.4 版本,确保安装了python-samplesjson 扩展不需要安装ansible
3.2 安装ansible
[[email protected] ~]# yum -y install epel-release
[[email protected] ~]# yum -y install ansible
- 查看版本
[[email protected] ~]# ansible --version
ansible 2.9.27
  config file = /etc/ansible/ansible.cfg
  configured module search path = [u'/root/.ansible/plugins/modules', u'/usr/share/ansible/plugins/modules']
  ansible python module location = /usr/lib/python2.7/site-packages/ansible
  executable location = /usr/bin/ansible
  python version = 2.7.5 (default, Nov 16 2020, 22:23:17) [GCC 4.8.5 20150623 (Red Hat 4.8.5-44)]
二、管理节点与被管理节点建立SSH 信任关系
管理节点(ansible)中创建密钥对
[[email protected] ~]# ssh-keygen -t rsa
将本地的公钥传输到被管理节点
每个被管理节点都需要传递过程中需要被管理节点(这里是 192.168.75.130)的用户名(这里是root)及密码
[[email protected] ~]# ssh-copy-id [email protected]
验证,能免密登录即表示成功
[[email protected] ~]# ssh [email protected]
Last login: Wed Jun  8 23:35:41 2022 from 192.168.75.1
[[email protected] ~]# exit
logout
Connection to 192.168.75.130 closed.
三、快速入门
1、资产信息
# 管理节点:192.168.75.129 主机名 ansible

# 被管理节点(资产):
192.168.75.130
192.168.75.131
# 且管理节点和被管理节点之间的节点已经打通 SSH 信任关系。
2、实验一
在管理节点上,测试与所有被管理节点的网络连通性。
[[email protected] ~]# ansible all -i 192.168.75.130,192.168.75.131 -m ping
192.168.75.130 | SUCCESS => {

    "ansible_facts": {

        "discovered_interpreter_python": "/usr/bin/python"
    },
    "changed": false,
    "ping": "pong"
}
192.168.75.131 | UNREACHABLE! => {

    "changed": false,
    "msg": "Failed to connect to the host via ssh: ssh: connect to host 192.168.75.131 port 22: No route to host",
    "unreachable": true
}
注意 -i 参数后面接的是一个列表(List)。因此当为一个被管理节点时,我们后面一定要加一个英文逗号(,),告知是List,不加逗号会报错的
[[email protected] ~]# ansible all -i 192.168.75.130 -m ping
[WARNING]: Unable to parse /root/192.168.75.130 as an inventory source
[WARNING]: No inventory was parsed, only implicit localhost is available
[WARNING]: provided hosts list is empty, only localhost is available. Note that the implicit localhost does not
match 'all'
[[email protected] ~]# ansible all -i 192.168.75.130, -m ping
192.168.75.130 | SUCCESS => {

    "ansible_facts": {

        "discovered_interpreter_python": "/usr/bin/python"
    },
    "changed": false,
    "ping": "pong"
}
3、实验二
在管理节点上,确保文件/tmp/nginx.conf发布到所有被管理节点
[[email protected] ~]# ansible all -i 192.168.75.130, -m copy -a "src=/tmp/nignx.conf dest=/tmp/nignx.conf"
192.168.75.130 | CHANGED => {

    "ansible_facts": {

        "discovered_interpreter_python": "/usr/bin/python"
    },
    "changed": true,
    "checksum": "da39a3ee5e6b4b0d3255bfef95601890afd80709",
    "dest": "/tmp/nignx.conf",
    "gid": 0,
    "group": "root",
    "md5sum": "d41d8cd98f00b204e9800998ecf8427e",
    "mode": "0644",
    "owner": "root",
    "size": 0,
    "src": "/root/.ansible/tmp/ansible-tmp-1654703293.11-3498-29305731972284/source",
    "state": "file",
    "uid": 0
}
[[email protected] ~]# ll /tmp/nignx.conf
-rw-r--r-- 1 root root 0 Jun  8 23:48 /tmp/nignx.conf
[[email protected] ~]#
选项参数解释
- all 在 ansible 中,将其叫做pattern , 即匹配。我通常称它为资产选择器。就是匹配资产(-i 参数指定) 中的一部分。这里的all 是匹配所有指定的所有资产。将在下面资产部分详细阐述。
- -i 指定Ansible 的资产,也就是被管理服务器。
- -m 指定要运行的模块,比如这里的 ping 模块和 copy 模块
- -a 指定模块的参数,这里模块 ping 没有指定参数。模块 copy指定了 src 和 dest 参数。
四、ansible资产
Ansible 的资产分为静态资产和动态资产,动态资产会在后面的高级部分详细阐释。
1、静态资产
顾名思义它本身是一个文本文件,一个格式类似INI的文件。默认情况下,Ansible的资产文件位于/ect/ansible/hosts。pip 安装的可能没有这个文件,创建一个即可。
1.1 自定义资产
这个文件可以自定义,之后使用相应的参数指定。
下面给出一个自定义的静态资产实例,然后再具体解释其含义。
[[email protected] ~]# cat /etc/ansible/hosts
# This is the default ansible 'hosts' file.
#
# It should live in /etc/ansible/hosts
#
# - Comments begin with the '#' character
# - Blank lines are ignored
# - Groups of hosts are delimited by [header] elements
# - You can enter hostnames or ip addresses
# - A hostname/ip can be a member of multiple groups

# Ex 1: Ungrouped hosts, specify before any group headers.

## green.example.com
## blue.example.com
## 192.168.100.1
## 192.168.100.10
- Ansible 的资产文件中,可以以IP地址的形式或者主机名的形式存在。
- Ansible 的资产若连续,可以使用[stat:end] 的形式去表达。
- 可以将服务器按照业务场景定义成组,比如dbdb_servers和web_servers
- 组和组之间可以存在继承关系,比如dbdb_servers和web_servers同时继承alldb_servers组
1.2 如何使用自定义资产
通过-i参数指定自定义资产的位置即可(可以是全路径,也可以是相对路径)。
[[email protected] ~]# ansible all -i hosts
1.3 如何验证自定义资产
假如我们刚刚定义的资产为 hosts
- 列举出所有资产
[[email protected] ~]# pwd;ll hosts
/root
-rw-r--r-- 1 root root 15 Jun  9 00:02 hosts
[[email protected] ~]# ansible all -i hosts --list-hosts
  hosts (1):
    192.168.75.130
- 列举出选定资产
比如这里列举出web_servers
[[email protected] ~]# ansible webserver -i hosts --list-hosts
  hosts (1):
    192.168.75.131
2.、资产选择器
有时操作者希望只对资产中的一部分服务器进行操作,而不是资产中所有服务器。此时可以使用 Ansible 的资产选择器 PATTERN。下面学习如何通过资产选择器,更灵活的选择想要操作的服务器。
2.1 基本语法格式
ansible PATTERN -i inventory -m module -a argument
选择一台或者几台服务器
[[email protected] ~]# ansible 192.168.75.131 -i hosts --list-hosts
  hosts (1):
    192.168.75.131
[[email protected] ~]# ansible 192.168.75.131,192.168.75.130 -i hosts --list-hosts
  hosts (2):
    192.168.75.131
    192.168.75.130
[[email protected] ~]#
选择一组服务器
[[email protected] ~]# ansible webserver -i hosts --list-hosts
  hosts (1):
    192.168.75.131
使用 * 匹配
[[email protected] ~]# ansible 192.168.75.* -i hosts --list-hosts
  hosts (2):
    192.168.75.131
    192.168.75.130
使用逻辑匹配
- webserver和db 的并集,两个组内的所有主机
[[email protected] ~]# ansible 'webserver:db' -i hosts --list-hosts
  hosts (2):
    192.168.75.131
    192.168.192.111
- webserver和db 的交集,两个组共的有主机
[[email protected] ~]# ansible 'webserver:&db' -i hosts --list-hosts
  hosts (1):
    192.168.75.131
- 排除,在 webserver 中,但是不在 db中
[email protected] ~]# ansible 'webserver:!db' -i hosts --list-hosts
[WARNING]: No hosts matched, nothing to do
  hosts (0):
五、Ansible Ad-Hoc 命令
Ad-hoc 命令是什么呢?是相对于写Ansible playbook 来说的类似于在命令行敲入shell命令和写shell脚本两者之间的关系。
可以用于执行一些临时命令。如果我们敲入一些命令去比较快的完成一些事情,而不需要将这些执行的命令特别保存下来,这样的命令就叫做 ad-hoc 命令。
Ansible提供两种方式去完成任务,一是 ad-hoc 命令,一是写Ansible playbook。
前者可以解决一些简单的任务, 后者解决较复杂的任务,比如做配置管理或部署。
1、命令格式
ansible pattern [-i inventory] -m module -a argument
- pattern资产选择器
- -i指定资产清单文件的位置
- -m指定本次Ansible ad-hoc 要执行的模块。可以类别成SHELL 中的命令。
- -a模块的参数. 可以类比成SHELL 中的命令参数
2、模块类型
Ansible 模块分三种类型:核心模块(core module)、附加模块(extra module)及用户自定义模块(consume module)。
核心模块是由Ansible 的官方团队提供的。附加模块是由各个社区提供的。例如: OPENSTACK 社区、DOCKER 社区等等。当核心模块和附加模块都无法满足你的需求时,用户可以自定义模块。
默认情况下,在安装Ansible 的时候,核心模块和附加模块都已经安装而无需用户干预。
3、联机帮助
ansible 的核心模块和附加模块,数量有3000+ 。这样庞大的模块数量,对于任何一个接触Ansible 的人都不可能将其完全记住、掌握使用。因此能够顺利使用Ansible 的帮助文档,对我们来说是很有必要的。Ansible 的帮助文档,由它本身提供的命令 ansible-doc 实现。
常用帮助参数
- 列举出所有的核心模块和附加模块
[[email protected] ~]# ansible-doc -l
fortios_router_community_list                                 Configure community lists i...
azure_rm_devtestlab_info                                      Get Azure DevTest Lab facts
ecs_taskdefinition                                            register a task definition
- 查询某个模块的使用方法
[[email protected] ~]# ansible-doc yum
- 查询某个模块的使用方法,比较简洁的信息
[[email protected] ~]# ansible-doc -s yum
4、常用模块
4.1、command & shell 模块
两个模块都是在远程服务器上去执行命令。但command模块是ad-hoc的默认模块,在执行ad-hoc时若不指定模块的名字则默认使用此模块。
不指定-i hosts 则默认使用/etc/ansible/hosts里面的资产信息
[[email protected] ~]# ansible all -i hosts -a "echo ansible"
192.168.75.130 | CHANGED | rc=0 >>
ansible
[[email protected] ~]# ansible all -i hosts -m shell -a "echo ansible"
192.168.75.130 | CHANGED | rc=0 >>
ansible
[[email protected] ~]#
两个模块的差异
- shell 模块可以执行SHELL 的内置命令和特性(比如管道符)。
- command 模块无法执行SHELL 的内置命令和特性
[[email protected] ~]# ansible all -i hosts -m shell -a "echo 'hello'|grep -o 'e'"
192.168.75.130 | CHANGED | rc=0 >>
e
[[email protected] ~]# ansible all -i hosts -a "echo 'ansible'|grep -o 'e'"
192.168.75.130 | CHANGED | rc=0 >>
ansible|grep -o e
[[email protected] ~]#
4.2、script模块
将管理节点上的脚本传递到被管理节点(远程服务器)上进行执行。
[[email protected] ~]# vim test.sh
[[email protected] ~]# cat test.sh
touch /tmp/testfile`在这里插入代码片`
[[email protected] ~]# ansible all -i hosts -m script -a "test.sh"
192.168.75.130 | CHANGED => {

    "changed": true,
    "rc": 0,
    "stderr": "Shared connection to 192.168.75.130 closed.\r\n",
    "stderr_lines": [
        "Shared connection to 192.168.75.130 closed."
    ],
    "stdout": "",
    "stdout_lines": []
}
[[email protected] ~]# ansible all -i hosts -m shell -a "ls -l /tmp/testfile"
192.168.75.130 | CHANGED | rc=0 >>
-rw-r--r-- 1 root root 0 Jun  9 22:18 /tmp/testfile
[[email protected] ~]#
4.3、copy 模块
copy 模块的主要用于管理节点和被管理节点之间的文件拷⻉。
常用参数:
src 指定拷⻉文件的源地址
dest 指定拷⻉文件的目标地址
backup 拷⻉文件前,若原目标文件发生了变化,则对目标文件进行备份
woner 指定新拷⻉文件的所有者
group 指定新拷⻉文件的所有组
mode 指定新拷⻉文件的权限
copy 管理节点上的hosts到被管理节点上
[[email protected] ~]# ansible all -i hosts -m copy -a "src=hosts dest=/tmp/hosts"
[[email protected] ~]# ansible all -i hosts -m shell -a "ls -l /tmp/hosts"
- copy 前,在被管理节点上对原文件进行备份
[[email protected] ~]# ansible all -i hosts -m copy -a "src=hosts dest=/tmp/hosts backup=yes"
- copy 文件的同时对文件进行用户及用户组设置
[[email protected] ~]# ansible all -i hosts -m copy -a "src=hosts dest=/tmp/hosts owner=nobody group=nobody"
- copy 文件的同时对文件进行权限设置
[[email protected] ~]# ansible all -i hosts -m copy -a "src=hosts dest=/tmp/hosts mode=0755"
4.4、yum_repository
添加 YUM 仓库
常用参数
- name仓库名称,就是仓库文件中第一行的中括号中名称,必须的参数。
- description仓库描述信息,添加时必须的参数
- baseurl yum存储库 “repodata” 目录所在目录的URL,添加时必须的参数。它也可以是多个URL的列表。
- file仓库文件保存到被管理节点的文件名,不包含.repo。默认是name的值。
- state preset 确认添加仓库文件, absent 确认删除仓库文件。
- gpgcheck是否检查 GPG yes|no,没有默认值,使用/etc/yum.conf中的配置。
添加epel源
[[email protected] ~]# ansible all -i hosts -m yum_repository -a "name=epel baseurl=https://download.fedoraproject.org/pub/epel/$releasever/$basearch/ description='epel repo'"
删除 epel 源
[[email protected] ~]# ansible all -i hosts -m yum_repository -a "name=epel state=absent"
4.5、yum模块
等同于 Linux 上的YUM 命令,对远程服务器上RPM包进行管理。
常用参数:
- name 要安装的软件包名,多个软件包以英文逗号(,) 隔开
- state 对当前指定的软件安装、移除操作(present installedlatest absent removed)支持的参数
- present 确认已经安装,但不升级
- installed 确认已经安装
- latest 确保安装,且升级为最新
- absent 和 removed 确认已移除
安装一个软件包
[[email protected] ~]# ansible all -i hosts -m yum -a "name=httpd state=present|latest|installed"
移除一个软件包
[[email protected] ~]# ansible all -i hosts -m yum -a "name=httpd state=absent|removed"
安装一个软件包组
[[email protected] ~]# ansible all -i hosts -m yum -a "name='@Development tools' state=present"
4.6、systemd模块
Centos6 之前的版本使用service模块。请使用ansible-doc service命令自行查看帮助信息。管理远程节点上的 systemd 服务,就是由 systemd 所管理的服务。常用参数:
- daemon_reload 重新载入 systemd,扫描新的或有变动的单元
- enabled 是否开机自启动 yes|no
- name 必选项,服务名称,比如 httpd vsftpd
- state 对当前服务执行启动,停止、重启、重新加载等操作(started,stopped,restarted,reloaded)
重新加载systemd
[[email protected] ~]# ansible all -i hosts -m systemd -a "daemon_reload=yes"
启动nginx
[[email protected] ~]# ansible all -i hosts -m systemd -a "name=nginx state=started"
关闭nginx
[[email protected] ~]# ansible all -i hosts -m systemd -a "name=nginx state=stopped"
重启nginx
[[email protected] ~]# ansible all -i hosts -m systemd -a "name=nginx state=restarted"
重新加载nginx
[[email protected] ~]# ansible all -i hosts -m systemd -a "name=nginx state=reloaded"
nginx开机自启
[[email protected] ~]# ansible all -i hosts -m systemd -a "name=nginx enabled=yes"
4.7、group 模块
在被管理节点上,对组进行管理。常用参数:
- name 组名称,必须的
- system 是否为系统组, yes/no ,默认是 no
- state 删除或这创建,present/absent ,默认是present
创建db组
[[email protected] ~]# ansible all -i hosts -m group -a "name=db"
4.8、user模块
用于在被管理节点上对用户进行管理。常用参数:
- name 必须的参数,指定用户名
- password 设置用户的密码,这里接受的是一个加密的值,因为会直接存到 shadow, 默认不设置密码
- update_password 假如设置的密码不同于原密码,则会更新密码. 在 1.3 中被加入
- home 指定用户的家目录
- shell 设置用户的 shell
- comment用户的描述信息
- create_home 在创建用户时,是否创建其家目录。默认创建,假如不创建,设置为 no。2.5版本之前使用 createhome
- group 设置用户的主组groups 将用户加入到多个其他组中,多个用逗号隔开。默认会把用户从其他已经加入的组中删除。
- append yes|no 和 groups 配合使用,yes 时,不会把用户从其他已经加入的组中删除
- system 设置为 yes 时,将会创建一个系统账号
- expires 设置用户的过期时间,值为时间戳,会转为为天数后,放在 shadow 的第 8 个字段里
- generate_ssh_key设置为 yes 将会为用户生成密钥,这不会覆盖原来的密钥
- ssh_key_type 指定用户的密钥类型,默认 rsa, 具体的类型取决于被管理节点
- state 删除或添加用户, present 为添加,absent 为删除;默认值 present
- remove 当与 state=absent 一起使用,删除一个用户及关联的目录,比如家目录,邮箱目录。可选的值为: yes/no
创建用户并设置密码,先生成加密密码,执行 ansible 命令创建用户 foo 并设置密码
[[email protected] ~]# pass=$(echo "123456" |openssl passwd -1 -stdin)
[[email protected] ~]# ansible all -i hosts -m user -a "name=foo password=${pass}"
创建用户 yangge, 并且为其创建密钥对,并且密钥类型为:ecdsa
[[email protected] ~]# ansible all -i hosts -m user -a "name=yangge generate_ssh_key=yes ssh_key_ty
pe=ecdsa"
创建用 tom, 并且设置其有效期到 2020年4月15日, 加入到组db_admin 中, 不改变用户原有假如的组。
[[email protected] ~]# ansible all -i hosts -m user -a "name=tom expires=$(date +%s -d 20220609) groups=db append=yes"
date命令说明
// 计算3小时之后是几点几分# date +%T -d '3 hours'
// 任意日期的前 N 天,后 N 天的具体日期
# date +%F -d "20190910 1 day"
# date +%F -d "20190910 -1 day"
// 计算两个日期相差天数, 比如计算生日距离现在还有多少天
# d1=$(date +%s -d 20180728)
# d2=$(date +%s -d 20180726)# echo $(((d1-d2)/86400))
4.9、file模块
file 模块主要用于远程主机上的文件操作
常用参数
- owner 定义文件/目录的属主
- group 定义文件/目录的属组
- mode 定义文件/目录的权限
- path 必选项,定义文件/目录的路径
- recurse 递归的设置文件的属性,只对目录有效
- src 链接(软/硬)文件的源文件路径,只应用于state=link的情况
- dest 链接文件的路径,只应用于state=link的情况
- state
- directory 如果目录不存在,创建目录
- file 文件不存在,则不会被创建,存在则返回文件的信息,常用于检查文件是否存在。
- link 创建软链接
- hard 创建硬链接
- touch 如果文件不存在,则会创建一个新的文件,如果文件或目录已存在,则更新其最后修改时间
- absent 删除目录、文件或者取消链接文件
// 创建一个文件
# ansible all -i hosts -m file -a"path=/tmp/foo.conf state=touch"
// 改变文件所有者及权限
# ansible all -i hosts -m file -a"path=/tmp/foo.conf owner=nobody group=nobodymode=0644"
// 创建一个软连接
# ansible all -i hosts -m file -a "src=/tmp/foo.confdest=/tmp/link.conf state=link"
// 创建一个目录
# ansible all -i hosts -m file -a "path=/tmp/testdirstate=directory"
// 取消一个连接
# ansible all -i hosts -m file -a"path=/tmp/link.conf state=absent"
// 删除一个文件
# ansible all -i hosts -m file -a"path=/tmp/foo.conf state=absent"
4.10、cron模块
管理远程节点的CRON 服务。等同于Linux 中的计划任务。注意:使用 Ansible 创建的计划任务,是不能使用本地crontab -e去编辑,否则 Ansible 无法再次操作此计划任务了。
常用参数:
- name 指定一个cron job 的名字。一定要指定,便于日之后删除。
- minute 指定分钟,可以设置成(0-59, *, /2 等)格式。默认是 , 也就是每分钟。
- hour 指定小时,可以设置成(0-23, *, */2 等)格式。默认是 * ,也就是每小时。
- day 指定天,可以设置成(1-31, *, */2 等)格式。默认是 * , 也就是每天。
- month 指定月份,可以设置成(1-12, *, /2 等)格式。默认是 , 也就是每周。
- weekday 指定星期,可以设置成(0-6 for Sunday-Saturday, *等)格式。默认是 *,也就是每星期。
- job 指定要执行的内容,通常可以写个脚本,或者一段内容。
- state 指定这个job的状态,可以是新增(present)或者是删除(absent)。默认为新增(present)
// 新建一个 CRON JOB 任务
# ansible all -i hosts -m cron -a "name='create newjob' minute='0' job='ls -alh > /dev/null'"
// 删除一个 CRON JOB 任务,删除时,一定要正确指定job 的name参数,以免误删除。
# ansible all -i hosts -m cron -a "name='create newjob' state=absent"
4.11、debug模块
debug 模块主要用于调试时使用,通常的作用是将一个变量的值给打印出来。常用参数:
- var 直接打印一个指定的变量值
- msg 打印一段可以格式化的字符串
这里引入了变量,我们只需了解 debug 模板的使用即可。
# ansible all -i hosts -m debug -a "var=role" -e"role=web"
# ansible all -i hosts -m debug -a "msg='role is{
    {role}} '" -e "role=web"
4.12、 template 模块
template 模块使用了Jinjia2格式作为文件模版,可以进行文档内变量的替换。文件以 .j2 结尾。常用参数:
- src 指定 Ansible 控制端的文件路径
- dest 指定 Ansible 被控端的文件路径
- owner 指定文件的属主
- group 指定文件的属组
- mode 指定文件的权限
- backup 创建一个包含时间戳信息的备份文件,这样如果您以某种方式错误地破坏了原始文件,就可以将其恢复原状。yes/no
1. 建立一个 template 文件, 名为 hello_world.j2
# cat hello_world.j2Hello {
    {var}} !
2. 执行命令,并且设置变量 var 的值为 world
# ansible all -i hosts -m template -a"src=hello_world.j2 dest=/tmp/hello_world.world" -e"var=world"
3. 在被控主机上验证
# cat /tmp/hello_world.worldHello world !
4.13、lineinfile 模块
在被管理节点上,用正则匹配的方式对目标文件的一行内容修改删除等操作。
如果是在一个文件中把所有匹配到的多行都进行统一处理,请参考replace模块。
如果想对一个文件进行一次性添加/更新/删除多行内容等操作,参考blockinfile模块
常用参数
- path 被管理节点的目标文件路径, 必须。
- state 可选值absent 删除 |present 替换(默认值)。
- regexp 在文件的每一行中查找的正则表达式。对于 state=present ,仅找到的最后一行将被替换。
- line 要在文件中插入/替换的行。需要state=present。
- create 文件不存在时,是否要创建文件并添加内容。yes/noExample
删除被控节点文件里的某一条内容
# ansible
all -i hosts -m lineinfile -a"path=/etc/sudoers regexp='^%wheel' state=absent"
替换某一行
# ansible all -i hosts -m lineinfile -a"path=/etc/selinux/config regexp='^SELINUX='line='SELINUX=disabled' state=present"
4.14、blockinfile 模块
对目标文件进行多行的添加/更新/删除操作,常用参数
- path 目标文件路径
- block 文件中被操作的块内容
- state 块内容如何处理,absent 删除, present 添加/更新(默认值)
向文件/etc/ssh/sshd_config的最后添加几行内容,添加的内容是注意:
Match User ansible-agentPasswordAuthentication no
ansible all -i hosts -m blockinfile -a"path=/etc/ssh/sshd_config block='Match Useransible-agent\nPasswordAuthentication no'"
注意:\n是换行符的意思。
更新之前的内容
ansible dbservers -i hosts -m blockinfile -a"path=/etc/ssh/sshd_config block='Match Useransible-agent\nPasswordAuthentication yes'"
删除文件中的连续出现几行内容
ansible dbservers -i hosts -m blockinfile -a"path=/etc/ssh/sshd_config block='Match Useransible-agent\nPasswordAuthentication yes'state=absent"
边栏推荐
- Jetpack compose 1.1 release, based on kotlin's Android UI Toolkit
- Basic knowledge of assembly language
- Application service configurator (regular, database backup, file backup, remote backup)
- IDEA断点调试技巧,多张动图包教包会。
- MySQL digital function
- Koa Middleware
- MySQL Advanced (index, view, stored procedures, functions, Change password)
- JVM 垃圾回收器之Serial SerialOld ParNew
- JVM运行时数据区之程序计数器
- Activiti directory (IV) inquiry agency / done, approved
猜你喜欢
Flink 解析(二):反压机制解析
Take you hand-in-hand to do intensive learning experiments -- knock the level in detail
Models used in data warehouse modeling and layered introduction
信息与网络安全期末复习(完整版)
Flink源码解读(二):JobGraph源码解读
TCP's three handshakes and four waves
07个人研发的产品及推广-人力资源信息管理系统

肖申克的救赎有感

Wu Jun trilogy insight (IV) everyone's wisdom

PySpark算子处理空间数据全解析(4): 先说说空间运算
随机推荐
Only learning C can live up to expectations top3 demo exercise
ByteDance overseas technical team won the championship again: HD video coding has won the first place in 17 items
JVM之垃圾回收器上篇
MySQL basic addition, deletion, modification and query of SQL statements
Yum install XXX reports an error
Flink 解析(二):反压机制解析
Coursera cannot play video
JVM运行时数据区之程序计数器
arithmetic operation
案例:检查空字段【注解+反射+自定义异常】
Junit单元测试
C#版Selenium操作Chrome全屏模式显示(F11)
CTF reverse entry question - dice
Application service configurator (regular, database backup, file backup, remote backup)
Control transfer instruction
Basic knowledge of assembly language
Activiti directory (III) deployment process and initiation process
轻量级计划服务工具研发与实践
Assembly language addressing mode
【逆向中级】跃跃欲试