当前位置:网站首页>58:第五章:开发admin管理服务:11:开发【管理员人脸登录,接口】;(未实测)(使用了阿里AI人脸识别)(演示了,使用RestTemplate实现接口调用接口;)
58:第五章:开发admin管理服务:11:开发【管理员人脸登录,接口】;(未实测)(使用了阿里AI人脸识别)(演示了,使用RestTemplate实现接口调用接口;)
2022-08-01 19:29:00 【小枯林】
说明:
(1)本篇博客内容:
(2)声明:本项目演示的人脸登录,其实是不太安全的;只是两张图片对比,没有活体检测,那我用朋友的图片就能登录了;所以,在实际的企业级项目中,建议使用活体的人脸识别;
目录
1.在【admin】管理服务中的AdminMngControllerApi接口中,定义【管理员人脸登录,接口】;
2.在【files】文件服务的AdminMngController类中,去实现【管理员人脸登录,接口】;(人脸登录的整体逻辑)
(1) 首先,要判断前端传过来的数据中,username和img64不能为空;
(2)然后,利用username,查询该用户在GridFS中人脸图片的id;(要记得,管理员用户的username不允许重复)
(4)然后,利用在附加3中开发的FaceVerifyUtils工具类,去使用阿里人脸识别;
1.在FileUploaderControllerApi接口中,定义【根据faceId,从GridFS中获取admin用户头像,转成base64编码字符串,然后返回:接口】;
2.在FileUploaderController类中,去实现【根据faceId,获取admin用户头像的,base64编码数据,接口】;
附加2:实例化一个RestTemplate对象,到IoC容器中;
1.在【api】接口工程中,创建CloudConfig类:实例化一个RestTemplate对象,到IoC容器中;
附加3:创建阿里人脸识别的工具类;(阿里人脸识别的核心!!!)
1.在【common】通用工程中,创建FaceVerifyUtils工具类:
一:本篇博客合理性说明;
(1)在前面,我们使用人脸登录的方式,注册了admin8这个管理员账户;那么,在admin8这个管理员登录的时候,就可以使用人脸登录了;
(2)人脸登录的话,需要使用"人脸识别"技术;我们会借助阿里云的人脸识别技术,来实现;
(3)这儿的逻辑是:
● 点击"使用人脸识别登录"后,获取一张人脸数据后,前端会把该人脸数据转成Base64编码的字符串;然后,该字符串会和username一起传给后端的【管理员人脸登录,接口】;
● 然后,后端的【管理员人脸登录,接口】,去调用后端的【根据faceId,从GridFS中获取admin用户头像,转成base64编码字符串,然后返回:接口】,从GridFS中获取人脸的Base64字符串;(这儿我们使用的是RestTemplate来实现接口调用的)
● 然后,会调用阿里的人脸识别,去对比两个Base64字符串,计算人脸的匹配度;
● 如果匹配度满足,就会登录成功;

二:阿里云,人脸识别Face Recognition;
在阿里云首页,搜索人脸识别;
阿里的该产品的功能有;


但是,阿里云的这个SDK目前仅对企业用户开放;所以,这部分,自己不能实测了;所以,在这儿,理清思路进行了;
在【人脸比对1:1 - 阿里云视觉智能开放平台 - 阿里云】是官方提供的SDK说明,可以去参考;

友情提示:这个api是以前的,现在可能有点小过时了;
(1)网关;
(2)方法参数;
● 这也能够明白,为什么在该项目中我们在存储、传递人脸数据的时候,需要转成base64编码的字符串了;;;因为,我们预料到在项目中,会使用阿里的人脸识别,而且使用的是"传入两张图片的base64编码的方式";
● 此外,如果采用"传入两张图片的url的方式",这个url是需要在公网可访问的;
(3)返回结果;
● 这个置信度,我们可以自己设置;比如,两张图片阿里人脸识别,对比的相似度是75%;如果置信度我们设为了60%,那么在业务中,就认为两张人脸匹配通过;


三:开发:【管理员人脸登录,接口】;
1.在【admin】管理服务中的AdminMngControllerApi接口中,定义【管理员人脸登录,接口】;
@PostMapping("adminFaceLogin")
    @ApiOperation(value = "管理员人脸登录", notes = "管理员人脸登录", httpMethod = "POST")
    public GraceJSONResult adminFaceLogin(@RequestBody AdminLoginBO adminLoginBO,
                                      HttpServletRequest request,
                                      HttpServletResponse response);
说明:
(1) 人脸登录的时候,人脸数据会作为AdminLoginBO对象的img64属性,传到后端;


2.在【files】文件服务的AdminMngController类中,去实现【管理员人脸登录,接口】;(人脸登录的整体逻辑)
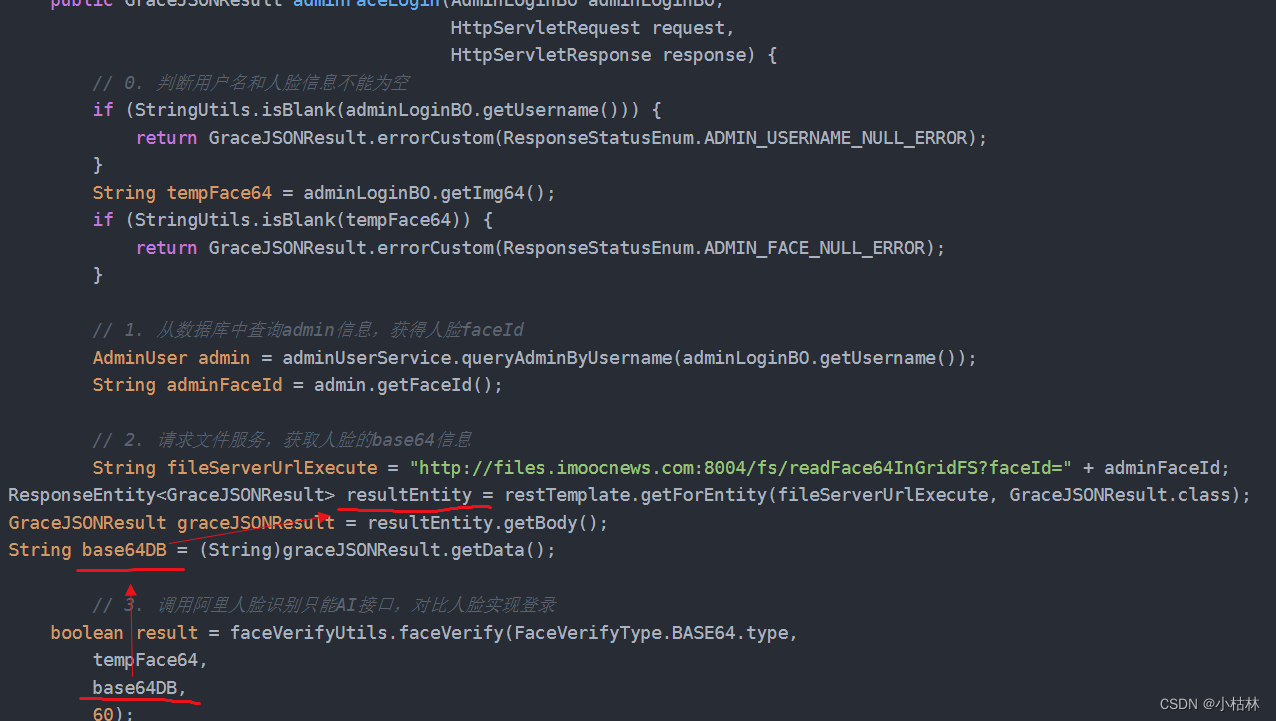
@Autowired
private RestTemplate restTemplate;
@Autowired
private FaceVerifyUtils faceVerifyUtils;


@Override
    public GraceJSONResult adminFaceLogin(AdminLoginBO adminLoginBO,
                                          HttpServletRequest request,
                                          HttpServletResponse response) {
        // 0. 判断用户名和人脸信息不能为空
        if (StringUtils.isBlank(adminLoginBO.getUsername())) {
            return GraceJSONResult.errorCustom(ResponseStatusEnum.ADMIN_USERNAME_NULL_ERROR);
        }
        String tempFace64 = adminLoginBO.getImg64();
        if (StringUtils.isBlank(tempFace64)) {
            return GraceJSONResult.errorCustom(ResponseStatusEnum.ADMIN_FACE_NULL_ERROR);
        }

        // 1. 从数据库中查询admin信息,获得人脸faceId
        AdminUser admin = adminUserService.queryAdminByUsername(adminLoginBO.getUsername());
        String adminFaceId = admin.getFaceId();

        // 2. 请求文件服务,获取人脸的base64信息
        String fileServerUrlExecute = "http://files.imoocnews.com:8004/fs/readFace64InGridFS?faceId=" + adminFaceId;
ResponseEntity<GraceJSONResult> resultEntity = restTemplate.getForEntity(fileServerUrlExecute, GraceJSONResult.class);
GraceJSONResult graceJSONResult = resultEntity.getBody();
String base64DB = (String)graceJSONResult.getData();

        // 3. 调用阿里人脸识别只能AI接口,对比人脸实现登录
    boolean result = faceVerifyUtils.faceVerify(FaceVerifyType.BASE64.type,
        tempFace64,
        base64DB,
        60);

if (!result) {
    return GraceJSONResult.errorCustom(ResponseStatusEnum.ADMIN_FACE_LOGIN_ERROR);
}

        // 4. 设置管理员信息到redis与cookie
doLoginSettings(admin, request, response);

        return GraceJSONResult.ok();
    }
说明:
(1) 首先,要判断前端传过来的数据中,username和img64不能为空;
……………………………………………………
(2)然后,利用username,查询该用户在GridFS中人脸图片的id;(要记得,管理员用户的username不允许重复)
● 在【49:第五章:开发admin管理服务:2:开发【管理员登录】接口;】中,我们就在AdminUserService中开发了""管理员用户名",查询管理员用户的queryAdminByUsername()"方法;如有需要,可以去参考;
……………………………………………………
(3)然后,利用在附加2中开发的RestTemplate,去调用在附加1部分,在【files】文件服务中开发【根据faceId,从GridFS中获取admin用户头像,转成base64编码字符串,然后返回:接口】:以便从GridFS中,获取人脸照片的Base64编码的字符串;
● 我们需要注入RestTemplate对象;
● 利用RestTemplate的getForEntity()方法,去调用其他接口;
● 参数说明;
● 利用getBody()方法,获得接口的返回值;
● 从接口的返回值中,获得人脸照片的Base64编码后的字符串数据;
……………………………………………………
(4)然后,利用在附加3中开发的FaceVerifyUtils工具类,去使用阿里人脸识别;
● 我们需要注入FaceVerifyUtils工具类的对象;
● 调用FaceVerifyUtils的faceVerify()方法,去校验人脸是否OK;
这四个参数的意思是依次是:
参数1:使用FaceVerifyType枚举类中的BASE64,来指定"我们此次使用阿里人脸识别时,是直接通过两个文件的base64编码的字符串"来比较的;
参数2:管理员登录时,前端获取的人脸图片的Base64编码后的数据;即,从前端传过来的人脸数据;
参数3:从GridFS中,获取的人脸图片的Base64数据;即,根据username从GridFS中查询的;
参数4:60:即我们根据这儿的业务情况,规定只要阿里人脸识别,对比两张图片相似度>=60,我们在我们的业务中,就认为人脸识别通过;
● 如果人脸识别没通过,就返回信息是"人脸识别失败,请重试!"的GraceJSONRResult;
……………………………………………………
(5)然后,如果上面一切OK,就表示人脸识别通过了,那么用户就是可以登录的,我们就去设置cookie;
● 调用AdminMngController类中的doLoginSetting()方法去设置cookie;
……………………………………………………
(6)最后,返回OK;


附1:在【files】文件服务中,开发【根据faceId,从GridFS中获取admin用户头像,转成base64编码字符串,然后返回:接口】:这个接口的作用,就是根据id从GridFS中,获取文件的base64编码的字符串;(这个接口,将被【admin】管理服务的【管理员人脸登录,接口】来调用)
1.在FileUploaderControllerApi接口中,定义【根据faceId,从GridFS中获取admin用户头像,转成base64编码字符串,然后返回:接口】;
/**
 * 根据faceId获得admin的base64头像信息
 * @param faceId
 * @param request
 * @param response
 * @return
 * @throws Exception
 */
@GetMapping("readFace64InGridFS")
public GraceJSONResult readFace64InGridFS(
        @RequestParam String faceId,
        HttpServletRequest request,
        HttpServletResponse response) throws Exception;
说明:
(1)这个接口,不是前端调用的;而是将被【admin】管理服务的【管理员人脸登录,接口】来调用的;
2.在FileUploaderController类中,去实现【根据faceId,获取admin用户头像的,base64编码数据,接口】;
@Override
    public GraceJSONResult readFace64InGridFS(String faceId,
                                              HttpServletRequest request,
                                              HttpServletResponse response) throws Exception {
        // 1. 判断faceId不能为空
        if (StringUtils.isBlank(faceId)) {
            return GraceJSONResult.errorCustom(ResponseStatusEnum.FILE_NOT_EXIST_ERROR);
        }

        // 2. 获得文件
        File file = readGridFSByFaceId(faceId);

        // 3. 把文件转换为base64并返回给调用方
        String base64 = FileUtils.fileToBase64(file);

        return GraceJSONResult.ok(base64);
    }
说明:
(1) 直接调用我们在【57:第五章:开发admin管理服务:10:开发【从MongoDB的GridFS中,获取文件,接口】;】中,开发【从MongoDB的GridFS中,获取文件,接口】时,创建的工具方法,readGridFSByFaceId():【通过id,从GridFS中,获取文件】→【保存到服务器本地】→【返回该文件,在本地服务器的file对象】;
(2)然后,调用 我们在【57:第五章:开发admin管理服务:10:开发【从MongoDB的GridFS中,获取文件,接口】;】中,开发【从MongoDB的GridFS中,获取文件,接口】时,创建的工具类FileUtils中的方法,fileToBase64():根据文件流,把文件转成base64编码的字符串;
(3)最后,直接返回文件的base64编码的字符串数据;


附加2:实例化一个RestTemplate对象,到IoC容器中;
(1)【admin】管理服务的【管理员人脸登录,接口】,想要调用,【files】文件服务中的【根据faceId,从GridFS中获取admin用户头像,转成base64编码字符串,然后返回:接口】;
(2)这个接口间发起调用有很多方式,可以使用RPC通信,也可使用HTTP(具体可以是restTemplate);我们这儿,就是使用restTemplate来调用;
(3)后面,我们把项目改造成微服务后,这儿将会被改成Spring Cloud微服务的调用方式;
1.在【api】接口工程中,创建CloudConfig类:实例化一个RestTemplate对象,到IoC容器中;
CloudConfig类:
package com.imooc.api.config;

import org.springframework.context.annotation.Bean;
import org.springframework.context.annotation.Configuration;
import org.springframework.http.client.OkHttp3ClientHttpRequestFactory;
import org.springframework.web.client.RestTemplate;
import org.springframework.web.cors.CorsConfiguration;
import org.springframework.web.cors.UrlBasedCorsConfigurationSource;
import org.springframework.web.filter.CorsFilter;

@Configuration
public class CloudConfig {

    public CloudConfig() {
    }

    /**
     * 会基于OKHttp3的配置来配置RestTemplate
     * @return
     */
    @Bean
    public RestTemplate restTemplate() {
        return new RestTemplate(new OkHttp3ClientHttpRequestFactory());
    }

}
说明:
(1)这儿的意思很简单,就是实例化一个RestTemplate对象,到IoC容器中;

附加3:创建阿里人脸识别的工具类;(阿里人脸识别的核心!!!)
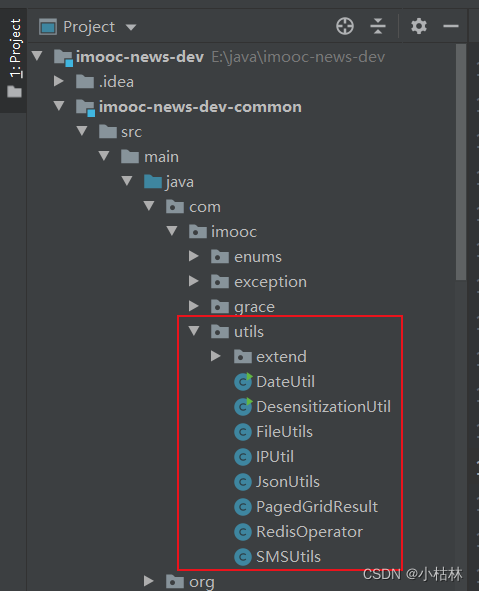
1.在【common】通用工程中,创建FaceVerifyUtils工具类:
FaceVerifyUtils类:
package com.imooc.utils;

import com.aliyuncs.utils.Base64Helper;
import com.imooc.enums.FaceVerifyType;
import com.imooc.exception.GraceException;
import com.imooc.grace.result.ResponseStatusEnum;
import com.imooc.utils.extend.AliyunResource;
import org.apache.tomcat.util.codec.binary.Base64;
import org.slf4j.Logger;
import org.slf4j.LoggerFactory;
import org.springframework.beans.factory.annotation.Autowired;
import org.springframework.stereotype.Component;

import javax.crypto.Mac;
import javax.crypto.spec.SecretKeySpec;
import java.io.*;
import java.net.HttpURLConnection;
import java.net.URL;
import java.net.URLConnection;
import java.security.MessageDigest;
import java.text.SimpleDateFormat;
import java.util.Date;
import java.util.Locale;
import java.util.Map;
import java.util.SimpleTimeZone;

@Component
public class FaceVerifyUtils {

    final static Logger logger = LoggerFactory.getLogger(FaceVerifyUtils.class);

    @Autowired
    private AliyunResource aliyunResource;

    private static final String gateway = "https://dtplus-cn-shanghai.data.aliyuncs.com/face/verify";

    /*
     * 计算MD5+BASE64
     */
    public static String MD5Base64(String s) {
        if (s == null)
            return null;
        String encodeStr = "";
        byte[] utfBytes = s.getBytes();
        MessageDigest mdTemp;
        try {
            mdTemp = MessageDigest.getInstance("MD5");
            mdTemp.update(utfBytes);
            byte[] md5Bytes = mdTemp.digest();
            Base64Helper b64Encoder = new Base64Helper();
            encodeStr = b64Encoder.encode(md5Bytes);
        } catch (Exception e) {
            throw new Error("Failed to generate MD5 : " + e.getMessage());
        }
        return encodeStr;
    }

    /*
     * 计算 HMAC-SHA1
     */
    public static String HMACSha1(String data, String key) {
        String result;
        try {
            SecretKeySpec signingKey = new SecretKeySpec(key.getBytes(), "HmacSHA1");
            Mac mac = Mac.getInstance("HmacSHA1");
            mac.init(signingKey);
            byte[] rawHmac = mac.doFinal(data.getBytes());
            result = (new Base64Helper()).encode(rawHmac);
        } catch (Exception e) {
            throw new Error("Failed to generate HMAC : " + e.getMessage());
        }
        return result;
    }

    /*
     * 等同于javaScript中的 new Date().toUTCString();
     */
    public static String toGMTString(Date date) {
        SimpleDateFormat df = new SimpleDateFormat("E, dd MMM yyyy HH:mm:ss z", Locale.UK);
        df.setTimeZone(new SimpleTimeZone(0, "GMT"));
        return df.format(date);
    }

    /**
     * 发送POST请求 进行两张图的人脸对比
     * @param type
     *          0: 通过url识别,参数image_url不为空;1: 通过图片content识别,参数content不为空
     * @param face1
     *          type为0,则传入图片url,为1则传入base64
     * @param face2
     *          type为0,则传入图片url,为1则传入base64
     * @return
     */
    //如果发送的是转换为base64编码后后面加请求参数type为1,如果请求的是图片的url则不用加type参数。
    public String sendPostVerifyFace(int type, String face1, String face2) throws Exception {
        String body = "";
        if (type == FaceVerifyType.BASE64.type) {
            body = "{\"content_1\": \"" + face1 + "\", \"content_2\":\"" + face2 + "\", \"type\":\"" + type + "\"}";
        } else if (type == FaceVerifyType.IMAGE_URL.type) {
            body = "{\"image_url_1\": \"" + face1 + "\", \"image_url_2\":\"" + face2 + "\", \"type\":\"" + type + "\"}";
        } else {
            GraceException.display(ResponseStatusEnum.FACE_VERIFY_TYPE_ERROR);
        }
//        String body = "{\"content_1\": \"" + face1 + "\", \"content_2\":\"" + face2 + "\", \"type\":\"" + "1" + "\"}";
        PrintWriter out = null;
        BufferedReader in = null;
        String result = "";
        int statusCode = 200;
        try {
            URL realUrl = new URL(gateway);
            /*
             * http header 参数
             */
            String method = "POST";
            // 返回值类型
            String accept = "application/json";
            // 请求内容类型
            String content_type = "application/json";
            String path = realUrl.getFile();
            // GMT时间
            String date = toGMTString(new Date());
            // 1.对body做MD5+BASE64加密
            String bodyMd5 = MD5Base64(body);
            String stringToSign = method + "\n" + accept + "\n" + bodyMd5 + "\n" + content_type + "\n" + date + "\n"
                    + path;
            // 2.计算 HMAC-SHA1
            String signature = HMACSha1(stringToSign, aliyunResource.getAccessKeySecret());
            // 3.得到 authorization header
            String authHeader = "Dataplus " + aliyunResource.getAccessKeyID() + ":" + signature;
            // 打开和URL之间的连接
            URLConnection conn = realUrl.openConnection();
            // 设置通用的请求属性
            conn.setRequestProperty("Accept", accept);
            conn.setRequestProperty("Content-type", content_type);
            conn.setRequestProperty("Date", date);
            // 认证信息
            conn.setRequestProperty("Authorization", authHeader);
            // 发送POST请求必须设置如下两行
            conn.setDoOutput(true);
            conn.setDoInput(true);
            // 获取URLConnection对象对应的输出流
            out = new PrintWriter(conn.getOutputStream());
            // 发送请求参数
            out.print(body);
            // flush输出流的缓冲
            out.flush();
            // 定义BufferedReader输入流来读取URL的响应
            statusCode = ((HttpURLConnection) conn).getResponseCode();
            if (statusCode != 200) {
                in = new BufferedReader(new InputStreamReader(((HttpURLConnection) conn).getErrorStream()));
            } else {
                in = new BufferedReader(new InputStreamReader(conn.getInputStream()));
            }
            String line;
            while ((line = in.readLine()) != null) {
                result += line;
            }
        } catch (Exception e) {
            e.printStackTrace();
        } finally {
            try {
                if (out != null) {
                    out.close();
                }
                if (in != null) {
                    in.close();
                }
            } catch (IOException ex) {
                ex.printStackTrace();
            }
        }
        if (statusCode != 200) {
            throw new IOException("\nHttp StatusCode: " + statusCode + "\nErrorMessage: " + result);
        }
        return result;
    }

    /**
     *
     * @param type
     * @param face1
     * @param face2
     * @param targetConfidence
     *          目标可信度,自定义阈值
     * @return
     */
    public boolean faceVerify(int type, String face1, String face2, double targetConfidence) {

        String response = null;
        try {
            response = sendPostVerifyFace(type, face1, face2);
        } catch (Exception e) {
            e.printStackTrace();
        }

        Map<String, String> map = JsonUtils.jsonToPojo(response, Map.class);
        Object confidenceStr = map.get("confidence");
        Double responseConfidence = (Double)confidenceStr;

        logger.info("人脸对比结果:{}", responseConfidence);

//        System.out.println(response.toString());
//        System.out.println(map.toString());

        if (responseConfidence > targetConfidence) {
            return true;
        } else {
            return false;
        }
    }

    /**
     *
     * 将图片转换为Base64
     * 将base64编码字符串解码成img图片
     * @param imgUrl
     * @return
     */
    public String getImgBase64(String imgUrl){
        ByteArrayOutputStream data = new ByteArrayOutputStream();
        try {
            // 创建URL
            URL url = new URL(imgUrl);
            byte[] by = new byte[1024];
            // 创建链接
            HttpURLConnection conn = (HttpURLConnection) url.openConnection();
            conn.setRequestMethod("GET");
            conn.setConnectTimeout(5000);
            InputStream is = conn.getInputStream();
            // 将内容放到内存中
            int len = -1;
            while ((len = is.read(by)) != -1) {
                data.write(by, 0, len);
            }
            is.close();
        } catch (IOException e) {
            e.printStackTrace();
        }
        // 对字节数组Base64编码
        return Base64.encodeBase64String(data.toByteArray());
    }

//    public static void main(String[] args) {
//        String face3 = "http://122.152.205.72:88/group1/M00/00/05/CpoxxF5MvvGAfnLXAAIHiv37wNk363.jpg";
//        String face4 = "http://122.152.205.72:88/group1/M00/00/05/CpoxxF5Mv3yAH74mAACOiTd9pO4462.jpg";
//
//        boolean result = new FaceVerifyUtils().faceVerify(FaceVerifyType.IMAGE_URL.type, face3, face4, 60);
//
//        logger.info("人脸对比是否成功:{}", result);
//    }

}
说明:
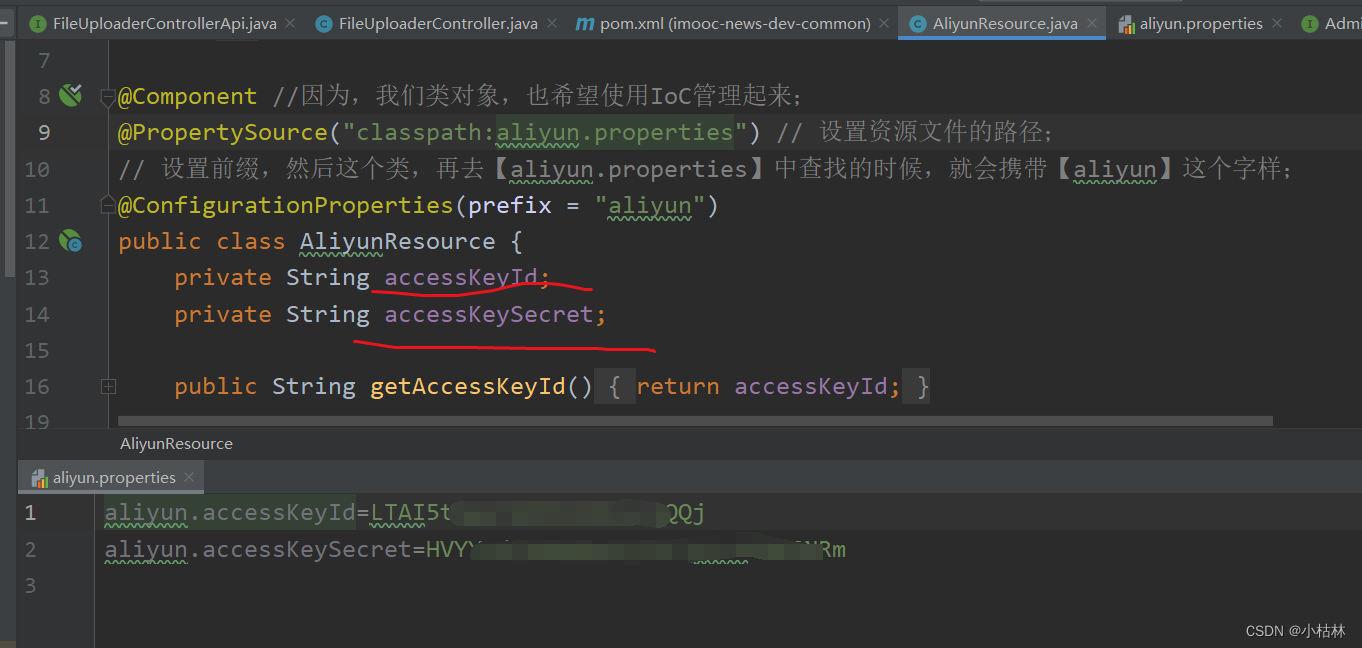
(1)首先,注入我们在【19:第三章:开发通行证服务:2:在程序中,打通阿里云短信服务;初步开发【发送短信,接口】;】中,创建的AliyunResource类;以便获取阿里的秘钥信息:accessKeyId accessKeySecret;(以前说过,我们要想使用阿里云的服务,必须要有秘钥;而且,自己账户的那个秘钥是通用的)
(2)然后,引入人脸识别的gateway,网关地址;(这个网关地址,是阿里人脸识别API文档中,定义的网关地址)
(3)然后,我们使用的时候,调用faceVerify()方法,即可;
(4)这儿,自己暂时并没有深究;而且,这个人脸识别的API可能有点小过时了;


四:测试;
这儿,自己并没有实测;
边栏推荐
- MySQL开发技巧——存储过程
- Try compiling QT test on Allwinner V853 development board
- Fuzzy query in Map pass-by-value and object pass-by-value
- [Kapok] #Summer Challenge# Hongmeng mini game project - Sudoku (3)
- Flowable-based upp (unified process platform) running performance optimization
- AcWing 797. 差分
- Source code analysis of GZIPOutputStream class
- 短视频软件开发,Android开发,使用Kotlin实现WebView
- ExcelPatternTool: Excel表格-数据库互导工具
- 文库网站建设源码分享
猜你喜欢


随机推荐
小白系统初始化配置资源失败怎么办
ssh & scp
Mobile Zero of Likou Brush Questions
How to install voice pack in Win11?Win11 Voice Pack Installation Tutorial
Win11怎么安装语音包?Win11语音包安装教程
【Redis】缓存雪崩、缓存穿透、缓存预热、缓存更新、缓存击穿、缓存降级
COS User Practice Call for Papers
When installing the GBase 8c database, the error message "Resource: gbase8c already in use" is displayed. How to deal with this?
Heavy cover special | intercept 99% malicious traffic, reveal WAF offensive and defensive drills best practices
对于web性能优化我有话说!
在全志V853开发板试编译QT测试
如何记录分析你的炼丹流程—可视化神器Wandb使用笔记【1】
mysql解压版简洁式本地配置方式
LeetCode 1374. Generate an odd number of each character string
Flowable-based upp (unified process platform) running performance optimization
如何看待腾讯云数据库负责人林晓斌借了一个亿炒股?
How to query database configuration parameters in GBase 8c, such as datestyle.What function or syntax to use?
Heavy cover special | build the first line of defense, cloud firewall offensive and defensive drills best practices
[pyqt5] Custom controls to achieve scaling sub-controls that maintain the aspect ratio
easyUI中datagrid中的formatter里面向后台发送请求获取数据