当前位置:网站首页>[higherhrnet] higherhrnet detailed heat map regression code of higherhrnet
[higherhrnet] higherhrnet detailed heat map regression code of higherhrnet
2022-07-07 10:19:00 【Great black mountain monastic】
Related series links :
Preface :
HigherHRNet From CVPR2020 The paper of :
HigherHRNet: Scale-Aware Representation Learning for Bottom-Up Human Pose Estimation.
This paper mainly proposes a bottom-up 2D Human pose estimation network –HigherHRNet.
The paper code has become a classic network of bottom-up Networks ,CVPR2021 The most advanced bottom-up network in DEKR and SWAHR It's all based on HigherHRNet Partial improvement on the source code of .
So understand HigherHRNet Yes 2020~2021 The research of this paper is very helpful .
Related information :
HigherHRNet Address of thesis :
https://arxiv.org/abs/1908.10357
Code address :
https://github.com/HRNet/HigherHRNet-Human-Pose-Estimation
HigherHRNet Explanation of network code
Main model code : Located in the project directory :
HigherHRNet-Human-Pose-Estimation/lib/models/pose_higher_hrnet.py
1. Main frame
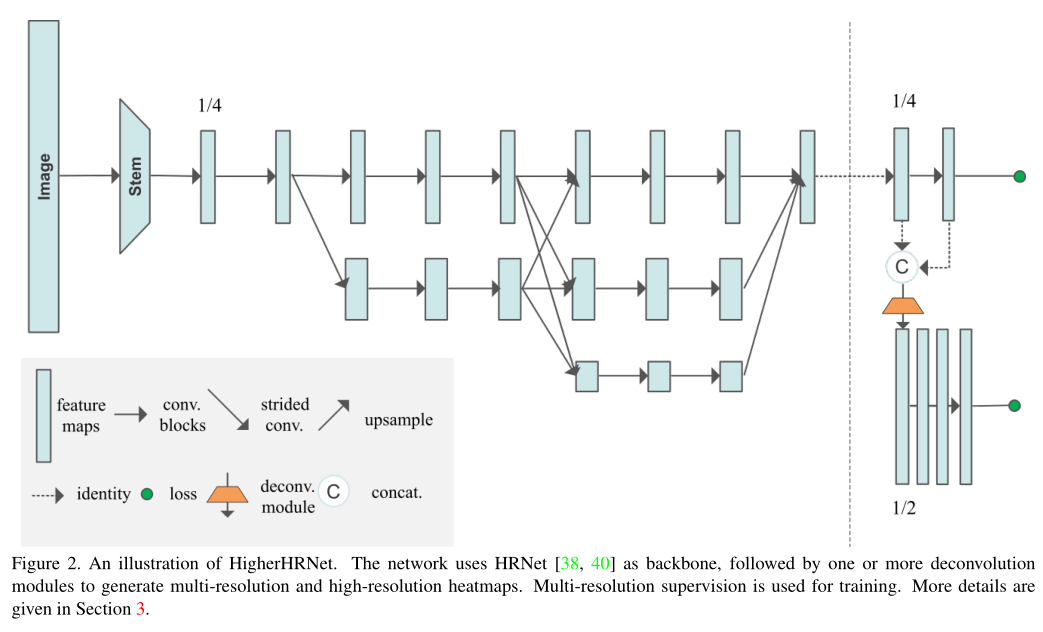
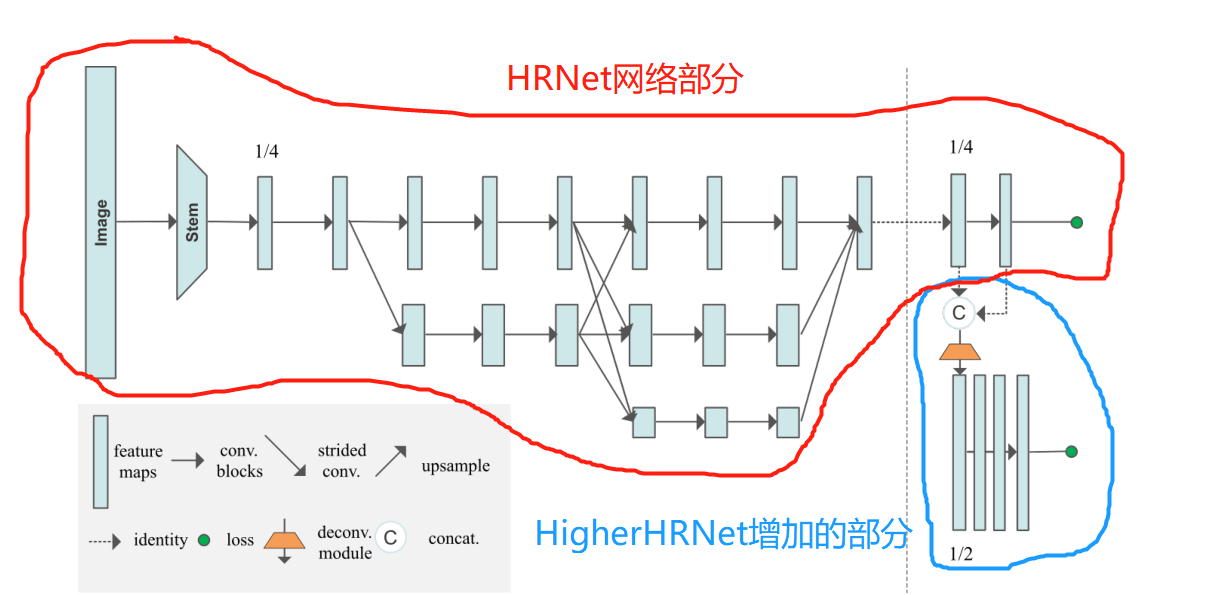
The backbone network of the whole heat map regression network is still HRNet, be familiar with HRNet People will be easy to understand HigherHRNet.
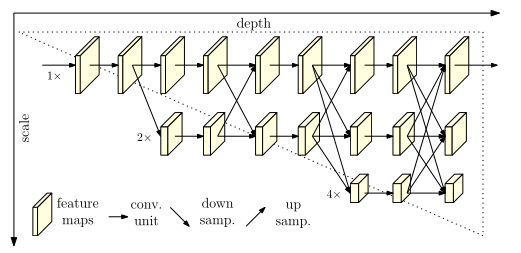
HRNet The pictures in the paper
Here is a brief introduction HRNet, This is from CVPR2019 Year paper :Deep High-Resolution Representation Learning for Human Pose Estimation. Very classic , From the beginning of this paper until now (2022), Basically, all those who brush the list 2D Attitude estimation papers will be written in HRNet As a backbone , Previous papers mainly focus on ResNet Mainly .2D Attitude estimation task adopts HRNet Backbone networks are generally better than ResNet The backbone network is several percentage points high .
HigherHRNet The network has two sizes :512 and 640. Cut to 512×512 Compared with 640×640 The image size becomes smaller , This means that the occupied video memory is reduced , The amount of model parameters decreases , Faster training and reasoning , The detection accuracy decreases .
( Why? HRNet Adopted size 256×192 and 384×288, and HigherHRNet use 512×512 and 640×640? The reason lies in HRNet It's from the top down , First detect people , And then roi The region then estimates the posture of a single person , Image size can be reduced , because HRNet Only a part of the whole image is detected , And the output size is close to the length width ratio of human body ;
and HigherHRNet It's from the bottom up , Key point detection of the whole image , Then group these key points .HigherHRNet Check the whole picture , So the network needs to train a larger size , And the length width ratio is equal .)
Then we input the image into this model to introduce , Among them 2,3,4,5 Part of the introduction is HRNet Part of , Familiar students can directly skip , Look directly at 6 part .
Jump here
2. Steam Part of the code
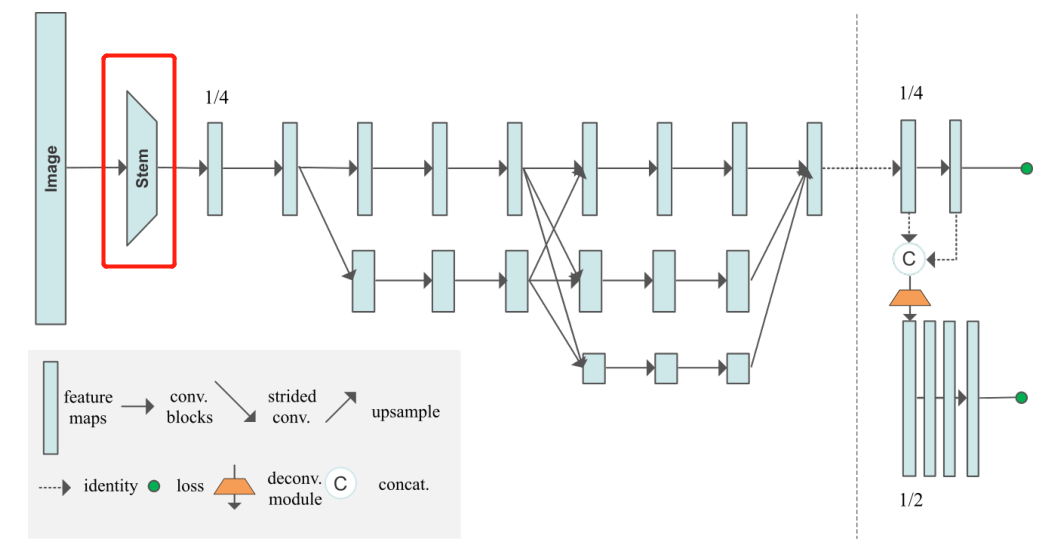
Image input into the network shape:[b,3,512,512], Represent the batchsize, Number of image channels (3 passageway ), width, height.
adopt steam From the image, we can get the initial feature map after several convolution correlation operations :
Annotated code , First of all to see forward function :
        # 1.  In the initial stage 2 heavy (conv+bn), Input 3 passageway , Output 64 passageway , Single branch .
        #  After a series of convolution ,  Obtain the preliminary characteristic diagram , The overall process is x[b,3,512,512]-->x[b,64,128,128]
        x = self.conv1(x)
        x = self.bn1(x)
        x = self.relu(x)
        x = self.conv2(x)
        x = self.bn2(x)
        x = self.relu(x)
Convolution related operation definition :
        #  Perform a series of convolution operations , Get the initial feature map N11
        self.conv1 = nn.Conv2d(3, 64, kernel_size=3, stride=2, padding=1,
                               bias=False)
        self.bn1 = nn.BatchNorm2d(64, momentum=BN_MOMENTUM)
        self.conv2 = nn.Conv2d(64, 64, kernel_size=3, stride=2, padding=1,
                               bias=False)
        self.bn2 = nn.BatchNorm2d(64, momentum=BN_MOMENTUM)
        self.relu = nn.ReLU(inplace=True)
        self.layer1 = self._make_layer(Bottleneck, 64, 4)
We can draw pictures to get :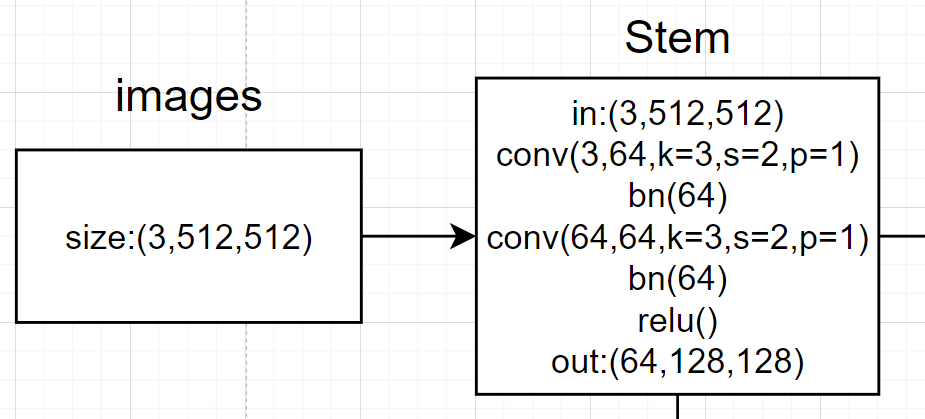
3. HRNet In the model stage Design idea
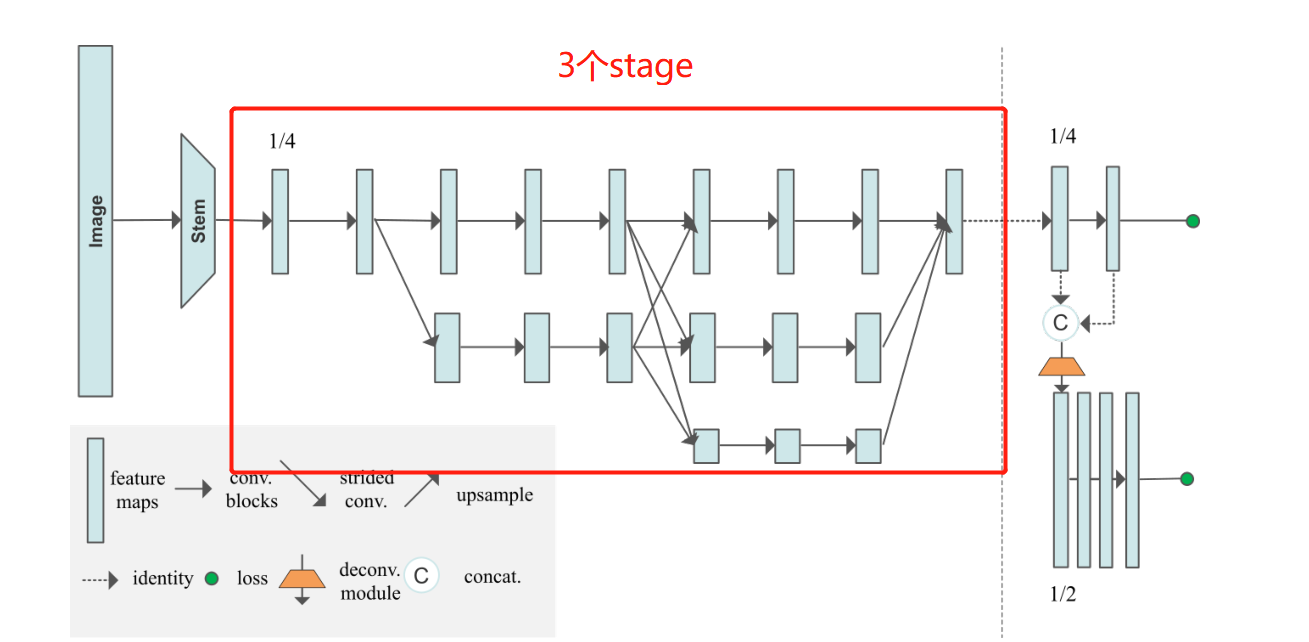
This part is HRNet The essence of , It is also the most difficult part to understand . Understand this part , Basically understand the whole HRNet Network . Just to understand , We must understand this picture first , Understand the relevant potential information .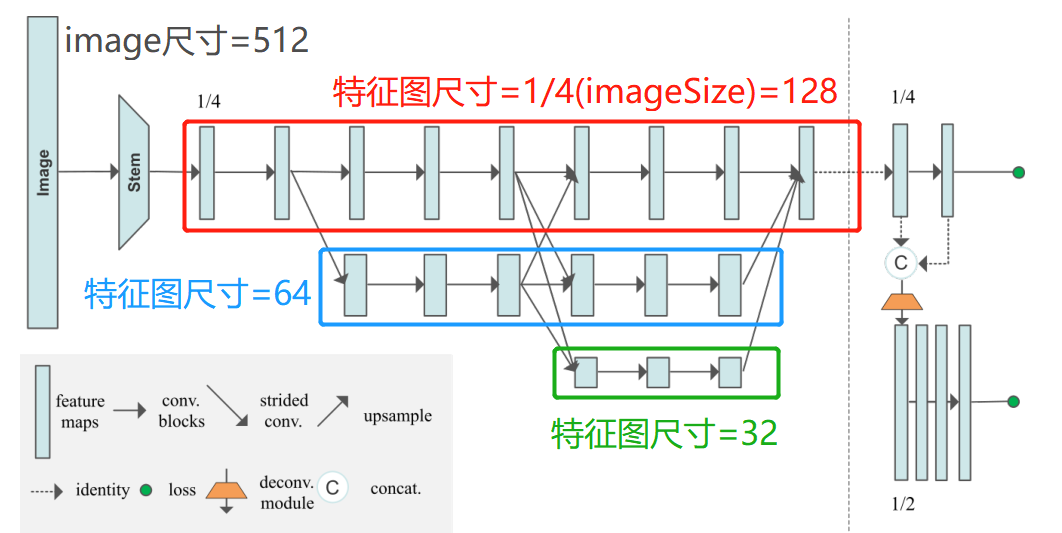
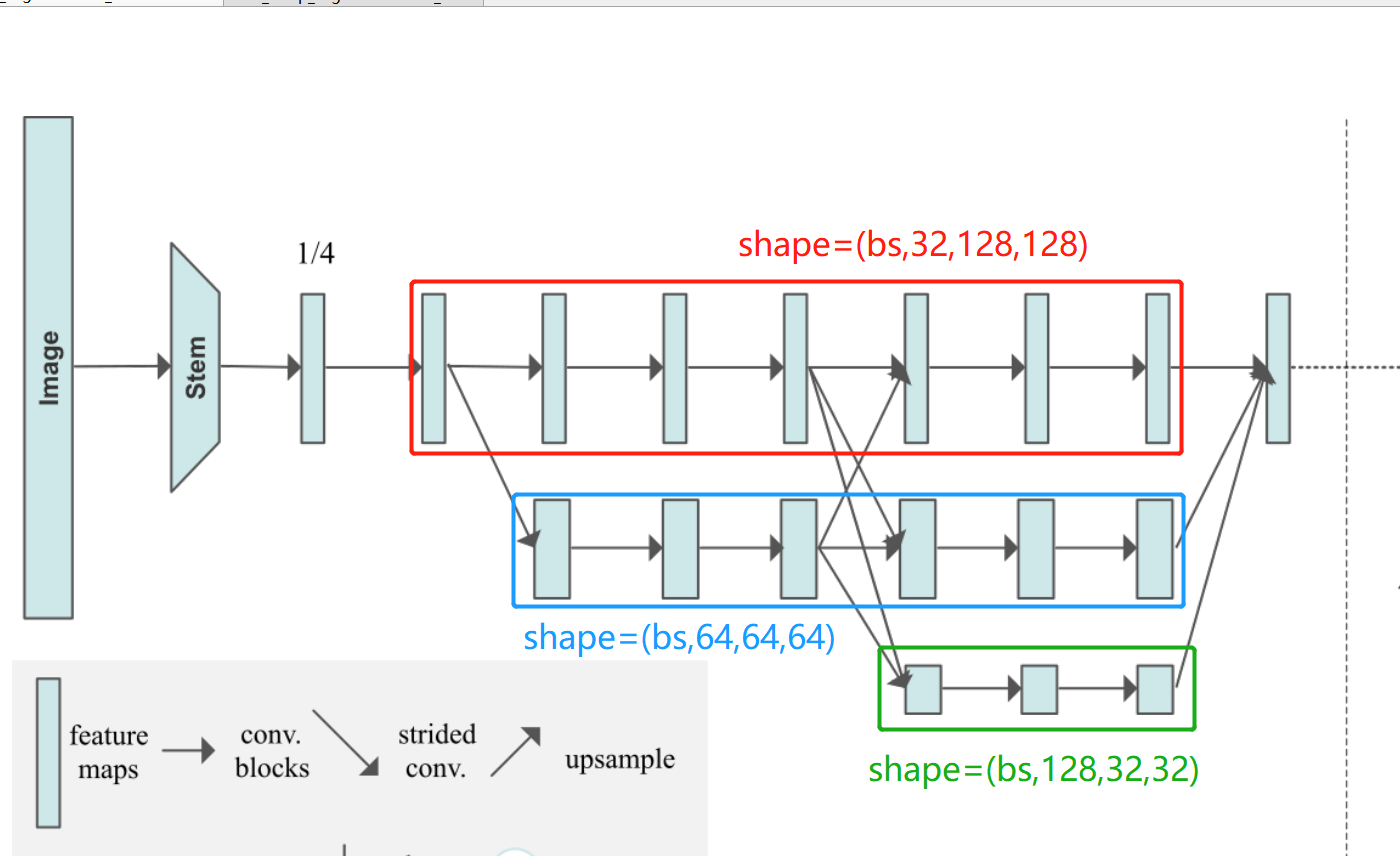
stay HRNet The core of , Drawn on each line tensor Of shape It's all the same . It can be seen that the branch size of the lower layer of the network diagram will be larger than that of the upper layer (shape The last two ) Cut it in half , And the number of characteristic channels (shape Of the 2 The number of bits will double ). In a nutshell , Lower and lower , The lower the resolution of the feature map . The high representation of the rectangular block in the image
And then introduce HRNet The core idea of , That is, it can maintain high-resolution features in the whole network . It means throughout the whole model , High resolution features always work . Let's see HRNet The previous practice can be well understood .
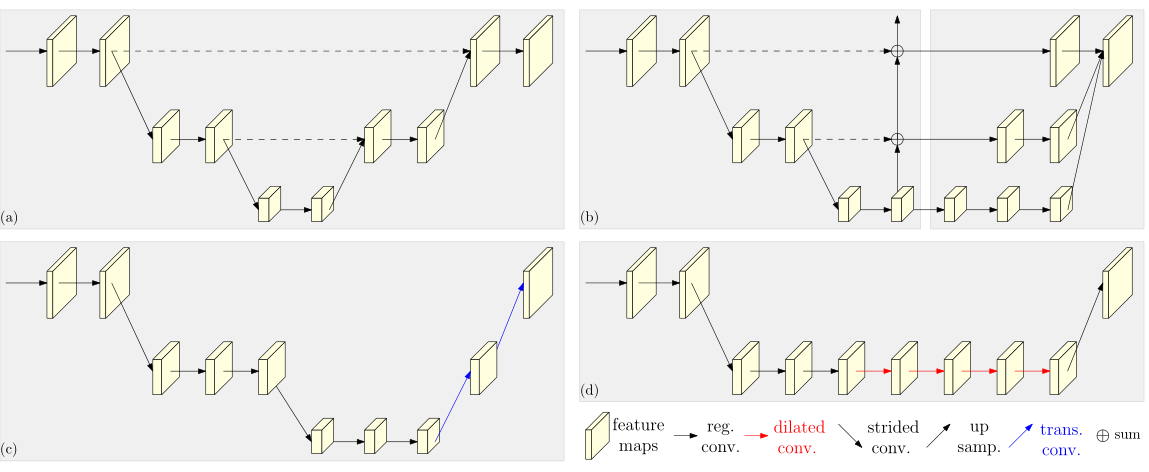
HRNet Summarize the operation in the previous model , The characteristic images are first convoluted to reduce the resolution , Then continue to take samples (upsample) Improve resolution , But in this process, many important information is lost . therefore ,HRNet High resolution features can be maintained through continuous cross addition .
then HRNet The operation of can be summarized as how many times stage. Every time make_stage It includes the following links : Residual block calculation , Cross calculation between branches fuse_layer( the last one stage With the exception of ), Add new edge operation transition_layer( the last one stage With the exception of ).
Or draw pictures to understand , The train of thought understands , The code is easy to understand .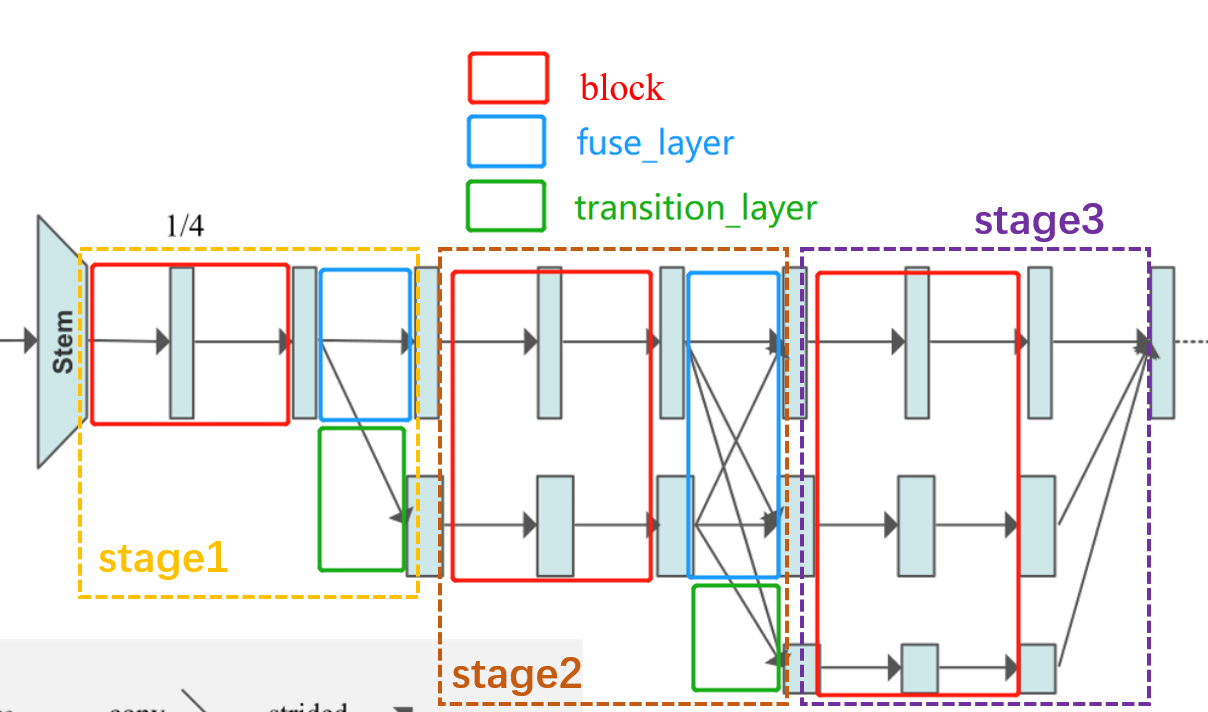
It is clear from the picture that , Except for the last one stage, Other stage It's all by 3 Modules :
block: As shown in the red box After several residual block calculations , But input and output tensor Of shape unchanged .
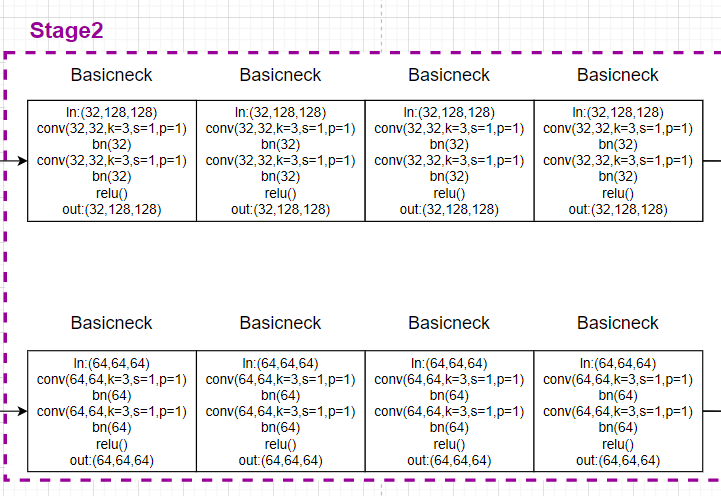
stay stage1 When you use bottleneck Residual block , And the number of channels of the characteristic graph increases :
In the rear stage Then use basicneck Residual block , Input and output are consistent :
fuse_layer: As shown in the blue box , Each characteristic graph in the network is added alternately , When the low-resolution feature map is added to the high-resolution feature map to generate a high-resolution feature map , The low resolution feature map will be adopted to increase its resolution ; Empathy , When a low resolution feature map is added to a high resolution feature map to generate a low resolution feature map , Will convolute the high-resolution feature map to reduce its resolution .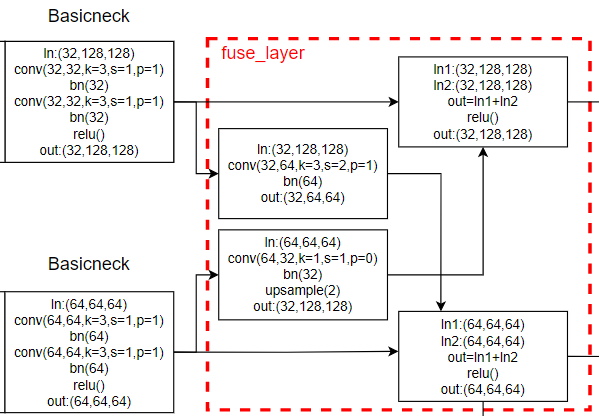
transition_layer: As shown in the green box , Is to generate a new branch down , His resolution continues to halve , Feature channels continue to double .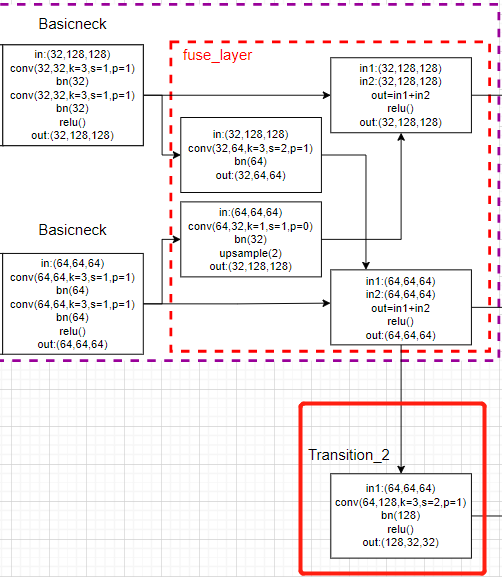
Be careful :HigherHRNet The network structure of is not completely consistent with the model it draws !!! Only 3 individual stage and 3 A slip road , and HigherHRNet The actual model of is made up of 4 individual stage,4 Of branches .
The following diagram is drawn , It looks something like this ,Nxx Represents the generated feature graph , It doesn't mean any operation .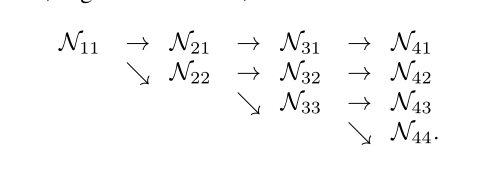
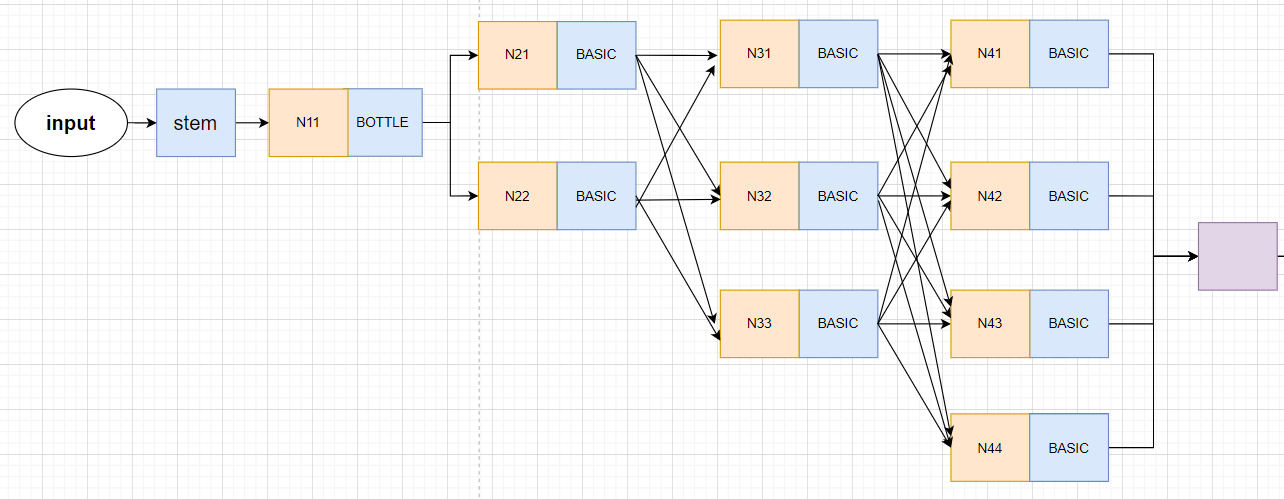
HRNet My thesis is also painted 3 individual stage Model diagram , Then the network model is indeed 3stage Of , Because the size of network input is small . Input image The size is 256×192, Then the size of the first floor branch is 64×48, The branch on the second floor is 32×24, The third layer branch is 16×12, If set to 4 individual stage, Is the first 4 The size of the layer branch is too small .
and HigherHRNet It's a bottom-up approach , The size entered is 512×512, Then the size of the first floor branch is 128×128, The branch on the second floor is 64×64, The third layer branch is 32×32, The Branch Road on the fourth floor is 16×16. So we need to 4stage Of HRNet The Internet .
4. HRNet In the backbone stage Code implementation of
In the previous part ,image adopt steam layer , The initial characteristic graph is generated :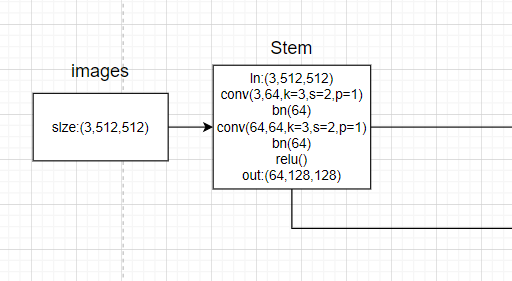
4.1 first stage:
The first is block part , That is, the part in the red box in the figure below :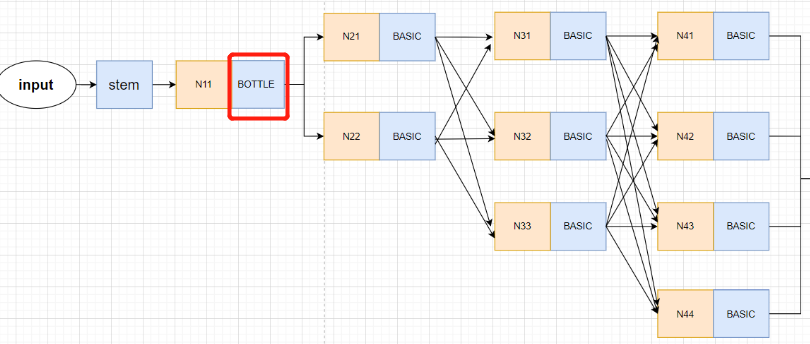
First of all to see forward Code :
        # 2.  experience 4 Time bottleneck modular , Input 64 passageway , Output 256 passageway , Single branch .
        # [b,256,64,48]-->x[b, 256, 128, 128]
        x = self.layer1(x)
Definition section :
self.layer1 = self._make_layer(Bottleneck, 64, 4)
    def _make_layer(self, block, planes, blocks, stride=1):
        downsample = None
        if stride != 1 or self.inplanes != planes * block.expansion:
            downsample = nn.Sequential(
                nn.Conv2d(self.inplanes, planes * block.expansion,
                          kernel_size=1, stride=stride, bias=False),
                nn.BatchNorm2d(planes * block.expansion, momentum=BN_MOMENTUM),
            )

        layers = []
        # 0: self.inplanes=64, planes=64, stride=1
        layers.append(block(self.inplanes, planes, stride, downsample))
        self.inplanes = planes * block.expansion
        for i in range(1, blocks):
            layers.append(block(self.inplanes, planes))     # 256, 64

        return nn.Sequential(*layers)
This part of the code drawing :
And then the first one stage Only cross calculation , There is no need for fuse_layer Cross calculation .
So directly generate new branches transition_layer operation , That is, the part in the red box in the figure below :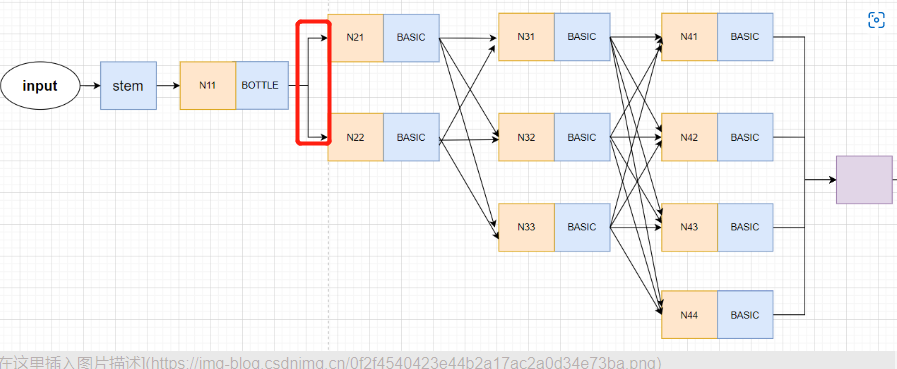
forward Code :
		x_list = []
        # 3.  Go through 1 Time (conv+bn), Form two branches . Input 256 passageway , Output [32,64] passageway , Double branch .
        #  Corresponding to stage2
        #  It contains the process of creating branches , namely  N11-->N21,N22  This process
        # N22 The resolution is N21 Half of , The overall process is :
        # x[b,256,128,128] ---> y[b, 32, 128, 128]  Because the number of channels is inconsistent , Transform the number of channels through convolution
        # y[b, 64, 128, 128]  Generate by creating a new parallel branch
        for i in range(self.stage2_cfg['NUM_BRANCHES']):
            if self.transition1[i] is not None:
                x_list.append(self.transition1[i](x))
            else:
                x_list.append(x)
init part :
		#  A new parallel partition will be generated here N2 Branch network , namely N11-->N21,N22 This process
        #  At the same time, the input characteristic diagram x Perform channel transformation ( If the input and output channels are inconsistent )
        self.transition1 = self._make_transition_layer([256], num_channels)  # _make_transition_layer([256],[32,64])
The definition function is too long , Not in the back , Jump in the code and watch ....
Corresponding model drawing :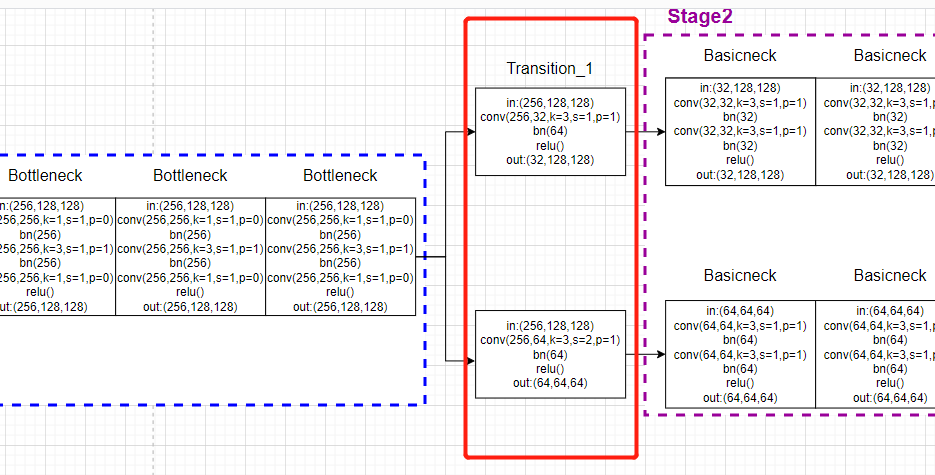
4.2 the second stage:
Mainly the first stage And the last stage It's special , Others are very regular .
All the back stage Of block Module and fuse_layer Are put into a function .
forword Code :
		# 4.  Input : The first 1 Access Rd 32 passageway , after 4 Time basicneck common 8(conv+bn), Output tmp11;  Input : The first 2 Access Rd 32 passageway , after 4 Time basicneck common 8(conv+bn), Output tmp22;
        #  Fusion convolution , Enter the first 1 Access Rd 32 passageway , after 1(conv+bn) Output 64 passageway tmp12; Enter the first 2 Access Rd 64 passageway , after 1(conv+bn),upsample, Output 32 passageway , Output tmp21
        #  Last ,x1=tmp11+tmp21, passageway 32;x2=tmp12+tmp22, passageway 64;x_list = [32,64]
        #  The overall process is as follows ( After some convolution operation , However, the resolution and channel number of the feature map have not changed ):
        # x[b, 32, 128, 128] ---> y[b, 32, 128, 128]
        # x[b, 64, 64, 64] ---> y[b, 64, 64, 64]
        y_list = self.stage2(x_list)
init part :
        #  Process the parallel sub network , Let it output y, Can be used as the next stage The input of x,
        #  there pre_stage_channels For the current stage Number of output channels for , That's the next one stage The number of input channels
        #  At the same time, parallel sub network information exchange module , It also includes
        self.stage2, pre_stage_channels = self._make_stage(
            self.stage2_cfg, num_channels)
And then again _make_stage In the function , Will generate a class
    def _make_stage(self, layer_config, num_inchannels,
                    multi_scale_output=True):
        num_modules = layer_config['NUM_MODULES']   #
        num_branches = layer_config['NUM_BRANCHES']
        num_blocks = layer_config['NUM_BLOCKS']
        num_channels = layer_config['NUM_CHANNELS']
        block = blocks_dict[layer_config['BLOCK']]
        fuse_method = layer_config['FUSE_METHOD']

        modules = []
        for i in range(num_modules):
            # multi_scale_output is only used last module
            if not multi_scale_output and i == num_modules - 1:
                reset_multi_scale_output = False
            else:
                reset_multi_scale_output = True

            modules.append(
                HighResolutionModule(
                    num_branches,
                    block,
                    num_blocks,
                    num_inchannels,  # [32, 64, 128]
                    num_channels,   # [32, 64, 128]
                    fuse_method,
                    reset_multi_scale_output)# false
            )
            num_inchannels = modules[-1].get_num_inchannels()   #

        return nn.Sequential(*modules), num_inchannels
We jump to HighResolutionModule Of forward function :
This part is block modular
    def forward(self, x):
        if self.num_branches == 1:
            return [self.branches[0](x[0])]

        for i in range(self.num_branches):
            x[i] = self.branches[i](x[i])
Corresponding model drawing :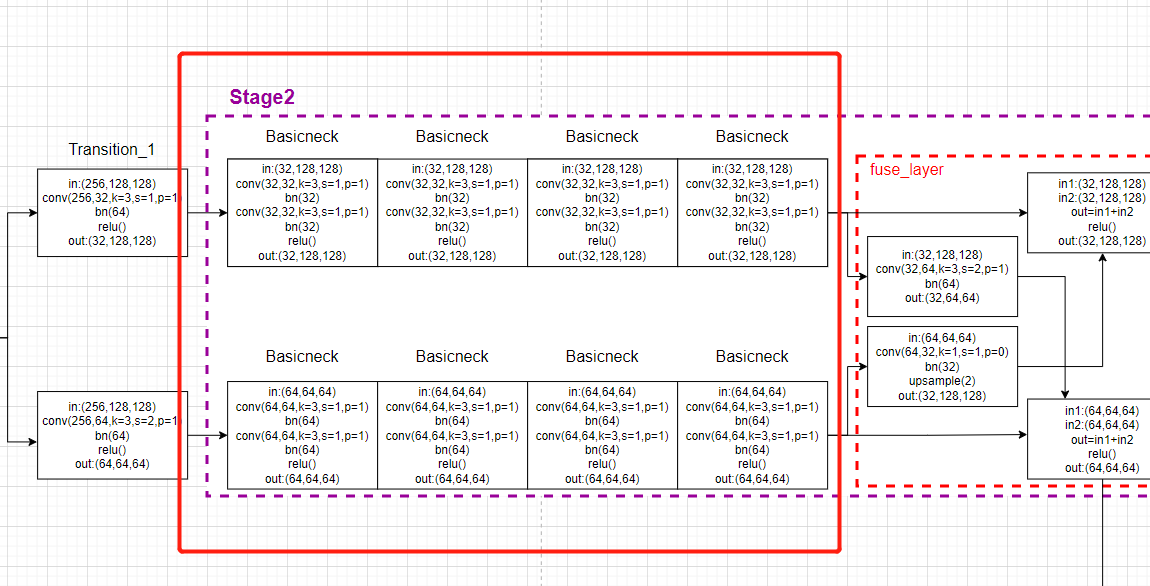
then forward The second half of the function is fuse_layer modular :
		x_fuse = []

        for i in range(len(self.fuse_layers)):
            y = x[0] if i == 0 else self.fuse_layers[i][0](x[0])
            for j in range(1, self.num_branches):
                if i == j:
                    y = y + x[j]
                else:
                    y = y + self.fuse_layers[i][j](x[j])
            x_fuse.append(self.relu(y))

        return x_fuse
Corresponding model drawing :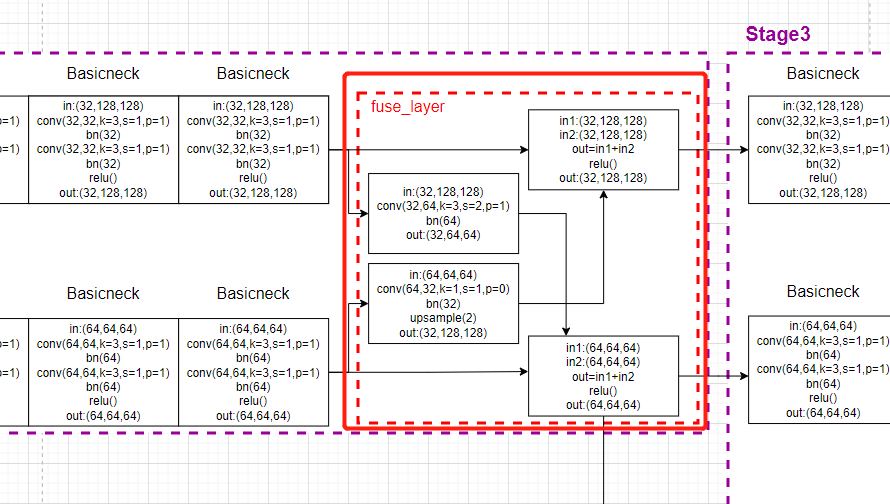
Then the last module transition_layer In the main model forward Within the function :
 		x_list = []
        # 5.  Input : The first 2 Access Rd 64 passageway ,1(conv+bn); Output : The first 3 Access Rd 128 passageway , The model has three branches
        #  It contains the process of creating branches , namely  N22-->N32,N33  This process
        # N33 The resolution is N32 Half of ,
        # y[b, 32, 128, 128] ---> x[b, 32, 128, 128]  Because the number of channels is the same , I didn't do anything
        # y[b, 64, 64, 64] ---> x[b, 64, 64, 64]  Because the number of channels is the same , I didn't do anything
        # x[b, 128, 32, 32]  Generate by creating a new parallel branch
        for i in range(self.stage3_cfg['NUM_BRANCHES']):
            if self.transition2[i] is not None:
                x_list.append(self.transition2[i](y_list[-1]))
            else:
                x_list.append(y_list[i])
x_list What is stored is the characteristic diagram of each branch .
Corresponding model drawing :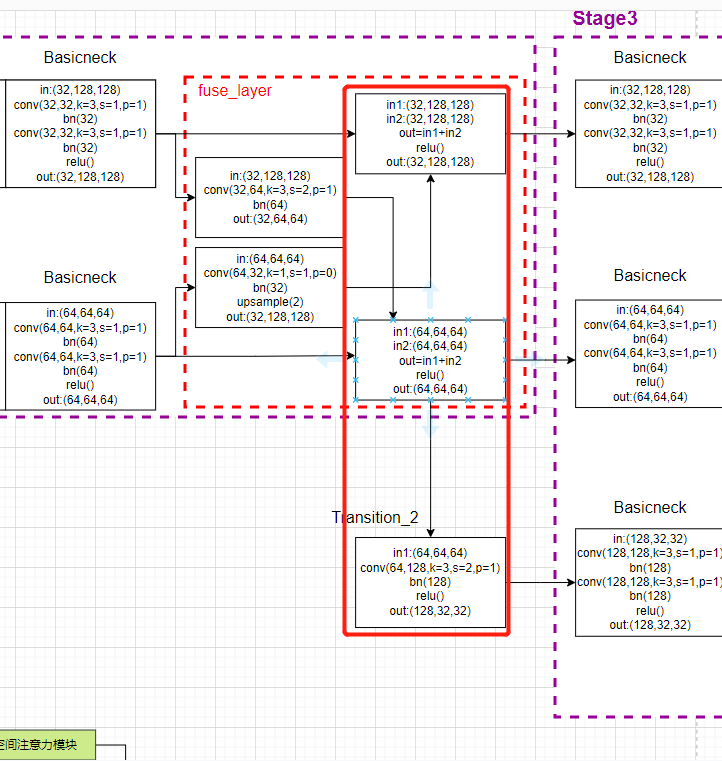
4.3 Third stage:
And the second stage The same rules , Only the number of branches increases ,x_list The amount of elements increases , It will lead to a sharp increase in the amount of computation when traversing , Complexity has increased significantly .
First look at the model forward function :
        # 6.  Input : The first 1 Access Rd 32 passageway , after 4 Time basicneck common 8(conv+bn), Output tmp11;  Input : The first 2 Access Rd 32 passageway , after 4 Time basicneck common 8(conv+bn), Output tmp22;
        #  The first 3 Access Rd 128 passageway , after 4 Time basicneck common 8(conv + bn), Output tmp33;
        #  Fusion convolution , Enter the first 1 Access Rd 32 passageway , after 1(conv+bn) Output 64 passageway tmp12;  Enter the first 1 Access Rd 32 passageway , after 2(conv+bn) Output 128 passageway tmp13
        #  Enter the first 2 Access Rd 64 passageway , after 1(conv+bn),upsample(2), Output 32 passageway , Output tmp21;  Enter the first 2 Access Rd 64 passageway , after 1(conv+bn) Output 128 passageway tmp23
        #  Enter the first 3 Access Rd 128 passageway , after 1(conv+bn),upsample(4), Output 32 passageway , Output tmp31; Enter the first 3 Access Rd 128 passageway , after 1(conv+bn),upsample(2), Output 642 passageway , Output tmp31;
        #  Last ,x1=tmp11+tmp21+tmp31, passageway 32;x2=tmp12+tmp22+tmp32, passageway 64; x3=tmp13+tmp23+tmp33, passageway 128; x_list = [32,64,128]
        #  The overall process is as follows ( After some convolution operation , However, the resolution and channel number of the feature map have not changed ):
        # x[b, 32, 128, 128] ---> x[b, 32, 128, 128]
        # x[b, 32, 64, 64] ---> x[b, 32, 64, 64]
        # x[b, 64, 32, 32] ---> x[b, 64, 32, 32]
        y_list = self.stage3(x_list)
self.stage3(x_list) Part contains block Module and fuse_layer modular , The details are consistent with the functions called in the previous part .
init part :
        self.stage3, pre_stage_channels = self._make_stage(
            self.stage3_cfg, num_channels)
Whole stage3 Corresponding model drawing :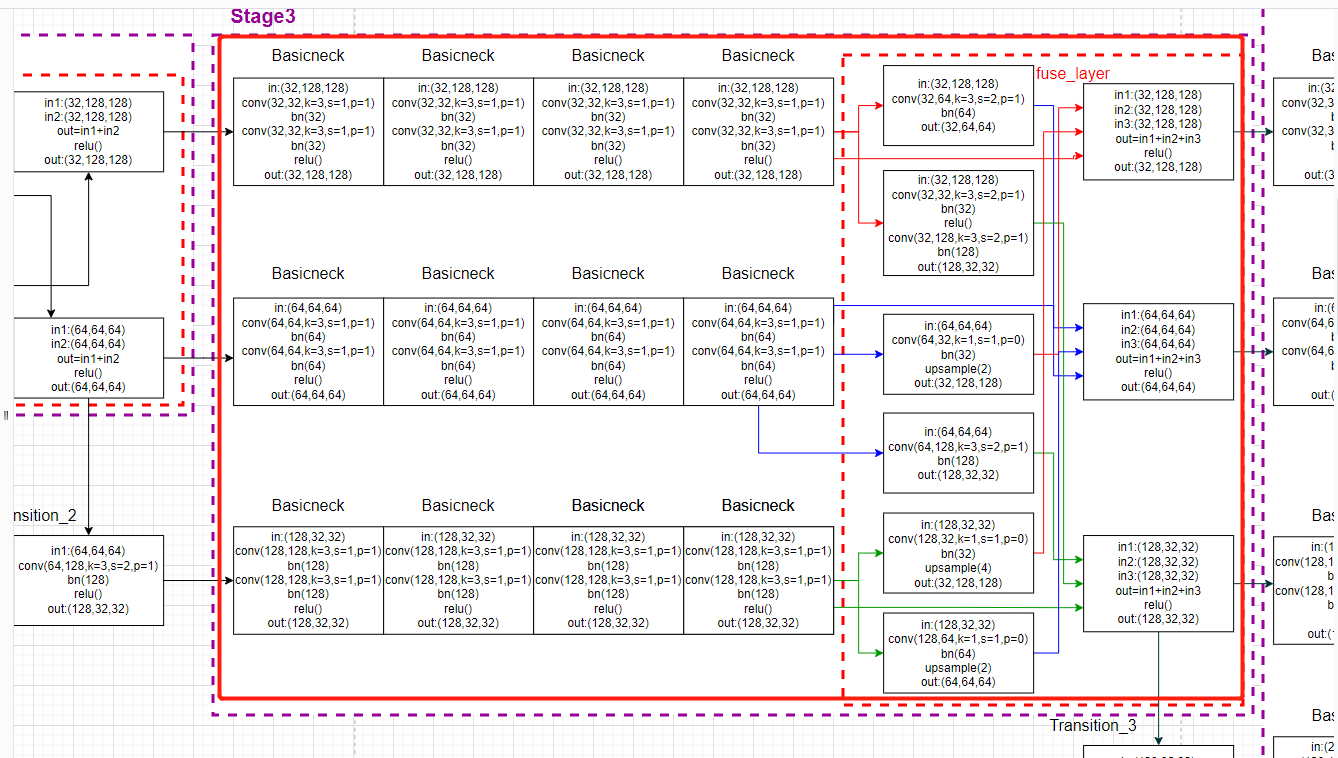
Then the last module transition_layer stay forward Code within function :
        x_list = []
        # 7.  New branch : Input : The first 3 Access Rd 128 passageway ,1(conv+bn); Output : The first 4 Access Rd 256 passageway , The model has four branches
        #  It contains the process of creating branches , namely  N33-->N43,N44  This process
        # N44 The resolution is N43 Half of
        # y[b, 32, 128, 128] ---> x[b, 32, 128, 128]  Because the number of channels is the same , I didn't do anything
        # y[b, 64, 64, 64] ---> x[b, 64, 64, 64]  Because the number of channels is the same , I didn't do anything
        # y[b, 128, 32, 32] ---> x[b, 128, 32, 32]  Because the number of channels is the same , I didn't do anything
        # x[b, 256, 16, 16]  Generate by creating a new parallel branch
        for i in range(self.stage4_cfg['NUM_BRANCHES']):
            if self.transition3[i] is not None:
                x_list.append(self.transition3[i](y_list[-1]))
            else:
                x_list.append(y_list[i])
4.3 The fourth one stage:
Ahead block Module and fuse_layer The module rules are the same .
First look at the model forward function :
        # 8. Input : The first 1 Access Rd 32 passageway , after 4 Time basicneck common 8(conv+bn), Output tmp11;  Input : The first 2 Access Rd 32 passageway , after 4 Time basicneck common 8(conv+bn), Output tmp22;
        #  The first 3 Access Rd 128 passageway , after 4 Time basicneck common 8(conv + bn), Output tmp33;  The first 4 Access Rd 256 passageway , after 4 Time basicneck common 8(conv + bn), Output tmp44;
        #  Fusion convolution , Enter the first 1 Access Rd 32 passageway , after 1(conv+bn) Output 64 passageway tmp12;  Enter the first 1 Access Rd 32 passageway , after 2(conv+bn) Output 128 passageway tmp13;
        #  Enter the first 1 Access Rd 32 passageway , after 3(conv+bn) Output 256 passageway tmp14;
        #  Enter the first 2 Access Rd 64 passageway , after 1(conv+bn),upsample(2), Output 32 passageway tmp21; Enter the first 2 Access Rd 64 passageway , after 1(conv+bn), Output 128 passageway tmp23;
        #  Enter the first 2 Access Rd 64 passageway , after 2(conv+bn), Output 256 passageway tmp24;
        #  Enter the first 3 Access Rd 128 passageway , after 1(conv+bn),upsample(4), Output 32 passageway tmp31; Enter the first 3 Access Rd 128 passageway , after 1(conv+bn),upsample(2), Output 64 passageway tmp32;
        #  Enter the first 3 Access Rd 128 passageway , after 1(conv+bn), Output 256 passageway tmp34;
        #  Enter the first 4 Access Rd 256 passageway , after 1(conv+bn),upsample(8), Output 32 passageway tmp41; Enter the first 4 Access Rd 256 passageway , after 1(conv+bn),upsample(4), Output 64 passageway tmp42;
        #  Enter the first 4 Access Rd 256 passageway , after 1(conv+bn),upsample(2), Output 256 passageway tmp43;
        # x[b, 32, 128, 128] --->
        # x[b, 64, 64, 64] --->
        # x[b, 128, 32, 32] --->
        # x[b, 256,16, 16 ] ---> y[b, 32, 128, 128]
        y_list = self.stage4(x_list)
init part :
        self.stage4, pre_stage_channels = self._make_stage(
            self.stage4_cfg, num_channels, multi_scale_output=False) #
Whole stage4 Corresponding model drawing :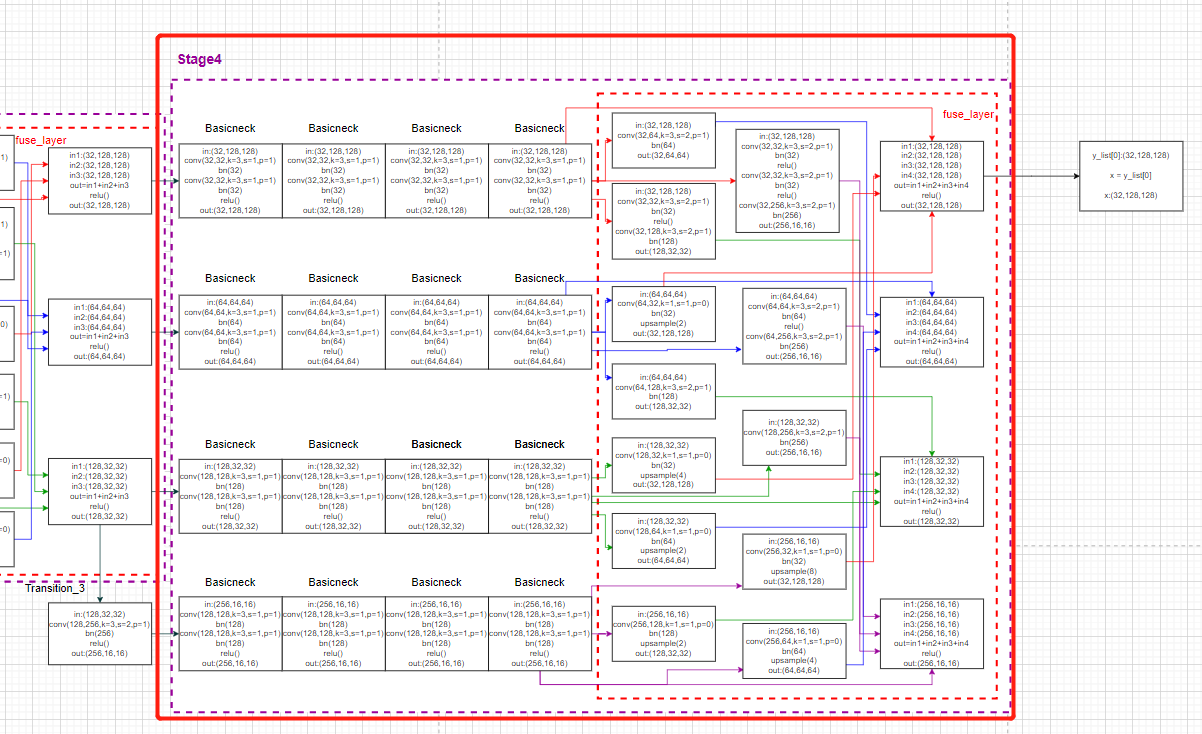
the last one stage Unwanted transition_layer layer , The code directly outputs the characteristic diagram of the first branch .forward function :
        final_outputs = []
        # x= x1, passageway 32
        x = y_list[0]
Corresponding model drawing :
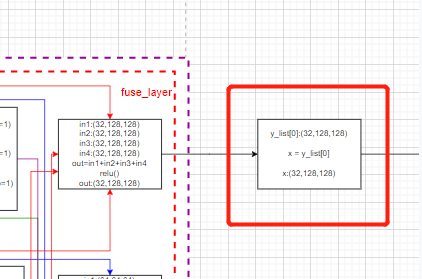
thus ,HRNet The part of the backbone is over .
Output x The variable is image Data after HRNet The characteristic diagram output after the backbone .
5. HRNet Heat map generation code in the backbone
From the model diagram , The part that generates the heat map from the backbone is shown in the red box :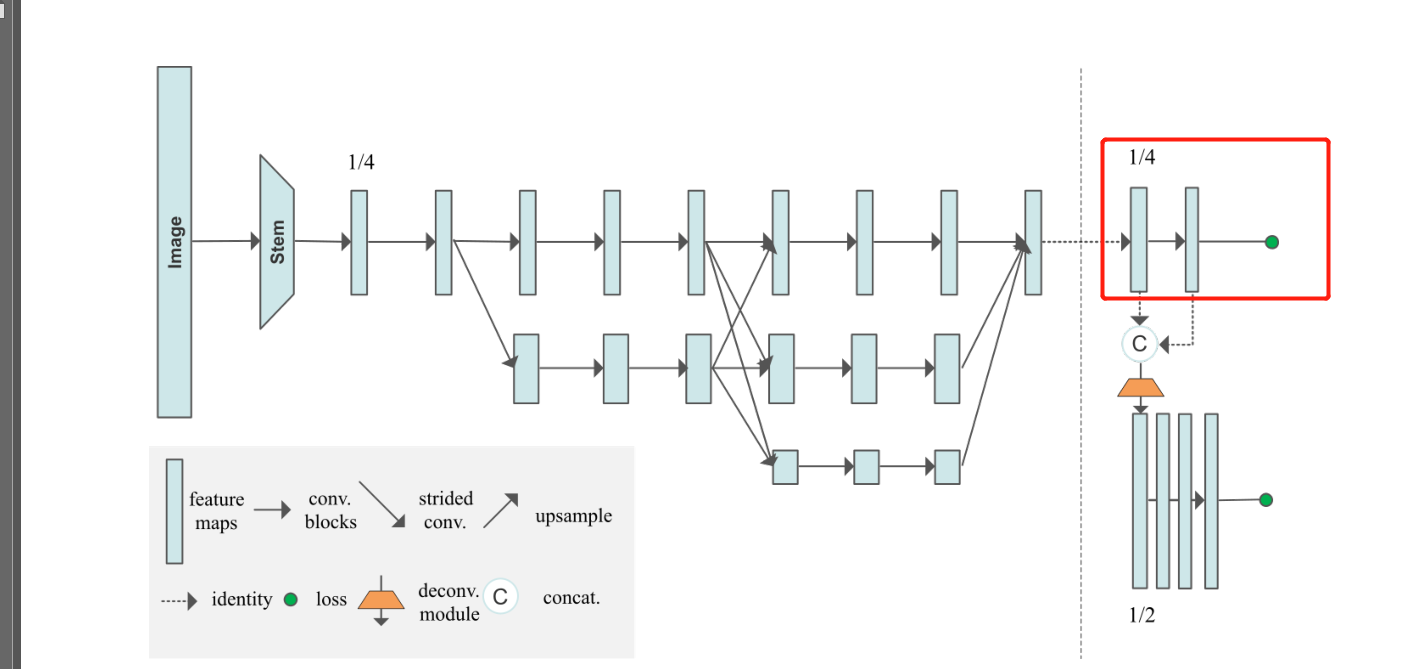
It's very simple , It is mainly a convolution :
Model forward function :
		# conv(32,34,k=1)
        # y[b, 32, 64, 48] --> x[b, 17, 64, 48]
        y = self.final_layers[0](x)
        final_outputs.append(y)
init part :
        #  After mixing the final feature map, carry out a convolution ,  Prediction of key points of human body heatmap
        self.final_layers = self._make_final_layers(cfg, pre_stage_channels[0])
_make_final_layers Function definition :
    def _make_final_layers(self, cfg, input_channels):
        dim_tag = cfg.MODEL.NUM_JOINTS if cfg.MODEL.TAG_PER_JOINT else 1    # 17
        extra = cfg.MODEL.EXTRA

        final_layers = []
        # 17+17
        output_channels = cfg.MODEL.NUM_JOINTS + dim_tag \
            if cfg.LOSS.WITH_AE_LOSS[0] else cfg.MODEL.NUM_JOINTS   # default:True
        final_layers.append(nn.Conv2d(
            in_channels=input_channels,     # 32
            out_channels=output_channels,   # num_joints*2
            kernel_size=extra.FINAL_CONV_KERNEL,       # default:1
            stride=1,
            padding=1 if extra.FINAL_CONV_KERNEL == 3 else 0    # 0
        ))

        deconv_cfg = extra.DECONV       #
        for i in range(deconv_cfg.NUM_DECONVS):     # 1
            input_channels = deconv_cfg.NUM_CHANNELS[i]     # 32
            # output_channels = 34
            output_channels = cfg.MODEL.NUM_JOINTS + dim_tag \
                if cfg.LOSS.WITH_AE_LOSS[i+1] else cfg.MODEL.NUM_JOINTS
            final_layers.append(nn.Conv2d(
                in_channels=input_channels,     # 32
                out_channels=output_channels,   # num_joints*2
                kernel_size=extra.FINAL_CONV_KERNEL,    # 1
                stride=1,
                padding=1 if extra.FINAL_CONV_KERNEL == 3 else 0
            ))

        return nn.ModuleList(final_layers)
It can be seen that the generation of heat map calls layers A convolution operation of the list , In essence :
nn.Conv2d( in_channels=32, out_channels= num_joints*2, kernel_size=1, stride=1, padding=0)
Then draw a picture :
This is also HRNet How to generate heat maps in the model , It's also HigherHRNet One of the outputs of the network .
stay HigherHRNet In the network , according to HRNet Output a heat map in the form of network , Then go through the deconvolution operation , Output the second heat map with higher resolution , A total of two heat maps are generated as the output of the network .
6. HigherHRNet Deconvolution module generates heat map code
From the model diagram , The part that generates the heat map from the backbone is shown in the red box :
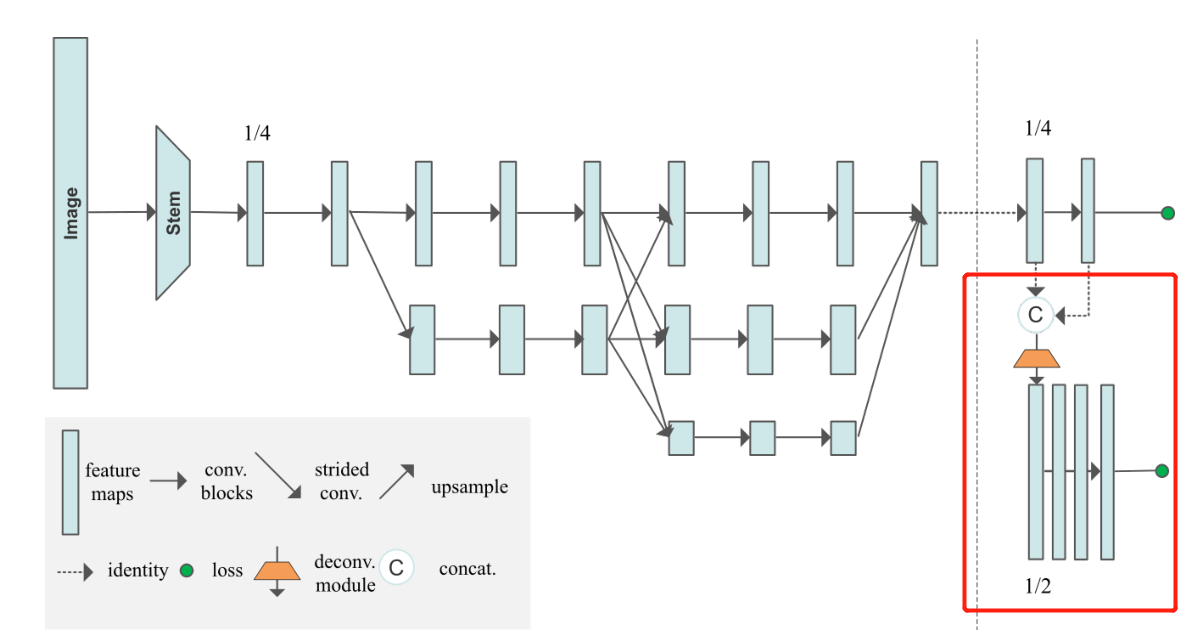
Briefly summarize the operation of the deconvolution module :
- First of all, will HRNet Characteristic diagram of backbone network output
xAnd the heat map generated after convolutionySplicing (cat) - Perform deconvolution (nn.ConvTranspose2d), Resolution improvement
- And then through 4 Time basicneck Residual block
- Finally, perform another convolution operation to output a high-resolution heat map :
Model forward function :
        for i in range(self.num_deconvs):   # rang(1)
            if self.deconv_config.CAT_OUTPUT[i]:    # True
                x = torch.cat((x, y), 1)        # torch.cat Is to put two tensors (tensor) Splice together ,  By dimension 1( Column ) Splicing

			#  Perform deconvolution (nn.ConvTranspose2d),  And then through 4 Time basicneck Residual block
            # conv(66, 34, k=4), 4 BasicBlock(34,34)
            x = self.deconv_layers[i](x)
            #  Finally, perform another convolution operation to output a high-resolution heat map :
            # conv(34,34,k=1)
            y = self.final_layers[i+1](x)
            final_outputs.append(y)
        return final_outputs
init part :
        #  Deconvolution layer
        self.deconv_layers = self._make_deconv_layers(
            cfg, pre_stage_channels[0])
_make_deconv_layers Definition of function :
    def _make_deconv_layers(self, cfg, input_channels):
        dim_tag = cfg.MODEL.NUM_JOINTS if cfg.MODEL.TAG_PER_JOINT else 1    # 17
        extra = cfg.MODEL.EXTRA
        deconv_cfg = extra.DECONV

        deconv_layers = []
        for i in range(deconv_cfg.NUM_DECONVS):     # 1
            if deconv_cfg.CAT_OUTPUT[i]:        # ture
                final_output_channels = cfg.MODEL.NUM_JOINTS + dim_tag \
                    if cfg.LOSS.WITH_AE_LOSS[i] else cfg.MODEL.NUM_JOINTS       # 34
                input_channels += final_output_channels     # 32+34
            output_channels = deconv_cfg.NUM_CHANNELS[i]    # 32
            deconv_kernel, padding, output_padding = \
                self._get_deconv_cfg(deconv_cfg.KERNEL_SIZE[i]) # 4, 1, 0

            layers = []
            #  Perform deconvolution
            layers.append(nn.Sequential(
                nn.ConvTranspose2d(
                    in_channels=input_channels,     # ?+34
                    out_channels=output_channels,   # 32
                    kernel_size=deconv_kernel,      # 4
                    stride=2,
                    padding=padding,                # 1
                    output_padding=output_padding,  # 0
                    bias=False),
                nn.BatchNorm2d(output_channels, momentum=BN_MOMENTUM),
                nn.ReLU(inplace=True)
            ))

            #  adopt 4 Time BasicBlock Residual block
            for _ in range(cfg.MODEL.EXTRA.DECONV.NUM_BASIC_BLOCKS):  # 4
                layers.append(nn.Sequential(
                    BasicBlock(output_channels, output_channels),
                ))
            deconv_layers.append(nn.Sequential(*layers))
            input_channels = output_channels

        return nn.ModuleList(deconv_layers)
Draw a picture according to the model :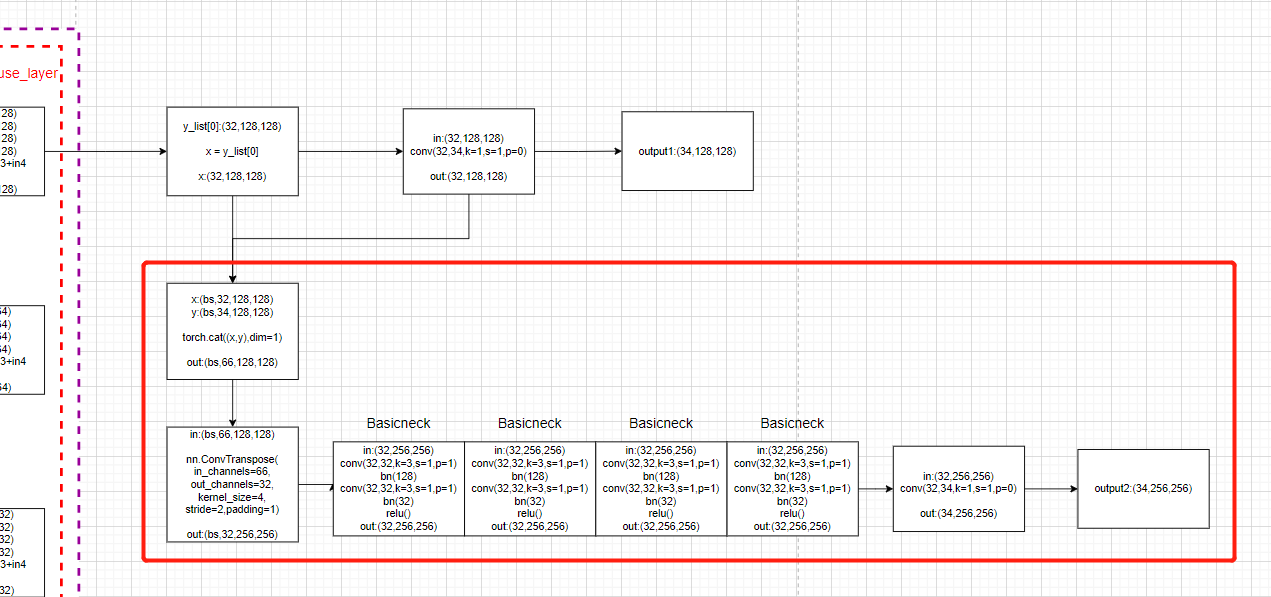
边栏推荐
- CONDA creates virtual environment offline
- 高数_第1章空间解析几何与向量代数_向量的数量积
- 为什么安装mysql时starting service报错?(操作系统-windows)
- Chris Lattner, père de llvm: Pourquoi reconstruire le logiciel d'infrastructure ai
- Word自动生成目录的方法
- 嵌入式背景知识-芯片
- Arcgis操作: 批量修改属性表
- Introduction to uboot
- Google colab loads Google drive (Google drive is used in Google colab)
- STM32 product introduction
猜你喜欢

ES6中的原型对象

mysql插入数据创建触发器填充uuid字段值
Wallys/IPQ6010 (IPQ6018 FAMILY) EMBEDDED BOARD WITH ON-BOARD WIFI DUAL BAND DUAL CONCURRENT
Bean operation domain and life cycle
Methods of adding centerlines and centerlines in SolidWorks drawings
ISP、IAP、ICP、JTAG、SWD的编程特点
This article explains the complex relationship between MCU, arm, muc, DSP, FPGA and embedded system
Win10 installation vs2015

Programming features of ISP, IAP, ICP, JTAG and SWD
喜马拉雅网页版每次暂停后弹窗推荐下载客户端解决办法
随机推荐
对存储过程进行加密和解密(SQL 2008/SQL 2012)
Appx代碼簽名指南
Performance optimization record of the company's product "yunzhujia"
Leetcode exercise - 113 Path sum II
Interface test
Horizontal split of database
Why does the starting service report an error when installing MySQL? (operating system Windows)
Chris Lattner, père de llvm: Pourquoi reconstruire le logiciel d'infrastructure ai
反射效率为什么低?
[sword finger offer] 42 Stack push in and pop-up sequence
2022.7.4DAY596
Win10 installation vs2015
Video based full link Intelligent Cloud? This article explains in detail what Alibaba cloud video cloud "intelligent media production" is
The new activity of "the arrival of twelve constellations and goddesses" was launched
运用tensorflow中的keras搭建卷积神经网络
Learning records - high precision addition and multiplication
SolidWorks工程图中添加中心线和中心符号线的办法
Postman interface test VI
fiddler-AutoResponder
Become a "founder" and make reading a habit