当前位置:网站首页>设备树解析源码分析<devicetree>-1.基础结构
设备树解析源码分析<devicetree>-1.基础结构
2022-08-03 05:23:00 【SEVENTHD7】
- linux-v5.6
参考资料:
- devicetree-specification-v0.3.pdf
可从官网下载:https://www.devicetree.org/- Documentation/devicetree/
一、DTB格式
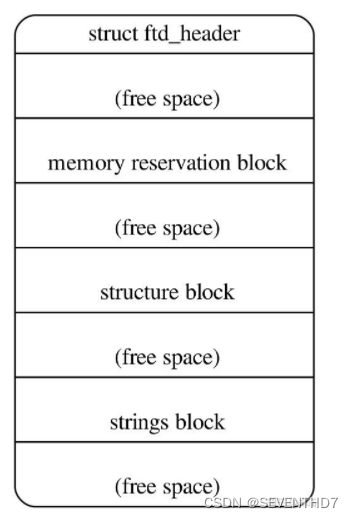
根据device tree的规格书的FLATTENED DEVICETREE (DTB) FORMAT章节描述,DTB的组成如下:

1.1 header 设备树头信息
首先是struct fdt_header,该结构体定义如下:
/* scripts/dtc/libfdt/fdt.h */
struct fdt_header {
fdt32_t magic; /* magic word FDT_MAGIC */
fdt32_t totalsize; /* total size of DT block */
fdt32_t off_dt_struct; /* offset to structure */
fdt32_t off_dt_strings; /* offset to strings */
fdt32_t off_mem_rsvmap; /* offset to memory reserve map */
fdt32_t version; /* format version */
fdt32_t last_comp_version; /* last compatible version *//* version 2 fields below */
fdt32_t boot_cpuid_phys; /* Which physical CPU id we're booting on */
/* version 3 fields below */
fdt32_t size_dt_strings; /* size of the strings block *//* version 17 fields below */
fdt32_t size_dt_struct; /* size of the structure block */
};
所有成员都是32-bit整型,并以大端模式存储;从头部可获知memory reservation block、structure block和strings block部分的起始地址和大小。
下面以树梅派4b的dtb文件为例,首先使用fdtdump工具对dtb文件进行dump:
fdtdump -sd bcm2711-rpi-4-b.dtb > dtb_dump
查看dtb_dump文件,header信息如下:
bcm2711-rpi-4-b.dtb: found fdt at offset 0
/dts-v1/;
// magic: 0xd00dfeed
// totalsize: 0xa721 (42785)
// off_dt_struct: 0x48
// off_dt_strings: 0x98dc
// off_mem_rsvmap: 0x28
// version: 17
// last_comp_version: 16
// boot_cpuid_phys: 0x0
// size_dt_strings: 0xe45
// size_dt_struct: 0x9894
查看对应的16进制数据:
00000000: d0 0d fe ed 00 00 a7 21 00 00 00 48 00 00 98 dc
00000010: 00 00 00 28 00 00 00 11 00 00 00 10 00 00 00 00
00000020: 00 00 0e 45 00 00 98 94
发现的确是以大端模式存储。
1.2 memory reservation block
设备树预留内存区域,用于存放并保护一些重要的数据,与特定平台的实现相关,本文不详细讨论;其对应的数据结构如下:
struct fdt_reserve_entry {
fdt64_t address;
fdt64_t size;
};
成员为64-bit整型,记录预留内存区域的起始地址和大小。
1.3 structure block和strings block
struct fdt_node_header {
fdt32_t tag;
/* node名称,作为额外数据以'\0'结尾的字符串形式存储在structure block
* 32-bits对齐,不够的位用0x0补齐
*/
char name[0];
};struct fdt_property {
fdt32_t tag;
/* 表示property value的长度 */
fdt32_t len;
/* property的名称存放在string block区域,nameoff表示其在string block的偏移 */
fdt32_t nameoff;
/* property value值,作为额外数据以'\0'结尾的字符串形式存储structure block
* 32-bits对齐,不够的位用0x0补齐
*/
char data[0];
};
其中,tag有如下几种取值情况:
#define FDT_BEGIN_NODE 0x1 /* Start node: full name */
#define FDT_END_NODE 0x2 /* End node */
#define FDT_PROP 0x3 /* Property: name off,
size, content */
#define FDT_NOP 0x4 /* nop */
#define FDT_END 0x9
- FDT_BEGIN_NODE:标识一个node的开始
- FDT_END_NODE:标识一个node的结束
- FDT_PROP:标识node中property的开始
- FDT_NOP:所有的设备树解析程序都会忽略该令牌,一般用于覆盖树中的属性或者节点,以将其从书中删除。
- FDT_END:标识structure block区域的结束
下面取树梅派4b设备树中的一个节点进行说明:
/ {
[email protected] {
device_type = "memory";
reg = <0 0 0>;
};......
};
对应的dtb dump数据如下:
// 71f0: tag: 0x00000001 (FDT_BEGIN_NODE)
[email protected] {
// 7200: tag: 0x00000003 (FDT_PROP)
// 9d69: string: device_type
// 720c: value
device_type = "memory";
// 7214: tag: 0x00000003 (FDT_PROP)
// 9a45: string: reg
// 7220: value
reg = <0x00000000 0x00000000 0x00000000>;
// 722c: tag: 0x00000002 (FDT_END_NODE)
};
对应的16进制数据如下:
000071f0: 00 00 00 01 6d 65 6d 6f 72 79 40 30 00 00 00 00 [email protected]
00007200: 00 00 00 03 00 00 00 07 00 00 04 8d6d 65 6d 6f ............memo
00007210: 72 79 00 00 00 00 00 03 00 00 00 0c 00 00 01 69 ry.............i
00007220: 00 00 00 00 00 00 00 00 00 00 00 00 00 00 00 02 ................
- 00 00 00 01:FDT_BEGIN_NODE
- 6d 65 6d 6f 72 79 40 30 00:[email protected](含结尾的'\0'),后面的00 00 00为32-bits补齐
- 00 00 00 03:FDT_PROP
- 00 00 00 07:len,表示该属性值的长度为7(memory加最后的'\0',刚好7个字节)
- 00 00 04 8d:nameoff,表示该属性的名称在strings block的偏移为0x048d,从header可知strings block的起始地址为0x98dc,那么该名称的起始地址为0x9d69,查看该地址数据:
00009d60: 65 2d 6d 65 74 68 6f 64 00 64 65 76 69 63 65 5f e-method.device_
00009d70: 74 79 70 65 00 63 70 75 2d 72 65 6c 65 61 73 65 type.cpu-release
发现64 65 76 69 63 65 5f 74 79 70 65 00刚好是device_type(含结尾的'\0')。
- 6d 65 6d 6f 72 79 00:memory(含结尾的'\0'),后面的00为32-bits补齐
- 00 00 00 03:FDT_PROP
- 00 00 00 0c:len,该属性值长度为12 "reg = <0 0 0>;"
- 00 00 01 69:nameoff,该名称的起始地址为0x9a45(0x98dc+0x0169),查看该地址数据:
00009a40: 6e 67 65 73 00 72 65 67 00 69 6e 74 65 72 72 75 nges.reg.interru发现72 65 67 00刚好是reg(含结尾的'\0')。
- 00 00 00 00 00 00 00 00 00 00 00 00:reg值为整型,没有结尾的'\0'。
- 00 00 00 02:FDT_END_NODE
1.4 零长数组
零长数组一般用作结构体最后一个成员,用于访问该结构体对象之后的一段内存(一般为动态分配),来看GNU C官网的一个例子:
/* https://gcc.gnu.org/onlinedocs/gcc/Zero-Length.html */
struct line {
  int length;
  char contents[0];
};

struct line *thisline = (struct line *)
  malloc (sizeof (struct line) + this_length);
thisline->length = this_length;
contents只是一个标记,sizeof (struct line)的大小与sizeof(int)的大小是相同的;使用时往后多申请的this_length大小的内存,即可使用thisline->contents进行访问;
由于设备树node节点的名称和property value值的长度是不固定的,所以fdt_node_header和fdt_property结构体便使用了零长数组进行实现。
二、dtb数据解析
第一章节介绍了dtb文件的整体组成,包括header的组成,structure block区域是由tag、node name、property len、property nameoff和property value组成的,strings block是由各个property name组成的,本章节介绍linux内核是如何找到并获取这些内容的。
kernel启动的入口函数为stext,其中会将bootloader传来的dtb地址(物理地址,保存在x21寄存器中)赋值给__fdt_pointer变量:
ENTRY(stext)
--> __primary_switch
    --> __primary_switched
--> str_l x21, __fdt_pointer, x5 // Save FDT pointer如此,此后执行的start_kernel便可知晓此时dtb文件在内存中的物理地址,从而对dtb文件进行映射,并进行数据解析。
2.1 tag
使用fdt_next_tag函数获取当前tag数值并查找下一个tag的偏移。
/* scripts/dtc/libfdt/fdt.c
* fdt: dtb文件虚拟地址
* startoffset: 当前tag的偏移
* nextoffset: 需要查找的下一个tag的偏移
*//*
off_dt_struct: dt_struct Offset
*/
#define fdt_off_dt_struct(fdt) (fdt_get_header(fdt, off_dt_struct))
/*
field: ftd_header_t.off_dt_struct
*/
#define fdt_get_header(fdt, field) \
(fdt32_to_cpu( ((const struct fdt_header *)(fdt))->field))
const void *fdt_offset_ptr(const void *fdt, int offset, unsigned int len)
{
unsigned absoffset = offset + fdt_off_dt_struct(fdt);
/**/
if ((absoffset < offset)
|| ((absoffset + len) < absoffset)
|| (absoffset + len) > fdt_totalsize(fdt))
return NULL;if (fdt_version(fdt) >= 0x11)
if (((offset + len) < offset)
|| ((offset + len) > fdt_size_dt_struct(fdt)))
return NULL;/*
(const char *)fdt + fdt_off_dt_struct(fdt) + offset;
*/
return _fdt_offset_ptr(fdt, offset);
}
uint32_t fdt_next_tag(const void *fdt, int startoffset, int *nextoffset)
{
int offset = startoffset;*nextoffset = -FDT_ERR_TRUNCATED;
/* (const char *)fdt + fdt_off_dt_struct(fdt) + offset
* 此处获取当前tag首地址:ftd + stucture block 偏移 +offset
*/
tagp = fdt_offset_ptr(fdt, offset, FDT_TAGSIZE); //FDT_TAGSIZE=32bits
if (!tagp)
return FDT_END; /* premature end */
/* fdt32_to_cpu(x) 获取大端模式的32bit数值
* --> (FDT_FORCE uint32_t)CPU_TO_FDT32(x)
* --> ((EXTRACT_BYTE(x, 0) << 24) | (EXTRACT_BYTE(x, 1) << 16) | \
* (EXTRACT_BYTE(x, 2) << 8) | EXTRACT_BYTE(x, 3))
* 即tagp[0]<<24 + tagp[1]<<16 + tagp[2]<<8 + tagp[3]
* 即获得了32bits大小的tag数值
*/
tag = fdt32_to_cpu(*tagp);
/* 跳过tag */
offset += FDT_TAGSIZE;
*nextoffset = -FDT_ERR_BADSTRUCTURE;
switch (tag) {
case FDT_BEGIN_NODE:
/* 如果是FDT_BEGIN_NODE,则还需要跳过node name */
do {
p = fdt_offset_ptr(fdt, offset++, 1);//每次移动一个字节
} while (p && (*p != '\0')); //查找当前节点 value值结束位置
break;case FDT_PROP:
/* 如果是FDT_PROP,则还需要跳过len、nameoff以及property value的长度 */
lenp = fdt_offset_ptr(fdt, offset, sizeof(*lenp));
offset += sizeof(struct fdt_property) - FDT_TAGSIZE
+ fdt32_to_cpu(*lenp);
break;case FDT_END:
case FDT_END_NODE:
case FDT_NOP:
break;default:
return FDT_END;
}
/* 检查当前offset是否合法 :参数1-此次查找最开始的位置,参数2-查找的字符的长度*/
if ( !fdt_offset_ptr(fdt, startoffset, offset - startoffset) )
return FDT_END; /* premature end */
/* device tree有32-bits对齐要求,对齐后的nextoffset即为下一个tag的偏移
* (((offset) + (FDT_TAGSIZE) - 1) & ~((FDT_TAGSIZE) - 1))
* -------------- --------------
* 保证进位 清零多余的位
*/
*nextoffset = FDT_TAGALIGN(offset);
/* 返回当前tag数值 */
return tag;
}
2.2 node
使用fdt_next_node函数查找下一个node:
int fdt_next_node(const void *fdt, int offset, int *depth)
{
int nextoffset = 0;
uint32_t tag;
/* of_scan_flat_dt获取首个node节点时传入的offset为-1,此时不进行
* fdt_check_node_offset_检查
*/
if (offset >= 0)
/* fdt_check_node_offset_主要进行一些检查:
* 1、offset是否>=0,该句在此情景下其实是重复判断
* 2、offset是否32-bits对齐
* 3、当前tag是否为FDT_BEGIN_NODE
* 4、检查通过,将offset形参数值返回
*/
if ((nextoffset = fdt_check_node_offset_(fdt, offset)) < 0)
return nextoffset;do {
offset = nextoffset;
/* 获取当前tag值,以及下一个tag的偏移(nextoffset) */
tag = fdt_next_tag(fdt, offset, &nextoffset);switch (tag) {
case FDT_PROP:
case FDT_NOP:
break;case FDT_BEGIN_NODE:
if (depth)
(*depth)++;
break;case FDT_END_NODE:
/* FDT_END_NODE后面要么是FDT_BEGIN_NODE,
* 要么是FDT_END,FDT_END时直接返回((--(*depth)为-1)
*/
if (depth && ((--(*depth)) < 0))
return nextoffset;
break;case FDT_END:
/* tag为FDT_END时,offset会超出structure block区域,
* nextoffset为-FDT_ERR_BADSTRUCTURE,即-11
*/
if ((nextoffset >= 0)
|| ((nextoffset == -FDT_ERR_TRUNCATED) && !depth))
return -FDT_ERR_NOTFOUND;
else
return nextoffset;
}
} while (tag != FDT_BEGIN_NODE);/* 返回FDT_BEGIN_NODE或者FDT_END,后续可以以depth值进行区分 */
return offset;
}
有了node的起始offset,则可以计算对应的虚拟地址,强制转换为fdt_node_header结构体即可获取node name,如fdt_get_name函数:
const char *fdt_get_name(const void *fdt, int nodeoffset, int *len)
{
    const struct fdt_node_header *nh = fdt_offset_ptr_(fdt, nodeoffset);
    nameptr = nh->name;
    /* 因name以'\0'结尾,故可直接使用strlen计算长度 */
    *len = strlen(nameptr);
}
关于node name:
- 对于设备树version0~3:node name为以'/'开头,以'\0'结尾的全路径名
- 对于设备树version16及以上:node name仅仅是以'\0'结尾的node本身的名字(根节点的name为'\0')
2.3 property
使用nextprop_函数查找node中的下一个property。
static int nextprop_(const void *fdt, int offset)
{
        uint32_t tag;
        int nextoffset;

        do {
                tag = fdt_next_tag(fdt, offset, &nextoffset);

                switch (tag) {
                case FDT_END:
                        if (nextoffset >= 0)
                                return -FDT_ERR_BADSTRUCTURE;
                        else
                                return nextoffset;

                case FDT_PROP:
                        return offset;
                }
                offset = nextoffset;
        } while (tag == FDT_NOP);

        return -FDT_ERR_NOTFOUND;
}
fdt_first_property_offset与fdt_next_property_offset函数均是调用nextprop_获取node中的第一个property和下一个property;有了property起始offset,则可像node操作一样,获取fdt_property结构体的其他成员(除了property name)。
property name可以通过fdt_get_string函数进行获取:
const char *fdt_get_string(const void *fdt, int stroffset, int *lenp)
{
        int32_t totalsize = fdt_ro_probe_(fdt);
        /* stroffset: nameoff
         * absoffset: property name字符串在dtb中的绝对偏移
         */
        uint32_t absoffset = stroffset + fdt_off_dt_strings(fdt);
        size_t len;
        const char *s, *n;

        len = totalsize - absoffset;

        if (fdt_magic(fdt) == FDT_MAGIC) {
                if (stroffset < 0)
                        goto fail;
                if (fdt_version(fdt) >= 17) {
                        if (stroffset >= fdt_size_dt_strings(fdt))
                                goto fail;
                        if ((fdt_size_dt_strings(fdt) - stroffset) < len)
                                len = fdt_size_dt_strings(fdt) - stroffset;
                }
        }
        /* 获取property name的虚拟地址 */
        s = (const char *)fdt + absoffset;
        /* 获取从s第一次出现'\0'字符的地址 */
        n = memchr(s, '\0', len);
        if (!n) {
                /* missing terminating NULL */
                err = -FDT_ERR_TRUNCATED;
                goto fail;
        }

        if (lenp)
                *lenp = n - s;
        return s;
}
三、kernel处理流程
知晓了dtb各种信息的获取方法后,来看kernel对设备树的具体处理流程。
3.1 重要数据结构
kernel使用device_node和property结构体来记录node和node下的属性信息。
/* include/linux/of.h */
struct device_node {
        /* node名称,取"/"与"@"之间的字符 */
        const char *name;
        phandle phandle;
        /* node路径全称 */
        const char *full_name;
        /* Firmware device相关 */
        struct fwnode_handle fwnode;

        /* node下的第一个property */
        struct  property *properties;
        struct  property *deadprops;    /* removed properties */
        struct  device_node *parent;
        struct  device_node *child;
        struct  device_node *sibling;
#if defined(CONFIG_OF_KOBJ)
        struct  kobject kobj;
#endif
        unsigned long _flags;
        void    *data;
#if defined(CONFIG_SPARC)
        unsigned int unique_id;
        struct of_irq_controller *irq_trans;
#endif
};

struct property {
        char    *name;
        int     length;
        void    *value;
        /* 同一个node下的property会形成一个单链表 */
        struct property *next;
#if defined(CONFIG_OF_DYNAMIC) || defined(CONFIG_SPARC)
        unsigned long _flags;
#endif
#if defined(CONFIG_OF_PROMTREE)
        unsigned int unique_id;
#endif
#if defined(CONFIG_OF_KOBJ)
        struct bin_attribute attr;
#endif
};
3.2 解析流程
大致调用路径如下:
start_kernel
--> setup_arch(&command_line);
    --> setup_machine_fdt(__fdt_pointer);
        /* acpi与dt有着类似的功能,但主要用于提高电源效率 */
        if (acpi_disabled)
                unflatten_device_tree();
下面主要分析setup_machine_fdt和unflatten_device_tree这两个函数。
3.2.1 setup_machine_fdt
setup_machine_fdt函数用于提前解析一些系统启动必要的属性。
static void __init setup_machine_fdt(phys_addr_t dt_phys)
{
int size;
/* 为了支持后续early_init_dt_scan对fdt的修改,此处以可读写方式对设备树物理地址
* 进行映射,详见comiit e112b032a72c7(arm64: map FDT as RW for
* early_init_dt_scan())
* 由于此时内存管理子系统还没初始化完成,故使用fixmap region,相关commit为
* 61bd93ce801bb(arm64: use fixmap region for permanent FDT mapping)
*/
void *dt_virt = fixmap_remap_fdt(dt_phys, &size, PAGE_KERNEL);
const char *name;if (dt_virt)
memblock_reserve(dt_phys, size);if (!dt_virt || !early_init_dt_scan(dt_virt)) {
/* 无效的dtb,打印Error并进入cpu_relax */
}/* Early fixups are done, map the FDT as read-only now
* 重新以只读方式进行映射
*/
fixmap_remap_fdt(dt_phys, &size, PAGE_KERNEL_RO);
}
early_init_dt_scan函数实现如下:
bool __init early_init_dt_scan(void *params)
{
        /* 1. 检查device tree有效性
         * 2. 将全局变量initial_boot_params赋值为dt_virt
         */
        status = early_init_dt_verify(params);
        /* 做一些预先的扫描工作 */
        early_init_dt_scan_nodes();
}early_init_dt_scan_node函数:
void __init early_init_dt_scan_nodes(void)
{
int rc = 0;/* of_scan_flat_dt函数主要作用为从root开始遍历所有node,并回调传入的函数;
* 输入回调函数的形参:
* node: 当前扫描节点
* uname: 节点名词
* depth: node嵌套深度
* data: 私有数据,即of_scan_flat_dt的第二个形参
*//* 从/chosen或者/[email protected]节点获取以下属性值:
* linux,initrd-start、linux,initrd-end
* bootargs,该属性为bootloader传入的命令行参数,赋值给boot_command_line
*/
rc = of_scan_flat_dt(early_init_dt_scan_chosen, boot_command_line);
if (!rc)
pr_warn("No chosen node found, continuing without\n");/* 获取"/"节点下的{size,address}-cells信息(根节点的depth为0),
* 将名称为#size-cells和#address-cells的属性的虚拟地址值赋值给
* 全局变量dt_root_size_cells和dt_root_addr_cells
*/
of_scan_flat_dt(early_init_dt_scan_root, NULL);/* 扫描device_type为"memory"的node,并将"linux,usable-memory"
* 或者"reg"属性的值解析成各个base和size,最后添加到内存管理系统:
* early_init_dt_scan_memory
* --> early_init_dt_add_memory_arch
* --> memblock_add(base, size)
*/
of_scan_flat_dt(early_init_dt_scan_memory, NULL);
}
上述回调函数中涉及到的比较重要的函数有of_get_flat_dt_prop函数:
/* 在node下寻找属性名称与name相同的属性,并返回:
 *      1、找到的property的虚拟地址
 *      2、找到的property value的长度
 */
const void *__init of_get_flat_dt_prop(unsigned long node, const char *name,
                                       int *size)
{
        return fdt_getprop(initial_boot_params, node, name, size);
}
3.2.2 unflatten_device_tree
unflatten_device_tree开始全面扫描dtb文件,并将相关信息填充到device_node和property结构体,创建一颗device_nodes树。
oid __init unflatten_device_tree(void)
{
        /* initial_boot_params: 在early_init_dt_scan-->early_init_dt_verify中赋值为
         *                      设备树首地址(虚拟地址)
         * of_root: 经过该函数处理后会指向根节点
         * early_init_dt_alloc_memory_arch: 该函数使用的内存分配器
         */
        __unflatten_device_tree(initial_boot_params, NULL, &of_root,
                                early_init_dt_alloc_memory_arch, false);

        /* Get pointer to "/chosen" and "/aliases" nodes for use everywhere */
        of_alias_scan(early_init_dt_alloc_memory_arch);

        unittest_unflatten_overlay_base();
}
主要实现在__unflatten_device_tree函数中:
void *__unflatten_device_tree(const void *blob,
                              struct device_node *dad,
                              struct device_node **mynodes,
                              void *(*dt_alloc)(u64 size, u64 align),
                              bool detached)
{
    /* 读取dtb头部信息,并进行合法检查
     * 其中有一项是dtb的totalsize不能大于INT_MAX,即不能大于2GB
     */
    if (fdt_check_header(blob)) {
        pr_err("Invalid device tree blob header\n");
        return NULL;
    }
    /* 第一次调用unflatten_dt_nodes,仅创建device_node和property结构体,并计算
     * 总共需要的内存大小
     */
    size = unflatten_dt_nodes(blob, NULL, dad, NULL);
    /* 进行4字节对齐 */
    size = ALIGN(size, 4);
    /* Allocate memory for the expanded device tree */
    mem = dt_alloc(size + 4, __alignof__(struct device_node));
    memset(mem, 0, size);
    /* 设置魔数 */
    *(__be32 *)(mem + size) = cpu_to_be32(0xdeadbeef);
    /* 第二次调用,进行实际的填充工作*/
    unflatten_dt_nodes(blob, mem, dad, mynodes);
    if (be32_to_cpup(mem + size) != 0xdeadbeef)
        pr_warn("End of tree marker overwritten: %08x\n",
                be32_to_cpup(mem + size));
    return mem;
}
其中对unflatten_dt_nodes函数进行了两次调用,在commit dfbd4c6eff35f(drivers/of: Split unflatten_dt_node())中,将unflatten_dt_node分成了populate_properties()、populate_node()和unflatten_dt_node()。
- populate_properties():被populate_node调用,为当前node下所有的property创建struct property结构体,并进行信息填充
- populate_node():被unflatten_dt_node()调用,为当前offset处的node创建struct device_node结构体、struct property结构体,并进行信息填充
- unflatten_dt_node():解析并填充dtb中的所有节点、属性信息。
首先是populate_properties()函数:
static void populate_properties(const void *blob,
                                int offset,
                                void **mem,
                                struct device_node *np,
                                const char *nodename,
                                bool dryrun)
{
        struct property *pp, **pprev = NULL;
        int cur;
        bool has_name = false;

        /* np下所有的property会形成一个单链表,
         * np->properties指向其中第一个property
         */
        pprev = &np->properties;
        /* 查找np下所有的property,最终都会调用到2.3小节的nextprop_()函数
         * 返回的cur为找到的property的offset值
         */
        for (cur = fdt_first_property_offset(blob, offset);
             cur >= 0;
             cur = fdt_next_property_offset(blob, cur)) {
                const __be32 *val;
                const char *pname;
                u32 sz;

                /* 通过offset获取property的value、value size以及name值 */
                val = fdt_getprop_by_offset(blob, cur, &pname, &sz);
                /* 此处不是向内存管理器申请内存,而是为property划分内存区域
                 * 函数实现:
                 *      *mem = PTR_ALIGN(*mem, align);
                 *      res = *mem;
                 *      *mem += size;   //mem指向该property后面的地址
                 *      return res;     //返回对齐后的地址
                 */
                pp = unflatten_dt_alloc(mem, sizeof(struct property),
                                        __alignof__(struct property));
                /* dryrun有两种情况:
                 *      1:传入的mem为NULL,即第一次调用unflatten_dt_nodes的情况
                 *      0: 传入的mem指向一块已分配的内存,即第二次调用情况
                 * 第一次调用只是为了获取size,不做具体填充操作
                 */
                if (dryrun)
                        continue;

                /* We accept flattened tree phandles either in
                 * ePAPR-style "phandle" properties, or the
                 * legacy "linux,phandle" properties.  If both
                 * appear and have different values, things
                 * will get weird. Don't do that.
                 */
                if (!strcmp(pname, "phandle") ||
                    !strcmp(pname, "linux,phandle")) {
                        if (!np->phandle)
                                np->phandle = be32_to_cpup(val);
                }
                /* And we process the "ibm,phandle" property
                 * used in pSeries dynamic device tree
                 * stuff
                 */
                if (!strcmp(pname, "ibm,phandle"))
                        np->phandle = be32_to_cpup(val);

                pp->name   = (char *)pname;
                pp->length = sz;
                pp->value  = (__be32 *)val;
                *pprev     = pp;
                /* 指向property链表的下一个成员 */
                pprev      = &pp->next;
        }

        /* 设备树的16及以上版本没有name为"name"的property,此处重新进行创建
         */
        if (!has_name) {
                const char *p = nodename, *ps = p, *pa = NULL;
                int len;

                while (*p) {
                        if ((*p) == '@')
                                pa = p;
                        /* 注:设备树16及以上版本的nodename中不含'/'字符 */
                        else if ((*p) == '/')
                                ps = p + 1;
                        p++;
                }

                if (pa < ps)
                        pa = p;
                len = (pa - ps) + 1;
                /* 在struct property后面多划分了len大小的内存区域,用于存放pp->value,
                 * 也就是这里的"nodename",及node的名称(取'/'和'@'之间的字符)
                 */
                pp = unflatten_dt_alloc(mem, sizeof(struct property) + len,
                                        __alignof__(struct property));
                if (!dryrun) {
                        pp->name   = "name";
                        pp->length = len;
                        pp->value  = pp + 1;
                        *pprev     = pp;
                        pprev      = &pp->next;
                        memcpy(pp->value, ps, len - 1);
                        ((char *)pp->value)[len - 1] = 0;
                        pr_debug("fixed up name for %s -> %s\n",
                                 nodename, (char *)pp->value);
                }
        }
    if (!dryrun)
                *pprev = NULL;
}
然后是populate_node()函数:
static bool populate_node(const void *blob,
                          int offset,
                          void **mem,
                          struct device_node *dad,
                          struct device_node **pnp,
                          bool dryrun)
{
        struct device_node *np;
        const char *pathp;
        unsigned int l, allocl;

        /* 获取offset处的node的name和name字符串的长度(不含结尾的'\0') */
        pathp = fdt_get_name(blob, offset, &l);
        if (!pathp) {
                *pnp = NULL;
                return false;
        }

        /* 将结尾的'\0'长度加上 */
        allocl = ++l;

        /* np为存放当前node数据的首地址
         * 在struct device_node大小后面多划分allocl大小的内存,用于存放np->full_name
         */
        np = unflatten_dt_alloc(mem, sizeof(struct device_node) + allocl,
                                __alignof__(struct device_node));
        if (!dryrun) {
                char *fn;
                of_node_init(np);
                np->full_name = fn = ((char *)np) + sizeof(*np);
                /* 将name字符串的值拷贝到划分的内存处 */
                memcpy(fn, pathp, l);
                /* 如果当前节点有父节点 */
                if (dad != NULL) {
                        np->parent = dad;
                        np->sibling = dad->child;
                        dad->child = np;
                }
        }
        /* 分配struct property结构体,并进行填充(dryrun == 0时) */
        populate_properties(blob, offset, mem, np, pathp, dryrun);
        if (!dryrun) {
                /* 获取当前node下name属性,并将value值赋值给np->name('/'和'@'之间的字符)
                 * 注:version 16及以上的node name不是全路径名,只是name本身,所以不会含有'/'
                 */
                np->name = of_get_property(np, "name", NULL);
                if (!np->name)
                        np->name = "<NULL>";
        }
        /* 将填充好的np赋值到pnp指向的地址,如果是根节点情况(offset == 0),
         * 则nps[depth+1]指向根节点('/')
         */
        *pnp = np;
        return true;
}
最后是unflatten_dt_nodes()函数:
static int unflatten_dt_nodes(const void *blob,
                              void *mem,
                              struct device_node *dad,
                              struct device_node **nodepp)
{
        struct device_node *root;
        int offset = 0, depth = 0, initial_depth = 0;
#define FDT_MAX_DEPTH   64
        /* 题外话:
         *      nps是一个数组,数组成员为struct device_node *类型的指针
         *      如果写为struct device_node (*nps)[FDT_MAX_DEPTH];
         *      那么nps是一个指针,指向由struct device_node类型数据组成的数组
         */
        struct device_node *nps[FDT_MAX_DEPTH];
        void *base = mem;
        bool dryrun = !base;

        /* unflatten_device_tree()函数中传入的nodepp为&of_root(全局变量) */
        if (nodepp)
                *nodepp = NULL;

        /* 如果有父节点,需要设置depth为1,
         * unflatten_device_tree()函数中传入的dad为NULL
         */
        if (dad)
                depth = initial_depth = 1;

        root = dad;
        nps[depth] = dad;

        for (offset = 0;
             offset >= 0 && depth >= initial_depth;
             offset = fdt_next_node(blob, offset, &depth)) {
                /* 嵌套深度大于64的node将不会被处理 */
                if (WARN_ON_ONCE(depth >= FDT_MAX_DEPTH))
                        continue;
                /* 没有定义CONFIG_OF_KOBJ,并且当前noden节点的status属性值为disable,
                 * 则跳过对该节点的处理
                 * 注:CONFIG_OF_KOBJ在commit b56b5528f5b3c(of: make kobject and
                 *     bin_attribute support configurable)加入,当sysfs和OF_DYNAMIC
                 *     使能时配置该选项;
                 */
                if (!IS_ENABLED(CONFIG_OF_KOBJ) &&
                    !of_fdt_device_is_available(blob, offset))
                        continue;
                /* 分配struct device_node结构体,并进行填充(dryrun == 0时) */
                if (!populate_node(blob, offset, &mem, nps[depth],
                                   &nps[depth+1], dryrun))
                        /* 如果获取到的node name为NULL,则提前返回size */
                        return mem - base;
                if (!dryrun && nodepp && !*nodepp)
                        /* of_root指向根节点 */
                        *nodepp = nps[depth+1];
                if (!dryrun && !root)
                        /* root指向根节点 */
                        root = nps[depth+1];
        }

        /*
         * Reverse the child list. Some drivers assumes node order matches .dts
         * node order
         */
        if (!dryrun)
                reverse_nodes(root);

        /* 将所有struct device_node,struct property,包含紧跟的一些name的size的
         * 的总和进行返回(unflatten_dt_alloc()函数划分的区域大小)
         */
        return mem - base;
}
从注释看,reverse_nodes()函数会对设备树的child链表进行反转,下面以一个简单的设备树为例:
/ {
    leds {
        act {
            gpios = <&gpio 42 GPIO_ACTIVE_HIGH>;
        };

        pwr {
            label = "PWR";
            gpios = <&expgpio 2 GPIO_ACTIVE_LOW>;
            default-state = "keep";
            linux,default-trigger = "default-on";
        };
    };

    wifi_pwrseq: wifi-pwrseq {
        compatible = "mmc-pwrseq-simple";
        reset-gpios = <&expgpio 1 GPIO_ACTIVE_LOW>;
    };

};
该设备树经过populate_node()解析处理后,结构体关系如下:
- /节点:
  - parent:NULL
  - sibling:NULL
  - child:wifi_pwrseq
- led节点:
  - parent:/
  - sibling:NULL
  - child:pwr
- act节点:
  - parent:led
  - sibling:NULL
  - child:NULL
- pwr节点:
  - parent:led
  - sibling:act
  - child:NULL
- wifi_pwrseq节点:
  - parent:/
  - sibling:led
  - child:NULL
可以发现该树形结构中的child和sibling与实际dts中的顺序的确是相反的。
边栏推荐
猜你喜欢

神经网络之感知机

Qlik Sense 临时处理表数据详解(Resident)

当我们在看Etherscan的时候,到底在看什么?

Android学习 | 08.SQLiteOpenHelper

BeanFactory和FactoryBean的区别

【IDEA】字体修改-护眼主题-文件注释头设置
![[frp intranet penetration]](/img/5c/ca18bef3e5fec279c19825ee93b34b.png)
[frp intranet penetration]

Execute the mysql script file in the docker mysql container and solve the garbled characters

docker mysql 容器中执行mysql脚本文件并解决乱码

Browser multi-threaded off-screen rendering, compression and packaging scheme
随机推荐
自监督论文阅读笔记 TASK-RELATED SELF-SUPERVISED LEARNING FOR REMOTE SENSING IMAGE CHANGE DETECTION
EIP-5058 能否防止NFT项目方提桶跑路?
中国磷化铟晶圆行业发展前景与投资规划分析报告2022~2028年
【解读合约审计】Harmony的跨链桥是如何被盗一亿美金的?
深度学习基本概念
new / malloc / delete / free之间的区别
深度学习理论课程第八、九、十章总结
Let small program development into ` tailwind jit ` era
中国聚氯乙烯(PVC)土工膜发展动态及投资前景预测报告2022~2028年
[CSRF, SSRF, XXE, PHP deserialization, Burpsuite]
【Yarn】yarn常用命令 查看日志和Kill任务
中国食品产业园区行业前景规划建议及投融资模式分析报告2022~2028年
中国水煤浆行业“十四五”规划与运营模式分析报告2022~2028年
Sqli-labs-master靶场1-23关通关详细教程(基础篇)
NFT租赁提案EIP-5006步入最后审核!让海外大型游戏的链改成为可能
IPC通信 - 管道
【 command execution and middleware loopholes 】
opencv目标检测
自监督论文阅读笔记 Incremental-DETR:Incremental Few-Shot Object Detection via Self-Supervised Learning
自监督论文阅读笔记 S3Net:Self-supervised Self-ensembling Network for Semi-supervised RGB-D Salient Object Det