当前位置:网站首页>Introduction to ros2 installation and basic knowledge
Introduction to ros2 installation and basic knowledge
2022-07-06 06:53:00 【Little white classic】
ros Introduce
ROS(Robot Operating System) Is an open source robot operating system ,ROS The system is composed of a large number of nodes , Any of these nodes can be published / Subscribe to communicate with other nodes . Take a chestnut , The radar unit in a position sensor on the robot can be used as ROS A node of , It can release the information obtained by radar in the form of information flow , The published information can be used by other nodes such as navigation units 、 Path planning unit, etc , The navigation and path planning unit itself is also a node , Similarly, the information obtained by each party is released in the form of information flow , For other nodes
ros2 install
This time it's in Ubuntu 22.04 Installation on system ros2 Of humble edition
Set the coding format of the terminal
sudo apt update && sudo apt install locales -y
sudo locale-gen en_US en_US.UTF-8
sudo update-locale LC_ALL=en_US.UTF-8 LANG=en_US.UTF-8
export LANG=en_US.UTF-8
Enable Universe The repository
sudo apt install software-properties-common
sudo add-apt-repository universe
Add source
First update the software and download and install curl、gnupg and lsb-release
sudo apt update && sudo apt install curl gnupg lsb-release -yGet the key of the source and save it to the specified directory , Only locally GPG Key to download and install ros2 Software for
sudo curl -sSL https://raw.githubusercontent.com/ros/rosdistro/master/ros.key -o /usr/share/keyrings/ros-archive-keyring.gpgAn error is reported here
Failed to connect to raw.githubusercontent.com port 443 after 17 ms: Connection refused, The solution is as follows :visit This website see raw.githubusercontent.com The domain name corresponds to IP Address , see DNS Resource Records Information in
Execute commands at the terminal
sudo vi /etc/hosts, open hosts fileChoose one , take IP And domain name added to hosts In file , Such as :
185.199.108.133 raw.githubusercontent.comIf you execute the order again, you won't report a mistake
Add software source and update index
echo "deb [arch=$(dpkg --print-architecture) signed-by=/usr/share/keyrings/ros-archive-keyring.gpg] http://packages.ros.org/ros2/ubuntu $(source /etc/os-release && echo $UBUNTU_CODENAME) main" | sudo tee /etc/apt/sources.list.d/ros2.list > /dev/nullinstall ros2 package
Update the system software first
sudo apt update && sudo apt upgrade -yinstall ros2, The version is humble The desktop version , This installation takes a long time , Please be patient , If there is an error, it is basically a network problem , Please check by yourself
sudo apt install ros-humble-desktop -ySet up the environment
The purpose is to let the operating system know ros2 Where is it installed , Use
sourceOrder or.command , Load environment informationsource /opt/ros/humble/setup.bashor. /opt/ros/humble/setup.bashThis command can only take effect on the current terminal , Reopening the terminal requires another execution , You can add this command to
.bashrcThere is no need to execute every time in the file , The system can recognizeros2commandecho "source /opt/ros/humble/setup.bash" >> ~/.bashrcverification ros2 installation is complete
ros2 Provides C++ and python Of demo, Execute the following command at the terminal , As publisher
ros2 run demo_nodes_cpp talkerOpen another terminal , As a listener, execute the following commands
ros2 run demo_nodes_py listenerlistenerCan seetalkerConstant news , explain ros2 Installation successful
ros2 Core concept of
working space (Workspace): Project location
Function pack (Package): The storage place of each function module developed
node (Node): Working cells of robots , Used to create publishers 、 subscriber 、 Service etc.
topic of conversation (Topic): A bridge for transferring data between nodes
service (Service): Between nodes, you ask me and answer , It consists of a pair of messages ( Request and reply )
communication interface (Interface): Standard structure of data transmission
Parameters (Parameter): Global dictionary of robot system
action (Action): Process management of complete behavior
Distributed communication (Distributed Communication): Task allocation of multiple computing platforms
DDS(Data Distribution Service): Neural network of robot
turtlesim and rqt Installation and use
turtlesim and rqt Introduce
Turtlesim It's for learning ros2 Lightweight simulator for , It shows ros2 Work done at the basic level , In order to understand what can be done with real robots or robot simulations in the future
rqt yes ros2 Graphical interface of (GUI) Tools , What can be done on the command line rqt Can also do ,rpt Provides a more concise 、 In a more friendly way ros2 The elements of
turtlesim and rqt install
Perform the following installation turtlesim and rqt
sudo apt update
sudo apt install ros-humble-turtlesim ~nros-humble-rqt* -y
start-up turrlesim
Executing the following command will bring up the simulator window , Randomly display a small turtle
ros2 run turtlesim turtlesim_nodeUse turrlesim
Do not turn off the last terminal , Open a new terminal , Carry out orders
ros2 run turtlesim turtle_teleop_keythen , Click the direction key on the keyboard on this terminal to make the little turtle move
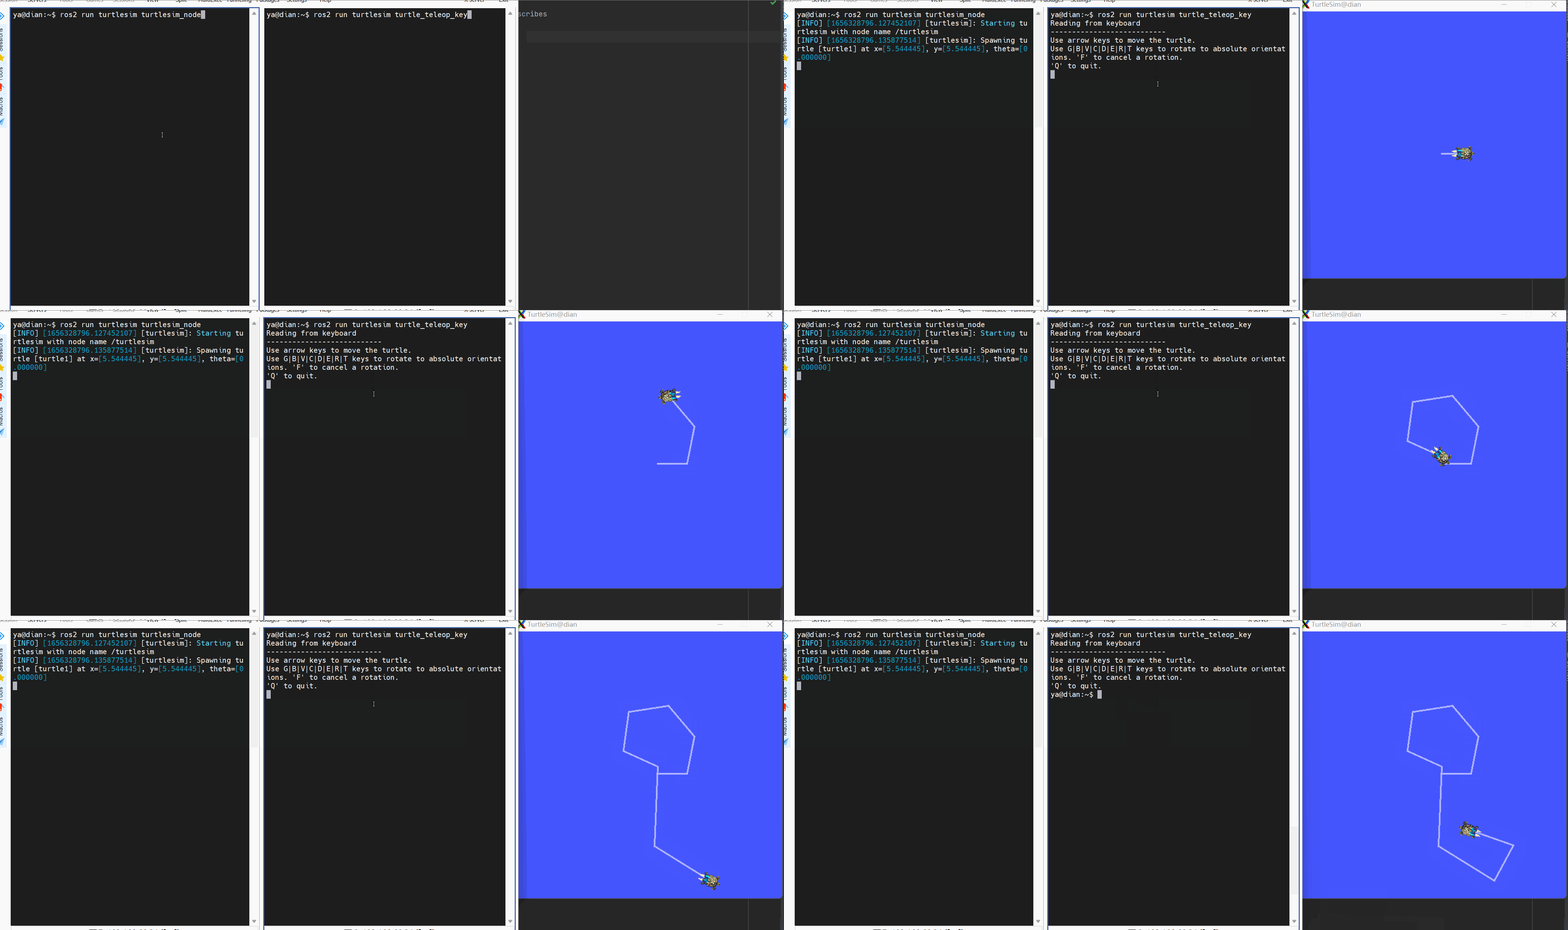
Do not close the above two terminals , Open a new terminal again , Now open 3 Terminals , Execute the following commands on the new terminal to view the currently used nodes 、 topic of conversation 、 Services and actions
ros2 node list		#  View the list of nodes
ros2 topic list		#  Check the list of topics
ros2 service list	#  View the list of services
ros2 action list	#  View the action list
start-up rqt
The input terminal
rqt, You can open rqt windowadopt rqt Post topic news
Select... In the menu bar Plugins → Topics → Message Publisher, call
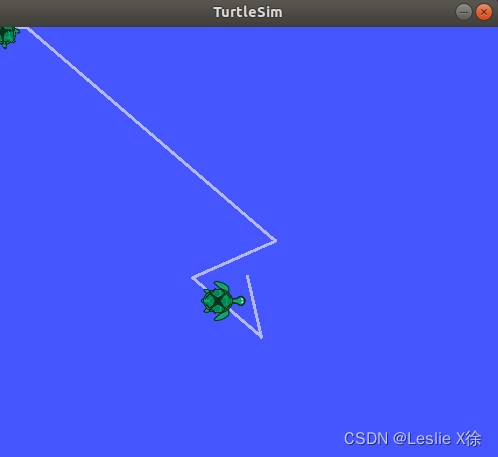
/turtle1/cmd_velIn servicegeometry_msgs/msg/Twisttype , Modify linear velocity and angular velocity , Then post the topic , The little turtle will move its position according to the set value , As shown in the figure below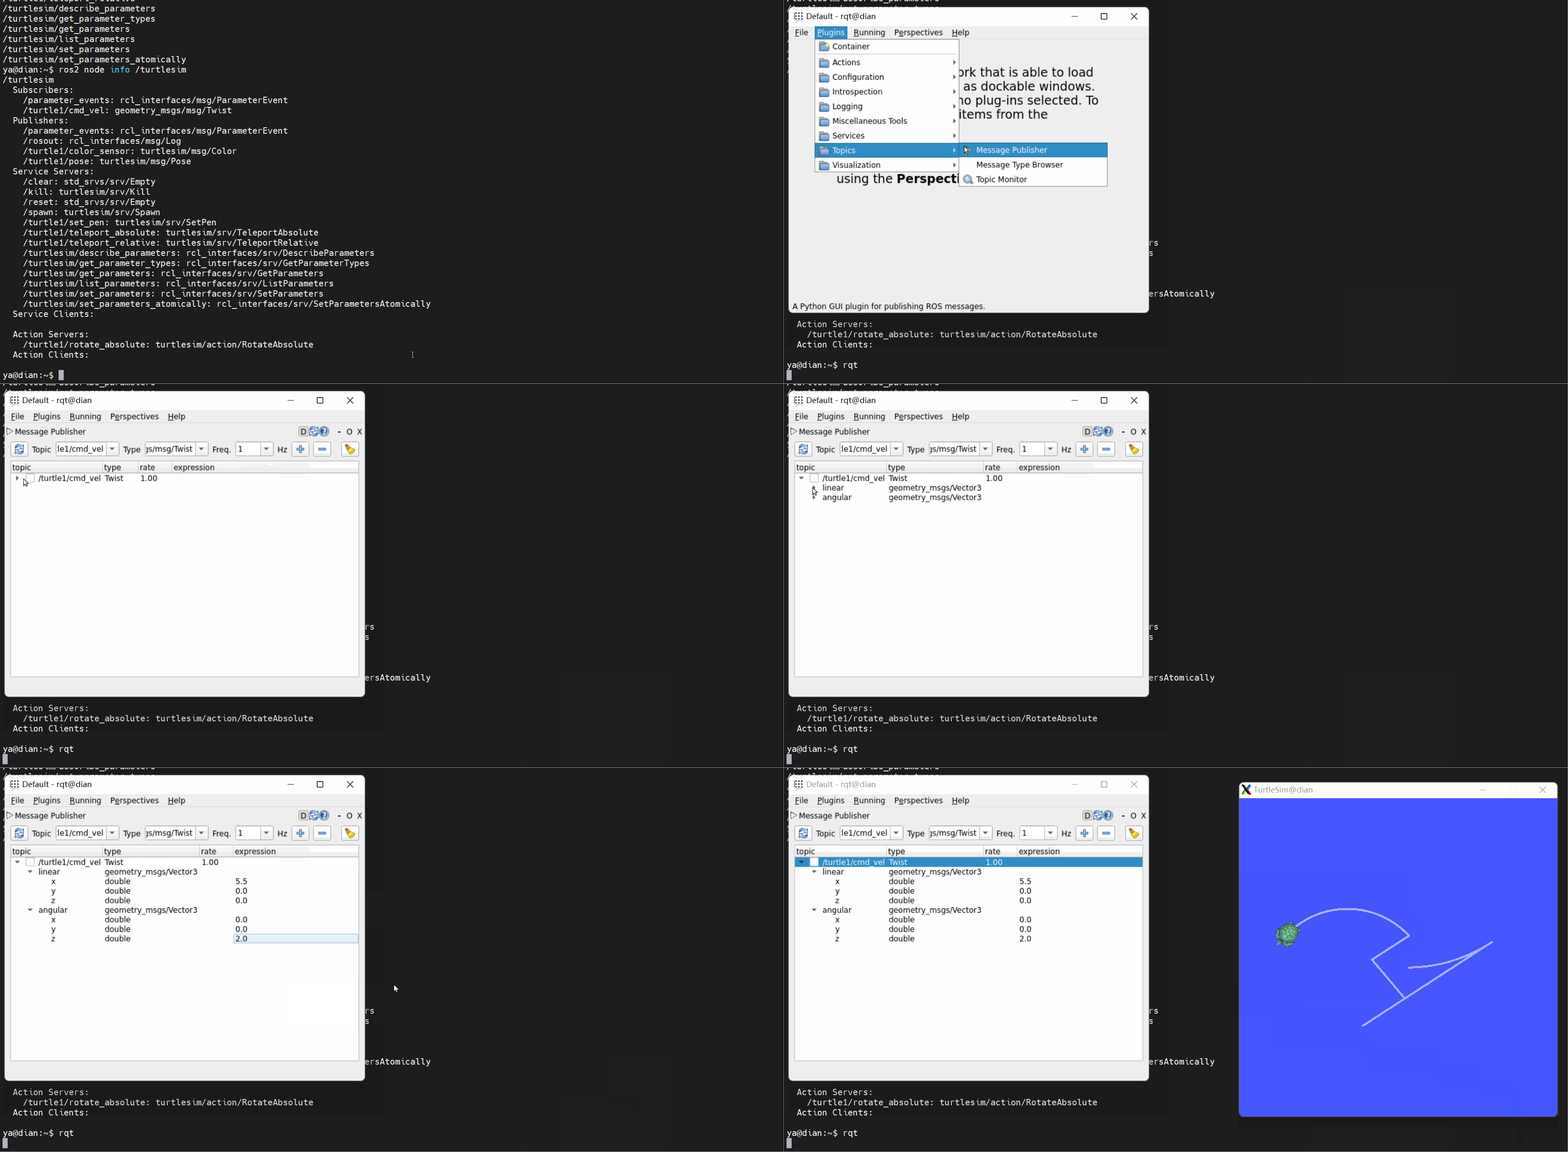
Issue topic messages by command
Let the little turtle move using command line operation , The order is as follows ,rate Parameters can be understood as 1 Once per second , The default is 1 second , You can add parameters
--onceOnly once , Otherwise, the command will be executed all the time , Keep drawing circlesros2 topic pub -r 1 /turtle1/cmd_vel geometry_msgs/msg/Twist "{linear:{x: 3.0,y: 0.0,z: 0.0},angular:{x: 0.0,y: 0.0,z: 2.2}}"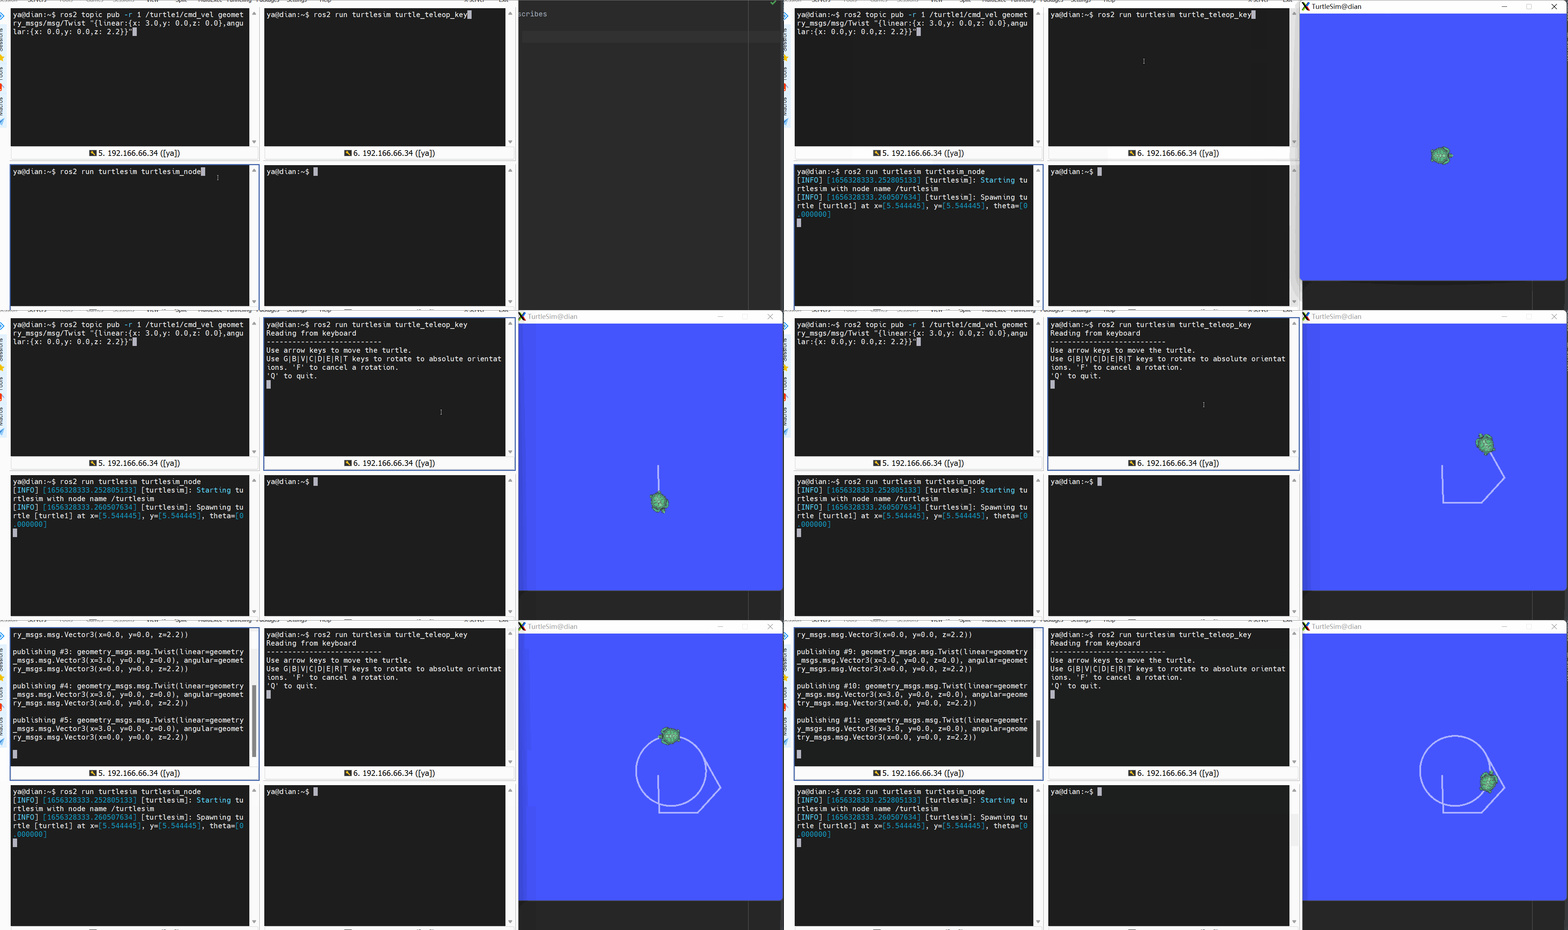
adopt rqt call
/spawnService creation Little TurtleSelect... In the menu bar Plugins → Services → Service Caller, call
/spawnThe service can create a new little turtle , Set the position where the little turtle appears 、 Angle and name , Click on 【Call】 stay turtlesim The window will show a new little turtle , As shown in the figure below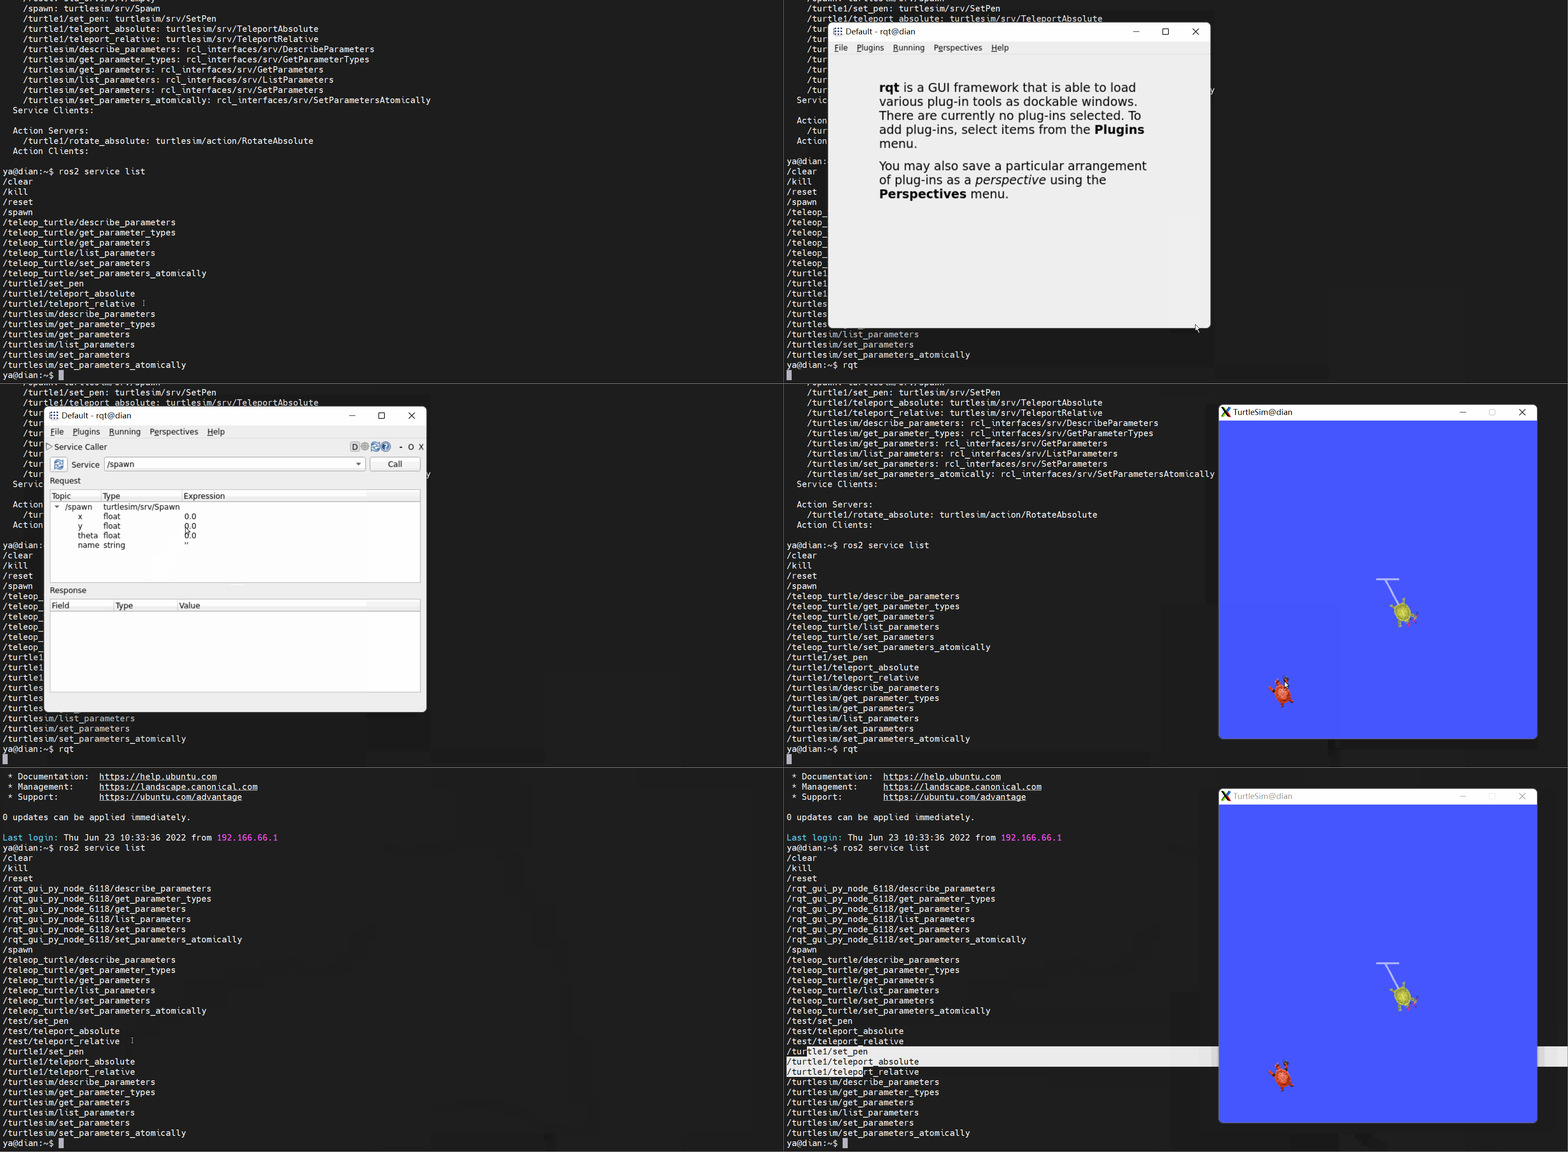
Call... By command
/spawnService creation Little TurtleYou can also use commands to operate , The order is as follows
ros2 service call /spawn turtlesim/srv/Spawn "{x: 3,y: 2,theta: 0.5,name: "test"}"Turtle name can be empty , The default name of a little turtle is
turtle1, If it is empty , The new name of the little turtle isturtle2……
Clone sample project
Create workspace
mkdir -p ~/dev_ws/src && cd ~/dev_ws/src # Create and enter the workspaceClone the little turtle project into the work area
sudo apt install git -y
sudo git clone https://github.com/ros/ros_tutorials.git -b humble
Resolve dependencies
cd .. #  Don't stop at src Under the table of contents , Go back to dev_ws Catalog
sudo apt install python3-rosdep2 -y	#  install python3-rosdep2
rosdep update	#  initialization rosdep
Encounter newspaper
ERROR: unable to process source [https://raw.githubusercontent.com/ros/rosdistro/master/rosdep/osx-homebrew.yaml], It's still caused by the network , The solution is as follows :Connect phone hotspot
Execute commands at the terminal
sudo vim /etc/ros/rosdep/sources.list.d/20-default.listIn the original url with
https://ghproxy.com/, As shown belowyaml https://ghproxy.com/https://raw.githubusercontent.com/ros/rosdistro/master/rosdep/osx-homebrew.yaml osx yaml https://ghproxy.com/https://raw.githubusercontent.com/ros/rosdistro/master/rosdep/base.yaml yaml https://ghproxy.com/https://raw.githubusercontent.com/ros/rosdistro/master/rosdep/python.yaml yaml https://ghproxy.com/https://raw.githubusercontent.com/ros/rosdistro/master/rosdep/ruby.yaml gbpdistro https://ghproxy.com/https://raw.githubusercontent.com/ros/rosdistro/master/releases/fuerte.yaml fuerteThen execute the following command to complete the initialization ! If it's still wrong , Please try other online methods by yourself
sudo apt-get update
rosdep update
Finally, execute the command to solve the dependency
rosdep install -i --from-path src --rosdistro humble -yappear
All required rosdeps installed successfullyIt means completion
colcon structure
colcon Is a universal build tool ,ros Although the system is not recommended, the official documents still use this tool , Let's also demonstrate this , For more information about building tools, please check This article
install colcon
sudo apt install python3-colcon-common-extensions
Execute the following command to build all packages in the workspace
colcon build
Because automatic loading has been configured above ros2 Environmental information , Now we need to run this project , It is necessary to load the environment required by this project on this basis , After building , Open a new terminal , Execute the following command
source ~/dev_ws/install/local_setup.sh
At this time, execute the following command , What started is the local little turtle
ros2 run turtlesim turtlesim_node
It can be modified by setWindowTitle("TurtleSim") Verify the window name in and execute the following command , Amendment No 52 Window name of the row
vim ~/dev_ws/src/ros_tutorials/turtlesim/src/turtle_frame.cpp
Then rebuild the package
colcon build
Execute the following command again to see that the window name has been modified
ros2 run turtlesim turtlesim_node

ros2 Common commands
About operation commands, you should use more tab Key automatic completion function and -h View help documents , The following commands are not introduced about optional parameters , Check more help documents !
If there is no automatic completion function , It's the lack of python3-argcomplete The installation package causes , Restart the terminal after executing the following commands
sudo apt-get install python3-argcomplete
| meaning | command |
|---|---|
| Create Feature Pack | ros2 pkg create --build-type ament_python <package_name> |
| View the function pack list | ros2 pkg list |
| View the list of executable files in the package | ros2 pkg executables <package_name> |
| Run the executable file in the package | ros2 run <package_name> <executable_name> |
| View the list of currently active nodes | ros2 node list |
| View node details | ros2 node info <node_name> |
| List the currently available topics | ros2 topic list |
| Check the message type of the topic | ros2 topic type <topic_name> |
| List the currently available topics and types | ros2 topic list -t |
| Check the topic message type 、 Number of publishers and subscribers | ros2 topic info <topic_name> |
| Find relevant topics according to the message type | ros2 topic find <message_type> |
| according to header The timestamp in calculates the message delay | ros2 topic delay <topic_name> |
| Display the average publishing frequency of current topics in real time | ros2 topic hz <topic_name> |
| Show the bandwidth of the current topic in real time | ros2 topic bw <topic_name> |
| Display topic messages in real time on the console | ros2 topic echo <topic_name> |
| Issue topic messages by command | ros2 topic pub <topic_name> <message_type> <message_content> |
| See all the services | ros2 service list |
| View service types | ros2 service type <service_name> |
| Output all services and types | ros2 service list -t |
| List all services of the specified type | ros2 service find <service_type> |
| Call the service | ros2 service call <service_name> <service_type> |
| View all actions | ros2 action list |
| View action information | ros2 action info <action_name> |
| View all actions and types | ros2 action list -t |
| Launch action target | ros2 action send_goal <action_name> <action_type> <goal> |
| View information about available plug-ins | ros2 bag list <plugin_type> |
| Record the data of the specified topic | ros2 bag record <topic_name> |
| Record data of multiple topics and customize file names | ros2 bag record -o <bag_file> <topic_name> <topic_name>…… |
| View record information | ros2 bag info <bag_file> |
| Playback recorded information | ros2 bag play <bag_file> |
| View all parameters | ros2 param list |
| View the value of the specified parameter | ros2 param get <node_name> <parameter_name> |
| Set the value of the specified parameter | ros2 param set <node_name> <parameter_name> <value> |
| See parameter details | ros2 param describe <node_name> <parameter_name> |
| Transfer node parameters to yaml In file | ros2 param dump <node_name> --output-dir <dir_name> |
| Load the parameter file of the node | ros2 param load <node_name> < parameter_file> |
| Delete parameters | ros2 param delete <node_name> <parameter_name> |
| Classification shows all interfaces | ros2 interface list |
| View the list of packages that provide interfaces | ros2 interface packages |
| Check the interface in the package | ros2 interface package <package_name> |
| View the details of the specified interface | ros2 interface show <interface_name> |
| View the specified interface prototype | ros2 interface proto <interface_name> |
| adopt launch Files run multiple nodes at once | ros2 launch <package_name> <launch_arguments> |
For more functions and operations, please check Official documents Well !
边栏推荐
- 顶测分享:想转行,这些问题一定要考虑清楚!
- [hot100] 739. Température quotidienne
- [daily question] 729 My schedule I
- LeetCode每日一题(1870. Minimum Speed to Arrive on Time)
- 医疗软件检测机构怎么找,一航软件测评是专家
- What are the characteristics of trademark translation and how to translate it?
- Map of mL: Based on the adult census income two classification prediction data set (whether the predicted annual income exceeds 50K), use the map value to realize the interpretable case of xgboost mod
- Day 245/300 JS foreach data cannot be updated to the object after multi-layer nesting
- Classification des verbes reconstruits grammaticalement - - English Rabbit Learning notes (2)
- CS certificate fingerprint modification
猜你喜欢

AttributeError: Can‘t get attribute ‘SPPF‘ on <module ‘models.common‘ from ‘/home/yolov5/models/comm
ROS学习_基础
18.多级页表与快表
What is the difference between int (1) and int (10)? Senior developers can't tell!

Use shortcut LNK online CS

万丈高楼平地起,每个API皆根基

ROS learning_ Basics
Pallet management in SAP SD delivery process

What are the characteristics of trademark translation and how to translate it?
详解SQL中Groupings Sets 语句的功能和底层实现逻辑
随机推荐
Machine learning plant leaf recognition
The ECU of 21 Audi q5l 45tfsi brushes is upgraded to master special adjustment, and the horsepower is safely and stably increased to 305 horsepower
Due to high network costs, arbitrum Odyssey activities are suspended, and nitro release is imminent
Leetcode daily question (1870. minimum speed to arrive on time)
Day 246/300 ssh连接提示“REMOTE HOST IDENTIFICATION HAS CHANGED! ”
指尖上的 NFT|在 G2 上评价 Ambire,有机会获得限量版收藏品
Attributeerror successfully resolved: can only use cat accessor with a ‘category‘ dtype
Map of mL: Based on the adult census income two classification prediction data set (whether the predicted annual income exceeds 50K), use the map value to realize the interpretable case of xgboost mod
My creation anniversary
【每日一题】729. 我的日程安排表 I
SAP SD发货流程中托盘的管理
Phishing & filename inversion & Office remote template
ML之shap:基于adult人口普查收入二分类预测数据集(预测年收入是否超过50k)利用Shap值对XGBoost模型实现可解释性案例之详细攻略
UNIPRO Gantt chart "first experience": multi scene exploration behind attention to details
Automated test environment configuration
【软件测试进阶第1步】自动化测试基础知识
[advanced software testing step 1] basic knowledge of automated testing
攻防世界 MISC中reverseMe简述
Database basics exercise part 2
[hot100] 739. Température quotidienne
