当前位置:网站首页>Yolov5 official code reading - prior to transmission
Yolov5 official code reading - prior to transmission
2022-08-02 15:26:00 【Hongyao】
yolov5Interpretation of the forward propagation code
前言
本笔记以yolov5 4.0版本为例
在yolov5/models/yolo.py中,我们可以运行mainCode block viewyolov5s的结构.
                 from  n    params  module                                  arguments
  0                -1  1      3520  models.common.Focus                     [3, 32, 3]
  1                -1  1     18560  models.common.Conv                      [32, 64, 3, 2]
  2                -1  1     18816  models.common.C3                        [64, 64, 1]
  3                -1  1     73984  models.common.Conv                      [64, 128, 3, 2]
  4                -1  1    156928  models.common.C3                        [128, 128, 3]
  5                -1  1    295424  models.common.Conv                      [128, 256, 3, 2]
  6                -1  1    625152  models.common.C3                        [256, 256, 3]
  7                -1  1   1180672  models.common.Conv                      [256, 512, 3, 2]
  8                -1  1    656896  models.common.SPP                       [512, 512, [5, 9, 13]]
  9                -1  1   1182720  models.common.C3                        [512, 512, 1, False]
 10                -1  1    131584  models.common.Conv                      [512, 256, 1, 1]
 11                -1  1         0  torch.nn.modules.upsampling.Upsample    [None, 2, 'nearest']
 12           [-1, 6]  1         0  models.common.Concat                    [1]
 13                -1  1    361984  models.common.C3                        [512, 256, 1, False]
 14                -1  1     33024  models.common.Conv                      [256, 128, 1, 1]
 15                -1  1         0  torch.nn.modules.upsampling.Upsample    [None, 2, 'nearest']
 16           [-1, 4]  1         0  models.common.Concat                    [1]
 17                -1  1     90880  models.common.C3                        [256, 128, 1, False]
 18                -1  1    147712  models.common.Conv                      [128, 128, 3, 2]
 19          [-1, 14]  1         0  models.common.Concat                    [1]
 20                -1  1    296448  models.common.C3                        [256, 256, 1, False]
 21                -1  1    590336  models.common.Conv                      [256, 256, 3, 2]
 22          [-1, 10]  1         0  models.common.Concat                    [1]
 23                -1  1   1182720  models.common.C3                        [512, 512, 1, False]
 24      [17, 20, 23]  1    229245  Detect                                  [80, [[10, 13, 16, 30, 33, 23], [30, 61, 62, 45, 59, 119], [116, 90, 156, 198, 373, 326]], [128, 256, 512]]
Model Summary: 283 layers, 7276605 parameters, 7276605 gradients, 17.1 GFLOPS
在mainAdd print statements below the code block,手动打印yolov5的模型结构
print(model)
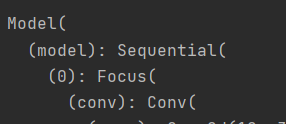
这时,我们就会惊讶的发现,yolov5The model is actually only onenn.Sequential的顺序结构,Isn't it good to say that it is the following complex network structure??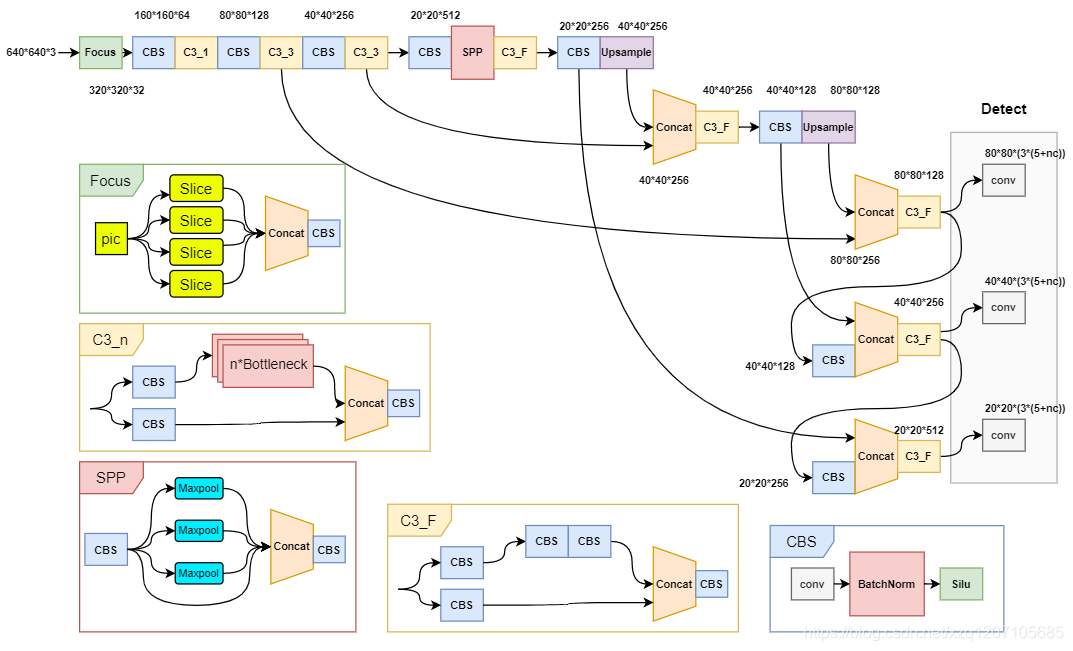
这就是yolov5官方编写前向传播The ingenuity of procedural code
yolov5的网络结构
yolov5/models/yolov5s.yaml
# parameters
nc: 80  # number of classes
depth_multiple: 0.33  # model depth multiple
width_multiple: 0.50  # layer channel multiple

# anchors
anchors:
  - [10,13, 16,30, 33,23]  # P3/8
  - [30,61, 62,45, 59,119]  # P4/16
  - [116,90, 156,198, 373,326]  # P5/32

# YOLOv5 backbone
backbone:
  # [from, number, module, args]
  [[-1, 1, Focus, [64, 3]],  # 0-P1/2
   [-1, 1, Conv, [128, 3, 2]],  # 1-P2/4
   [-1, 3, C3, [128]],
   [-1, 1, Conv, [256, 3, 2]],  # 3-P3/8
   [-1, 9, C3, [256]],
   [-1, 1, Conv, [512, 3, 2]],  # 5-P4/16
   [-1, 9, C3, [512]],
   [-1, 1, Conv, [1024, 3, 2]],  # 7-P5/32
   [-1, 1, SPP, [1024, [5, 9, 13]]],
   [-1, 3, C3, [1024, False]],  # 9
  ]

# YOLOv5 head
head:
  [[-1, 1, Conv, [512, 1, 1]],
   [-1, 1, nn.Upsample, [None, 2, 'nearest']],
   [[-1, 6], 1, Concat, [1]],  # cat backbone P4
   [-1, 3, C3, [512, False]],  # 13

   [-1, 1, Conv, [256, 1, 1]],
   [-1, 1, nn.Upsample, [None, 2, 'nearest']],
   [[-1, 4], 1, Concat, [1]],  # cat backbone P3
   [-1, 3, C3, [256, False]],  # 17 (P3/8-small)

   [-1, 1, Conv, [256, 3, 2]],
   [[-1, 14], 1, Concat, [1]],  # cat head P4
   [-1, 3, C3, [512, False]],  # 20 (P4/16-medium)

   [-1, 1, Conv, [512, 3, 2]],
   [[-1, 10], 1, Concat, [1]],  # cat head P5
   [-1, 3, C3, [1024, False]],  # 23 (P5/32-large)

   [[17, 20, 23], 1, Detect, [nc, anchors]],  # Detect(P3, P4, P5)
  ]
yolov5官方在yolov5s.yaml 定义了yolov5s的网络结构,其中backbone和headdefines each layer of the network
[数据来源,网络深度,网络类型,参数]
以[[-1, 6], 1, Concat, [1]], # cat backbone P4这一行为例:
- 数据来源:Indicates which layer the input to this layer comes from,-1代表上一层,“数字”代表顺序(从0开始).The first in this example
[-1, 6]Represents where the data for this layer comes from上一层和第6层. - 网络深度
- 网络类型:该例中Concat代表该层为Concat层
- 参数:Parameters for creating network objects,In this example, the first4个
[1]代表创建Concat对象时,第一个参数dimension为1,下面时Concat层的定义.
class Concat(nn.Module):
    # Concatenate a list of tensors along dimension
    def __init__(self, dimension=1):
        super(Concat, self).__init__()
        self.d = dimension

    def forward(self, x):
        return torch.cat(x, self.d)
yolov5的前向传播代码
生成网络结构
官方在yolov5/models/yolo.py的mainThe code to generate the network structure is defined in the method.
The code is actually readingyaml文件中的数据,Create the corresponding network object to add tolayers列表中,然后创建一个nn.Sequential对象.
def parse_model(d, ch):  # model_dict, input_channels(3)
    logger.info('\n%3s%18s%3s%10s %-40s%-30s' % ('', 'from', 'n', 'params', 'module', 'arguments'))
    anchors, nc, gd, gw = d['anchors'], d['nc'], d['depth_multiple'], d['width_multiple']
    na = (len(anchors[0]) // 2) if isinstance(anchors, list) else anchors  # number of anchors
    no = na * (nc + 5)  # number of outputs = anchors * (classes + 5)

    layers, save, c2 = [], [], ch[-1]  # layers, savelist, ch out
    for i, (f, n, m, args) in enumerate(d['backbone'] + d['head']):  # from, number, module, args
        m = eval(m) if isinstance(m, str) else m  # eval strings
        for j, a in enumerate(args):
            try:
                args[j] = eval(a) if isinstance(a, str) else a  # eval strings
            except:
                pass

        n = max(round(n * gd), 1) if n > 1 else n  # depth gain
        if m in [Conv, Bottleneck, SPP, DWConv, MixConv2d, Focus, CrossConv, BottleneckCSP, C3]:
            c1, c2 = ch[f], args[0]
            args = [c1, c2, *args[1:]]
            if m in [BottleneckCSP, C3]:
                args.insert(2, n)
                n = 1
        elif m is nn.BatchNorm2d:
            args = [ch[f]]
        elif m is Concat:
            c2 = sum([ch[x if x < 0 else x + 1] for x in f])
        elif m is Detect:
            args.append([ch[x + 1] for x in f])
            if isinstance(args[1], int):  # number of anchors
                args[1] = [list(range(args[1] * 2))] * len(f)
        elif m is Contract:
            c2 = ch[f if f < 0 else f + 1] * args[0] ** 2
        elif m is Expand:
            c2 = ch[f if f < 0 else f + 1] // args[0] ** 2
        else:
            c2 = ch[f if f < 0 else f + 1]

        m_ = nn.Sequential(*[m(*args) for _ in range(n)]) if n > 1 else m(*args)  # module
        t = str(m)[8:-2].replace('__main__.', '')  # module type
        np = sum([x.numel() for x in m_.parameters()])  # number params
        m_.i, m_.f, m_.type, m_.np = i, f, t, np  # attach index, 'from' index, type, number params
        logger.info('%3s%18s%3s%10.0f %-40s%-30s' % (i, f, n, np, t, args))  # print
        save.extend(x % i for x in ([f] if isinstance(f, int) else f) if x != -1)  # append to savelist
        layers.append(m_)
        ch.append(c2)
    return nn.Sequential(*layers), sorted(save)
The most important of which is the following sentence,将我们在yamlThe data sources for each layer defined in the file are saved to that layer对象中.
m_.i, m_.f, m_.type, m_.np = i, f, t, np # attach index, 'from' index, type, number params
前向传播
The key code for forward propagation is in yolov5/models/yolo.py中,Model(nn.Module)类的forward_once方法
Model(nn.Module).forward_once(self, x, profile=False)
    def forward_once(self, x, profile=False):
        y, dt = [], []  # outputs
        for m in self.model:
            if m.f != -1:  # if not from previous layer
                x = y[m.f] if isinstance(m.f, int) else [x if j == -1 else y[j] for j in m.f]  # from earlier layers

            if profile:
                o = thop.profile(m, inputs=(x,), verbose=False)[0] / 1E9 * 2 if thop else 0  # FLOPS
                t = time_synchronized()
                for _ in range(10):
                    _ = m(x)
                dt.append((time_synchronized() - t) * 100)
                print('%10.1f%10.0f%10.1fms %-40s' % (o, m.np, dt[-1], m.type))

            x = m(x)  # run
            y.append(x if m.i in self.save else None)  # save output

        if profile:
            print('%.1fms total' % sum(dt))
        return x
x是输入的数据,yis a list that holds the output results of each layer
each forward pass,The program traversesself.modelEach layer of the network saved in ,in the code below
x = y[m.f] if isinstance(m.f, int) else [x if j == -1 else y[j] for j in m.f] # from earlier layers
If the data source for this layerm.f是-1,就保留x为上一层的输出,否则,就从yTake out the output of the corresponding layer.
之后,After the forward propagation of this layer is done,Just add the output to y中
x = m(x)  # run
y.append(x if m.i in self.save else None)  # save output
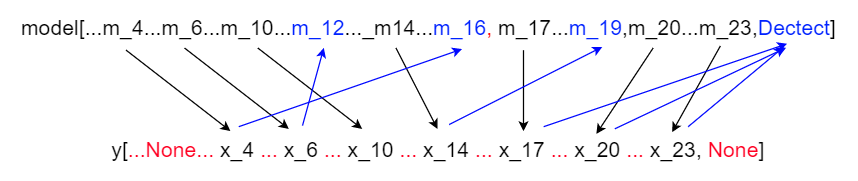
Note that the above is only the layer indexm.i在self.save中时,results will be saved,否则保存None.
综上,yolov5The schematic diagram of the forward propagation process of the official code is as follows:(注意,The input of each layer also includes the output of the previous layer)
边栏推荐
猜你喜欢

Win11没有本地用户和组怎么解决
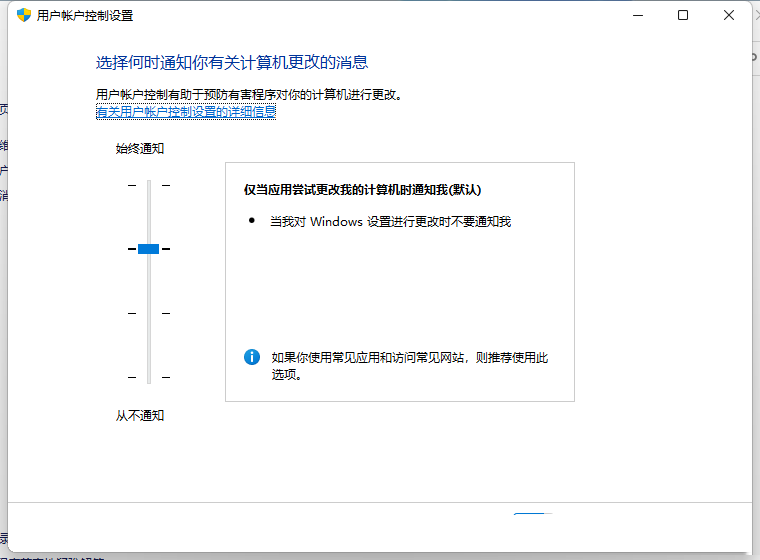
win11一直弹出用户账户控制怎么解决
关于c语言的调试技巧
win10 system update error code 0x80244022 how to do
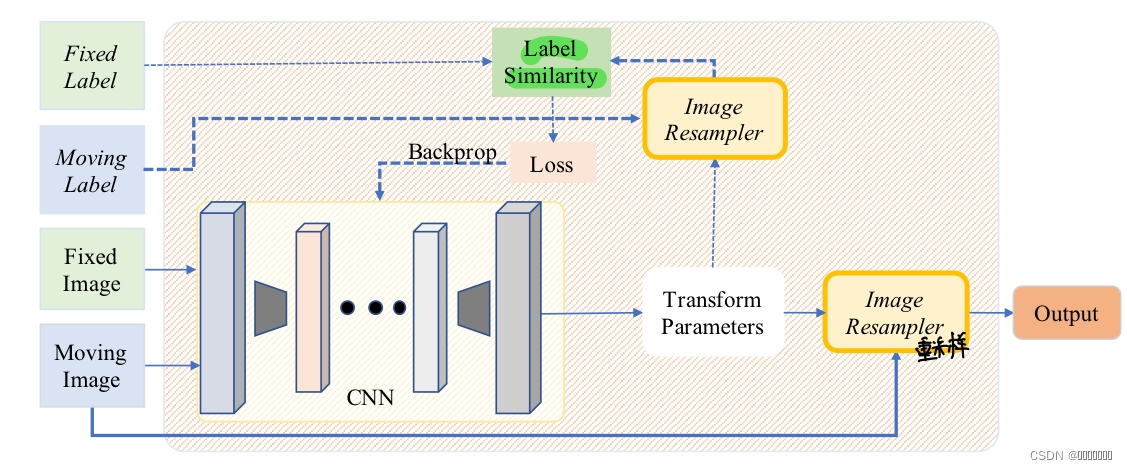
基于深度学习的配准框架
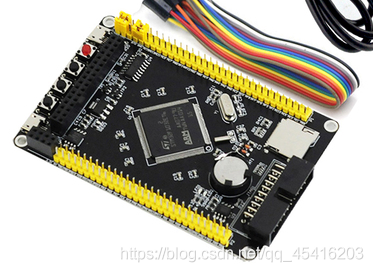
【我的电赛日记(三)】STM32学习笔记与要点总结
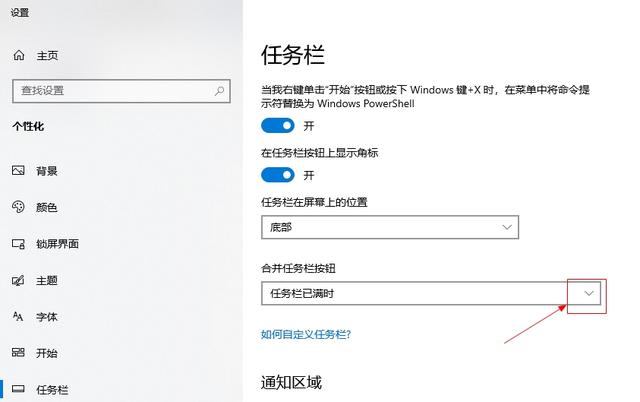
How to set the win10 taskbar does not merge icons

What should I do if Windows 10 cannot connect to the printer?Solutions for not using the printer
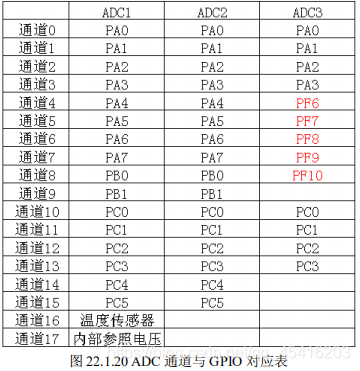
【我的电赛日记(二)】ADF4351锁相环模块
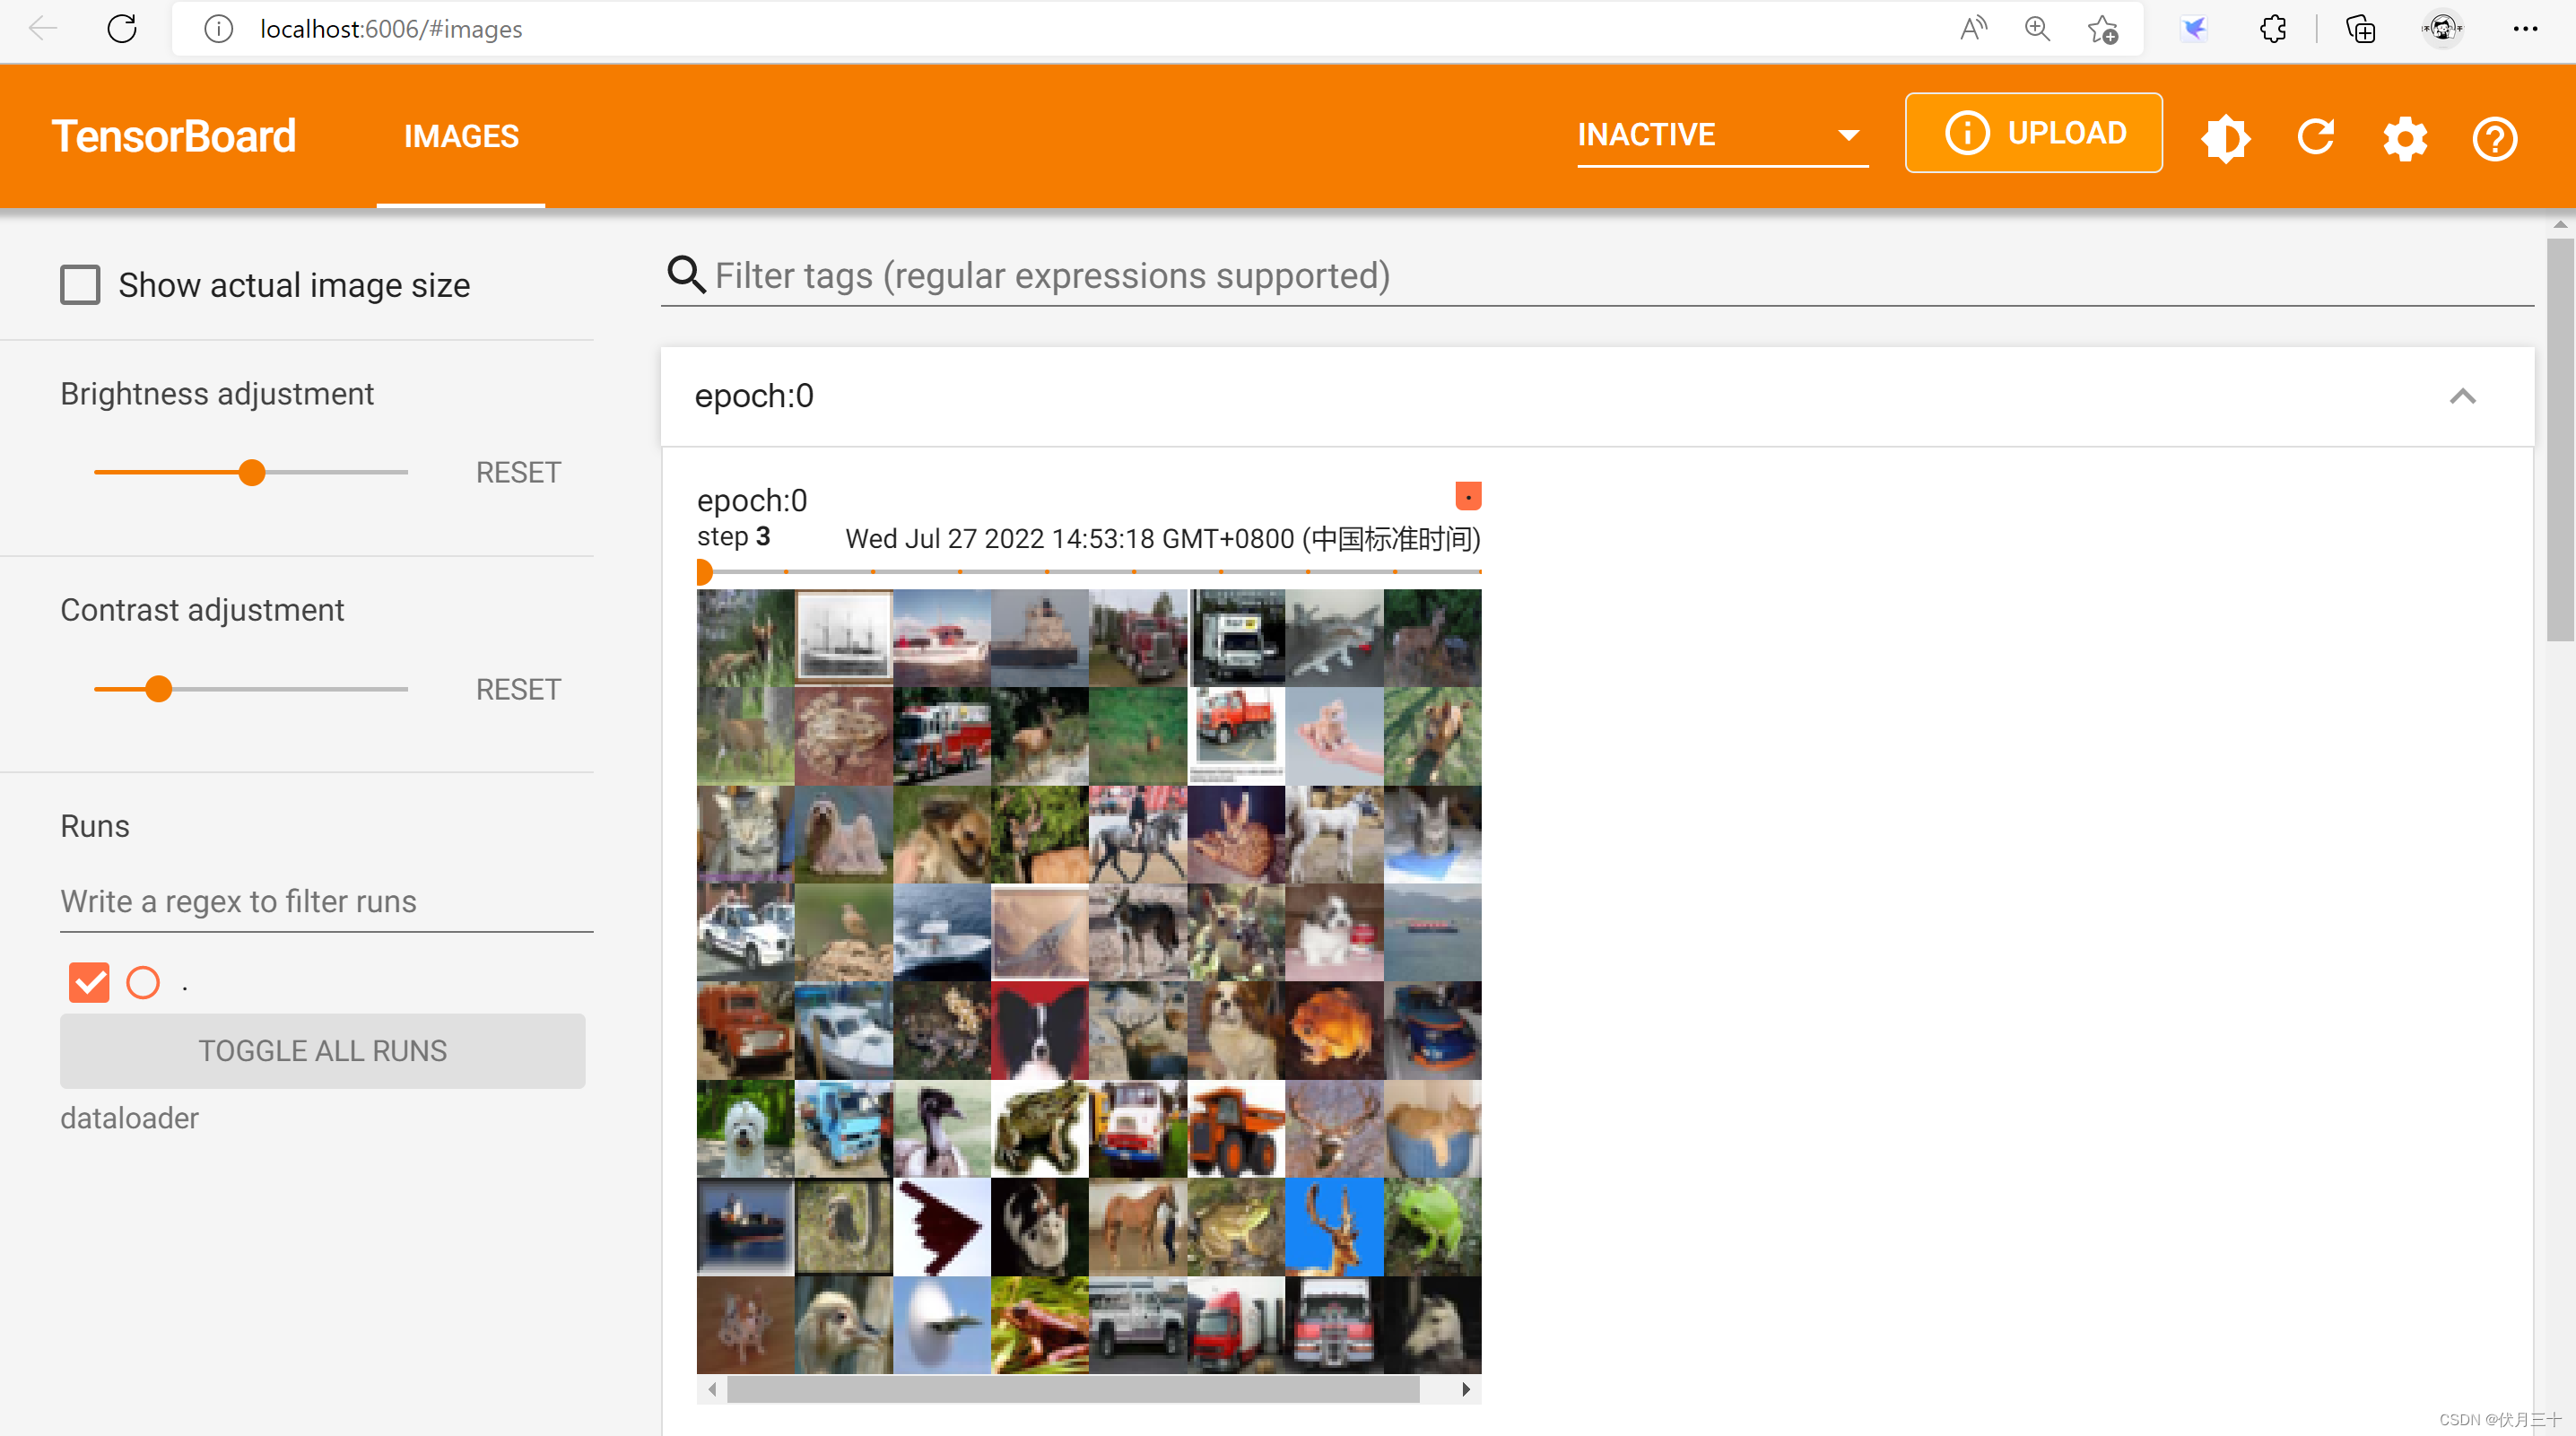
PyTorch④---DataLoader的使用
随机推荐
DP1332E内置c8051的mcu内核NFC刷卡芯片国产兼容NXP
How to update Win11 sound card driver?Win11 sound card driver update method
Win11没有本地用户和组怎么解决
arm ldr系列指令
DP4301无线收发SUB-1G芯片兼容CC1101智能家居
What is Win10 God Mode for?How to enable God Mode in Windows 10?
Win10上帝模式干嘛的?Win10怎么开启上帝模式?
日常-笔记
casbin模型
ECP2459耐压60V降压BUCK电路用于WIFI模块供电方案原理图
PyTorch④---DataLoader的使用
5. Use RecyclerView to elegantly achieve waterfall effect
SQL的通用语法和使用说明(图文)
【我的电赛日记(三)】STM32学习笔记与要点总结
CI24R1小模块2.4G收发模块无线通信低成本兼容si24r1/XN297超低功耗
Tensorflow常用函数
win10无法直接用照片查看器打开图片怎么办
FP7195转模拟恒流调光芯片在机器视觉光源的应用优势
PyTorch⑤---卷积神经网络_卷积层
2021-10-14