当前位置:网站首页>2022-06-30 unity core 8 - model import
2022-06-30 unity core 8 - model import
2022-07-07 08:55:00 【Sugarcane causes bitterness】
List of articles
One 、 Overview of model import
Unity Supports many model formats . such as .fbx /.dae /.3ds /.dxf /.obj wait .
99% Our models are not Unity Made in , They are all made by artists in modeling software , Such as 3DMax、Maya wait .
When they finish making the model , although Unity Many model formats are supported, but the official recommendation is to export the model in the modeling software as FBX Format before using
Use FBX Advantages of model format :
- Reduce unnecessary data , Improve import efficiency
- There is no need to install an authorized copy of the modeling software on each computer
- Yes Unity No version required , Use primitive 3D The model format may cause errors or accidents due to different versions
stay Project Select the imported model in the window , stay Inspector Window for related settings ,4 The tabs are
Model Model tab
Rig manipulation ( bones ) Tab
Animation Animation tab
Materials Material texture tab
Through this 4 After setting the information related to the model action in the tabs , We can better use these model resources in the scene
Two 、Model Model tab
This tab is mainly used to set .
such as :
- Model scale settings
- Whether to import cameras and light sources in the model
- Mesh compression method And so on
- Modify various elements and attributes stored in the model
It will eventually affect Unity Some performances when using models in
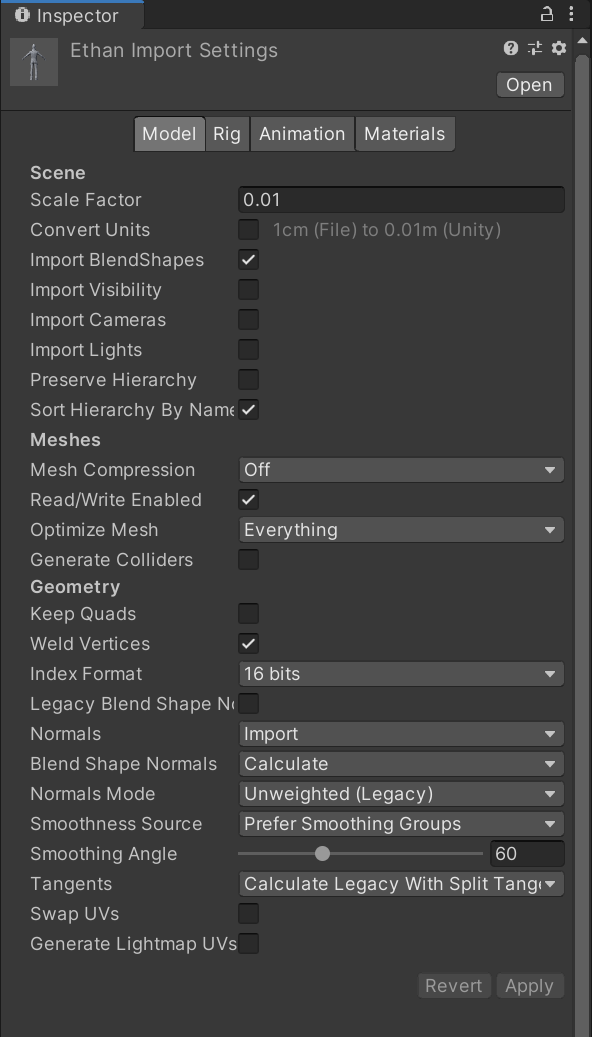
( One )Scene Scenario setting
Scale Factor: Global scale of the model
Unity The physical system wants to play in the game world 1 Meters in the imported model file are 1 A unit of
Convert Units: Convert the model scale defined in the model file to Unity The proportion of
The proportions of different formats are as follows :
.fbx / .max / .jas = 0.01
.3ds = 0.1
.mb / .ma / .lxo / .dxf / .blend / .dae = 1
Import BlendShapes: Whether to allow Unity Import blend shapes with mesh
When importing meshes containing mixed shapes , Will use Skinned MeshRenderer Components
Be careful :
The normal of the imported mixed shape needs to be in FBX There are smoothing groups in the file
If you want to import a mixed shape with normals :
1) Put the Blend Shape Normals Property is set to Import, Will use FBX The normal of the file
2) Put the Blend Shape Normals Property is set to Calculate,Unity The same logic will be used to calculate normals on meshes and blended shapes
Import Visibility: Whether to import visibility , After opening, it can be accessed from FBX Read the visibility attribute in the file
For example, in the model action , There are some actions to hide the model image , It will not take effect until it is opened
some 3D Modeling software does not support or has restrictions on visibility attributes , such as Maya and Blender
Generally, you can not check
Import Camera: Whether to import camera
Whether to put FBX The camera in the file is also imported , however Unity Only support FBX Some properties of the camera in .
such as : orthogonal / perspective 、 Animation 、 physical property 、 Near and far cutting surface, etc
Import Lights: Whether to import light source
Supported light source types : Global light 、 Spotlights 、 Directional light 、 Surface light source
Supported lighting properties : Range 、 Color 、 Strength 、 angle
Generally not used
Preserve Hierarchy: Always create a display preform root
Usually when importing ,FBX Empty root nodes in the model will be optimized and removed
But if more than one FBX The file contains empty root objects at the same level , You can check it to keep them
The main role : For example, there are two files 1、2, The file 1 Contains bones and meshes , file 2 Only bone animation . If you import a file without enabling this attribute 2,Unity The root node will be split , It will make the levels mismatch , Make the animation can't play normally
Sort Hierarchy By Name: Sort sub objects by name in the hierarchy window
If not enabled , Will retain FBX The hierarchical order defined in the document
( Two )Meshes Grid settings
Mesh Compression: Grid compression , Set the compression ratio and reduce the file size of the grid
Increasing the compression ratio will reduce the accuracy of the mesh , Adjusting this parameter can optimize the size of the game package
- Off: No compression
- Low: Low compression ratio
- Medium: Medium compression ratio
- High: High compression ratio
Read / Write Enabled: Whether to enable reading and writing grid information
If open ,Unity Transmit grid data to GPU after , stay CPU Addressable memory is also reserved in , It means that we can access grid data through code for processing .
If you don't turn it on ,Unity Transmit grid data to GPU after , Will CPU Addressable in memory grid data deletion , We can no longer get grid data
On , Will increase the memory consumption ; closed , It can save memory usage at runtime
The following situations can be considered to open :
- You need to read or write grid data in your code
- Need to merge the grid at runtime
- You need to use a mesh collider
- Need to be used at runtime NavMesh Build components to bake NavMesh
Optimize Mesh: Determine the order in which triangles are listed in the mesh to improve GPU performance
- Nothing: No optimization
- Everything: Reorder vertex and polygon vertex indexes
- Polygon Order: Reorder polygons only
- Vertex Order: Reorder vertices only
Generate Colliders: Generate collider
When enabled, the mesh collider will be automatically attached to import your mesh
It is recommended that environment geometry that is not moved can be turned on , However, it is recommended not to turn on the geometry that needs to be moved
( 3、 ... and )Geometry Set up
Keep Quads: Keep quadrilateral
When enabled ,Unity Will not 4 Polygons with vertices are converted into triangles
You may need to enable this option when using surface subdivision shaders , Because quadrilateral surface peripheral color paint is more efficient than polygon
Unity You can import any type of polygon ( Triangle to N Edge shape ). Polygons with more than four vertices will always be converted to triangles , Regardless of this setting .
If a mesh has quadrangles and triangles ( Or convert to triangle N Edge shape ), that Unity Two sub meshes will be created to separate quadrangles and triangles . Each sub mesh either contains only triangles , Or it only contains quadrilateral .
Weld Vertices: Merge vertices that share the same position in space , The premise is that these vertices generally share the same attributes (UV, normal , Tangents, etc )
When on, it is equivalent to optimizing the vertex count of the mesh by reducing the total number of meshes
Usually open , Unless you want to keep these repeated vertices intentionally , Then I want to get them through code for processing
Index Format: The size of the grid index buffer
We usually choose 16 bits,Auto Will default to 16 bits.
Use only when necessary 32 bits,16 bits Both universal and memory saving
Legacy Blend Shape Normals: After enabling, it will be based on Smoothing Angle Value to calculate the normal
Normals: Define how to calculate normals
- Import: Import normals from a file , If the file does not contain discovery information , Will use Calculate Mode calculates normals
- Calculate: according to Normals Mode、Smoothness Source and Smoothing Angle Property to calculate normals
- None: Do not calculate normals
Blend Shape Normals: Define how to calculate normals for mixed shapes
Only when Legacy Blend Shape Normals Appears when disabled
Normals Mode: Calculate the mode of normals , Only when the top Normals Set to Import or Calculate Will appear
- Unweighted Legacy:2017.1 How to calculate normals before version , If it is all imported before this version FBX Model , The default setting is this mode
- Unweighted: Normals are not weighted
- Area Weighted: The normal is weighted according to the surface area
- Angle Weighted: Normals are weighted according to the vertex angle on each surface
- Area And Angle Weighted: The normals are weighted according to the surface area and vertex angle on each surface , This is the default option
Smoothness Source: How to determine smoothness , Which edges should be smooth , What should be rough
Only when Legacy Blend Shape Normals Appears when disabled
- Prefer Smoothing Groups: Use smoothing groups in model files whenever possible
- From Smoothing Groups: Use only smoothing groups in the model file
- From Angle: Use Smoothing Angle Value to determine which edges should be smooth
- None: Do not split any vertices of hard edges
Smoothing Angle: Controls whether vertices are split for hard edges
Usually , The bigger the value is. , The fewer vertices produced
Only when the Normals Set to Calculate Only when
Be careful : This setting is only used for very smooth or very complex models , otherwise , Best in 3D Manually smooth in the modeling software and then import , It is always recommended to do it when modeling , More accurate
Tangents: Define how to import or calculate vertex tangents
Only when the Normals Set to Calculate or Import when , This property is available
- Import: If Normals Set to Import, From FBX Import vertex tangents in file , If the mesh has no tangents , Then normal map shaders cannot be used
- Calculate Legacy: Use the old algorithm to calculate the tangent
- Calculate Legacy With Split Tangents: Use the old algorithm to calculate the tangent , And in UV Split on the chart . If the seam on the mesh breaks the normal map illumination , Please use this property
- Calculate Mikktspace: Calculate tangents using mickett space
- None: Do not import vertex tangents , Mesh has no tangents , Normal map shaders cannot be used
Swap UVs: Swap in the grid UV passageway
If the diffuse texture uses UV, Please use this option
Generate Lightmap UVs: Create a second for the lightmap UV passageway
3、 ... and 、Rig Model tab
This tab is mainly used to set how to map bones to meshes in the imported model , So that it can be animated
For human character models , Need to allocate or create Avatar( Avatar information )
For non human character models , You need to determine the root bone in the bone
Simply speaking Rig The tab is mainly used to set information about bones and avatar system , Set them , Animation can be played normally
( One ) Panel parameters
Animation Type: Animation type .Unity Models are divided into the following four categories according to animation
None: There is no animation , It is mainly used for some environmental static models
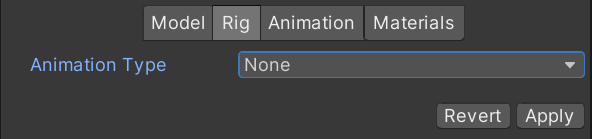
Humanoid: Human model
In general , Have head and limbs ( One head, two legs, two hands ) In human form
Human models need to use Avatar Avatar system , Bind the mapping relationship of human main joints
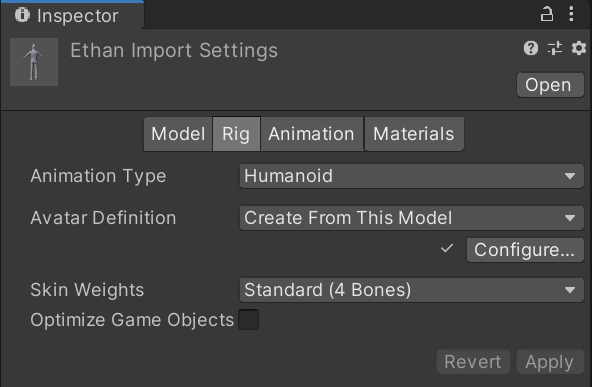
Avatar Definition: Select get Avatar Defined location
- No Avatar: No avatar system information
- Create From This Model: Based on this model Avatar Avatar information
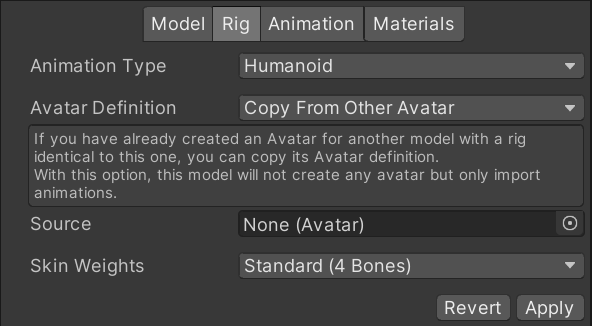
- Copy from Other Avatar: Point to... Set on another model Avatar Avatar information
Source: Copy another with the same skeleton Avatar Avatar information to import its animation clips
Use Copy From Other Avatar Only when
Configure…: open Avatar Avatar configuration
Use Create From This Model Only when
Skin Weights: Set the maximum number of bones that affect a single vertex
- Standard(4 Bones): Most used 4 Bones to make an impact . The default value is , In consideration of performance , This setting is recommended
- Custom: Set the maximum number of customized bones , After selection, the following two options will appear
- Max Bones / Vertex: Define the maximum number of bones per vertex , The higher the value, the greater the performance consumption
- Max Bone Weight: Set the lowest threshold considering bone weight , Contents smaller than this value will be ignored in weight calculation
Optimize Game Objects: stay Avatar Avatar system and Animator Delete and store the game object bone level information of the imported character in the animation component .
If enabled, the following Extra Transforms to Expose Options . The role will use Unity The internal skeleton of the animation system , It can improve the performance of animated characters
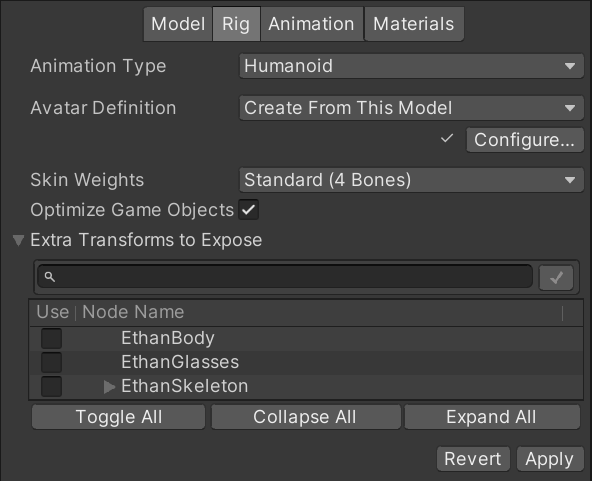
Extra Transforms to Expose: The bone level to be exposed , Checking below will reveal the bone level information
Magnifier : Search the corresponding bone information by name
Toggle All: Select all or invert
Collapse All: All folding
Expand All: Expand all
Generic: Generic model , Non human model
Not a standard humanoid model , It can be any shape , There may be 8 One leg, two first-class
This model mainly needs to set the bone root node
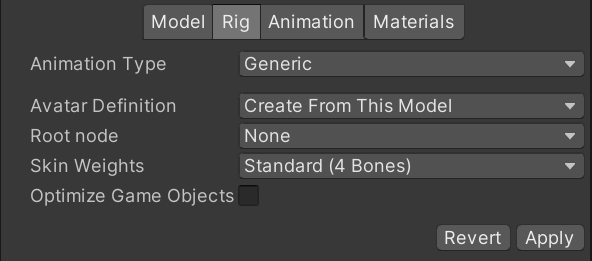
- Root Node: Select for this Avatar The bone of the root node of , Only if Create From This Model Will appear
Legacy: Old animation types
And Unity3.x And earlier versions import and use animation , Generally not used
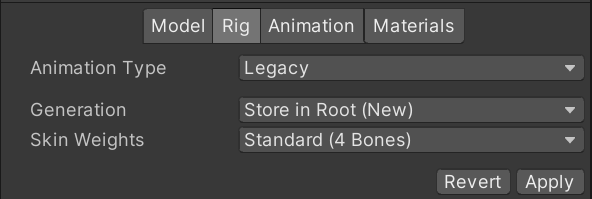
- Generation: Animation import method
- Dont Import: Don't import animation
- The first 2 ~ 4 Options : Has been disabled , Do not use
- Store in Root(New): Import animation and store it in the root node of the model
- Generation: Animation import method
( Two )Avatar Avatar system
To understand the avatar system, we must first know what bone animation is
3D The essence of animation , It's also bone animation . It is the production process of model animation to animate the made model binding bones
The understanding of image : For people , The overall structure of people is consistent , Theoretically speaking, we can imitate the actions that another person can do
And the essence of the avatar system , Is the imitation of action ( Reuse ). We can reuse a standard humanoid action to other humanoid models through the avatar system , As long as their joint point correspondence is consistent
The next step is to learn how to set the corresponding relationship between the joints of the human model in the avatar system
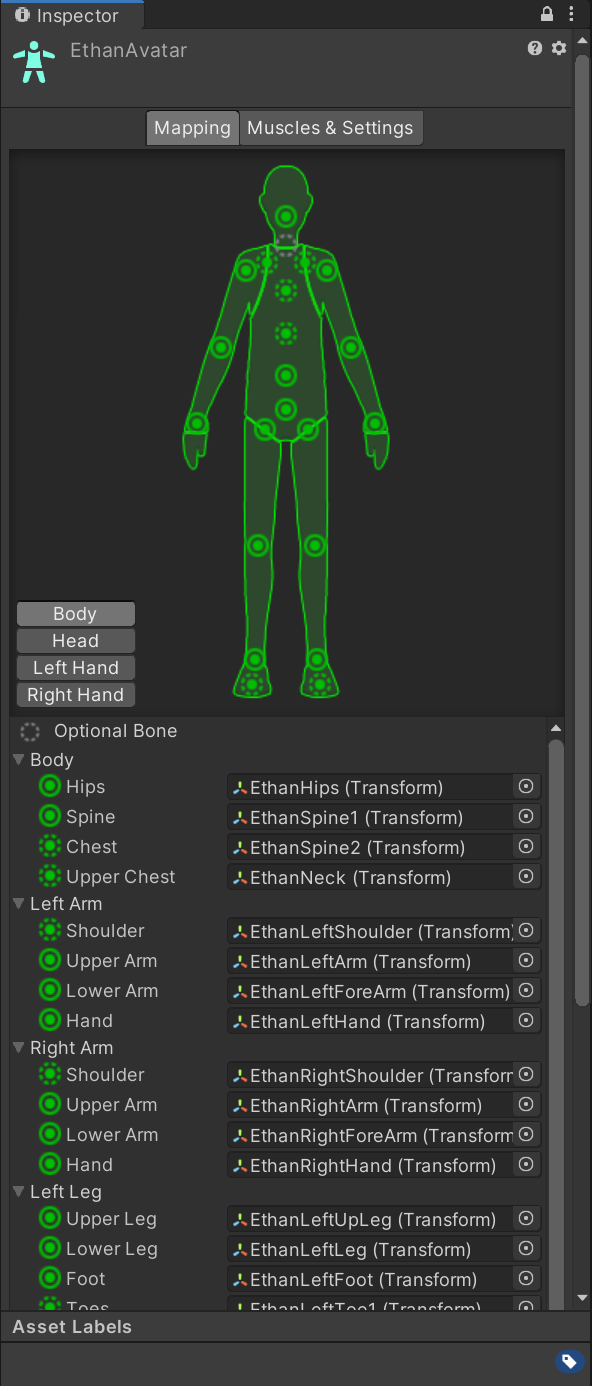
Mapping: Joint mapping information settings
We need to set the mapping of model joints in this tab , Because character animation is nothing more than changing the angle of these joints
Joint mapping information settings
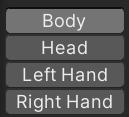
- Body: Body joints
- Head: Head joints
- Left Hand: Left hand joint
- Right Hand: Right hand joint
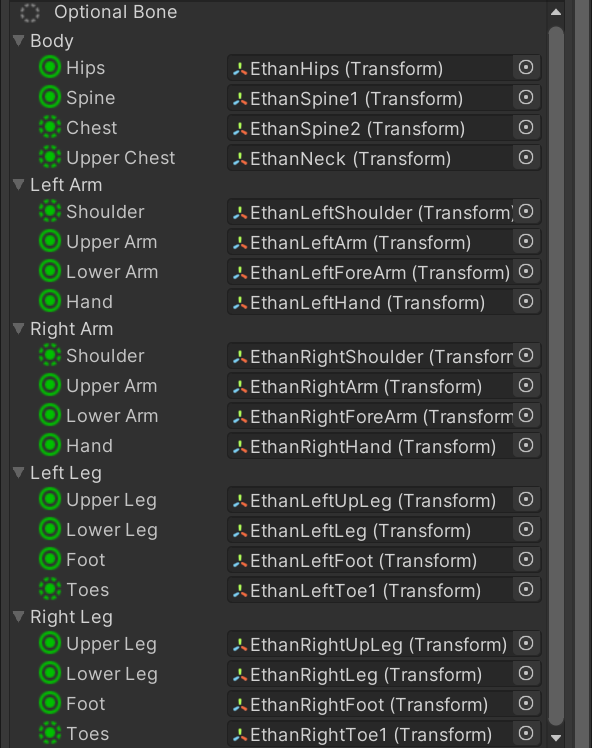
Joint point mapping relationship
Mapping: Mapping file Settings
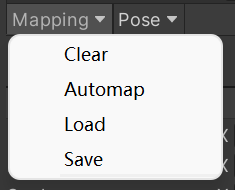
- Clear: Empty the mapping
- AutoMap: Automatic mapping
- Load: Read from file
- Save: Save mapping information
Pose: Pose the model
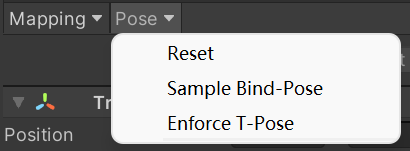
- Reset: Reset posture
- Sample Bind-Pose: Binding pose example
- Enforce T-Pose: mandatory T posture , It is recommended to use
Muscles&Settings: Muscles and settings
Muscle Group Preview: Muscle group preview
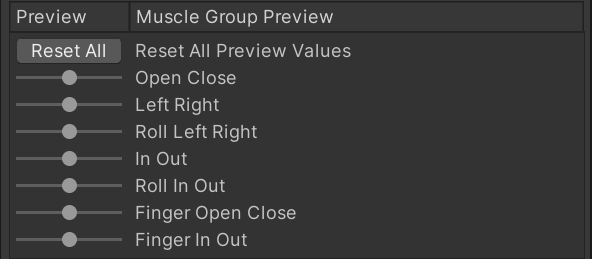
You can preview the rotation changes in different poses here , It is used to observe whether the previous association mapping relationship is reasonable
It mainly serves as a preview
Per-Muscle Settings: Muscle setting
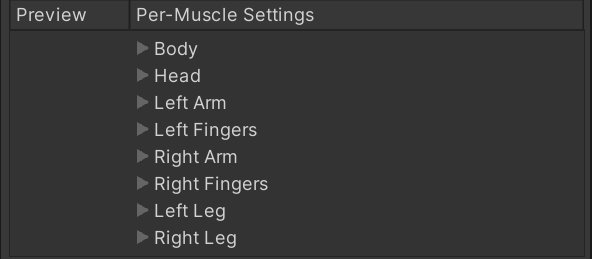
Used to set the range limit of each bone when rotating , Because if you don't set restrictions , It will be very strange at some extreme angles
We can set the limit range separately here
Additional Settings: Advanced settings

You can set the torsion and extension values of hands and feet , Generally, they will not be modified
among Translation DoF More important
If enabled , The moving animation of the humanoid character will be enabled
If you disable ,Unity Animate bones using rotation only
But when enabled , Will increase performance consumption , Because animation requires additional steps to redirect the human animation , Unless the animation contains animated movement of some bones of the character
Generally, disable it
Muscles: Reset all settings

Four 、Animation Animation tab
When we select a model that contains animation clips , This tab will display contents related to animation settings
The animation clip is Unity The smallest element of animation , Represents a single action
When art students export animation, it is recommended to export the model and animation files separately
Export models that contain grid information but not action information
Export actions that do not contain grid information and action information ( Model ) file
Animation The animation tab is divided into 4 Most of the :
- Basic information settings
- Basic settings of animation clip attributes
- Animation clip properties other settings
- Preview window
( One ) Basic information settings
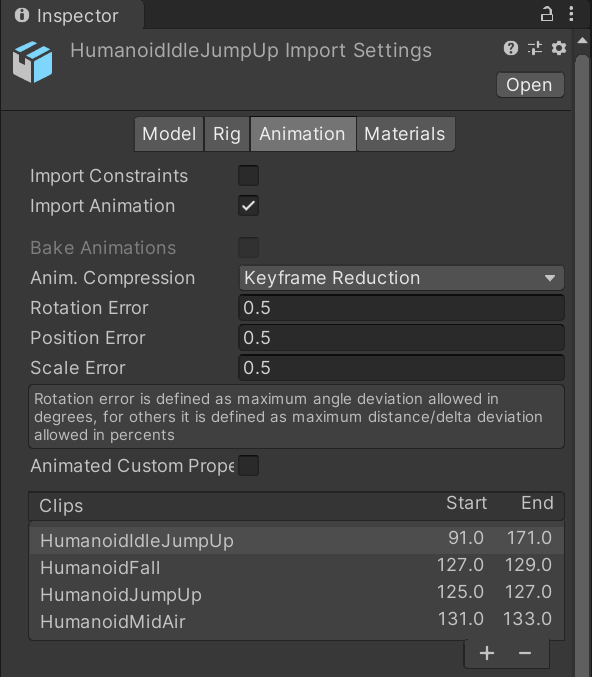
Import Constraints: Import constraints from this resource
When enabled ,Unity The corresponding constraint component will be automatically added to associate it with the correct game object
Import Animation: Import animation from this asset
If you disable , None of the following , And no animation will be imported
Anim. Compression: The compression type used when importing animation
- Off: Disable animation compression , At the time of import Unity It will not reduce the number of keyframes , The effect is the best and the performance is low , Larger files , The memory consumption at runtime is also large . It is generally not recommended to use
- Keyframe Reduction: Reduce redundant keyframes , Only applicable to Generic General animation type
- Keyframe Reduction and Compression: Compress keys when reducing keys and storing animation in a file , Affects file size , But memory size and Keyframe Reduction identical , Only applicable to Legacy Old animation types
- Optimal: Give Way Unity Decide how to compress , Only for Generic General and Humanoid Humanoid animation type
Rotation Error: Set the rotation curve compression tolerance ( percentage ), The minimum angle between the original rotation value and the reduced value
Position Error: Set the position curve compression tolerance ( percentage )
Scale Error: Set the scaling curve compression tolerance ( percentage )
If the difference between the original value and the subtracted value is less than the original value multiplied by the tolerance percentage , Key frames will be deleted
These contents are only in Keyframe Reduction or Optimal Available when compressed
Animated Custom Properties: Import any that you specify as custom user attributes FBX attribute
Clips: Animation clip selection list
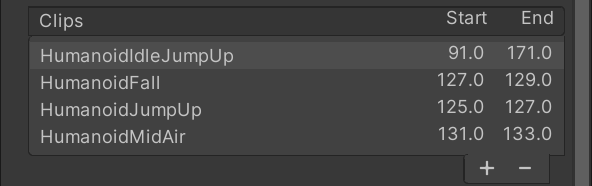
Here we can see all the animation clips , Can pass + or - To add clips or delete selected clips
Select an animation clip here , We can edit specific related attribute information below
( Two ) Basic settings of animation clip attributes
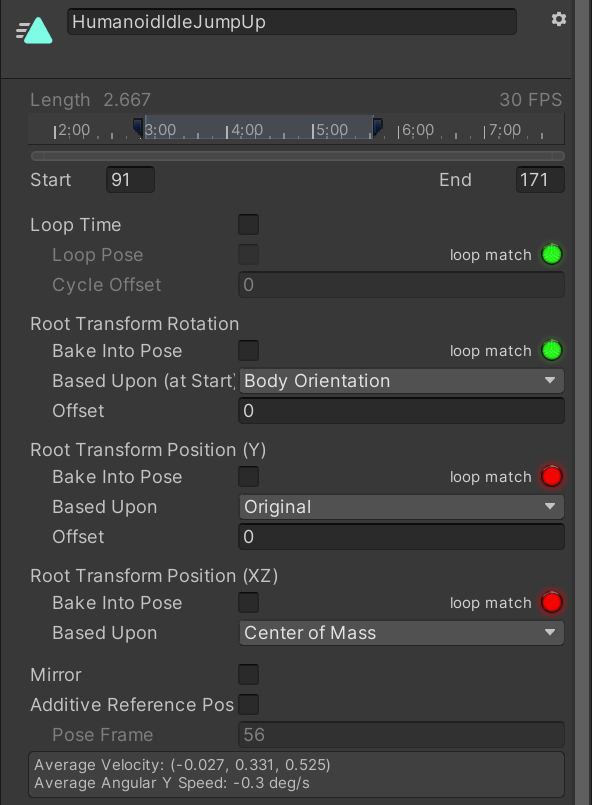
Loop Time: Whether to cycle when playing animation clips , Start over at the end
- Loop Pose: Seamless circular motion
- Loop Match: Loop match , If it can match circularly, it will display green , Otherwise it's red
- Cycle Offset: Cycle offset at the beginning of the animation at other times
Root Transform Rotation: The angle of the root position is related
- Bake Into Pose: Bake the root rotation until the bone moves , Disabling this option will store as root motion
- Based Upon: The foundation of root rotation
- Original: Keep the original rotation in the source file
- Root Node Rotation: Use the rotation of the root node ( Only for Generic General animation type )
- Body Orientation: Keep your upper body forward ( Only applicable to Humanoid Humanoid animation type )
- Offset: Root rotation offset ( Company : degree )
Root Transform Position(Y): Root vertical position (Y Axis direction )
- Bake Into Pose: Bake the vertical root motion to the bone movement . Disabling this option will store as root motion
- Based Upon(at Start): The foundation of the root position in the vertical direction
- Original: Keep the vertical position in the source file
- Root Node Position: Use vertical root position ( Only for Generic General animation type )
- Center Of Mass: Keep the centroid and root position aligned ( Only for Humanoid Humanoid animation type )
- Feet: Keep your feet aligned with the root shift ( Only for Humanoid Humanoid animation type )
- Offset: Vertical root offset
Root Transform Position(XZ): Root horizontal position (XZ Plane )
- Bake Into Pose: Bake horizontal root motion to bone movement . Disabling this option will store as root motion
- Based Upon: Foundation of horizontal root position
- Original: Keep the horizontal position in the source file
- Root Node Position: Use horizontal root position ( Only for Generic General animation type )
- Center Of Mass: Keep it aligned with the root position ( Only for Humanoid Humanoid animation type )
Mirror: Mirror left and right in this clip ( only Humanoid Only human animation types are displayed )
Additive Reference Pose: When on, you can set the frame of the basic reference pose of the additional animation layer . You can see the blue mark in the timeline
Attach animation layers : In the animation controller ( State machine ) You can add new animation layers
- Pose Frame: When the reference pose frame is enabled , This item is the specific frame selected
( 3、 ... and ) Animation clip properties other settings
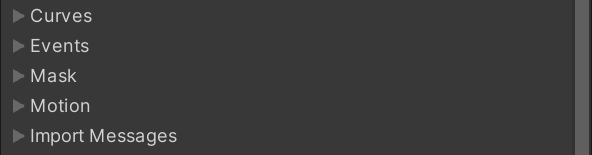
Curves: Curve settings
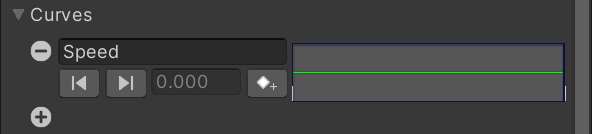
The curve can match Animator As a parameter , By adding curve values, you can use it to mark important points
You can change the name of the curve , The name is similar to the parameter name , Add or delete curve information by adding or subtracting
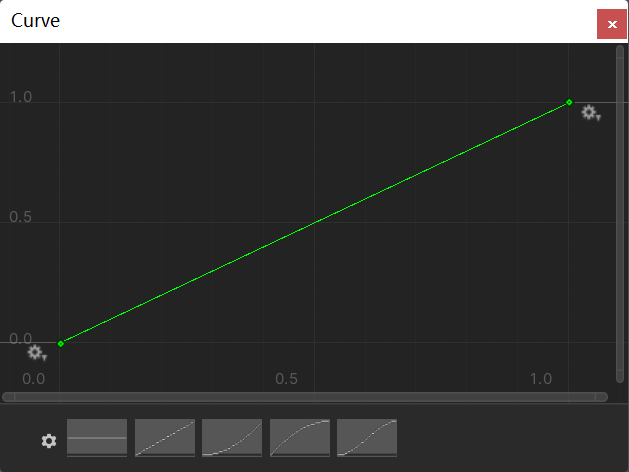
The value in the curve X The axis represents the standardization time (0 ~ 1) Represents the beginning and end of the animation ,Y The value of the axis can be set according to your needs , You can also use the preset curve provided below
Events: Animation Events

similar Animation Animation events in the window , You can add an event to the animation clip here , When the animation is played to the event, it will automatically find the function with the same name in the object script
It is very common when we want to do logical processing at a certain time in animation , For example, make injury judgment at a certain moment
Mask: Animation masks
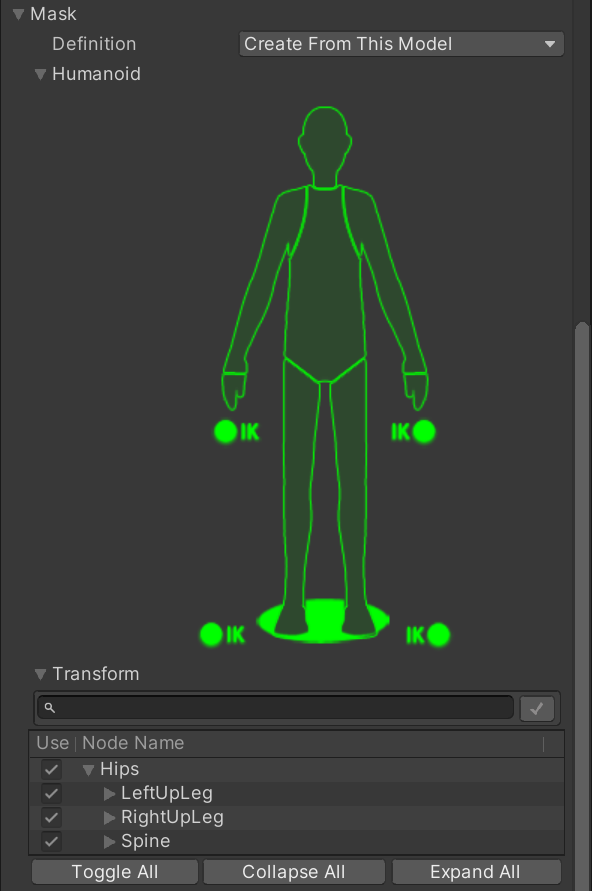
The main function is when playing the animation , You can specify which parts or bones are excluded from the action
Humanoid( Quick setting of human animation )
We can control the head respectively 、 Left and right arms 、 Left and right hands 、 Left and right legs 、 Root, etc . Click on them to turn them red , It means that the action does not affect the part
Transform( Specify which bone joint points are not affected )
Motion: Action settings

When the imported animation clip contains root motion , We can manually set specific bone joint points here as our root motion nodes , All you see after expansion are bone joint nodes
Import Messages: Model import information
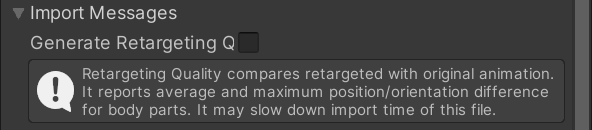
When we have problems importing animation , When you see the yellow warning symbol , You can take Generate Retargeting Quality Report Choose
Unity It will help us generate more specific information about redirection , We can see some specific problems
Enabled only when you see that the warning animation is incorrect , Can help us troubleshoot problems
( Four ) Preview window
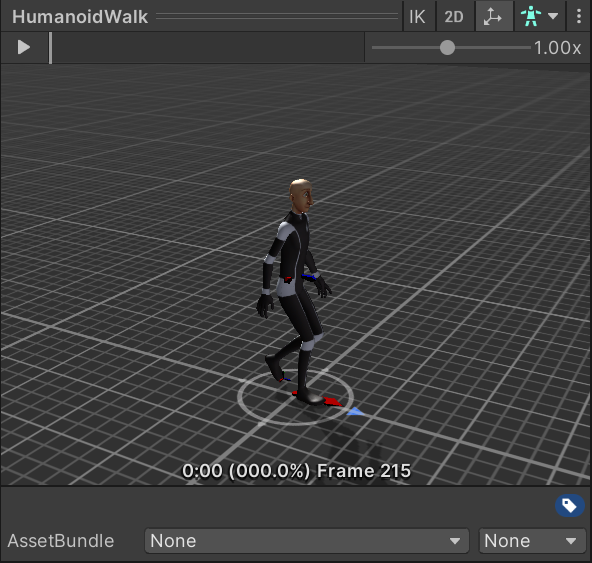
IK: Whether to open the preview of foot anti dynamics
2D Mode preview
Coordinate arrow : Whether to display the pivot and centroid auxiliary icons
humanoid : Switch the game object of preview operation , As long as its corresponding Avatar If you meet the requirements, you can play the animation
AssetBundle:AB Package settings , After that, I will explain
5、 ... and 、Materials Material texture tab
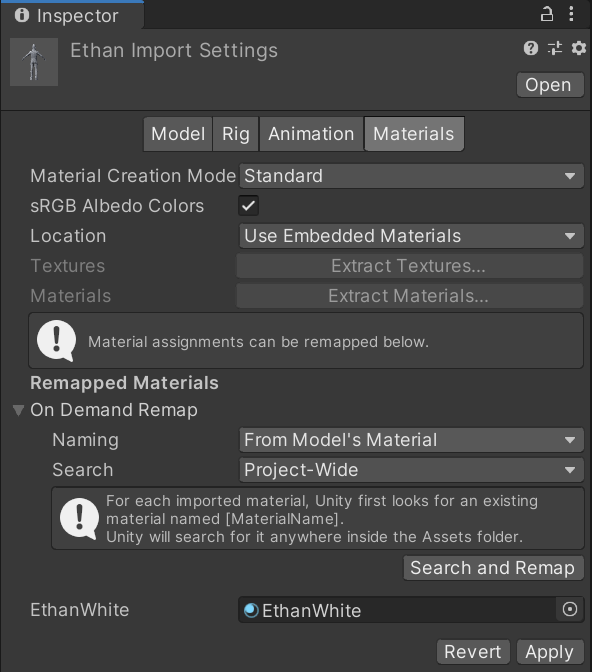
Material Creation Mode: Define hope Unity How to generate or import materials for a model
None: Do not use any materials embedded in this model , change to the use of sth. Unity The default diffuse material
Standard: Import time ,Unity Use default rules to generate materials . This item is generally used
Import via MaterialDescription(Experimental): Import time ,Unity Use FBX The material description embedded in the file is used to generate the material .
And Standard comparison , The result of this method is more accurate , And support a wider range of material types ,
sRGB Albedo Colors: Whether to use reflectance color in gamma space
For projects that use linear color controls , Disable this option
If the above option is Import via MaterialDescription(Experimental), This property is not availableLocation: Define how to access materials and textures
- Use Embedded Materials: Keep the imported material in the imported asset
- Use External Materials(Legacy): Extract imported materials as external assets . Old material treatment , Apply to 2017.1 Or earlier Unity Version created projects
Extract Textures / Materials: When choosing Use Embedded Materials What will appear later . These two buttons can extract all materials and textures embedded in the imported assets
If there are no sub resources to extract , These two buttons are grayed out 、
Naming: Define the naming rules of materials
- By Base Texture Name: Use the diffuse texture name of the imported material to name the material . If the diffuse texture is not assigned to the material ,Unity The name of the imported material will be used
- From Model’s Material: Use the name of the imported material to name the material
- Model Name + Model’s Material: Name the material by combining the name of the model file with the name of the imported material
Search: Define location rules for finding existing materials
- Local Materials Folder: In the local Materials Material subfolder ( The location of the model file is the same as — Folder ) Find existing materials in
- Recursive-Up: In all parent folders ( All the way up to Assets Folder ) All in Materials Find existing materials in subfolders
- Project-Wide: In all Unity Find an existing material in the project folder
EthanWhite: Remapped material
If you find it ,Unity Will automatically associate ; otherwise , We can associate manually
边栏推荐
- Data analysis methodology and previous experience summary 2 [notes dry goods]
- go mod module declares its path as: gtihub. com/xxx-xx but was required as:xx-xx
- Un salaire annuel de 50 W Ali P8 vous montrera comment passer du test
- 个人力扣题目分类记录
- Enterprise manager cannot connect to the database instance
- Greenplum 6.x common statements
- Required String parameter ‘XXX‘ is not present
- Simple use of Xray
- [Yugong series] February 2022 U3D full stack class 006 unity toolbar
- 模拟卷Leetcode【普通】1609. 奇偶树
猜你喜欢
![[Yugong series] February 2022 U3D full stack class 005 unity engine view](/img/19/dc1b2f74b9ec5f5808de3049793862.jpg)
[Yugong series] February 2022 U3D full stack class 005 unity engine view
![[step on the pit] Nacos registration has been connected to localhost:8848, no available server](/img/ee/ab4d62745929acec2f5ba57155b3fa.png)
[step on the pit] Nacos registration has been connected to localhost:8848, no available server
Why choose cloud native database

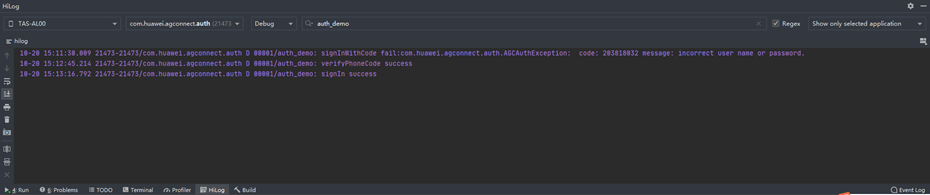
Calling the creation engine interface of Huawei game multimedia service returns error code 1002, error message: the params is error
leetcode135. Distribute candy
Appeler l'interface du moteur de création du service multimédia de jeu Huawei renvoie le Code d'erreur 1002, le message d'erreur: les paramètres sont l'erreur
Rapid integration of authentication services - harmonyos platform
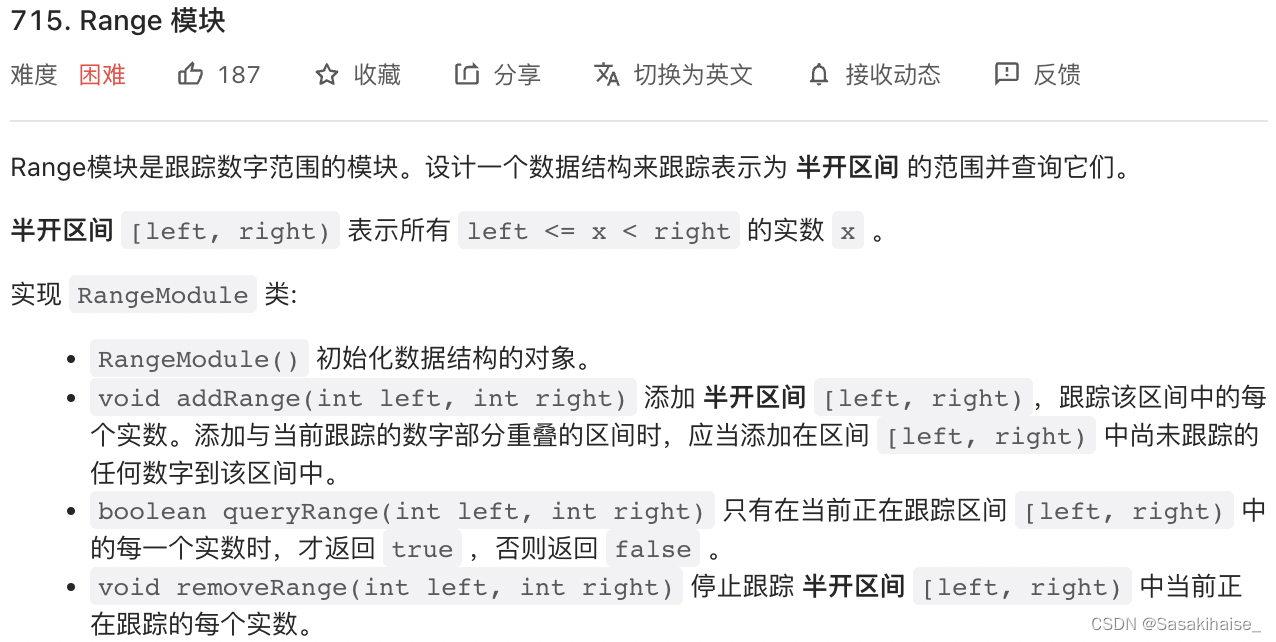
LeetCode 715. Range 模块
調用華為遊戲多媒體服務的創建引擎接口返回錯誤碼1002,錯誤信息:the params is error
leetcode134. gas station
随机推荐
Markdown编辑器Editor.md插件的使用
How to integrate app linking services in harmonyos applications
Unity Shader入门精要初级篇(一)-- 基础光照笔记
Several methods of calculating the average value of two numbers
RuntimeError: Calculated padded input size per channel: (1 x 1). Kernel size: (5 x 5). Kernel size c
idea里使用module项目的一个bug
Upload an e-office V9 arbitrary file [vulnerability recurrence practice]
Three series of BOM elements
What are the advantages of commas in conditional statements- What is the advantage of commas in a conditional statement?
指针进阶,字符串函数
Find the original code, inverse code and complement of signed numbers [C language]
Gson转换实体类为json时报declares multiple JSON fields named
With an annual salary of 50W, Alibaba P8 will come out in person to teach you how to advance from testing
About using CDN based on Kangle and EP panel
IP地址的类别
Markdown editor Use of MD plug-in
Skills that testers must know: Selenium's three waiting ways are interpreted clearly
Greenplum 6.x build_ install
cmake命令行使用
ncs成都新电面试经验