当前位置:网站首页>Rapid integration of authentication services - harmonyos platform
Rapid integration of authentication services - harmonyos platform
2022-07-07 08:35:00 【Huawei Developer Forum】
We can integrate authentication services in applications SDK To easily and quickly launch registration to users 、 Login and other related functions . Here's how to use HarmonyOS Platform integration AGC Certification services .
Integrated content
adopt harmony sdk Plug in integration AGC The validation service , stay AGC Start the authentication service on , And add two ways of mobile phone verification and email verification , At the same time, end-to-side integration SDK Called by AGC Send verification code to mobile phone or email , Enter the verification code and password to complete user registration .
Integration preparation
- install DevEco Studio development tool , And be familiar with Harmony Application development process .
- AGC Create projects and open services .
a) stay AGC establish Harmony Apply and open the verification service .


Enable mobile phone and email authentication

3、DevEco Studio Created in Harmony engineering
a) open IDE Tools , choice File-New-New project, choice Java After the language compiles the template , Click on Next Enter the create project configuration interface .

Pay attention to the application (Application), Package name and AGC The application package name created is the same .

b) take agconnect-services.json Copy the file to the project's entry Module directory

c) To configure Maven Warehouse address and AGC Plug-in address .
open harmony Project level build.gradle file .
stay allprojects ->repositories It's equipped with maven Warehouse address .
stay buildscript->repositories Middle configuration maven Warehouse address .
stay buildscript->dependencies Middle configuration AppGallery Connect Plug-in address .
The test environment needs to configure the internal private warehouse address , Formal environment requires configuration of external formal warehouse .
buildscript { repositories { maven { url 'https://repo.huaweicloud.com/repository/maven/' } maven { url 'https://developer.huawei.com/repo/' } maven { url 'http://language.cloudartifact.dgg.dragon.tools.huawei.com/artifactory/product_maven' } maven { url 'http://szg1.artifactory.inhuawei.com/artifactory/sz-maven-public/' } jcenter() } dependencies { classpath 'com.huawei.ohos:hap:2.4.4.2' classpath 'com.huawei.ohos:decctest:1.2.4.0' classpath 'com.huawei.agconnect:agcp-harmony:1.2.0.200' }}allprojects { repositories { maven { url 'https://repo.huaweicloud.com/repository/maven/' } maven { url 'https://developer.huawei.com/repo/' } maven { url 'http://language.cloudartifact.dgg.dragon.tools.huawei.com/artifactory/product_maven' } maven { url 'http://szg1.artifactory.inhuawei.com/artifactory/sz-maven-public/' } jcenter() }}d) Add compilation dependencies and integrations SDK.
open harmony Project application level (entry) Of build.gradle file , Add plug-in address .
apply plugin: 'com.huawei.ohos.hap'apply plugin: 'com.huawei.ohos.decctest'apply plugin: 'com.huawei.agconnect'stay “dependencies” Add... To agconnect-core Compilation dependencies and crash SDK.
dependencies { implementation fileTree(dir: 'libs', include: ['*.jar', '*.har']) implementation 'com.huawei.agconnect:agconnect-auth-harmony:1.2.0.1-snapshot' implementation 'com.huawei.agconnect:agconnect-tasks-harmony:1.2.0.1-snapshot'}e)entry (hap) Add configuration information to the module
enrty Modular config.json Of documents module/abilities in , Add the following configuration , Pay attention to the replacement of package name .
{ "permissions": [ "com.huawei.agconnect.core.DataAbilityShellProvider.PROVIDER" ], "name": "com.huawei.agconnect.core.provider.AGConnectInitializeAbility", "type": "data", "uri": "dataability://com.huawei.agconnect.auth.AGConnectInitializeAbility"}f) Synchronize project configuration

4、 Configure signature information
Harmony Install the application to the real machine for testing , Signature information needs to be configured , There are two ways of manual signature and automatic signature , For details, please refer to : Configure signature information . It is recommended to give priority to automatic signature , If the automatic signature fails , You can choose to sign manually . Here we use automatic signature :
a) Connect real equipment , Make sure DevEco Studio Connected to the real device , After the real machine is successfully connected, it is shown in the following figure

b) Get into File > Project Structure > Project > Signing Configs Interface , Click on “Sign In” Button to log in , choice Debug, Check Automatically generate signing, Click on try again You can automatically sign . Automatically generate the key required for signature (.p12)、 digital certificate (.cer) and Profile file (.p7b) Will be saved to the user user In the catalog .ohos\config Under the table of contents .

After setting the signature information , Click on OK Preservation , Then you can do it under the project build.gradle View signature configuration information in .

Sign in AGC, Get into “ Users and access ”-“ Certificate management ”, Click Add certificate , Upload the previously generated .csr file , Type selection commissioning certificate
After completing the signature configuration, you can click Install to apply to the debugging device .
Function realization
Mobile authentication login layout design

Refer to the layout above , Enter the country code in the four text boxes 、 cell-phone number 、 password 、 Verification Code , Click to verify and receive the verification code SMS , Enter verification code , Click login , Complete registration and login The layout code is as follows :
<?xml version="1.0" encoding="utf-8"?><DirectionalLayout xmlns:ohos="http://schemas.huawei.com/res/ohos" ohos:width="match_parent" ohos:height="match_parent"> <TextField ohos:id="$+id:countryCode" ohos:height="match_content" ohos:width="150vp" ohos:hint="Your countryCode" ohos:text_input_type="pattern_number" ohos:text_size="50" ohos:top_margin="10vp" /> <TextField ohos:id="$+id:phoneNumber" ohos:height="match_content" ohos:width="150vp" ohos:hint="Your phone" ohos:text_input_type="pattern_number" ohos:text_size="50" ohos:bottom_margin="10vp" /> <TextField ohos:id="$+id:password" ohos:height="match_content" ohos:width="150vp" ohos:hint="Password" ohos:text_input_type="pattern_password" ohos:text_size="50" ohos:bottom_margin="10vp" /> <TextField ohos:id="$+id:verifyCode" ohos:height="match_content" ohos:width="150vp" ohos:hint="verifyCode" ohos:text_input_type="pattern_number" ohos:text_size="50" ohos:bottom_margin="10vp" /> <DirectionalLayout ohos:height="match_content" ohos:width="match_parent" ohos:orientation="horizontal"> <Button ohos:id="$+id:Verify" ohos:height="match_content" ohos:width="100vp" ohos:background_element="$graphic:background_ability_main" ohos:left_margin="15vp" ohos:text="Verify" ohos:text_size="16fp"/> <Button ohos:id="$+id:Login" ohos:height="match_content" ohos:width="100vp" ohos:background_element="$graphic:background_ability_main" ohos:left_margin="15vp" ohos:text="Login" ohos:text_size="16fp"/> </DirectionalLayout></DirectionalLayout>Authentication and login :
Enter the country code 、 cell-phone number 、 Then click Verify, Return the verification code sending success log , The mobile phone receives the verification code , Enter the password and verification code and click Login Return the login success log :
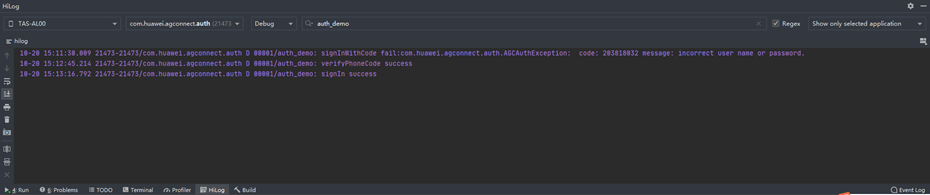
The page jumps to the login success page :

The authentication and login codes are as follows :
private void verify() { String countryCode = getCountryCode(); String phoneNumber = getPhoneNumber(); int action = VerifyCodeSettings.ACTION_REGISTER_LOGIN; VerifyCodeSettings settings = VerifyCodeSettings.newBuilder() .action(action) .sendInterval(30) .build(); HarmonyTask<VerifyCodeResult> task = AGConnectAuth.getInstance() .requestVerifyCode(countryCode, phoneNumber, settings); task.addOnSuccessListener(TaskExecutors.uiThread(), new OnSuccessListener<VerifyCodeResult>() { @Override public void onSuccess(VerifyCodeResult verifyCodeResult) { log("verifyPhoneCode success"); } }).addOnFailureListener(TaskExecutors.uiThread(), new OnFailureListener() { @Override public void onFailure(Exception e) { log("verifyPhoneCode fail:" + e); } });}private void login() { String countryCode = getCountryCode(); String phoneNumber = getPhoneNumber(); String password = getPassword(); String verifyCode = getVerify(); AGConnectAuthCredential phoneAuthCredential = PhoneAuthProvider.credentialWithVerifyCode(countryCode, phoneNumber, password, verifyCode); /* signIn */ HarmonyTask<SignInResult> task = AGConnectAuth.getInstance().signIn(phoneAuthCredential); task.addOnSuccessListener(new OnSuccessListener<SignInResult>() { @Override public void onSuccess(SignInResult signInResult) { log("signIn success"); showUser(signInResult.getUser()); } }).addOnFailureListener(new OnFailureListener() { @Override public void onFailure(Exception e) { log("signInWithCode fail:" + e); } });}2、 Mailbox verification login layout

Refer to the layout above , Enter the mailbox number in the three text boxes 、 password 、 Verification Code , Click to verify and receive the verification code SMS , Enter verification code , Click login , Complete registration and login , The layout code is as follows :
<?xml version="1.0" encoding="utf-8"?><DirectionalLayout xmlns:ohos="http://schemas.huawei.com/res/ohos" ohos:width="match_parent" ohos:height="match_parent"> <TextField ohos:id="$+id:phoneNumber" ohos:height="match_content" ohos:width="150vp" ohos:hint="Your phone" ohos:text_input_type="pattern_number" ohos:text_size="50" ohos:bottom_margin="10vp" /> <TextField ohos:id="$+id:password" ohos:height="match_content" ohos:width="150vp" ohos:hint="Password" ohos:text_input_type="pattern_password" ohos:text_size="50" ohos:bottom_margin="10vp" /> <TextField ohos:id="$+id:verifyCode" ohos:height="match_content" ohos:width="150vp" ohos:hint="verifyCode" ohos:text_input_type="pattern_number" ohos:text_size="50" ohos:bottom_margin="10vp" /> <DirectionalLayout ohos:height="match_content" ohos:width="match_parent" ohos:orientation="horizontal"> <Button ohos:id="$+id:Verify" ohos:height="match_content" ohos:width="100vp" ohos:background_element="$graphic:background_ability_main" ohos:left_margin="15vp" ohos:text="Verify" ohos:text_size="16fp"/> <Button ohos:id="$+id:Login" ohos:height="match_content" ohos:width="100vp" ohos:background_element="$graphic:background_ability_main" ohos:left_margin="15vp" ohos:text="Login" ohos:text_size="16fp"/> </DirectionalLayout></DirectionalLayout>Enter the email number and click Verify, Return the verification code sending success log , Email received verification code , Enter the password and verification code and click Login Return the login success log :

The page jumps to the login success page :

The email verification and login codes are as follows :
private void verify() { //String countryCode = getCountryCode(); String emailStr = getEmailStr(); int action = VerifyCodeSettings.ACTION_REGISTER_LOGIN; VerifyCodeSettings settings = VerifyCodeSettings.newBuilder() .action(action) .sendInterval(30) .build(); HarmonyTask<VerifyCodeResult> task = AGConnectAuth.getInstance() .requestVerifyCode(emailStr, settings); task.addOnSuccessListener(TaskExecutors.uiThread(), new OnSuccessListener<VerifyCodeResult>() { @Override public void onSuccess(VerifyCodeResult verifyCodeResult) { log("verifyEmailCode success"); } }).addOnFailureListener(TaskExecutors.uiThread(), new OnFailureListener() { @Override public void onFailure(Exception e) { log("verifyEmailCode fail:" + e); } });}private void login() { //String countryCode = getCountryCode(); String emailStr = getEmailStr(); String password = getPassword(); String verifyCode = getVerify(); AGConnectAuthCredential emailAuthCredential = EmailAuthProvider.credentialWithVerifyCode(emailStr, password, verifyCode); /* signIn */ HarmonyTask<SignInResult> task = AGConnectAuth.getInstance().signIn(emailAuthCredential); task.addOnSuccessListener(new OnSuccessListener<SignInResult>() { @Override public void onSuccess(SignInResult signInResult) { log("signIn success"); showUser(signInResult.getUser()); } }).addOnFailureListener(new OnFailureListener() { @Override public void onFailure(Exception e) { log("signInWithCode fail:" + e); } });}A functional test
After landing successfully , open AGC The validation service , Query data in the background :
Users who register with mobile phones and e-mail all display account information and authentication times in the background , The number of verifications is the same as the number of requests ;


stay AGC Delete account on , If you log in again with the same user name and password, you will report that the user name or password is wrong

After disabling the account, login will report that the account has been disabled .

For more technical articles , Welcome to visit https://developer.huawei.com/consumer/cn/forum/?ha_source=zzh
边栏推荐
- ES6_ Arrow function
- opencv学习笔记二——图像基本操作
- Splunk query CSV lookup table data dynamic query
- Full text query classification
- Grpc, oauth2, OpenSSL, two-way authentication, one-way authentication and other column directories
- [IELTS speaking] Anna's oral learning records Part3
- Ebpf cilium practice (1) - team based network isolation
- Rsync remote synchronization
- Composer change domestic image
- XCiT学习笔记
猜你喜欢
如何在快应用中实现滑动操作组件
Deit learning notes

Opencv learning notes II - basic image operations
Rainbow version 5.6 was released, adding a variety of installation methods and optimizing the topology operation experience
opencv学习笔记一——读取图像的几种方法
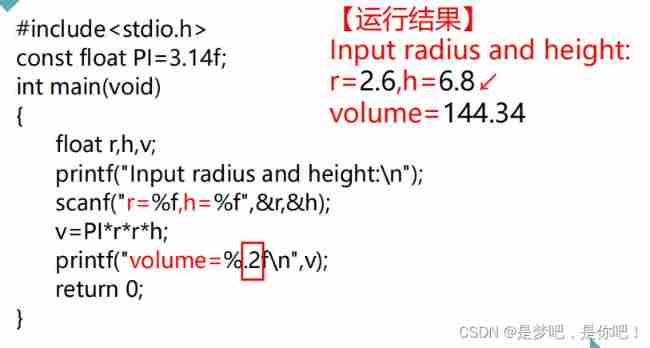
Input and output of floating point data (C language)
Ebpf cilium practice (2) - underlying network observability
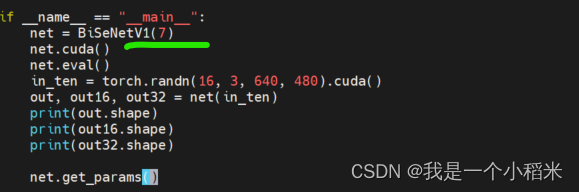
Implement your own dataset using bisenet
快速集成认证服务-HarmonyOS平台
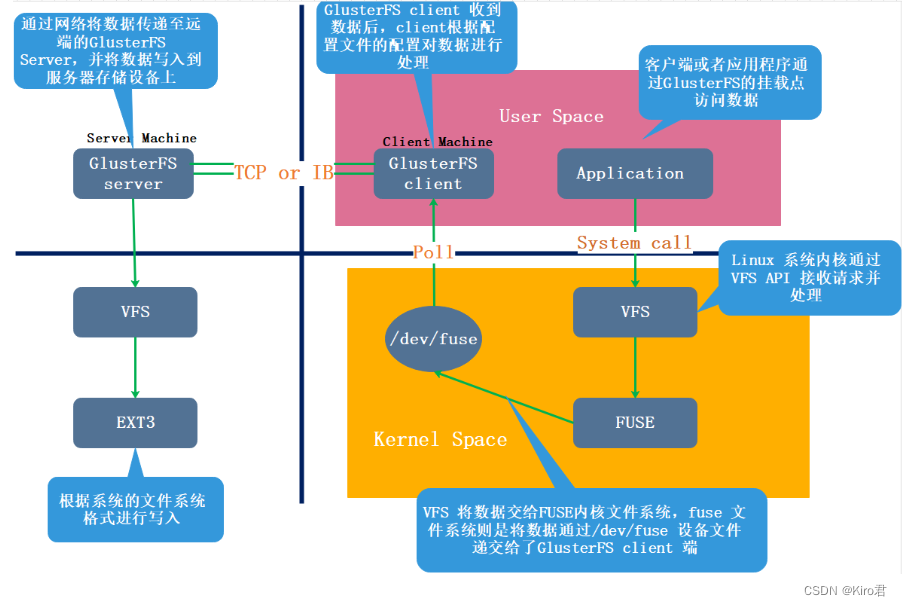
GFS分布式文件系统
随机推荐
Opencv learning note 3 - image smoothing / denoising
Merge sort and non comparison sort
Basic data types and string types are converted to each other
A method for quickly viewing pod logs under frequent tests (grep awk xargs kuberctl)
A single game with goods increased by 100000, and the rural anchor sold men's clothes on top of the list?
Pvtv2--pyramid vision transformer V2 learning notes
Ebpf cilium practice (2) - underlying network observability
All about PDF crack, a complete solution to meet all your PDF needs
Interface as a parameter (interface callback)
GFS分布式文件系统
如何在快应用中实现滑动操作组件
Implementation of navigation bar at the bottom of applet
[kuangbin] topic 15 digit DP
You should use Google related products with caution
Teach you how to select PCB board by hand (II)
Low success rate of unit test report
Tips for using jeditabletable
Openvscode cloud ide joins rainbow integrated development system
MES系統,是企業生產的必要選擇
Laravel8 uses passport login and JWT (generate token)