当前位置:网站首页>Actual combat simulation │ JWT login authentication
Actual combat simulation │ JWT login authentication
2022-07-04 19:52:00 【InfoQ】
Token The certification process
- As the most popular cross domain authentication solution ,
JWT(JSON Web Token)Loved by developers , The main process is as follows :
- The client sends an account and password to request login
- The server receives the request , Verify whether the account and password pass
- After successful verification , The server will generate a unique
token, And return it to the client
- Client received
token, Store it incookieperhapslocalStrogein
- After that, every time the client sends a request to the server , Will pass
cookieperhapsheaderTake with youtoken
- Server side validation
tokenThe effectiveness of the , The data of the response is returned only after passing

Token Certification benefits
- Support cross domain access :
CookieCross domain access is not allowed , That's rightTokenThere is no mechanism , The premise is that the transmitted user authentication information passesHTTPHead transmission
- No state :
TokenThe mechanism does not need storage on the serversessionInformation , becauseTokenIt contains the information of all users who log in , Just on the client sidecookieOr local media storage status information
- More applicable :As long as it's support
httpProtocol client , You can usetokenauthentication .
- Don't need to consider CSRF:Because no longer rely on
cookie, So usingtokenThe authentication method will not happenCSRF, So there is no need to considerCSRFDefense
JWT structure
- One
JWTIt's actually a string , It consists of three parts :Head、loadAndSignature. Middle point.Divided into three parts . Be carefulJWTThere is no line break inside .
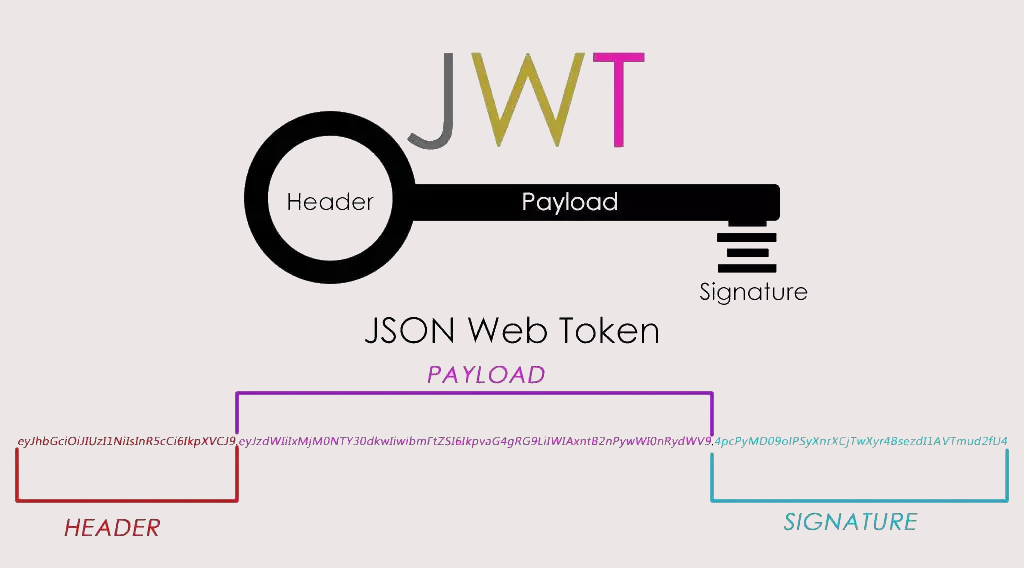
- Head / header
headerIt's made up of two parts :tokenThe type ofJWTAnd algorithm name :HMAC、SHA256、RSA
{
 "alg": "HS256",
 "typ": "JWT"
}- load / Payload
PayloadPart of it is also aJSONobject , It is used to store the data that needs to be transferred .JWTSpecify seven default fields to choose from .
- In addition to the default fields , You can add any field you want , Generally, after the user logs in successfully , Store user information here
iss: The issuer
exp: Due time
sub: The theme
aud: user
nbf: Not available until
iat: Release time
jti:JWT ID Used to identify the JWT
{
"iss": "xxxxxxx",
"sub": "xxxxxxx",
"aud": "xxxxxxx",
"user": [
'username': ' Geek flying rabbit ',
'gender': 1,
'nickname': ' Flying rabbit '
]
}- Signature / Signature
- The signature part is on the above Head 、 load Data signature with two parts of data
- To ensure that the data is not tampered with , You need to specify a key , And this key is usually only known by you , And stored on the server
- The code to generate the signature is generally as follows :
//  among secret  It's the key
String signature = HMACSHA256(base64UrlEncode(header) + "." + base64UrlEncode(payload), secret)
JWT Basic use
- The client receives the
JWT, Can be stored inCookieInside , It can also be stored inlocalStorage
- then Every time the client communicates with the server , Take this with you
JWT
- hold
JWTSave inCookieSend request inside , It can't beCross domain
- It's better to put it in
HTTPRequested header informationAuthorizationIn the field
fetch('license/login', {
 headers: {
 'Authorization': 'X-TOKEN' + token
 }
})
actual combat : Use JWT Login authentication
- Use here
ThinkPHP6IntegrateJWTLogin and authenticate for actual combat simulation
- install JWT Expand
composer require firebase/php-jwt- Package generation JWT And decryption methods
<?php
/**
* Desc: JWT authentication
* Author: autofelix
* Time: 2022/07/04
*/
namespace app\services;
use app\Helper;
use Firebase\JWT\JWT;
use Firebase\JWT\Key;
class JwtService
{
protected $salt;
public function __construct()
{
// Get a unique string from the configuration information , You can write whatever you like md5('token')
$this->salt = config('jwt.salt') || "autofelix";
}
// jwt Generate
public function generateToken($user)
{
$data = array(
"iss" => 'autofelix', // Issuer Can be null
"aud" => 'autofelix', // Face users , Can be null
"iat" => Helper::getTimestamp(), // The issuance of time
"nbf" => Helper::getTimestamp(), // Take effect immediately
"exp" => Helper::getTimestamp() + 7200, //token Expiration time Two hours
"user" => [ // Record user information
'id' => $user->id,
'username' => $user->username,
'truename' => $user->truename,
'phone' => $user->phone,
'email' => $user->email,
'role_id' => $user->role_id
]
);
$jwt = JWT::encode($data, md5($this->salt), 'HS256');
return $jwt;
}
// jwt Decrypt
public function chekToken($token)
{
JWT::$leeway = 60; // Subtract... From the current time 60, Leave some room for time
$decoded = JWT::decode($token, new Key(md5($this->salt), 'HS256'));
return $decoded;
}
}- After the user logs in , Generate JWT identification
<?php
declare (strict_types=1);

namespace app\controller;

use think\Request;
use app\ResponseCode;
use app\Helper;
use app\model\User as UserModel;
use app\services\JwtService;

class License
{
 public function login(Request $request)
 {
 $data = $request->only(['username', 'password', 'code']);

 // .... Relevant logic for verification ...
 $user = UserModel::where('username', $data['username'])->find();

 //  Verify by generating  JWT,  Return to front end save
 $token = (new JwtService())->generateToken($user);

 return json([
 'code' => ResponseCode::SUCCESS,
 'message' => ' Login successful ',
 'data' => [
 'token' => $token
 ]
 ]);
 }
}- Middleware verifies whether the user logs in
- stay
middleware.phpRegister middleware
<?php
//  Global middleware definition file
return [
 // ... Other middleware
 // JWT verification
 \app\middleware\Auth::class
];- After registering middleware , Improve the verification logic in the permission verification middleware
<?php
declare (strict_types=1);

namespace app\middleware;

use app\ResponseCode;
use app\services\JwtService;

class Auth
{
 private $router_white_list = ['login'];

 public function handle($request, \Closure $next)
 {
 if (!in_array($request->pathinfo(), $this->router_white_list)) {
 $token = $request->header('token');

 try {
 // jwt  verification
 $jwt = (new JwtService())->chekToken($token);
 } catch (\Throwable $e) {
 return json([
 'code' => ResponseCode::ERROR,
 'msg' => 'Token Validation failed '
 ]);
 }

 $request->user = $jwt->user;
 }

 return $next($request);
 }
}边栏推荐
- 牛客小白月赛7 I 新建 Microsoft Office Word 文档
- @Data source connection pool exhaustion caused by transactional abuse
- 多表操作-外连接查询
- 1006 Sign In and Sign Out(25 分)(PAT甲级)
- Swagger suddenly went crazy
- 明明的随机数
- 项目中遇到的线上数据迁移方案1---总体思路整理和技术梳理
- 1002. A+b for Polynomials (25) (PAT class a)
- Explicit random number
- c# .net mvc 使用百度Ueditor富文本框上传文件(图片,视频等)
猜你喜欢
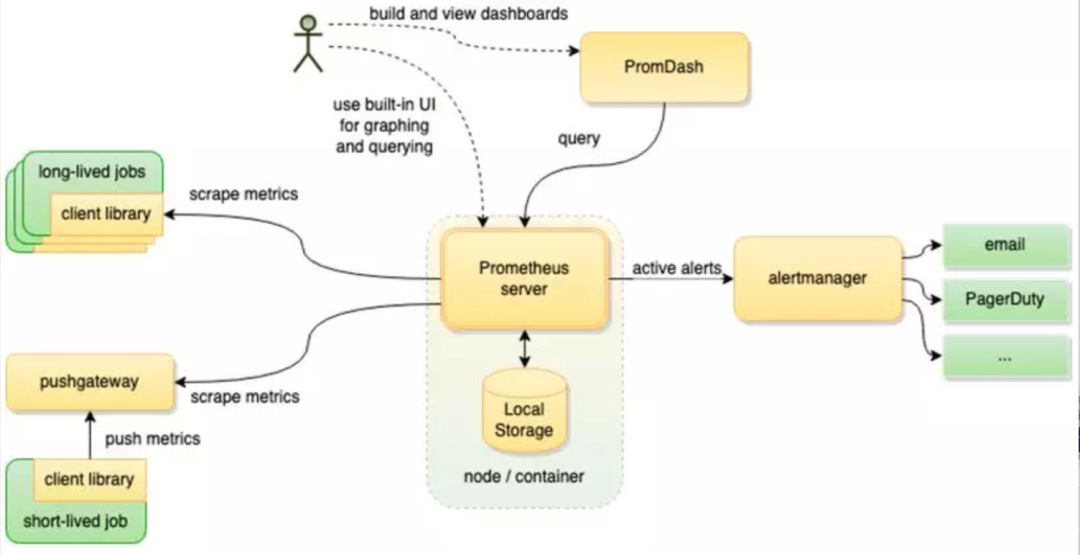
The company needs to be monitored. How do ZABBIX and Prometheus choose? That's the right choice!
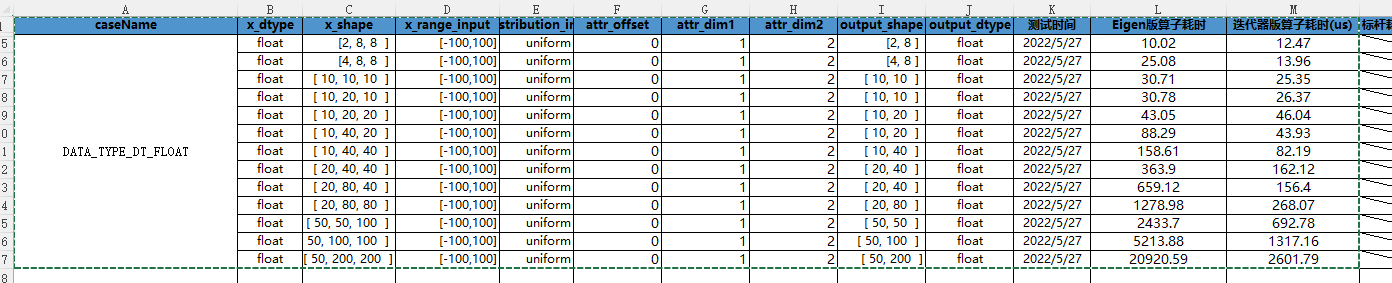
CANN算子:利用迭代器高效实现Tensor数据切割分块处理

What should we pay attention to when doing social media marketing? Here is the success secret of shopline sellers!
![[problem] Druid reports exception SQL injection violation, part always true condition not allow solution](/img/cc/160bc8ccdc378901510c1b61c3f5d3.png)
[problem] Druid reports exception SQL injection violation, part always true condition not allow solution

Lenovo explains in detail the green smart city digital twin platform for the first time to solve the difficulties of urban dual carbon upgrading
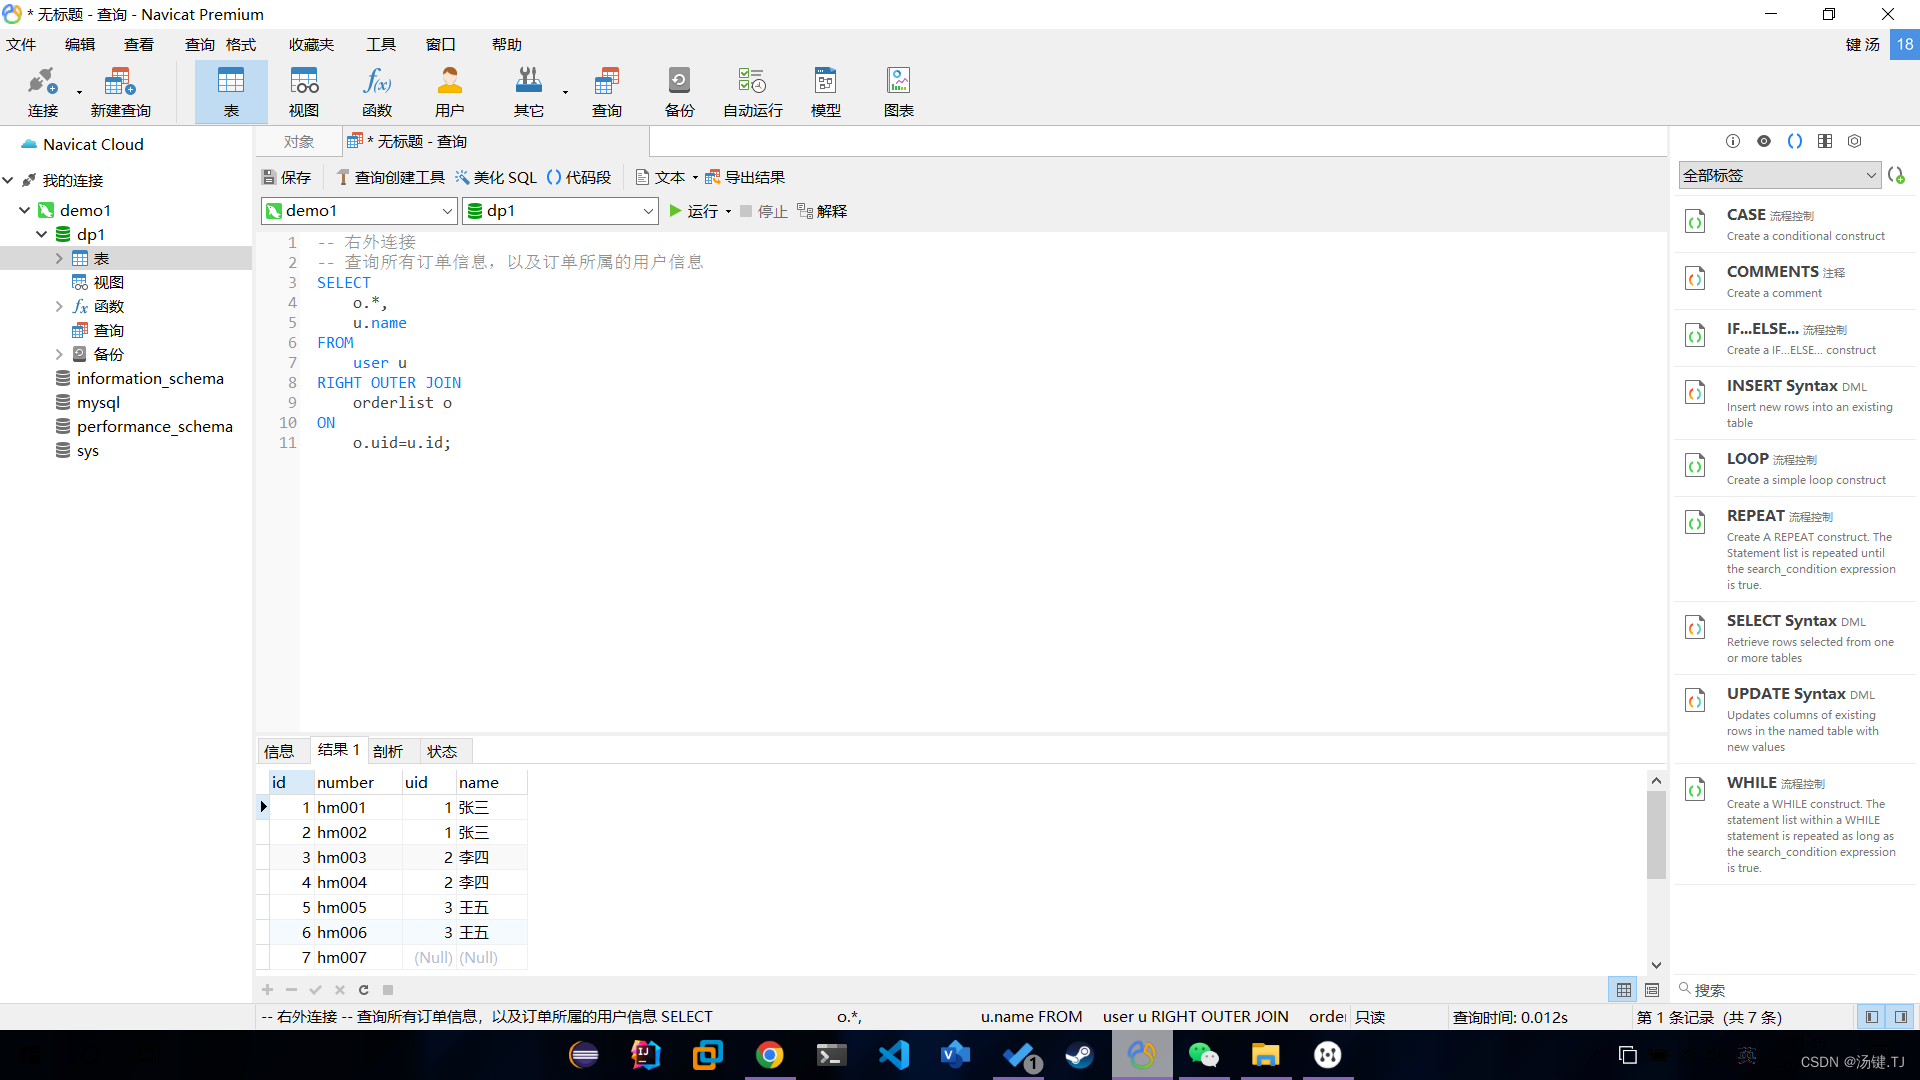
Multi table operation - external connection query

Stream stream
BCG 使用之CBCGPTabWnd控件(相当于MFC TabControl)
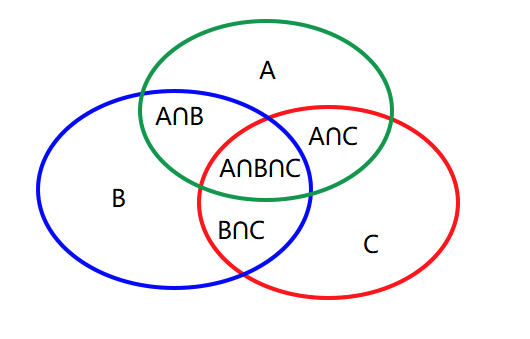
ACM组合计数入门
做社交媒体营销应该注意些什么?Shopline卖家的成功秘笈在这里!
随机推荐
多表操作-内连接查询
勾股数规律(任意三个数能够满足勾股定理需要满足的条件)
1003 Emergency(25 分)(PAT甲级)
Oracle with as ora-00903: invalid table name multi report error
socket编程demo二
牛客小白月赛7 I 新建 Microsoft Office Word 文档
Multi table operation - external connection query
FPGA timing constraint sharing 01_ Brief description of the four steps
The page element is vertically and horizontally centered, realizing the vertical and horizontal centering of known or unknown width.
一文掌握数仓中auto analyze的使用
1007 maximum subsequence sum (25 points) (PAT class a)
Chrome开发工具:VMxxx文件是什么鬼
Allure of pytest visual test report
1002. A+B for Polynomials (25)(PAT甲级)
1008 Elevator(20 分)(PAT甲级)
Explicit random number
Niuke Xiaobai month race 7 e applese's super ability
BCG 使用之CBCGPTabWnd控件(相当于MFC TabControl)
kotlin 基本使用
@Data source connection pool exhaustion caused by transactional abuse