当前位置:网站首页>Keras深度学习实战——基于Inception v3实现性别分类
Keras深度学习实战——基于Inception v3实现性别分类
2022-07-08 00:35:00 【盼小辉丶】
Keras深度学习实战——基于Inception v3实现性别分类
0. 前言
我们已经学习了基于 VGG16 和 VGG19 体系结构实现性别分类,除此之外,还有许多其它设计更加巧妙的深度神经网络架构,例如 Inception 在保证模型质量的前提下,极大的减少模型参数个数。在本节中,我们将对 Inception 模型的核心思想进行介绍,然后使用基于预训练的 Inception 体系结构实现性别分类。
1. Inception 结构
为了更好理解 Inception 模型的核心思想,我们首先考虑以下场景:在数据集中,有一些图像中的对象占据了图像的大部分,但在另一些图像中对象可能仅仅占整个图像的一小部分。如果在两种情况下我们都使用相同大小的卷积核,则将使模型难以同时学习到识别图像中较小的对象和图像中较大的对象。
为了解决这个问题,我们可以在同一层中使用的多种不同尺寸的卷积核。在这种情况下,网络本质上是变宽了,而不是变深了,如下所示:

在上图中,我们在给定层中使用多种不同尺寸的卷积核进行卷积,Inception v1 模块具有九个线性堆叠的 Inception 模块,如下所示:
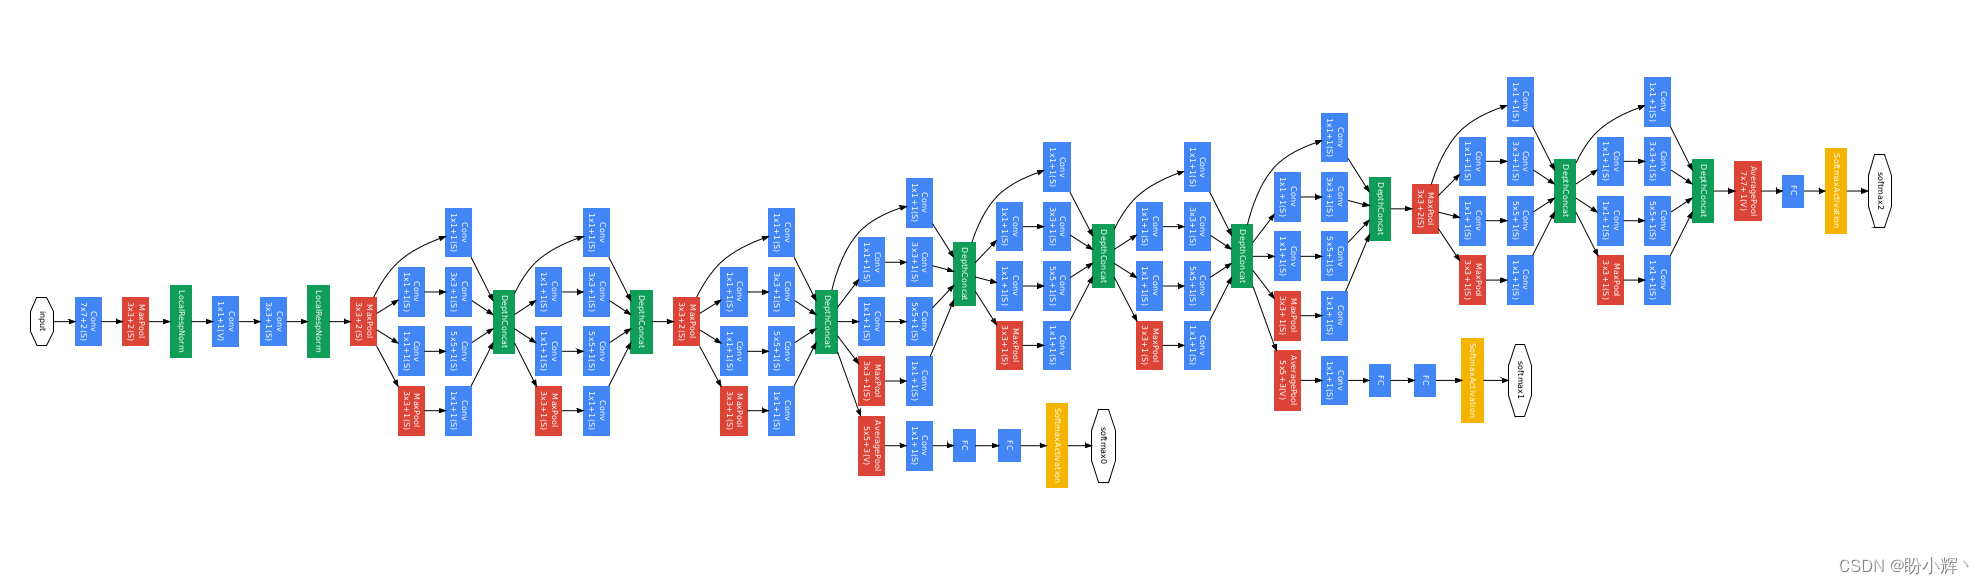
1.1 Inception v1 损失函数
在 Inception v1 体系架构图中,可以看到该架构既深又宽,这很可能会导致梯度消失。
为了解决梯度消失的问题,Inception v1 有两个辅助分类器,它们源于 Inception 模块,试图将基于 Inception 网络的总损失降到最低,如下所示:
total_loss = real_loss + 0.3 * aux_loss_1 + 0.3 * aux_loss_2
需要注意的是,辅助损失仅在训练期间使用,而在模型测试期间中会被忽略。
1.2 Inception v2 和 Inception v3
Inception v2 和 Inception v3 是对 Inception v1 体系结构的改进,其中在 Inception v2 中,Inception 作者在卷积运算的基础上进行了优化,以更快地处理图像;在 Inception v3 中,Inception 作者在原有卷积核的基础上添加了 7 x 7 的卷积核,并将它们串联在一起。总而言之,Inception 的贡献如下:
- 使用
Inception模块捕获图像的多尺度细节 - 使用
1 x 1卷积作为瓶颈层 - 使用平均池化层代替全连接层,降低模型参数量
- 使用辅助分支来避免梯度消失
2. 使用预训练的 Inception v3 模型实现性别分类
在《迁移学习》中,我们了解了利用迁移学习,只需要少量样本即可训练得到性能较好的模型;并基于迁移学习利用预训练的 VGG16 模型进行了性别分类的实战。在本节中,我们使用预训练的 Inception v3 构建模型识别图像中的人物性别。
2.1 模型实现
首先,加载所需要的库,并加载预训练的 Inception v3 模型:
from keras.applications import InceptionV3
from keras.applications.inception_v3 import preprocess_input
from glob import glob
from skimage import io
import cv2
import numpy as np

model = InceptionV3(include_top=False, weights='imagenet', input_shape=(256, 256, 3))
创建输入和输出数据集:
x = []
y = []
for i in glob('man_woman/a_resized/*.jpg')[:8000]:
    try:
        image = io.imread(i)
        x.append(image)
        y.append(0)
    except:
        continue

for i in glob('man_woman/b_resized/*.jpg')[:8000]:
    try:
        image = io.imread(i)
        x.append(image)
        y.append(1)
    except:
        continue

x_inception_v3 = []
for i in range(len(x)):
    img = x[i]
    img = preprocess_input(img.reshape((1, 256, 256, 3)))
    img_feature = model.predict(img)
    x_inception_v3.append(img_feature)
将输入和输出转换为 numpy 数组,并将数据集拆分为训练和测试集:
x_inception_v3 = np.array(x_inception_v3)
x_inception_v3 = x_inception_v3.reshape(x_inception_v3.shape[0], x_inception_v3.shape[2], x_inception_v3.shape[3], x_inception_v3.shape[4])
y = np.array(y)
from sklearn.model_selection import train_test_split
x_train, x_test, y_train, y_test = train_test_split(x_inception_v3, y, test_size=0.2)
在预训练模型得到的输出基础上构建微调模型:
from keras.models import Sequential
from keras.layers import Conv2D, MaxPooling2D, Flatten, Dropout, Dense
model_fine_tuning = Sequential()
model_fine_tuning.add(Conv2D(2048,
                        kernel_size=(3, 3),
                        activation='relu',
                        input_shape=(x_train.shape[1], x_train.shape[2], x_train.shape[3])))
model_fine_tuning.add(MaxPooling2D(pool_size=(2, 2)))
model_fine_tuning.add(Flatten())
model_fine_tuning.add(Dense(1024, activation='relu'))
model_fine_tuning.add(Dropout(0.5))
model_fine_tuning.add(Dense(1, activation='sigmoid'))
model_fine_tuning.summary()
前面的微调模型的简要信息输出,如下所示:
Model: "sequential"
_________________________________________________________________
Layer (type)                 Output Shape              Param #
=================================================================
conv2d_94 (Conv2D)           (None, 4, 4, 2048)        37750784
_________________________________________________________________
max_pooling2d_4 (MaxPooling2 (None, 2, 2, 2048)        0
_________________________________________________________________
flatten (Flatten)            (None, 8192)              0
_________________________________________________________________
dense (Dense)                (None, 1024)              8389632
_________________________________________________________________
dropout (Dropout)            (None, 1024)              0
_________________________________________________________________
dense_1 (Dense)              (None, 1)                 1025
=================================================================
Total params: 46,141,441
Trainable params: 46,141,441
Non-trainable params: 0
_________________________________________________________________
最后,编译并拟合模型:
model_fine_tuning.compile(loss='binary_crossentropy',optimizer='adam',metrics=['acc'])

history = model_fine_tuning.fit(x_train, y_train,
                                    batch_size=32,
                                    epochs=20,
                                    verbose=1,
                                    validation_data = (x_test, y_test))
在训练期间,模型在训练数据集和测试数据集上准确率和损失值的变化如下:

可以看到,基于与训练的 Inception V3 实现的性别分类模型准确率可以达到 95% 左右。
2.2 错误分类的图片示例
错误分类的图像示例如下:
x = np.array(x)
from sklearn.model_selection import train_test_split
x_train, x_test, y_train, y_test = train_test_split(x, y, test_size=0.2)

x_test_inception_v3 = []
for i in range(len(x_test)):
    img = x_test[i]
    img = preprocess_input(img.reshape((1, 256, 256, 3)))
    img_feature = model.predict(img)
    x_test_inception_v3.append(img_feature)

x_test_inception_v3 = np.array(x_test_inception_v3)
x_test_inception_v3 = x_test_inception_v3.reshape(x_test_inception_v3.shape[0], x_test_inception_v3.shape[2], x_test_inception_v3.shape[3], x_test_inception_v3.shape[4])
y_pred = model_fine_tuning.predict(x_test_inception_v3)
wrong = np.argsort(np.abs(y_pred.flatten()-y_test))
print(wrong)

y_test_char = np.where(y_test==0,'M','F')
y_pred_char = np.where(y_pred>0.5,'F','M')

plt.subplot(221)
plt.imshow(x_test[wrong[-1]])
plt.title('Actual: '+str(y_test_char[wrong[-1]])+', '+'Predicted: '+str((y_pred_char[wrong[-1]][0])))
plt.subplot(222)
plt.imshow(x_test[wrong[-2]])
plt.title('Actual: '+str(y_test_char[wrong[-2]])+', '+'Predicted: '+str((y_pred_char[wrong[-2]][0])))
plt.subplot(223)
plt.imshow(x_test[wrong[-3]])
plt.title('Actual: '+str(y_test_char[wrong[-3]])+', '+'Predicted: '+str((y_pred_char[wrong[-3]][0])))
plt.subplot(224)
plt.imshow(x_test[wrong[-4]])
plt.title('Actual: '+str(y_test_char[wrong[-4]])+', '+'Predicted: '+str((y_pred_char[wrong[-4]][0])))
plt.show()

相关链接
Keras深度学习实战(7)——卷积神经网络详解与实现
Keras深度学习实战(9)——卷积神经网络的局限性
Keras深度学习实战(10)——迁移学习
Keras深度学习实战——使用卷积神经网络实现性别分类
Keras深度学习实战——基于VGG19模型实现性别分类
边栏推荐
- qt--將程序打包--不要安裝qt-可以直接運行
- PHP to get information such as audio duration
- Cross modal semantic association alignment retrieval - image text matching
- nmap工具介绍及常用命令
- 软件测试笔试题你会吗?
- Write a pure handwritten QT Hello World
- Uniapp one click Copy function effect demo (finishing)
- Optimization of ecological | Lake Warehouse Integration: gbase 8A MPP + xeos
- C language - modularization -clion (static library, dynamic library) use
- The foreach map in JS cannot jump out of the loop problem and whether foreach will modify the original array
猜你喜欢

Apache多个组件漏洞公开(CVE-2022-32533/CVE-2022-33980/CVE-2021-37839)
C language - modularization -clion (static library, dynamic library) use

从Starfish OS持续对SFO的通缩消耗,长远看SFO的价值
Android 创建的sqlite3数据存放位置

C语言-Cmake-CMakeLists.txt教程

Voice of users | winter goes and spring comes, waiting for flowers to bloom -- on gbase 8A learning comprehension
液压旋转接头的使用事项
About snake equation (3)

Wechat applet uniapp page cannot jump: "navigateto:fail can not navigateto a tabbar page“
How to make the conductive slip ring signal better
随机推荐
Remote Sensing投稿經驗分享
QML fonts use pixelsize to adapt to the interface
cv2读取视频-并保存图像或视频
跨模态语义关联对齐检索-图像文本匹配(Image-Text Matching)
Is it necessary for project managers to take NPDP? I'll tell you the answer
给刚入门或者准备转行网络工程师的朋友一些建议
Gbase observation | how to protect the security of information system with frequent data leakage
【错误】加载h5权重出错AttributeError: ‘str‘ object has no attribute ‘decode‘
Dataworks duty table
图解网络:揭开TCP四次挥手背后的原理,结合男女朋友分手的例子,通俗易懂
Uniapp one click Copy function effect demo (finishing)
【目标跟踪】|DiMP: Learning Discriminative Model Prediction for Tracking
如何制作企业招聘二维码?
pb9.0 insert ole control 错误的修复工具
COMSOL----微阻梁模型的搭建---最终的温度分布和变形情况---材料的添加
nacos-微服务网关Gateway组件 +Swagger2接口生成
滑环在直驱电机转子的应用领域
滑环使用如何固定
Redisson分布式锁解锁异常
保姆级教程:Azkaban执行jar包(带测试样例及结果)