当前位置:网站首页>Opengl/webgl shader development getting started guide
Opengl/webgl shader development getting started guide
2022-07-08 02:15:00 【Brain in new VAT】
Learning to write graphics shaders is learning to use GPU The power of , Its thousands of cores all run in parallel . This is a kind of programming that requires different ways of thinking , But its huge potential is worth the initial investment .
Almost every modern graphic simulation you see is done in some way GPU Written code provides support , From the tip AAA Realistic lighting effect in the game to 2D Post treatment effect and fluid simulation .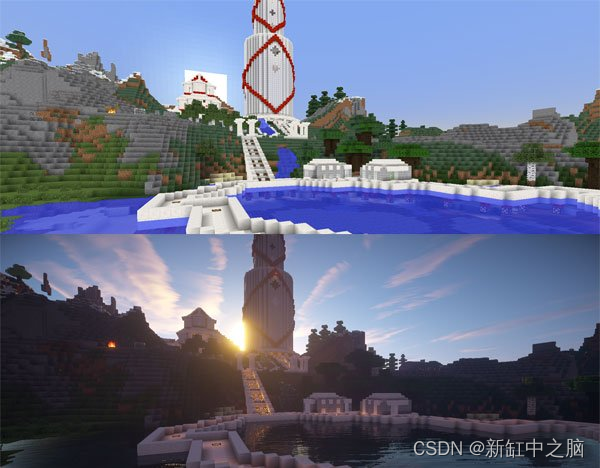
Minecraft A scene in , Before and after applying some shaders .
1、 The purpose of this guide
Shader programming sometimes becomes a mysterious dark magic , And often misunderstood . There are many code examples that show you how to create incredible effects , But little or no explanation was provided . This guide aims to bridge this gap . I will pay more attention to the basics of writing and understanding shader code , So you can easily adjust 、 Compose or write your own code from scratch !
This is a general guide , So what you learn here will apply to anything that can run shaders .
2、 What is a shader ?
Shaders are just programs that run in the graphics pipeline and tell the computer how to render each pixel . These programs are called shaders , Because they are usually used to control lighting and shadows effect , But there is no reason why they cannot deal with other special effects .
Shaders are written in a special shading language . Never mind , You don't have to go out and learn a new language ; We will use GLSL(OpenGL Coloring language ), It's kind of like C Language . There are many coloring languages for different platforms , But because they are applicable in GPU Up operation , So they are very similar .
Be careful : This article focuses on fragment shaders . If you are curious about other types of shaders , Can be in OpenGL Wiki Read about the phases in the graphics pipeline on .
3、 Let's get started !
We will use... In this tutorial ShaderToy. This allows you to start programming the colorator directly in the browser , Without any setup !ShaderToy Use WebGL Rendering , So you need a browser that can support this function . Creating an account is optional , But it's very convenient for saving code .
Be careful : At the time of writing ,ShaderToy In the testing phase . Some small ones UI/ Grammatical details may vary slightly .
single click New Shader after , You should see the following :
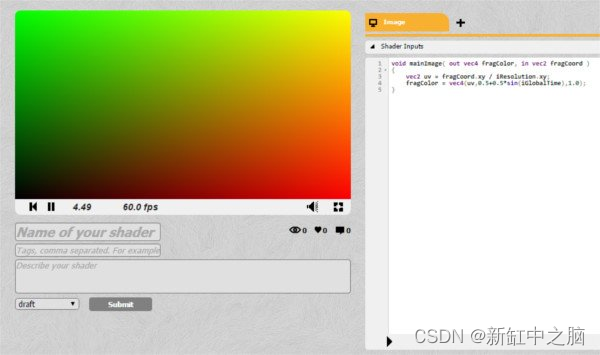
If you are not logged in , Your interface may be slightly different .
The small black arrow at the bottom is where you click to compile the code .
4、 What happened? ?
I will explain how shaders work in one sentence . are you ready ? Start !
The only purpose of the shader is to return four numbers :r、g、b and a.
This is what it has done or can do . The function you see in front of you runs for each pixel on the screen . It returns these four color values , This becomes the color of the pixel . This is the so-called pixel shader ( Sometimes called Fragment Shader ).
Consider this , Let's try to turn the screen into pure red .rgba( Red 、 green 、 Blue and “alpha”, Define transparency ) Value from 0 To 1, So what we need to do is return r,g,b,a = 1,0,0,1.ShaderToy Expect the final pixel color to be stored in fragColor.
void mainImage( out vec4 fragColor, in vec2 fragCoord )
{
    fragColor = vec4(1.0,0.0,0.0,1.0);
}
Congratulations ! This is your first working shader !
Challenge : Can you change it to pure gray ?
vec4 Just a data type , So we can declare colors as variables , As shown below :
void mainImage( out vec4 fragColor, in vec2 fragCoord )
{
    vec4 solidRed = vec4(1.0,0.0,0.0,1.0);
    fragColor = solidRed;
}
however , This is not very exciting . We have the ability to run code in parallel on hundreds of thousands of pixels , And we set them all to the same color .
Let's try to render a gradient on the screen . ok , If you don't know something about the pixels we are affecting , For example, its position on the screen , There is nothing we can do …
5、 Shader input
Pixel shaders pass some variables For your use . The most useful thing for us is fragCoord, It saves pixels x and y( as well as z, If you are in the 3D Work in China ) coordinate . Let's try to turn all pixels on the left half of the screen black , Turn all pixels on the right half red :
void mainImage( out vec4 fragColor, in vec2 fragCoord )
{
    vec2 xy = fragCoord.xy; //We obtain our coordinates for the current pixel
    vec4 solidRed = vec4(0,0.0,0.0,1.0);//This is actually black right now
    if(xy.x > 300.0){//Arbitrary number, we don't know how big our screen is!
        solidRed.r = 1.0;//Set its red component to 1.0
    }
    fragColor = solidRed;
}
Be careful : For any , You can go through 、 And or through obj.x、obj.y、obj.z、obj.w or obj.r 、obj.g 、obj.b 、obj.a visit vec4 Its components . They are equivalent ; This is just a convenient way of naming , To make your code more readable , So that others can see obj.r when , They will understand obj Represents a color .
Do you see the problem in the code above ? Try clicking the full screen button in the lower right corner of the preview window .
The ratio of the red screen will vary according to the size of the screen . To make sure half of the screen is red , We need to know how big the screen is . Screen size is not a built-in variable like pixel position , Because it is usually set up by the programmer who builds the application . under these circumstances , Setting the screen size is ShaderToy Developer .
If something is not a built-in variable , You can transfer this information from CPU( Your main program ) Send to GPU( Your shader ).ShaderToy Dealt with this problem for us . You can Shader Inputs Tab to see all the variables passed to the shader . In this way from CPU Pass on to GPU The variables in the GLSL called Uniform.
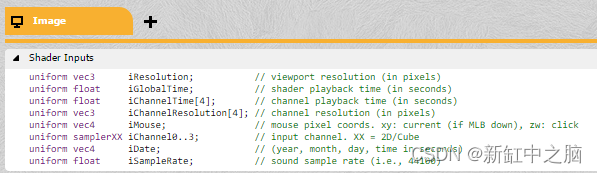
Let's adjust the code above to get the center of the screen correctly . We need to use shader input iResolution:
void mainImage( out vec4 fragColor, in vec2 fragCoord )
{
    vec2 xy = fragCoord.xy; //We obtain our coordinates for the current pixel
    xy.x = xy.x / iResolution.x; //We divide the coordinates by the screen size
    xy.y = xy.y / iResolution.y;
    // Now x is 0 for the leftmost pixel, and 1 for the rightmost pixel
    vec4 solidRed = vec4(0,0.0,0.0,1.0); //This is actually black right now
    if(xy.x > 0.5){
        solidRed.r = 1.0; //Set its red component to 1.0
    }
    fragColor = solidRed;
}
If you try to enlarge the preview window this time , The color should still perfectly divide the screen in two .
6、 From split to gradient
It should be easy to turn it into a gradient . Our color values range from 0 To 1, Coordinates are also from 0 To 1.
void mainImage( out vec4 fragColor, in vec2 fragCoord )
{
    vec2 xy = fragCoord.xy; //We obtain our coordinates for the current pixel
    xy.x = xy.x / iResolution.x; //We divide the coordinates by the screen size
    xy.y = xy.y / iResolution.y;
    // Now x is 0 for the leftmost pixel, and 1 for the rightmost pixel
    vec4 solidRed = vec4(0,0.0,0.0,1.0); //This is actually black right now
     solidRed.r = xy.x; //Set its red component to the normalized x value
    fragColor = solidRed;
}
look !
Challenge : Can you turn it into a vertical gradient ? The diagonal ? Gradient with multiple colors ?
If you play enough , You can see that there are coordinates in the upper left corner (0,1), instead of (0,0). It's important to remember that .
7、 The plot
It's fun to play with colors , But if we want to do something impressive , Our shader must be able to take input from the image and change it . In this way , We can make a shader that affects the whole game screen ( For example, underwater fluid effect or color correction ), Or only some objects are affected in some way according to the input ( For example, realistic lighting system ).
If we program on a common platform , You need to put the image ( Or texture ) As Uniform Send to GPU, Just like sending screen resolution .ShaderToy Solved this problem for us . There are four input channels at the bottom :

ShaderToy Four input channels of
single click iChannel0 And choose any texture you like ( Images ).
After completion , You now have an image being passed to the shader . however , There is a question : No, DrawImage() function . please remember , The only thing a pixel shader can do is change the color of each pixel .
So if we can only return one color , How do we paint textures on the screen ? We need to map the current pixel of the shader to the corresponding pixel on the texture in some way :
according to (0,0) Position on the screen , You may need to flip y Axis to map the texture correctly . At the time of writing ,ShaderToy Updated , Its origin is at the upper left , So there is no need to flip anything .
We can do that by using texture(textureData,coordinates) Function to do this , This function combines texture data with (x, y) Coordinate pairs as input , And take the texture color at these coordinates as a return vec4.
You can match the coordinates to the screen in any way you like . You can paint the entire texture on a quarter of the screen ( By skipping pixels , Effectively shrink it ) Or paint only part of the texture .
Because we just want to view the image , So we will match pixels 1:1:
void mainImage( out vec4 fragColor, in vec2 fragCoord )
{
    vec2 xy = fragCoord.xy / iResolution.xy;//Condensing this into one line
    vec4 texColor = texture(iChannel0,xy);//Get the pixel at xy from iChannel0
    fragColor = texColor;//Set the screen pixel to that color
}
such , We have the first picture !

Now we have extracted data from texture correctly , You can operate it at will ! You can stretch it and scale it , Or play with its color .
Let's try to modify it with a gradient , Similar to what we did above :
texColor.b = xy.x;

Congratulations , You just made your first post-processing effect !
Challenge : Can you write a shader that turns an image into black and white ?
Please note that , Even if it is a still image , What you see in front of you also happens in real time . You can see it for yourself by replacing still images with videos : Click again iChannel0 Enter and select one of the videos .
8、 Add some actions
up to now , All our effects are static . By using ShaderToy Input provided to us , We can do more interesting things .iGlobalTime Is an increasing variable ; We can use it as a seed to make periodic effects . Let's try to play with colors :
void mainImage( out vec4 fragColor, in vec2 fragCoord )
{
    vec2 xy = fragCoord.xy / iResolution.xy; // Condensing this into one line
    vec4 texColor = texture(iChannel0,xy); // Get the pixel at xy from iChannel0
       texColor.r *= abs(sin(iGlobalTime));
    texColor.g *= abs(cos(iGlobalTime));
    texColor.b *= abs(sin(iGlobalTime) * cos(iGlobalTime));
    fragColor = texColor; // Set the screen pixel to that color
}
GLSL Sine and cosine functions are built in , And many other useful functions , For example, get the length of a vector or the distance between two vectors . Color should not be negative , So we make sure to use abs Function to get the absolute value .
Challenge : You can make a shader , Change the image back and forth from black and white to full color ?
9、 Conclusion
Although you may be used to stepping through the code and printing out the values of everything to see what happened , But this is impossible when writing shaders . You may find some platform specific debugging tools , But usually the best way is to set the value being tested to the graph you can see .
These are just the basics of using shaders , But familiarity with these basics will enable you to do more . Browse ShaderToy Effect on , See if you can understand or copy some of these effects !
One thing I didn't mention in this tutorial is Vertex Shaders . They are still written in the same language , Except that they run on every vertex instead of every pixel , They return a position and a color . Vertex shaders are usually responsible for putting 3D The scene is projected onto the screen ( Something built into most graphics pipelines ). Pixel shaders are responsible for many of the advanced effects we see , This is why we pay attention .
The final challenge : Can you write a shader to remove ShaderToy The green screen in the previous video , And add another video as the background in the first video ?
Link to the original text : Novice guide to shader development — BimAnt
边栏推荐
- 《ClickHouse原理解析与应用实践》读书笔记(7)
- Talk about the cloud deployment of local projects created by SAP IRPA studio
- cv2-drawline
- Leetcode question brushing record | 27_ Removing Elements
- 【每日一题】648. 单词替换
- 生命的高度
- 如何用Diffusion models做interpolation插值任务?——原理解析和代码实战
- 力争做到国内赛事应办尽办,国家体育总局明确安全有序恢复线下体育赛事
- For friends who are not fat at all, nature tells you the reason: it is a genetic mutation
- leetcode 866. Prime Palindrome | 866. 回文素数
猜你喜欢

关于TXE和TC标志位的小知识

数据链路层及网络层协议要点

喜欢测特曼的阿洛
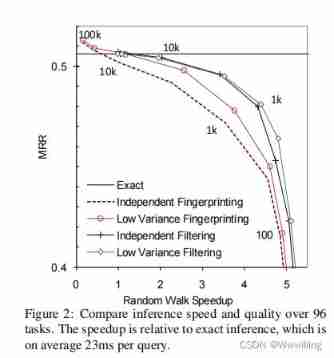
Random walk reasoning and learning in large-scale knowledge base
谈谈 SAP 系统的权限管控和事务记录功能的实现

Kwai applet guaranteed payment PHP source code packaging

很多小夥伴不太了解ORM框架的底層原理,這不,冰河帶你10分鐘手擼一個極簡版ORM框架(趕快收藏吧)

What are the types of system tests? Let me introduce them to you

MQTT X Newsletter 2022-06 | v1.8.0 发布,新增 MQTT CLI 和 MQTT WebSocket 工具
Nacos microservice gateway component +swagger2 interface generation
随机推荐
Redisson分布式锁解锁异常
Mqtt x newsletter 2022-06 | v1.8.0 release, new mqtt CLI and mqtt websocket tools
微信小程序uniapp页面无法跳转:“navigateTo:fail can not navigateTo a tabbar page“
喜欢测特曼的阿洛
发现值守设备被攻击后分析思路
Node JS maintains a long connection
Leetcode question brushing record | 485_ Maximum number of consecutive ones
很多小伙伴不太了解ORM框架的底层原理,这不,冰河带你10分钟手撸一个极简版ORM框架(赶快收藏吧)
QT -- create QT program
Redismission source code analysis
力扣5_876. 链表的中间结点
Clickhouse principle analysis and application practice "reading notes (8)
Nacos microservice gateway component +swagger2 interface generation
数据链路层及网络层协议要点
[target tracking] |dimp: learning discriminative model prediction for tracking
Is it necessary for project managers to take NPDP? I'll tell you the answer
CV2 read video - and save image or video
软件测试笔试题你会吗?
Leetcode featured 200 channels -- array article
[knowledge map paper] attnpath: integrate the graph attention mechanism into knowledge graph reasoning based on deep reinforcement