当前位置:网站首页>How to replace the backbone of the model
How to replace the backbone of the model
2022-07-07 03:22:00 【Master Ma】
1、 The principle of replacing the backbone network
Why can some models replace their internal modules ? The reason is simple , The module inside is regarded as a black box , Black box has input and output , So as a part of the network , There is input in front , Later, it also needs to be output to other modules , To replace the module and make the model work , The key is the matching of input and output , Let's take the model I have experimented with as an example .
The backbone network I want to replace is 3D One method of target detection is Group-Free 3d, The backbone network it uses is PointNet++, This is the part framed in red in the following figure .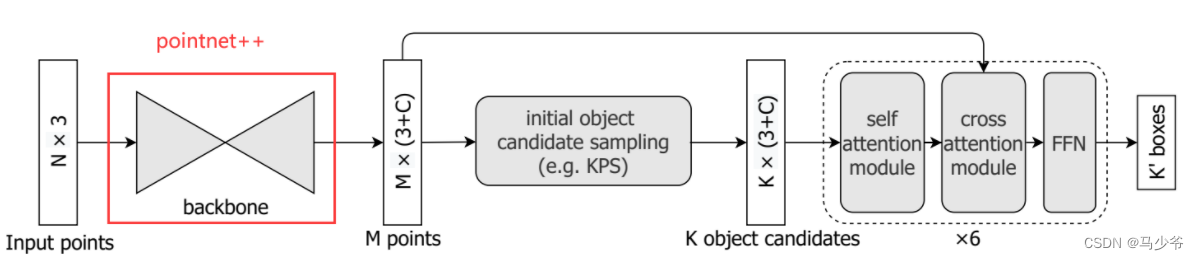
And I want to use one transformer The backbone network Pointformer Replace PointNet++. First of all, let me talk about why I want to use Pointformer To replace PointNet++, Because in Pointformer In this paper , It said Pointformer This backbone network can be replaced PointNet++ To get better performance , I observed Group-Free 3d Is used in PointNet++ As a backbone network , But no one put one of them PointNet++ Replace with Pointformer, So I want to put Pointformer Replace PointNet++ See if you can improve Group-Free 3d Performance of .** therefore , I want to emphasize that , The backbone network I replaced is the one used by others , But it has not been practiced in the new model .** But I think the principle is the same , Just match the input and output .
2、 Check the settings of network parameters
First of all, according to the Pointformer The introduction of the paper ,Pointforemer It can be directly replaced without modification PointNet++ Of , But there is no guarantee that someone will use PointNet++ The number of input and output layers will be modified , So here you need to check the network settings of the input and output layers . For example, I used it in this experiment Group-Free 3d in PointNet++ The output size of the last layer of is 288, Generally, it is output 256, As shown in the figure below :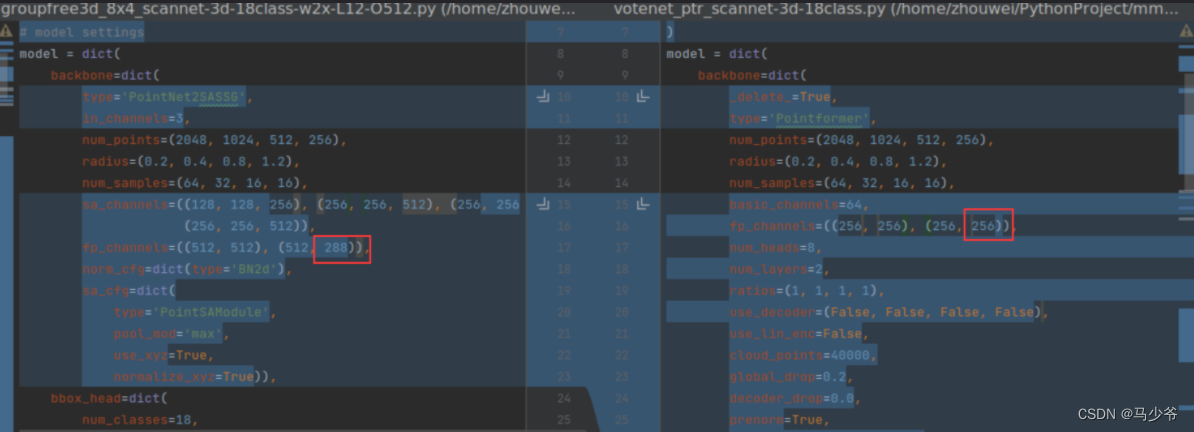
So change the output 256 by 288. If you don't use such a standardized form of code to concentrate input and output on one file , You can find the data input requirements of the first layer network and the output data format of the last layer network directly from the code of the backbone network .
such as :
Input :
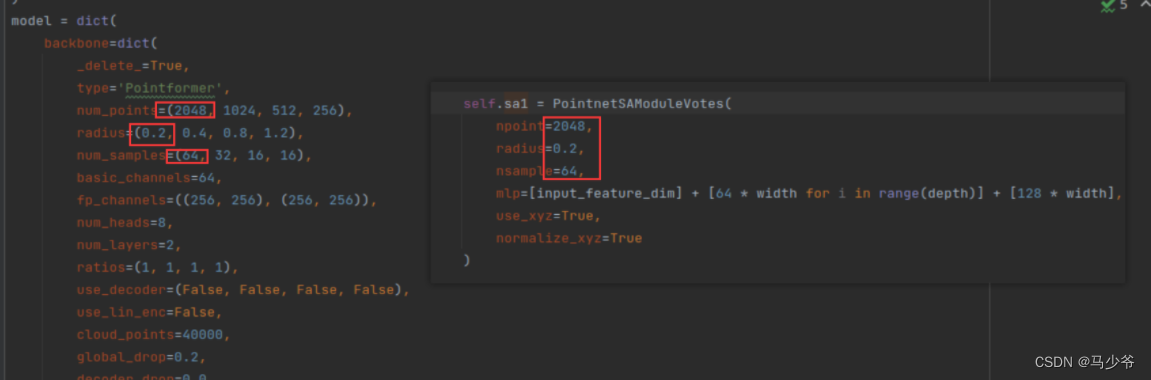
The real start of data processing here is the red box below , At this time, it can be based on self.sa1() The input involved in this function and the parameters of its network are checked .
Output :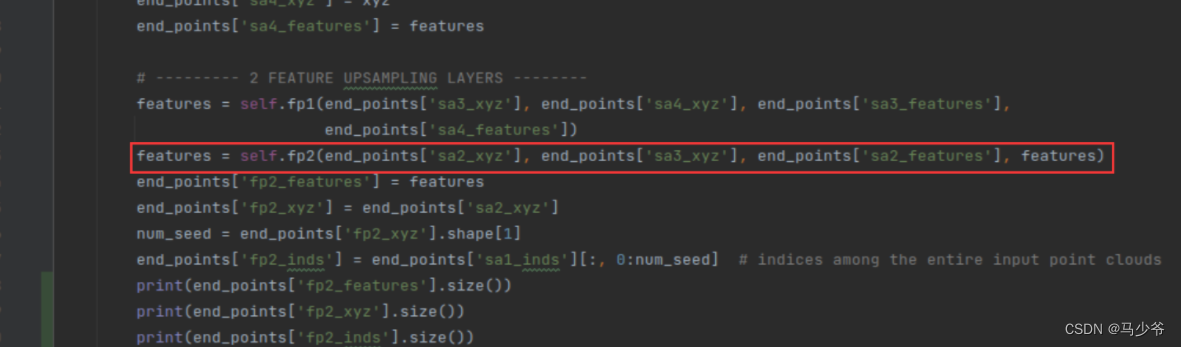
The last layer of the backbone network is self.fp2() This function , Similarly, you can find its network parameter design :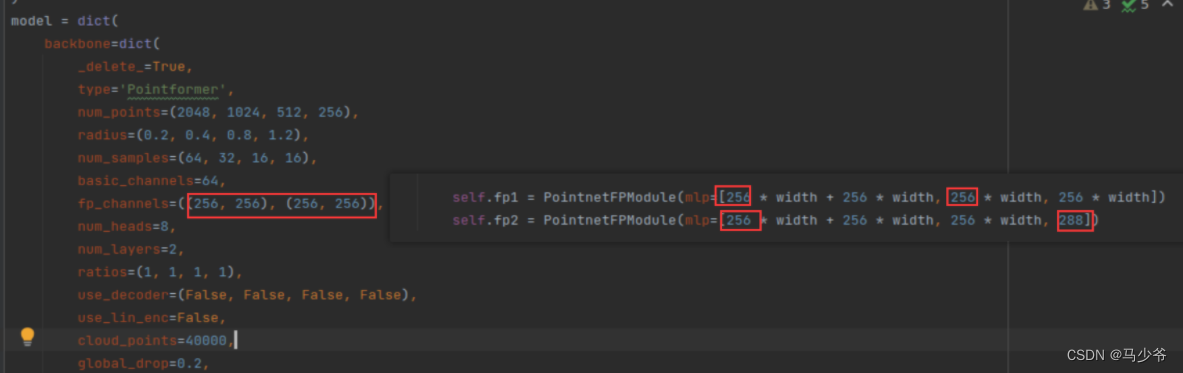
After modification, the backbone network can be replaced :
3、 Check whether the input and output match
After modifying the settings, you can replace the backbone network , Check the backbone network after replacement (Pointfomer) Whether the input and output in the new model are consistent with the original backbone network (PointNet++) The input and output of correspond to . First, check the input and output of the backbone network in the original method , This is the time to use debug The model , Here's the picture ,PointNet++ The input is :
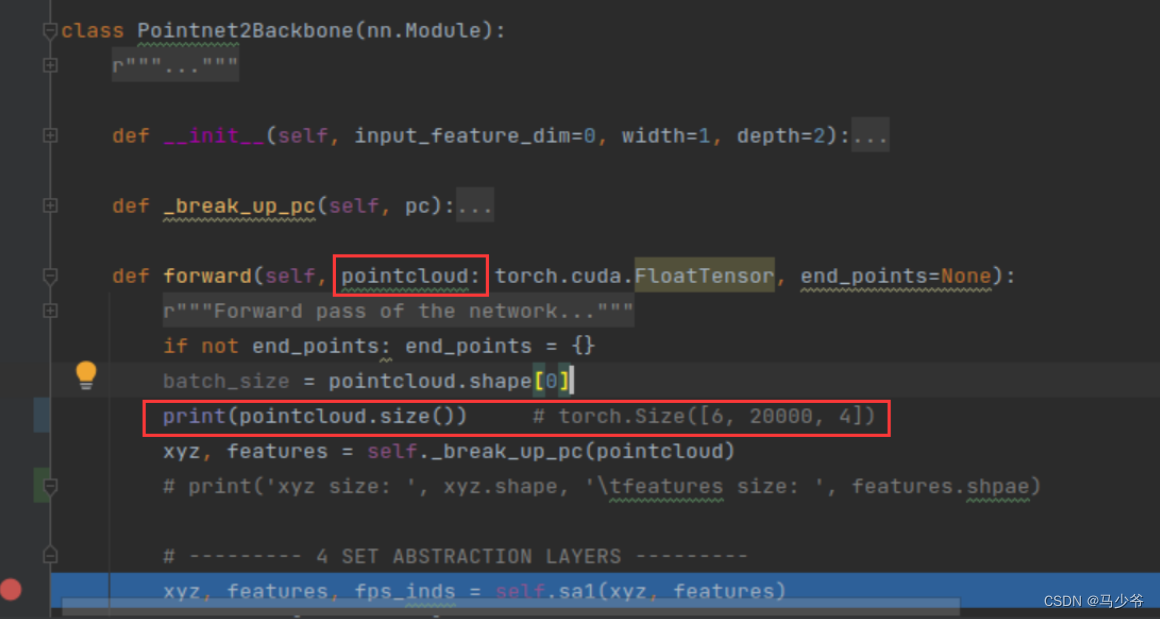
Attention should be paid to forward Check the input size in the function , Here, for example. PointNet++ The input size of is torch.Size([6, 20000, 4]), The format is (batch_size, Number of point clouds , Vector length of point cloud ), Remember the size of this input , Replace with Pointformer We should also let Pointformer Can accept data of this size .
Next look at PointNet++ Output , Pull straight to forward Function return statement , Then set the same breakpoint to print out the contents and size .
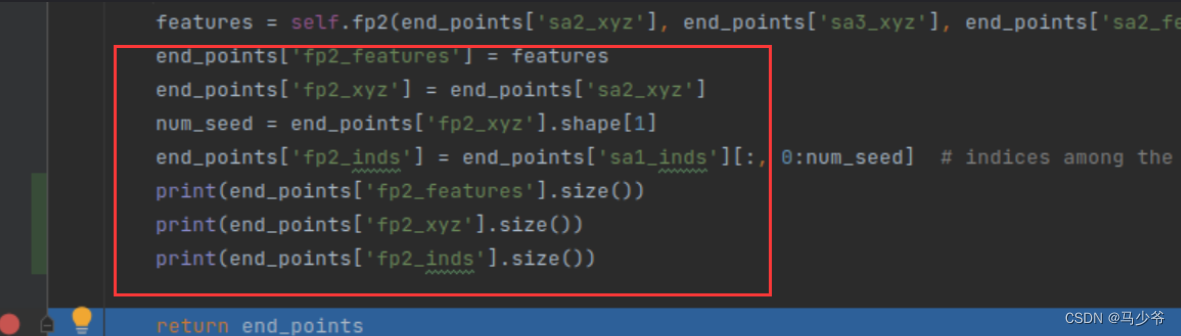
Grasp the main output , It mainly focuses on the output of the next module after the backbone network output , For example, there are three outputs in one dictionary , Take another look at the input of the module behind the backbone network, which also needs these three outputs , As shown in the figure below :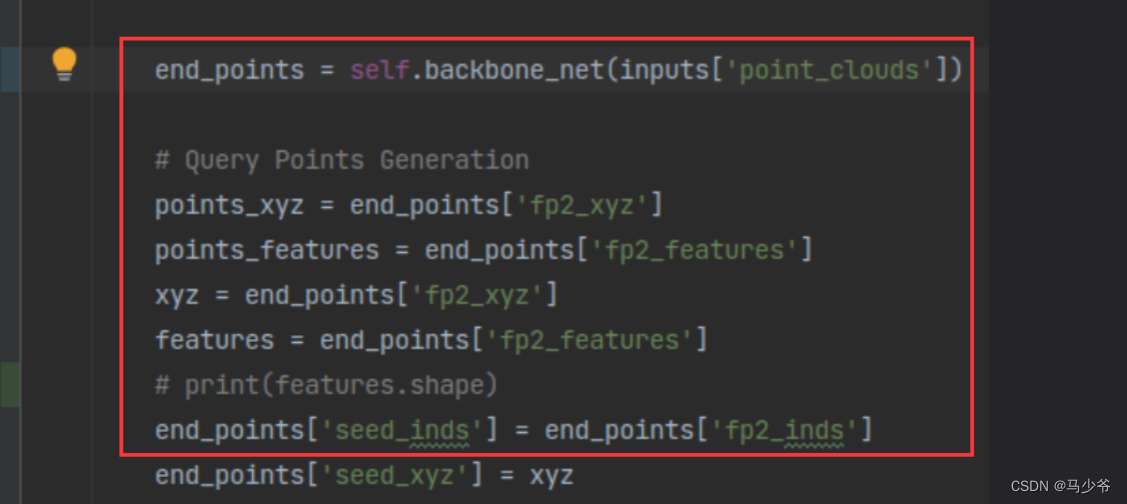
The output of the backbone network here is :
torch.Size([6, 288, 1024])
torch.Size([6, 1024, 3])
torch.Size([6, 1024])
Also remember the size of these three data , Replace with Pointformer Then check Pointformer Does the output of match the size of these data .
summary
The first principle to remember is , The replaced backbone network has the same size of data input and output as the original backbone network . Then check the data input size of the first layer of the backbone network and the output size of the last layer of the backbone network , Modify the parameters , After modifying the parameters, replace the backbone network , Then check whether the input and output of the network match the input and output of the original backbone network . There are many details involved , Everyone has different problems , This article aims to explain the principle and some experience , It is impossible to go into every detail , In a word, record input and output , And then modify it , many debug That's it .
As for the effect of replacement , honestly , This is metaphysics , It involves a lot of things , Maybe your learning rate is not good enough , Even the accuracy of the previous method is not as good as . It is also possible that the module you added has a conflict with the following module, resulting in a decline in performance , And so on. .
reference :https://blog.csdn.net/weixin_44715117/article/details/125322327
边栏推荐
- unrecognized selector sent to instance 0x10b34e810
- Hazel engine learning (V)
- DOMContentLoaded和window.onload
- 腾讯云原生数据库TDSQL-C入选信通院《云原生产品目录》
- LAB1配置脚本
- Stored procedures and functions (MySQL)
- 如何替换模型的骨干网络(backbone)
- Data analysis from the perspective of control theory
- [colmap] 3D reconstruction with known camera pose
- Form validation of uniapp
猜你喜欢
![Jericho is in non Bluetooth mode. Do not jump back to Bluetooth mode when connecting the mobile phone [chapter]](/img/ce/baa4acb1b4bfc19ccf8982e1e320b2.png)
Jericho is in non Bluetooth mode. Do not jump back to Bluetooth mode when connecting the mobile phone [chapter]
体会设计细节

Stored procedures and functions (MySQL)
杰理之开启经典蓝牙 HID 手机的显示图标为键盘设置【篇】

亚像素级角点检测Opencv-cornerSubPix
图形化工具打包YOLOv5,生成可执行文件EXE
Decoration design enterprise website management system source code (including mobile source code)
Uniapp adaptation problem
input_delay
mos管实现主副电源自动切换电路,并且“零”压降,静态电流20uA
随机推荐
Jericho turns on the display icon of the classic Bluetooth hid mobile phone to set the keyboard [chapter]
leetcode
Flink task exit process and failover mechanism
Jerry's FM mode mono or stereo selection setting [chapter]
Intelligent static presence detection scheme, 5.8G radar sensing technology, human presence inductive radar application
函数重入、函数重载、函数重写自己理解
Starting from 1.5, build a micro Service Framework -- log tracking traceid
Appx代码签名指南
Jerry's broadcast has built-in flash prompt tone to control playback pause [chapter]
[cpk-ra6m4 development board environment construction based on RT thread studio]
Experience design details
Hazel engine learning (V)
Data analysis from the perspective of control theory
上个厕所的功夫,就把定时任务的三种调度策略说得明明白白
校招行测笔试-数量关系
Cocos2d-x Box2D物理引擎编译设置
【达梦数据库】备份恢复后要执行两个sql语句
Household appliance industry under the "retail is king": what is the industry consensus?
变量、流程控制与游标(MySQL)
mos管实现主副电源自动切换电路,并且“零”压降,静态电流20uA