当前位置:网站首页>实现fashion_minst服装图像分类
实现fashion_minst服装图像分类
2022-08-02 19:48:00 【重邮研究森】
活动地址:CSDN21天学习挑战赛
目录
文中一些基础概念的知识在我写的这个文章中可以查阅
(5条消息) tensorflow零基础入门学习_重邮研究森的博客-CSDN博客 https://blog.csdn.net/m0_60524373/article/details/124143223
1.跑通代码
我这个人对于任何代码,我都会先去跑通之和才会去观看内容,哈哈哈,所以第一步我们先不管37=21,直接把博主的代码复制黏贴一份运行结果。(PS:做了一些修改,因为原文是jupyter,而我在pycharm)
import tensorflow as tf
from tensorflow.keras import datasets, layers, models
import matplotlib.pyplot as plt
import numpy as np

(train_images, train_labels), (test_images, test_labels) = datasets.fashion_mnist.load_data()

# 将像素的值标准化至0到1的区间内。
train_images, test_images = train_images / 255.0, test_images / 255.0


#调整数据到我们需要的格式
train_images = train_images.reshape((60000, 28, 28, 1))
test_images = test_images.reshape((10000, 28, 28, 1))


class_names = ['T-shirt/top', 'Trouser', 'Pullover', 'Dress', 'Coat',
               'Sandal', 'Shirt', 'Sneaker', 'Bag', 'Ankle boot']

plt.figure(figsize=(20,10))
for i in range(20):
    plt.subplot(5,10,i+1)
    plt.xticks([])
    plt.yticks([])
    plt.grid(False)
    plt.imshow(train_images[i], cmap=plt.cm.binary)
    plt.xlabel(class_names[train_labels[i]])
plt.show()


model = models.Sequential([
    layers.Conv2D(32, (3, 3), activation='relu', input_shape=(28, 28, 1)),  # 卷积层1,卷积核3*3
    layers.MaxPooling2D((2, 2)),  # 池化层1,2*2采样
    layers.Conv2D(64, (3, 3), activation='relu'),  # 卷积层2,卷积核3*3
    layers.MaxPooling2D((2, 2)),  # 池化层2,2*2采样
    layers.Conv2D(64, (3, 3), activation='relu'),  # 卷积层3,卷积核3*3

    layers.Flatten(),  # Flatten层,连接卷积层与全连接层
    layers.Dense(64, activation='relu'),  # 全连接层,特征进一步提取
    layers.Dense(10)  # 输出层,输出预期结果
])
model.summary()  # 打印网络结构


model.compile(optimizer='adam',
              loss=tf.keras.losses.SparseCategoricalCrossentropy(from_logits=True),
              metrics=['accuracy'])

history = model.fit(train_images, train_labels, epochs=10,
                    validation_data=(test_images, test_labels))


plt.imshow(test_images[1])
plt.show()
#
pre = model.predict(test_images) # 对所有测试图片进行预测
print( pre[1]) # 输出第一张图片的预测结果

plt.plot(history.history['accuracy'], label='accuracy')
plt.plot(history.history['val_accuracy'], label = 'val_accuracy')
plt.xlabel('Epoch')
plt.ylabel('Accuracy')
plt.ylim([0.5, 1])
plt.legend(loc='lower right')
plt.show()

test_loss, test_acc = model.evaluate(test_images,  test_labels, verbose=2)


print("测试准确率为:",test_acc)
点击pycharm即可运行出最后的预测结果!

2.代码分析
神经网络的整个过程我分为如下六部分,而我们也会对这六部分进行逐部分分析。那么这6部分分别是:
六步法:
1->import
2->train test(指定训练集的输入特征和标签)
3->class MyModel(model) model=Mymodel(搭建网络结构,逐层描述网络)
4->model.compile(选择哪种优化器,损失函数)
5->model.fit(执行训练过程,输入训练集和测试集的特征+标签,batch,迭代次数)
6->验证
2.1
导入:这里很容易理解,也就是导入本次实验内容所需要的各种库。在本案例中主要包括以下部分:
import tensorflow as tf
from tensorflow.keras import datasets, layers, models
import matplotlib.pyplot as plt
import numpy as np
主要是tensorflow以及绘制的库。
对于这里的话我们可以直接复制黏贴,当需要一些其他函数时,只需要添加对应的库文件即可。
2.2
设置训练集和测试集:对于神经网络的训练包括了两种数据集合,一个是训练集,一个是测试集。其中训练集数据较多,测试集较少,因为训练一个模型数据越多相对的模型更准确。
本文中的数据集利用了网络的fashion_mnist数据集,该数据集是一个衣服的数据集合
下图为该数据集介绍
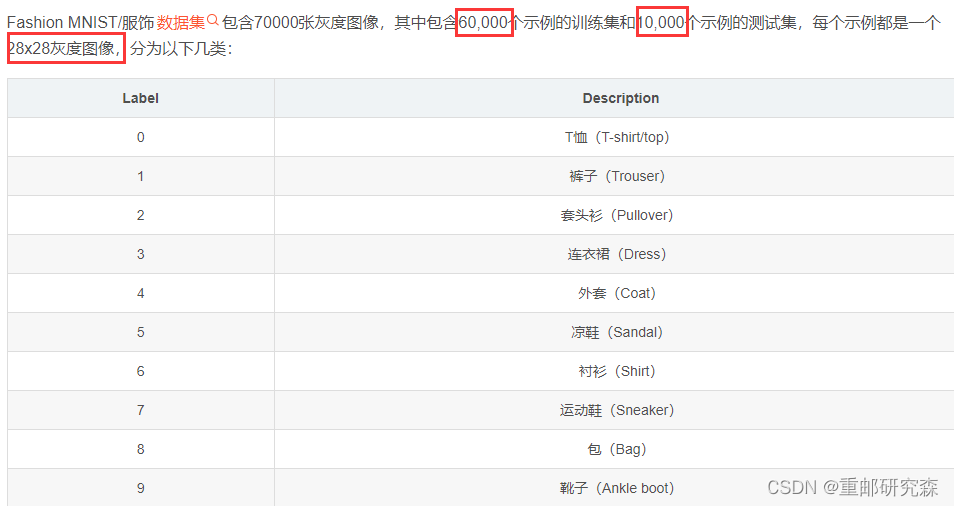
注意事项:由于本实验中的都是图像数据集,为了使网络训练结果更好,我们需要对图像数据进行标准化。像素点是255个,所以对于数据整除255即可。
train_images, test_images = train_images / 255.0, test_images / 255.0在进行了标准化之和,我们的图像数据还是不能直接传入,对于网络模型的输入,我们需要让输入数据和网络模型的“入口”保持一致。因此我们还需要把数据进行尺寸修改,这里的修改大小倒是不明确要求。
train_images = train_images.reshape((60000, 28, 28, 1))
test_images = test_images.reshape((10000, 28, 28, 1))注意事项:这里的60000和10000是指数据集中的衣服个数,28是指尺寸,而1是指灰色图像的通道数。
2.3
网络模型搭建:这里也是神经网络的重点了!废话不多说,直接开始!
本文的神经网络的结构图如下:
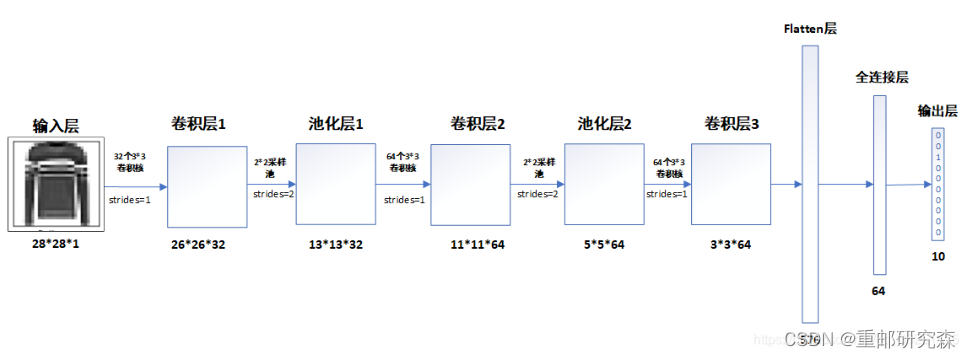
在搭建模型的时候,我们将按照这个图片进行模型的搭建。
卷积层1:32通道,3x3尺寸,步长1的卷积核
layers.Conv2D(32, (3, 3), activation='relu', input_shape=(28, 28, 1))注意事项:这里是网络模型的第一层,因此要加上输入
池化层1:该池化层为2x2
layers.MaxPooling2D((2, 2))卷积层2:64通道,3x3尺寸,步长1的卷积核
layers.Conv2D(64, (3, 3), activation='relu')池化层2:该池化层为2x2
layers.MaxPooling2D((2, 2))卷积层3:64通道,3x3尺寸,步长1的卷积核
layers.Conv2D(64, (3, 3), activation='relu')重点:
现在我们来分析一下图片中经过每层后数据的维度怎么来的
经过卷积层1之后,原数据28x28变为26x26是因为一个公式: (28-3)/stride+1=26
经过池化层1之后,原数据26x26变为13x13是因为池化池的卷积核为2,所以13=26/2
经过卷积层2之后,原数据13变为11:如上,32变为64是因为此时卷积核通道数为64
经过卷积层3之后,原数据(5-3)/stride+1=3
经过flatten层之后,数据数量=3*3*64=576
而后续全连接层的输出是根据全连接层代码设置。需要注意的是因为数据集是10种类型,因此最后为10
到此,我们便把网络模型设置的原因以及网络模型的输出结果进行了对应,我们可以看到网络模型的输出和我们分析的一致。
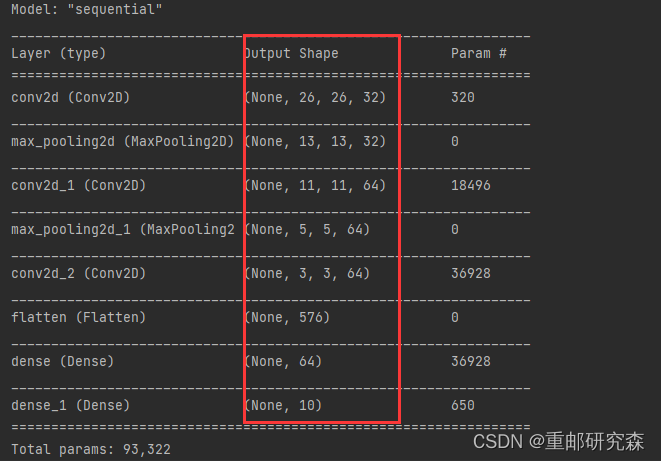
到此,网络模型我们变分析完了。
2.4
该部分也同样重要,主要完成模型训练过程中的优化器,损失函数,准确率的设置。
我们结合本文来看。
model.compile(optimizer='adam',
              loss=tf.keras.losses.SparseCategoricalCrossentropy(from_logits=True),
              metrics=['accuracy'])
其中:对于这三个内容的含义可以参考我的文章开头的另外一篇基础博文进行了详细的介绍
2.5
该部分就是执行训练了,那么执行训练肯定需要设置训练集数据及其标签,测试集数据及其标签,训练的epoch
history = model.fit(train_images, train_labels, epochs=10,
                    validation_data=(test_images, test_labels))
2.6
当训练执行完毕,我们就可以拿一个测试集合中或者其他满足格式的数据进行验证了,这里为了方便,我就用测试集合进行验证。
pre = model.predict(test_images) # 对所有测试图片进行预测
print( pre[1]) # 输出第一张图片的预测结果
3.补充
本文中我们引入了一些其他概念。模型评估
通过训练和测试集合的准确率曲线来看看我们的模型的效果。
plt.plot(history.history['accuracy'], label='accuracy')
plt.plot(history.history['val_accuracy'], label = 'val_accuracy')
plt.xlabel('Epoch')
plt.ylabel('Accuracy')
plt.ylim([0.5, 1])
plt.legend(loc='lower right')
plt.show()

test_loss, test_acc = model.evaluate(test_images,  test_labels, verbose=2)


print("测试准确率为:",test_acc)
最后我们可以得到模型曲线以及测试集合的准确率
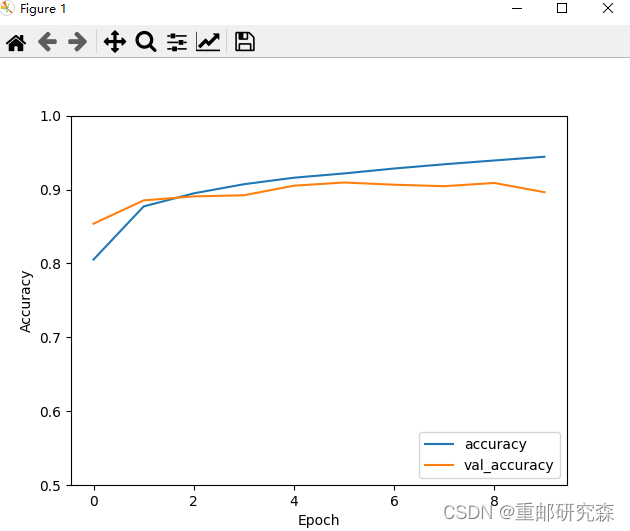
测试准确率为: 0.896399974822998
边栏推荐
猜你喜欢

Redis 5 种数据结构及对应使用场景
PG's SQL execution plan

即时通讯开发移动端网络短连接的优化手段

【LeetCode】118. 杨辉三角 - Go 语言题解
Leetcode刷题——单调栈问题(739每日温度问题、496下一个更大元素I、503下一个更大元素 II)
A Review of Nature Microbiology: Focusing on the Algae--Ecological Interface of Phytoplankton-Bacteria Interactions
2022-07-28

What is a Field Service Management System (FSM)?what is the benefit?
牛客题目——滑动窗口的最大值、矩阵最长递增路径、顺时针旋转矩阵、接雨水问题
JWT学习
随机推荐
Brain-computer interface 003 | Musk said that he has realized a virtual self-dialogue with the cloud, and related concept shares have risen sharply
Redis cluster configuration
Electron User Guide Beginning Experience
ShardingSphere-proxy +PostgreSQL implements read-write separation (static strategy)
golang刷leetcode 经典(10) tire树与ac自动机
ALV报表学习总结
【LeetCode】1161. 最大层内元素和
SQL Server数据类型转换函数cast()和convert()详解
【LeetCode】1374. 生成每种字符都是奇数个的字符串
golang刷leetcode 动态规划(13) 最长公共子序列
OpenCV开发中的内存管理问题
牛客题目——滑动窗口的最大值、矩阵最长递增路径、顺时针旋转矩阵、接雨水问题
SQL Server安装教程
译出我精彩 | 7月墨力翻译计划获奖名单公布
Geoserver+mysql+openlayers2
LM小型可编程控制器软件(基于CoDeSys)笔记二十五:plc的数据存储区(数字量输入通道部分)
MaxCompute 的SQL 引擎参数化视图具体有哪些增强功能?
PG's SQL execution plan
JWT学习
解析Collection接口中的常用的被实现子类重写的方法