当前位置:网站首页>【wpf】wpf中的那些模板之深度解析
【wpf】wpf中的那些模板之深度解析
2022-07-31 04:20:00 【code bean】
举几个例子
1 ItemsPanelTemplate(子项容器模板)
<ListView.ItemsPanel>
    <ItemsPanelTemplate>
        <!--布局的时候,子项是动态绑定-->
        <Canvas/>
    </ItemsPanelTemplate>
</ListView.ItemsPanel>
ListView的ItemsPanel的类型为ItemsPanelTemplate,
2 DataTemplate(数据模板)
<ListView.ItemTemplate>
    <DataTemplate>
        <Grid Canvas.Left="{Binding Left}" Canvas.Top="{Binding Top}">
            <Grid.ColumnDefinitions>
                <ColumnDefinition/>
                <ColumnDefinition/>
                <ColumnDefinition/>
            </Grid.ColumnDefinitions>
            <TextBlock Text="{Binding Name}"/>
            <TextBlock Text="{Binding Age}" Grid.Column="1"/>
        </Grid>
    </DataTemplate>
</ListView.ItemTemplate>
ListView的ItemTemplate属性的类型是DataTemplate
3 ControlTemplate(控件模板)
而Button的Template属性的类型是ControlTemplate,其实任何控制的Template属性的类型都是
ControlTemplate,如Button:
<Button DataContext="{StaticResource datas}" Height="50">
    <Button.Template>
        <ControlTemplate TargetType="Button">
            <Grid DataContext="{Binding [0]}">
                <Grid.ColumnDefinitions>
                    <ColumnDefinition/>
                    <ColumnDefinition/>
                    <ColumnDefinition/>
                </Grid.ColumnDefinitions>
                <TextBlock Text="{Binding Name}"/>
                <TextBlock Text="{Binding Age}" Grid.Column="1"/>
            </Grid>
        </ControlTemplate>
避开两个坑
要理解模板,首要避开的一个坑就是,模板属性名称和模板类型名称。不区分这个东西,你会误以为有很多模板类型,直接吓蒙,劝退。
每个控件的模板属性和模板类型,是实例与类的关系,这里一定注意!
其次,要认识到,下面这种语法这并不是嵌套,而是属性的赋值,是一个实例化的过程:
<ListView.ItemsPanel>
    <ItemsPanelTemplate>
        <!--布局的时候,子项是动态绑定-->
        <Canvas/>
    </ItemsPanelTemplate>
</ListView.ItemsPanel>
ListView的ItemsPanel属性的类型为ItemsPanelTemplate,所以这里在里面写了一个ItemsPanelTemplate,这表示实例化了一个ItemsPanelTemplate对象并赋值给ListView的ItemsPanel属性。
逻辑树和视觉树
谈论模板,避不开视觉树,首先看逻辑树,这个很简单,因为它很直观就是xaml中嵌套这些“业务逻辑”:
<Window x:Class="Zhaoxi.WPFLession.Window1"
        xmlns="http://schemas.microsoft.com/winfx/2006/xaml/presentation"
        xmlns:x="http://schemas.microsoft.com/winfx/2006/xaml"
        xmlns:d="http://schemas.microsoft.com/expression/blend/2008"
        xmlns:mc="http://schemas.openxmlformats.org/markup-compatibility/2006"
        xmlns:local="clr-namespace:Zhaoxi.WPFLession"
        mc:Ignorable="d"
        Title="Window1" Height="450" Width="800">
    <UniformGrid Rows="2" Columns="2">
        <Button>
            <TextBox>asdfasdf</TextBox>
        </Button>
        <TextBox Width="100" Height="30">123456</TextBox>
        <TextBlock Width="100" Height="30" Background="AliceBlue">sdfad</TextBlock>
    </UniformGrid>
</Window>
现在上面这段代码的逻辑树,就是:Window -》UniformGrid-》Button-》TextBox (并列的关系我就不画了)
视觉树,就要看控件内部,比如Button这个控件,就是由更基础的元素构建的,只是被封装起来我们看不到细节而已,但是你能看到button中间有文字,背景是灰色的。
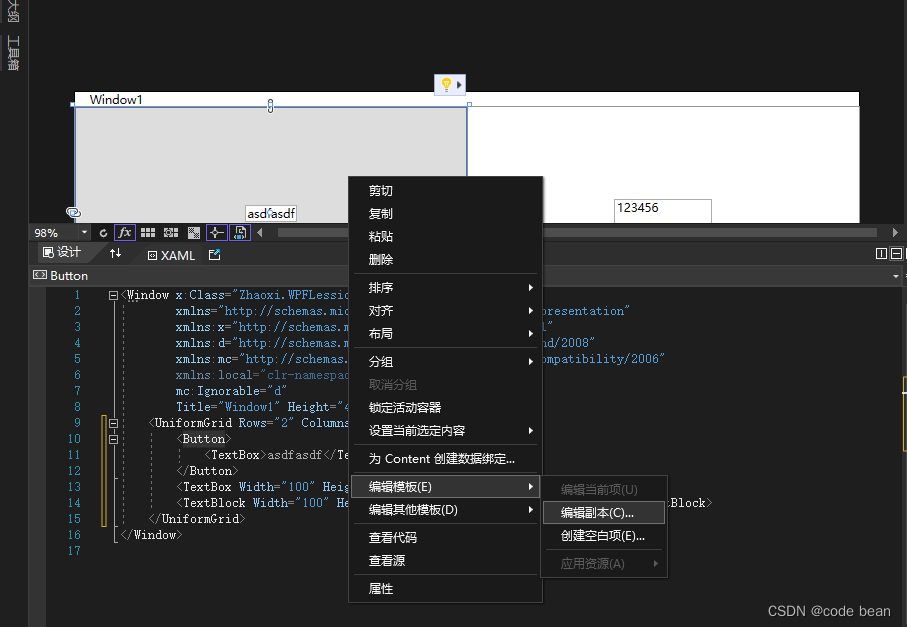
接下来,我们可以借助编辑模板这个功能,观察一下,Button的内部世界(视觉树):
选中Button,右键选择=》编辑模板
<Style x:Key="ButtonStyle1" TargetType="{x:Type Button}">
            <Setter Property="FocusVisualStyle" Value="{StaticResource FocusVisual}"/>
            <Setter Property="Background" Value="{StaticResource Button.Static.Background}"/>
            <Setter Property="BorderBrush" Value="{StaticResource Button.Static.Border}"/>
            <Setter Property="Foreground" Value="{DynamicResource {x:Static SystemColors.ControlTextBrushKey}}"/>
            <Setter Property="BorderThickness" Value="1"/>
            <Setter Property="HorizontalContentAlignment" Value="Center"/>
            <Setter Property="VerticalContentAlignment" Value="Center"/>
            <Setter Property="Padding" Value="1"/>
            <Setter Property="Template">
                <Setter.Value>
                    <ControlTemplate TargetType="{x:Type Button}">
                        <Border x:Name="border" Background="{TemplateBinding Background}" BorderBrush="{TemplateBinding BorderBrush}" BorderThickness="{TemplateBinding BorderThickness}" SnapsToDevicePixels="true">
                            <ContentPresenter x:Name="contentPresenter" Focusable="False" HorizontalAlignment="{TemplateBinding HorizontalContentAlignment}" Margin="{TemplateBinding Padding}" RecognizesAccessKey="True" SnapsToDevicePixels="{TemplateBinding SnapsToDevicePixels}" VerticalAlignment="{TemplateBinding VerticalContentAlignment}"/>
                        </Border>
                        <ControlTemplate.Triggers>
                            <Trigger Property="IsDefaulted" Value="true">
                                <Setter Property="BorderBrush" TargetName="border" Value="{DynamicResource {x:Static SystemColors.HighlightBrushKey}}"/>
                            </Trigger>
                            <Trigger Property="IsMouseOver" Value="true">
                                <Setter Property="Background" TargetName="border" Value="{StaticResource Button.MouseOver.Background}"/>
                                <Setter Property="BorderBrush" TargetName="border" Value="{StaticResource Button.MouseOver.Border}"/>
                            </Trigger>
                            <Trigger Property="IsPressed" Value="true">
                                <Setter Property="Background" TargetName="border" Value="{StaticResource Button.Pressed.Background}"/>
                                <Setter Property="BorderBrush" TargetName="border" Value="{StaticResource Button.Pressed.Border}"/>
                            </Trigger>
                            <Trigger Property="IsEnabled" Value="false">
                                <Setter Property="Background" TargetName="border" Value="{StaticResource Button.Disabled.Background}"/>
                                <Setter Property="BorderBrush" TargetName="border" Value="{StaticResource Button.Disabled.Border}"/>
                                <Setter Property="TextElement.Foreground" TargetName="contentPresenter" Value="{StaticResource Button.Disabled.Foreground}"/>
                            </Trigger>
                        </ControlTemplate.Triggers>
                    </ControlTemplate>
                </Setter.Value>
            </Setter>
        </Style>
这里通过Style设置了button的所有属性,但是这里我们重点关注的是Template这个属性!这里就是视觉树的呈现。那我们发现构成button的元素部分,异常的简单:
<Border x:Name="border" Background="{TemplateBinding Background}" BorderBrush="{TemplateBinding BorderBrush}" BorderThickness="{TemplateBinding BorderThickness}" SnapsToDevicePixels="true">
    <ContentPresenter x:Name="contentPresenter" Focusable="False" HorizontalAlignment="{TemplateBinding HorizontalContentAlignment}" Margin="{TemplateBinding Padding}" RecognizesAccessKey="True" SnapsToDevicePixels="{TemplateBinding SnapsToDevicePixels}" VerticalAlignment="{TemplateBinding VerticalContentAlignment}"/>
</Border>
一个 border里面放了一个ContentPresenter(数据模板相关,后面讲解) 。而这些被包含在了一个叫做ControlTemplate的标签里。
ControlTemplate
ControlTemplate控件模板就是给修改视觉树提供了一个接口!接下来我想看看Listbox的控件模板,方法一样:
<Style x:Key="ListBoxStyle1" TargetType="{x:Type ListBox}">
            <Setter Property="Background" Value="{StaticResource ListBox.Static.Background}"/>
            <Setter Property="BorderBrush" Value="{StaticResource ListBox.Static.Border}"/>
            <Setter Property="BorderThickness" Value="1"/>
            <Setter Property="Foreground" Value="{DynamicResource {x:Static SystemColors.ControlTextBrushKey}}"/>
            <Setter Property="ScrollViewer.HorizontalScrollBarVisibility" Value="Auto"/>
            <Setter Property="ScrollViewer.VerticalScrollBarVisibility" Value="Auto"/>
            <Setter Property="ScrollViewer.CanContentScroll" Value="true"/>
            <Setter Property="ScrollViewer.PanningMode" Value="Both"/>
            <Setter Property="Stylus.IsFlicksEnabled" Value="False"/>
            <Setter Property="VerticalContentAlignment" Value="Center"/>
            <Setter Property="Template">
                <Setter.Value>
                    <ControlTemplate TargetType="{x:Type ListBox}">
                        <Border x:Name="Bd" Background="{TemplateBinding Background}" BorderBrush="{TemplateBinding BorderBrush}" BorderThickness="{TemplateBinding BorderThickness}" Padding="1" SnapsToDevicePixels="true">
                            <ScrollViewer Focusable="false" Padding="{TemplateBinding Padding}">
                                <ItemsPresenter SnapsToDevicePixels="{TemplateBinding SnapsToDevicePixels}"/>
                            </ScrollViewer>
                        </Border>
                        <ControlTemplate.Triggers>
                            <Trigger Property="IsEnabled" Value="false">
                                <Setter Property="Background" TargetName="Bd" Value="{StaticResource ListBox.Disabled.Background}"/>
                                <Setter Property="BorderBrush" TargetName="Bd" Value="{StaticResource ListBox.Disabled.Border}"/>
                            </Trigger>
                            <MultiTrigger>
                                <MultiTrigger.Conditions>
                                    <Condition Property="IsGrouping" Value="true"/>
                                    <Condition Property="VirtualizingPanel.IsVirtualizingWhenGrouping" Value="false"/>
                                </MultiTrigger.Conditions>
                                <Setter Property="ScrollViewer.CanContentScroll" Value="false"/>
                            </MultiTrigger>
                        </ControlTemplate.Triggers>
                    </ControlTemplate>
                </Setter.Value>
            </Setter>
        </Style>
元素构成部分也不多:
<Border x:Name="Bd" Background="{TemplateBinding Background}" BorderBrush="{TemplateBinding BorderBrush}" BorderThickness="{TemplateBinding BorderThickness}" Padding="1" SnapsToDevicePixels="true">
    <ScrollViewer Focusable="false" Padding="{TemplateBinding Padding}">
        <ItemsPresenter SnapsToDevicePixels="{TemplateBinding SnapsToDevicePixels}"/>
    </ScrollViewer>
</Border>
最后我想看看TextBlock的ControlTemplate,然而你会发现TextBlock根本没有ControlTemplate,因为他根本就不算是一个控件,他直接继承自FrameworkElement,它只是一个元素。(包括Border和ItemPresenter以及ContentPresenter都是继承FrameworkElement并没有直接继承自Control)
那么这里,我总结一下:
逻辑树中每个控件的内部其实包含了视觉树。视觉树也是有基本的元素和控件构成!因为视觉树是被封装起来的,所以微软为程序员提供了修改控件内部(视觉树)的机会,及控件模板。修改控件模板,可以轻易改变控件的外表!举个例子:
这两个都是checkbox,我们不需要重写控件,只需要通过控件模板修改一下逻辑树以及Trigger就能实现。(Trigger下一篇再说)
注意:这里指定TargetType是很重要的,不然IsChecked这个属性无法通过编译
<CheckBox Width="100" Height="50" >
    <CheckBox.Template>
        <ControlTemplate TargetType="CheckBox">
            <Border Background="AliceBlue">
                <Canvas>
                    <Rectangle x:Name="rt" Fill="Orange" Width="50" Height="50"/>
                </Canvas>
            </Border>
            <ControlTemplate.Triggers>
                <Trigger Property="IsChecked" Value="true">
                    <Setter TargetName="rt" Property="Canvas.Left" Value="50"/>
                </Trigger>
            </ControlTemplate.Triggers>
        </ControlTemplate>
    </CheckBox.Template>
</CheckBox>
DataTemplate
接下来是数据模板,他也要看这个课视觉树,前面的视觉树中,我们发现了一个不认识的东西,但是视觉树里基本都有他:ItemPresenter以及ContentPresenter(以Presenter结尾的东西)
这些以Presenter结尾的元素,统称为“内容占位”。为啥wpf中控件之间可以任意嵌套?奥秘就在这里,如果你给button内部嵌套个啥的,这个东西都会扔给ContentPresenter,ContentPresenter会将其包裹起来。而Presenter结尾的元素也就是数据模板作用的对象。
举个例子:
<Window x:Class="Zhaoxi.WPFLession.Window1"
        xmlns="http://schemas.microsoft.com/winfx/2006/xaml/presentation"
        xmlns:x="http://schemas.microsoft.com/winfx/2006/xaml"
        xmlns:d="http://schemas.microsoft.com/expression/blend/2008"
        xmlns:mc="http://schemas.openxmlformats.org/markup-compatibility/2006"
        xmlns:local="clr-namespace:Zhaoxi.WPFLession"
        mc:Ignorable="d"
        Title="Window1" Height="450" Width="800">
    <Window.Resources>
        <x:Array Type="local:Person" x:Key="datas">
            <local:Person Name="啊啊啊" Age="20" Gender="1"/>
            <local:Person Name="呃呃呃" Age="21" Gender="2"/>
            <local:Person Name="哦哦哦" Age="21" Gender="2"/>
            <local:Person Name="呵呵呵" Age="21" Gender="2"/>
        </x:Array>
    </Window.Resources>
    <UniformGrid Rows="2" Columns="2">
        <ListBox ItemsSource="{StaticResource datas}">
            <ListBox.ItemTemplate>
                <DataTemplate>
                    <DockPanel LastChildFill="False">
                        <TextBlock DockPanel.Dock="Right" Text="{Binding Name}"/>
                        <CheckBox/>
                    </DockPanel>
                </DataTemplate>
            </ListBox.ItemTemplate>
        </ListBox>
    </UniformGrid>
</Window>
效果如下:
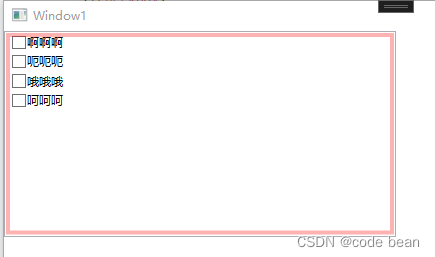
用snoop观察一下我们这个程序的内部结构:

你发现了三个Presenter结尾的元素,
一个ScrollContentPresenter是属于ListBox的视觉树种的ScrollView的,ScrollContentPresenter就包含了ItemsPresenter,就包含了一系列的ListBoxItem,而ListBoxItem就包含了我们在数据模板中定义的DataTemplate的内容:
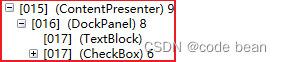
小结,数据模板,其实也能改变视觉树,只不过他并不是重新修改控件的整个视觉树,而是向Presenter结尾的元素中添加内容。而这些内容需要绑定的数据数据才会被实例化。
ItemsPanelTemplate,这个今天累了,后续补充吧。
总结:
1 我们需要避开两个坑
2 理解什么是视觉树
3 数据模板和控件模板都是微软提供的接口,用于修改视觉树。
边栏推荐
- el-image标签绑定点击事件后没有有用
- [C language] General method for finding the sum of the greatest common factor and the least common multiple of two integers m and n, the classical solution
- How Zotero removes auto-generated tags
- 「 每日一练,快乐水题 」1331. 数组序号转换
- 安全20220718
- Musk talks to the "virtual version" of Musk, how far is the brain-computer interaction technology from us
- SOLVED: After accidentally uninstalling pip (two ways to manually install pip)
- MySQL基础操作
- Two address pools r2 are responsible for managing the address pool r1 is responsible for managing dhcp relays
- exsl文件预览,word文件预览网页方法
猜你喜欢

Notes on the establishment of the company's official website (6): The public security record of the domain name is carried out and the record number is displayed at the bottom of the web page

Why don't you programmers make a living off your own projects?And have to work for someone else?
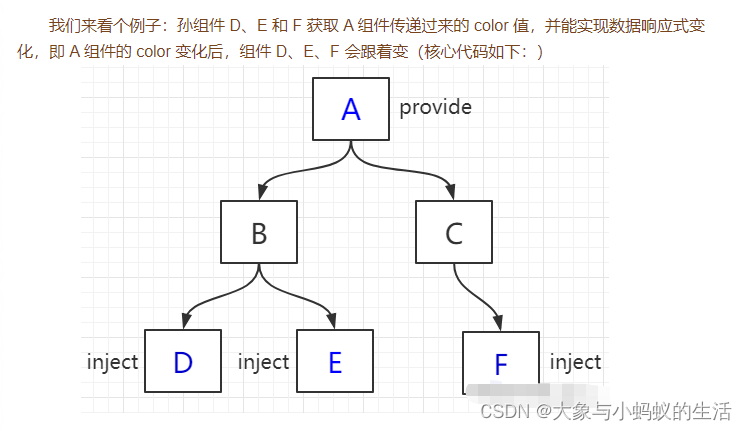
组件传值 provide/inject

What is a system?
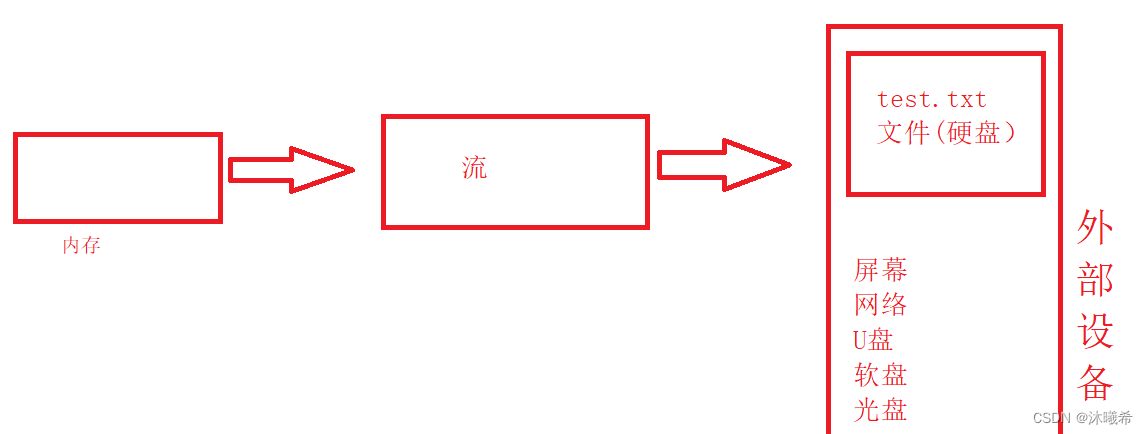
【C语言进阶】文件操作(一)

「 每日一练,快乐水题 」1331. 数组序号转换
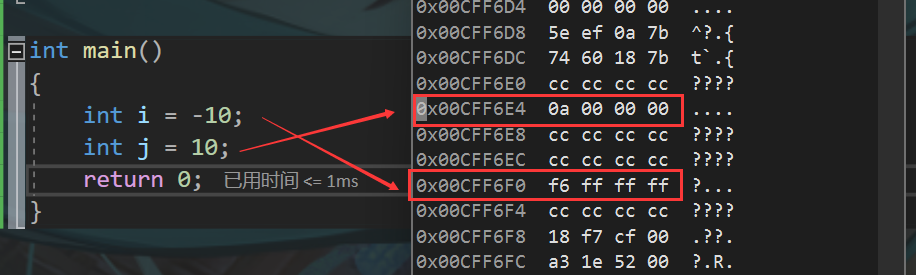
C language from entry to such as soil, the data store

从零开始,一镜到底,纯净系统搭建除草机(Grasscutter)

(4) Recursion, variable parameters, access modifiers, understanding main method, code block
![[C language] General method of base conversion](/img/28/954af5f47a79ff02d3cc0792ac8586.jpg)
[C language] General method of base conversion
随机推荐
mysql数据库安装(详细)
Thinking about data governance after Didi fines
MySQL修改root账号密码
Reinforcement learning: from entry to pit to shit
马斯克对话“虚拟版”马斯克,脑机交互技术离我们有多远
聚变云原生,赋能新里程 | 2022开放原子全球开源峰会云原生分论坛圆满召开
"DeepJIT: An End-To-End Deep Learning Framework for Just-In-Time Defect Prediction" paper notes
ERROR 1819 (HY000) Your password does not satisfy the current policy requirements
RESTful api interface design specification
RESTful api接口设计规范
type_traits metaprogramming library learning
已解决:不小心卸载pip后(手动安装pip的两种方式)
Summary of Huawei Distributed Storage FusionStorage Knowledge Points [Interview]
Port inspection steps - 7680 port analysis - Dosvc service
【C语言进阶】文件操作(一)
[Swift] Customize the shortcut that pops up by clicking the APP icon
ERROR 2003 (HY000) Can‘t connect to MySQL server on ‘localhost3306‘ (10061)解决办法
No qualifying bean of type 问题
重磅 | 开放原子校源行活动正式启动
Understanding of the presence of a large number of close_wait states