当前位置:网站首页>Pytorch Deep Learning Quick Start Tutorial -- Mound Tutorial Notes (3)
Pytorch Deep Learning Quick Start Tutorial -- Mound Tutorial Notes (3)
2022-08-05 09:32:00 【TARS_90%Honesty】
Pytorch入门学习(三)
现有网络模型的使用及修改
- 以vgg16网络模型为例,The final classification is1000类,而使用的CIFAR10The dataset needs to be split at the end10类,Therefore, it is necessary to modify the network model.
- Add linear layers directly
- Modify the parameters of the last linear layer
- 代码
# torchvision.models.vgg16(pretrained: bool = False, progress: bool = True, **kwargs)
# pretrained (bool) – If True, returns a model pre-trained on ImageNet
# progress (bool) – If True, displays a progress bar of the download to stderr
# 参数pretrained:为TrueRepresents that the parameters in the downloaded network model are already thereImageNetThe dataset is trained,预训练
# 为FalseRepresents the parameters in the downloaded network model as initial values,Not trained
# 参数progress为True,显示下载进度条
import torchvision

# ../Represents return to the previous path,通常./就可以
# train_data = torchvision.datasets.ImageNet("./ImageNet", split="train", transform=torchvision.transforms.ToTensor(),download = True)
# RuntimeError: The archive ILSVRC2012_devkit_t12.tar.gz is not present in the root directory or is corrupted.
# You need to download it externally and place it in ./ImageNet.
from torch import nn

vgg16_false = torchvision.models.vgg16(pretrained=False)
vgg16_true = torchvision.models.vgg16(pretrained=True)
# print(vgg16_true)

train_data = torchvision.datasets.CIFAR10("./dataset", train=True, download=True,
                                          transform=torchvision.transforms.ToTensor())
# How to improve your existing network to achieve your goals
# Vgg16训练好的模型,最后为1000类,而CIFAR10为10类

# 第一种实现,最后添加Linear层,将1000类转换成10类
# vgg16_true.add_module("add_linear", nn.Linear(1000, 10))
# print(vgg16_true)

# 第二种实现,在classifier中添加Linear层
# vgg16_true.classifier.add_module("add_linear", nn.Linear(1000, 10))
# print(vgg16_true)

# 第三种实现,直接修改VGG16模型最后Linear层的参数
print(vgg16_false)
vgg16_false.classifier[6] = nn.Linear(4096, 10)
print(vgg16_false)
网络模型的保存和读取
- 方式一:网络结构 + 网络参数
- 方式二:网络参数,以字典形式
保存
# 保存网络模型
import torch
import torchvision
from torch import nn

vgg16_false = torchvision.models.vgg16(pretrained=False)

# 保存方式一:网络模型结构 + 网络参数
# torch.save(vgg16_false, "vgg16_method1.pth")

# 保存方式二:网络参数,以字典形式(官方推荐)
# torch.save(vgg16_false.state_dict(), "vgg16_method2.pth")

# For your own defined network model,Use method 1 to save,There will be traps
class MyModule(nn.Module):
    def __init__(self) -> None:
        super().__init__()
        self.conv1 = nn.Conv2d(3, 64, kernel_size=3)
    def forward(self, x):
        x = self.conv1(x)
        return x
myModule = MyModule()
# Use method one to save
torch.save(myModule, "myModule_method1.pth")
读取
# 加载网络模型
import torch
import torchvision
from torch import nn
from model_save import *

# 加载方式一,Corresponding to save method 1
# model = torch.load("vgg16_method1.pth")
# print(model)

# 加载方式二,对应保存方式二:获取网络参数字典,Create a new network structure,导入网络参数
# model_dict = torch.load("vgg16_method2.pth")
# print(model_dict)
# vgg16 = torchvision.models.vgg16(pretrained=False)
# vgg16.load_state_dict(model_dict)
# print(vgg16)

# For your own defined network model,When using method one to load,You also need to add the definition section of the network model,The instance section is not required,否则报错
# If you don't want to copy the definition statement of the custom network model,A sentence can be addedfrom model_save import * 也可以
# class MyModule(nn.Module):
# def __init__(self) -> None:
# super().__init__()
# self.conv1 = nn.Conv2d(3, 64, kernel_size=3)
# def forward(self, x):
# x = self.conv1(x)
# return x
myModule = torch.load("myModule_method1.pth")
# If not add the definition of the network model,则会报错
# AttributeError: Can't get attribute 'MyModule' on <module '__main__' from xxx
print(myModule)
完整的模型训练套路
套路(一)
- 代码
- model.py
import torch
from torch import nn


class MyModule(nn.Module):
    def __init__(self) -> None:
        super().__init__()
        self.model = nn.Sequential(
            nn.Conv2d(in_channels=3, out_channels=32, kernel_size=5, stride=1, padding=2),
            nn.MaxPool2d(kernel_size=2),
            nn.Conv2d(32, 32, 5, 1, 2),
            nn.MaxPool2d(2),
            nn.Conv2d(32, 64, 5, 1, 2),
            nn.MaxPool2d(2),
            nn.Flatten(),
            nn.Linear(64*4*4, 64),
            nn.Linear(64, 10)
        )

    def forward(self, x):
        x = self.model(x)
        return x

# 测试网络
if __name__ == '__main__':
    myModule = MyModule()
    # The size requirement for the input of the convolutional layer is (N, C, H ,W)
    input = torch.ones((64, 3, 32, 32))
    output = myModule(input)
    print(output.shape)
    # torch.Size([64, 10])
- train.py
import torch.optim
import torchvision
from torch.utils.tensorboard import SummaryWriter

from model import *

# 准备数据集
from torch import nn
from torch.utils.data import DataLoader

train_data = torchvision.datasets.CIFAR10(root="./dataset", train=True, transform=torchvision.transforms.ToTensor(),
                                          download=True)
test_data = torchvision.datasets.CIFAR10(root="./dataset", train=False, transform=torchvision.transforms.ToTensor(),
                                         download=True)

# Get the length of the dataset
train_data_size = len(train_data)
test_data_size = len(test_data)
print("训练数据集的长度为:{}".format(train_data_size))
print("测试数据集的长度为:{}".format(train_data_size))

# 利用DataLoader加载数据集
train_dataloader = DataLoader(train_data, batch_size=64)
test_dataloader = DataLoader(test_data, batch_size=64)

# 搭建神经网络
# The standard is that new construction is requiredmodel.py,Write the definition of the network model in it,And simply test the network
# 需要导入model.py文件,from model import *

# 创建网络模型
myModule = MyModule()

# 损失函数
loss_fn = nn.CrossEntropyLoss()

# 优化器
learnng_rate = 1e-2 # 1 x 10 ^ (-2) = 0.01
optim = torch.optim.SGD(myModule.parameters(), lr = learnng_rate)

# 设置训练网络的参数
# 记录训练的次数
total_train_step = 0
# 记录测试的次数
total_test_step = 0
# 训练的轮数
epoch = 2

# 添加tensorboard
writer = SummaryWriter("logs")

for i in range(epoch):
    print("__________第{}轮训练开始__________".format(i+1))
    # 训练步骤开始
    for data in train_dataloader:
        imgs, targets = data
        outputs = myModule(imgs)
        loss = loss_fn(outputs, targets)
        # 优化器优化模型
        # Clears the previous gradient
        optim.zero_grad()
        # 反向传播,获取梯度
        loss.backward()
        # The optimizer optimizes the parameters according to the gradient
        optim.step()

        total_train_step += 1
        if total_train_step % 100 == 0:
            print("训练次数:{}, Loss:{}".format(total_train_step, loss.item())) # 添加item(),将tensorTypes are converted to plain numbers
            writer.add_scalar("train_loss", loss.item(), total_train_step)

    # After each round of training,The network needs to be run on the test data set,Evaluate the network model with its accuracy on the test dataset
    # 测试步骤开始,No tuning is required
    total_test_loss = 0
    with torch.no_grad():
        for data in test_dataloader:
            imgs, targets = data
            outputs = myModule(imgs)
            loss = loss_fn(outputs, targets)
            total_test_loss += loss.item()
    print("整体测试集上的Loss:{}".format(total_test_loss))
    writer.add_scalar("total_test_loss", total_test_loss, total_test_step)
    total_test_step += 1

    # 保存每一轮训练的结果
    torch.save(myModule, "myModule_{}.pth".format(i+1))
    print("第{}The model after the round of training has been saved".format(i+1))

writer.close()
- tensorboard显示
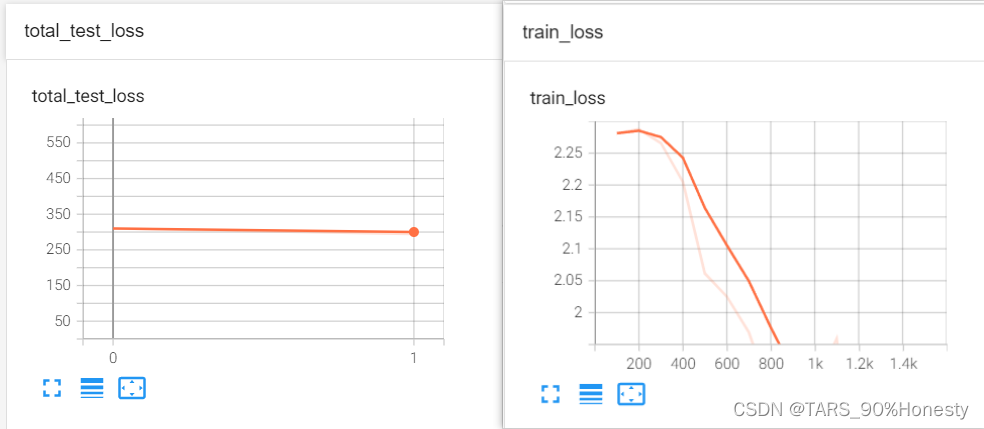
套路(二)
- Add optimized code:Add test data set accuracy
- The calculation idea of the accuracy rate
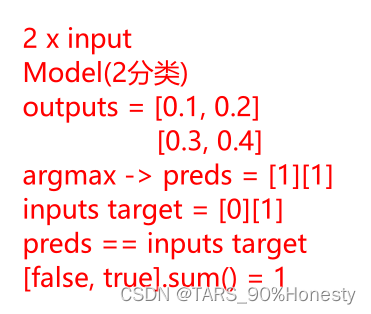
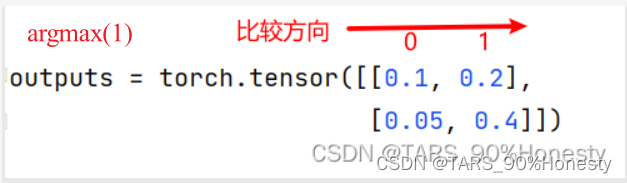
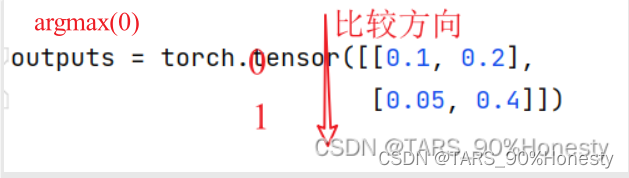
argmax函数将outputsConverted from probabilistic form to predsThe subscripted form of the highest probability
import torch
outputs = torch.tensor([[0.1, 0.2],
                        [0.05, 0.4]])

print(outputs.argmax(1)) # tensor([1, 1])
print(outputs.argmax(0)) # tensor([0, 1])
- The code implementation of the above correct rate idea
import torch

outputs = torch.tensor([[0.1, 0.2],
                        [0.3, 0.4]])


print(outputs.argmax(1)) # tensor([1, 1])

preds = outputs.argmax(1)

targets = torch.tensor([0, 1])
print(preds == targets) # tensor([False, True])
print((preds == targets).sum()) # tensor(1)
- For the above complete routine(一)进行改进
# Add the correct rate on the overall test settotal_test_accuray
import torch.optim
import torchvision
from torch.utils.tensorboard import SummaryWriter

from model import *

# 准备数据集
from torch import nn
from torch.utils.data import DataLoader

train_data = torchvision.datasets.CIFAR10(root="./dataset", train=True, transform=torchvision.transforms.ToTensor(),
                                          download=True)
test_data = torchvision.datasets.CIFAR10(root="./dataset", train=False, transform=torchvision.transforms.ToTensor(),
                                         download=True)

# Get the length of the dataset
train_data_size = len(train_data)
test_data_size = len(test_data)
print("训练数据集的长度为:{}".format(train_data_size))
print("测试数据集的长度为:{}".format(train_data_size))

# 利用DataLoader加载数据集
train_dataloader = DataLoader(train_data, batch_size=64)
test_dataloader = DataLoader(test_data, batch_size=64)

# 搭建神经网络
# The standard is that new construction is requiredmodel.py,Write the definition of the network model in it,And simply test the network
# 需要导入model.py文件,from model import *

# 创建网络模型
myModule = MyModule()

# 损失函数
loss_fn = nn.CrossEntropyLoss()

# 优化器
learnng_rate = 1e-2 # 1 x 10 ^ (-2) = 0.01
optim = torch.optim.SGD(myModule.parameters(), lr = learnng_rate)

# 设置训练网络的参数
# 记录训练的次数
total_train_step = 0
# 记录测试的次数
total_test_step = 0
# 训练的轮数
epoch = 2

# 添加tensorboard
writer = SummaryWriter("logs")

for i in range(epoch):
    print("__________第{}轮训练开始__________".format(i+1))
    # 训练步骤开始
    for data in train_dataloader:
        imgs, targets = data
        outputs = myModule(imgs)
        loss = loss_fn(outputs, targets)
        # 优化器优化模型
        # Clears the previous gradient
        optim.zero_grad()
        # 反向传播,获取梯度
        loss.backward()
        # The optimizer optimizes the parameters according to the gradient
        optim.step()

        total_train_step += 1
        if total_train_step % 100 == 0:
            print("训练次数:{}, Loss:{}".format(total_train_step, loss.item())) # 添加item(),将tensorTypes are converted to plain numbers
            writer.add_scalar("train_loss", loss.item(), total_train_step)

    # After each round of training,The network needs to be run on the test data set,Evaluate the network model with its accuracy on the test dataset
    # 测试步骤开始,No tuning is required
    total_test_loss = 0
    total_accuracy = 0
    with torch.no_grad():
        for data in test_dataloader:
            imgs, targets = data
            outputs = myModule(imgs)
            loss = loss_fn(outputs, targets)
            total_test_loss += loss.item()
            accuracy = (outputs.argmax(1) == targets).sum()
            total_accuracy += accuracy
    print("整体测试集上的Loss:{}".format(total_test_loss))
    print("整体测试集上的正确率:{}".format(total_accuracy / test_data_size))
    writer.add_scalar("total_test_loss", total_test_loss, total_test_step)
    writer.add_scalar("total_test_accuracy", total_accuracy / test_data_size, total_test_step)
    total_test_step += 1

    # 保存每一轮训练的结果
    torch.save(myModule, "myModule_{}.pth".format(i+1))
    print("第{}The model after the round of training has been saved".format(i+1))

writer.close()
套路(三)
- Pay attention to whether there are special layers in your network,If so, the following two lines of code must be called,If not, it can be called,不会影响代码运行,建议添加上,保证完整性.
- Suppose the instantiated network is myModule
myModule.train(), 进入训练状态myModule.eval(), 进入验证状态- Check out the official documentation for instructions,Only works on special layers in the network,比如Dropout,BatchNorm.
Sets the module in training mode.

This has any effect only on certain modules. See documentations of particular modules for details of their behaviors in training/evaluation mode, if they are affected, e.g. Dropout, BatchNorm, etc.
- For the above complete routine(二)进行改进
# 添加myModule.train() 和 myModule.eval()
# Works on specific layers in the network,比如Dropout,BatchNorm等
# when these layers are not included,Adding it also doesn't affect the code running,建议添加,保证完整性.

import torch.optim
import torchvision
from torch.utils.tensorboard import SummaryWriter

from model import *

# 准备数据集
from torch import nn
from torch.utils.data import DataLoader

train_data = torchvision.datasets.CIFAR10(root="./dataset", train=True, transform=torchvision.transforms.ToTensor(),
                                          download=True)
test_data = torchvision.datasets.CIFAR10(root="./dataset", train=False, transform=torchvision.transforms.ToTensor(),
                                         download=True)

# Get the length of the dataset
train_data_size = len(train_data)
test_data_size = len(test_data)
print("训练数据集的长度为:{}".format(train_data_size))
print("测试数据集的长度为:{}".format(train_data_size))

# 利用DataLoader加载数据集
train_dataloader = DataLoader(train_data, batch_size=64)
test_dataloader = DataLoader(test_data, batch_size=64)

# 搭建神经网络
# The standard is that new construction is requiredmodel.py,Write the definition of the network model in it,And simply test the network
# 需要导入model.py文件,from model import *

# 创建网络模型
myModule = MyModule()

# 损失函数
loss_fn = nn.CrossEntropyLoss()

# 优化器
learnng_rate = 1e-2 # 1 x 10 ^ (-2) = 0.01
optim = torch.optim.SGD(myModule.parameters(), lr = learnng_rate)

# 设置训练网络的参数
# 记录训练的次数
total_train_step = 0
# 记录测试的次数
total_test_step = 0
# 训练的轮数
epoch = 2

# 添加tensorboard
writer = SummaryWriter("logs")

for i in range(epoch):
    print("__________第{}轮训练开始__________".format(i+1))
    # 训练步骤开始
    myModule.train()
    for data in train_dataloader:
        imgs, targets = data
        outputs = myModule(imgs)
        loss = loss_fn(outputs, targets)
        # 优化器优化模型
        # Clears the previous gradient
        optim.zero_grad()
        # 反向传播,获取梯度
        loss.backward()
        # The optimizer optimizes the parameters according to the gradient
        optim.step()

        total_train_step += 1
        if total_train_step % 100 == 0:
            print("训练次数:{}, Loss:{}".format(total_train_step, loss.item())) # 添加item(),将tensorTypes are converted to plain numbers
            writer.add_scalar("train_loss", loss.item(), total_train_step)

    # After each round of training,The network needs to be run on the test data set,Evaluate the network model with its accuracy on the test dataset
    # 测试步骤开始,No tuning is required
    myModule.eval()
    total_test_loss = 0
    total_accuracy = 0
    with torch.no_grad():
        for data in test_dataloader:
            imgs, targets = data
            outputs = myModule(imgs)
            loss = loss_fn(outputs, targets)
            total_test_loss += loss.item()
            accuracy = (outputs.argmax(1) == targets).sum()
            total_accuracy += accuracy
    print("整体测试集上的Loss:{}".format(total_test_loss))
    print("整体测试集上的正确率:{}".format(total_accuracy / test_data_size))
    writer.add_scalar("total_test_loss", total_test_loss, total_test_step)
    writer.add_scalar("total_test_accuracy", total_accuracy / test_data_size, total_test_step)
    total_test_step += 1

    # 保存每一轮训练的结果
    torch.save(myModule, "myModule_{}.pth".format(i+1))
    print("第{}The model after the round of training has been saved".format(i+1))

writer.close()
GPU训练
方式一
- For which partsGPU训练呢?
- 网络模型
- 数据(输入,标注)
- 损失函数
- 添加
.cuda()
- 代码
if(torch.cuda.is_available()):
    myModule = myModule.cuda()
if(torch.cuda.is_available()):
    loss_fn = loss_fn.cuda()
if (torch.cuda.is_available()):
    imgs = imgs.cuda()
    targets = targets.cuda()
- For the complete set(三)添加GPU后代码,and add test run time
# 网络模型
# 数据(输入, 标注)
# 损失函数
# .cuda()
import torch.optim
import torchvision
from torch.utils.tensorboard import SummaryWriter
import time

# 准备数据集
from torch import nn
from torch.utils.data import DataLoader

train_data = torchvision.datasets.CIFAR10(root="./dataset", train=True, transform=torchvision.transforms.ToTensor(),
                                          download=True)
test_data = torchvision.datasets.CIFAR10(root="./dataset", train=False, transform=torchvision.transforms.ToTensor(),
                                         download=True)

# Get the length of the dataset
train_data_size = len(train_data)
test_data_size = len(test_data)
print("训练数据集的长度为:{}".format(train_data_size))
print("测试数据集的长度为:{}".format(train_data_size))

# 利用DataLoader加载数据集
train_dataloader = DataLoader(train_data, batch_size=64)
test_dataloader = DataLoader(test_data, batch_size=64)

# 搭建神经网络
class MyModule(nn.Module):
    def __init__(self) -> None:
        super().__init__()
        self.model = nn.Sequential(
            nn.Conv2d(in_channels=3, out_channels=32, kernel_size=5, stride=1, padding=2),
            nn.MaxPool2d(kernel_size=2),
            nn.Conv2d(32, 32, 5, 1, 2),
            nn.MaxPool2d(2),
            nn.Conv2d(32, 64, 5, 1, 2),
            nn.MaxPool2d(2),
            nn.Flatten(),
            nn.Linear(64*4*4, 64),
            nn.Linear(64, 10)
        )

    def forward(self, x):
        x = self.model(x)
        return x

# 创建网络模型
myModule = MyModule()
if(torch.cuda.is_available()):
    myModule = myModule.cuda()

# 损失函数
loss_fn = nn.CrossEntropyLoss()
if(torch.cuda.is_available()):
    loss_fn = loss_fn.cuda()

# 优化器
learnng_rate = 1e-2 # 1 x 10 ^ (-2) = 0.01
optim = torch.optim.SGD(myModule.parameters(), lr = learnng_rate)

# 设置训练网络的参数
# 记录训练的次数
total_train_step = 0
# 记录测试的次数
total_test_step = 0
# 训练的轮数
epoch = 2

# 添加tensorboard
writer = SummaryWriter("logs")
start_time = time.time()
for i in range(epoch):
    print("__________第{}轮训练开始__________".format(i+1))
    # 训练步骤开始
    myModule.train()
    for data in train_dataloader:
        imgs, targets = data
        if (torch.cuda.is_available()):
            imgs = imgs.cuda()
            targets = targets.cuda()
        outputs = myModule(imgs)
        loss = loss_fn(outputs, targets)
        # 优化器优化模型
        # Clears the previous gradient
        optim.zero_grad()
        # 反向传播,获取梯度
        loss.backward()
        # The optimizer optimizes the parameters according to the gradient
        optim.step()

        total_train_step += 1
        if total_train_step % 100 == 0:
            end_time = time.time()
            print(end_time - start_time)
            print("训练次数:{}, Loss:{}".format(total_train_step, loss.item())) # 添加item(),将tensorTypes are converted to plain numbers
            writer.add_scalar("train_loss", loss.item(), total_train_step)

    # After each round of training,The network needs to be run on the test data set,Evaluate the network model with its accuracy on the test dataset
    # 测试步骤开始,No tuning is required
    myModule.eval()
    total_test_loss = 0
    total_accuracy = 0
    with torch.no_grad():
        for data in test_dataloader:
            imgs, targets = data
            if (torch.cuda.is_available()):
                imgs = imgs.cuda()
                targets = targets.cuda()
            outputs = myModule(imgs)
            loss = loss_fn(outputs, targets)
            total_test_loss += loss.item()
            accuracy = (outputs.argmax(1) == targets).sum()
            total_accuracy += accuracy
    print("整体测试集上的Loss:{}".format(total_test_loss))
    print("整体测试集上的正确率:{}".format(total_accuracy / test_data_size))
    writer.add_scalar("total_test_loss", total_test_loss, total_test_step)
    writer.add_scalar("total_test_accuracy", total_accuracy / test_data_size, total_test_step)
    total_test_step += 1

    # 保存每一轮训练的结果
    torch.save(myModule, "myModule_{}.pth".format(i+1))
    print("第{}The model after the round of training has been saved".format(i+1))

writer.close()
- If you don't have a computerGPU,可以使用
Google ColabThis platform trains the code.
方式(二)- 更常用
.to(device)
device = torch.device("cpu)
device = torch.device(“cuda”)
When there are multiple graphics cards on the computer: 指定显卡
device = torch.device(“cuda:0”)
device = torch.device(“cuda:1”)
代码
# 网络模型
# 数据(输入, 标注)
# 损失函数
# .to(device)
# device = torch.device("cpu)
# device = torch.device("cuda")
# When there are multiple graphics cards on the computer: 指定显卡
# device = torch.device("cuda:0")
# device = torch.device("cuda:1")

import torch.optim
import torchvision
from torch.utils.tensorboard import SummaryWriter
import time

# 定义训练的设备
# device = torch.device("cuda")
device = torch.device("cuda" if torch.cuda.is_available() else "cpu")

# 准备数据集
from torch import nn
from torch.utils.data import DataLoader

train_data = torchvision.datasets.CIFAR10(root="./dataset", train=True, transform=torchvision.transforms.ToTensor(),
                                          download=True)
test_data = torchvision.datasets.CIFAR10(root="./dataset", train=False, transform=torchvision.transforms.ToTensor(),
                                         download=True)

# Get the length of the dataset
train_data_size = len(train_data)
test_data_size = len(test_data)
print("训练数据集的长度为:{}".format(train_data_size))
print("测试数据集的长度为:{}".format(train_data_size))

# 利用DataLoader加载数据集
train_dataloader = DataLoader(train_data, batch_size=64)
test_dataloader = DataLoader(test_data, batch_size=64)

# 搭建神经网络
class MyModule(nn.Module):
    def __init__(self) -> None:
        super().__init__()
        self.model = nn.Sequential(
            nn.Conv2d(in_channels=3, out_channels=32, kernel_size=5, stride=1, padding=2),
            nn.MaxPool2d(kernel_size=2),
            nn.Conv2d(32, 32, 5, 1, 2),
            nn.MaxPool2d(2),
            nn.Conv2d(32, 64, 5, 1, 2),
            nn.MaxPool2d(2),
            nn.Flatten(),
            nn.Linear(64*4*4, 64),
            nn.Linear(64, 10)
        )

    def forward(self, x):
        x = self.model(x)
        return x

# 创建网络模型
myModule = MyModule()
myModule = myModule.to(device)

# 损失函数
loss_fn = nn.CrossEntropyLoss()
loss_fn = loss_fn.to(device)

# 优化器
learnng_rate = 1e-2 # 1 x 10 ^ (-2) = 0.01
optim = torch.optim.SGD(myModule.parameters(), lr = learnng_rate)

# 设置训练网络的参数
# 记录训练的次数
total_train_step = 0
# 记录测试的次数
total_test_step = 0
# 训练的轮数
epoch = 2

# 添加tensorboard
writer = SummaryWriter("logs")
start_time = time.time()
for i in range(epoch):
    print("__________第{}轮训练开始__________".format(i+1))
    # 训练步骤开始
    myModule.train()
    for data in train_dataloader:
        imgs, targets = data
        imgs = imgs.to(device)
        targets = targets.to(device)
        outputs = myModule(imgs)
        loss = loss_fn(outputs, targets)
        # 优化器优化模型
        # Clears the previous gradient
        optim.zero_grad()
        # 反向传播,获取梯度
        loss.backward()
        # The optimizer optimizes the parameters according to the gradient
        optim.step()

        total_train_step += 1
        if total_train_step % 100 == 0:
            end_time = time.time()
            print(end_time - start_time)
            print("训练次数:{}, Loss:{}".format(total_train_step, loss.item())) # 添加item(),将tensorTypes are converted to plain numbers
            writer.add_scalar("train_loss", loss.item(), total_train_step)

    # After each round of training,The network needs to be run on the test data set,Evaluate the network model with its accuracy on the test dataset
    # 测试步骤开始,No tuning is required
    myModule.eval()
    total_test_loss = 0
    total_accuracy = 0
    with torch.no_grad():
        for data in test_dataloader:
            imgs, targets = data
            imgs = imgs.to(device)
            targets = targets.to(device)
            outputs = myModule(imgs)
            loss = loss_fn(outputs, targets)
            total_test_loss += loss.item()
            accuracy = (outputs.argmax(1) == targets).sum()
            total_accuracy += accuracy
    print("整体测试集上的Loss:{}".format(total_test_loss))
    print("整体测试集上的正确率:{}".format(total_accuracy / test_data_size))
    writer.add_scalar("total_test_loss", total_test_loss, total_test_step)
    writer.add_scalar("total_test_accuracy", total_accuracy / test_data_size, total_test_step)
    total_test_step += 1

    # 保存每一轮训练的结果
    torch.save(myModule, "myModule_{}.pth".format(i+1))
    print("第{}The model after the round of training has been saved".format(i+1))

writer.close()
完整的模型验证(测试,demo)套路
- 即利用已经训练好的模型,然后给它提供输入
- 代码如下
import torch
import torchvision
from PIL import Image
from torch import nn

image_path = "image/img.png"
image = Image.open(image_path)
print(image) # PIL image
# pngThe format is four channels,除了RGB三通道外,还有一个透明度通道,所以我们需要调用convert('RGB')保留其颜色通道
# 如果图片本来就是三个颜色通道,经过此操作,不变.
# 加上这一步后,可以适应png jpg各种格式的图片.
image = image.convert('RGB')
transform = torchvision.transforms.Compose([torchvision.transforms.Resize((32, 32)),
                                            torchvision.transforms.ToTensor()])
image = transform(image)
print(image.shape) # torch.Size([3, 32, 32])

class MyModule(nn.Module):
    def __init__(self) -> None:
        super().__init__()
        self.model = nn.Sequential(
            nn.Conv2d(3, 32, 5, 1, 2),
            nn.MaxPool2d(2),
            nn.Conv2d(32, 32, 5, 1, 2),
            nn.MaxPool2d(2),
            nn.Conv2d(32, 64, 5, 1, 2),
            nn.MaxPool2d(2),
            nn.Flatten(),
            nn.Linear(64*4*4, 64),
            nn.Linear(64, 10)
        )
    def forward(self, x):
        x = self.model(x)
        return x
# 获取在Google Colab上训练好的CIFAR10网络模型myModule_gpu_30.pth文件
# GPUThe model above is inCPU上运行,Annotation device is required,device
model = torch.load("myModule_gpu_30.pth", map_location=torch.device('cpu'))
# print(model)

image = torch.reshape(image, (1, 3, 32, 32))
model.eval()
with torch.no_grad():
    output = model(image)
print(output)
# tensor([[ 0.0420, -1.9627, 3.6137, 2.4646, 2.2315, 4.4008, -0.0148, -3.1938,
# -1.0747, -7.2118]], grad_fn=<AddmmBackward0>)
print(output.argmax(1)) # tensor([5]) 核对CIFAR10数据集的标签 ,是dog,The test is accurate
边栏推荐
- 2022/8/4 考试总结
- 自定义过滤器和拦截器实现ThreadLocal线程封闭
- 无题九
- 2.4G无线收发模块的应用
- 使用 External Secrets Operator 安全管理 Kubernetes Secrets
- 无题五
- Seata source code analysis: initialization process of TM RM client
- 轩辕实验室丨欧盟EVITA项目预研 第一章(四)
- Hundred lines of code launch red hearts, why programmers lose their girlfriends!
- Is there a problem with writing this?How to synchronize data in sql-client
猜你喜欢
eKuiper Newsletter 2022-07|v1.6.0:Flow 编排 + 更好用的 SQL,轻松表达业务逻辑

如何实现按键的短按、长按检测?
交换机端口的三种类型详解与hybrid端口实验

干货!生成模型的评价与诊断

Code Audit - PHP

Tanabata romantic date without overtime, RPA robot helps you get the job done

Creo 9.0 基准特征:基准轴
汇编语言(8)x86内联汇编

科普大佬说 | 港大黄凯斌老师带你解锁黑客帝国与6G的关系

Dynamic memory development (C language)
随机推荐
pytorch余弦退火学习率CosineAnnealingLR的使用
CCVR eases heterogeneous federated learning based on classifier calibration
开源一夏|OpenHarmony如何查询设备类型(eTS)
MySQL使用聚合函数可以不搭配GROUP BY分组吗?
Comprehensively explain what is the essential difference between GET and POST requests?Turns out I always misunderstood
Weekly Report 2022-8-4
Excuse me if you want to write data in mysql, with flink - connector - JDBC directly is ok, but I'm in the f
我的杂记链接
Rotation of the displayed value on the button
Two-table query average grouping in sql server
sql server中 两表查询 平均数 分组
基于 Kubernetes 的微服务项目整体设计与实现
leetcode 剑指 Offer 10- II. 青蛙跳台阶问题
百行代码发射红心,程序员何愁命不中女朋友!
openpyxl操作Excel文件
蚁剑webshell动态加密连接分析与实践
无题四
无题十三
线程之Happens-before规则
自定义过滤器和拦截器实现ThreadLocal线程封闭