当前位置:网站首页>真实项目,用微信小程序开门编码实现(完结)
真实项目,用微信小程序开门编码实现(完结)
2022-07-06 18:38:00 【华为云】
大家好,欢迎来到[阿提说说]博客
在前面的文章《微信小程序实现蓝牙开门(一)》中我们已经做好了详细技术设计,现在这篇文章主要就是讲如何进行编码实现了。
如果读者想要知道小程序是如何调用蓝牙开门的部分,可以直接点击[小程序功能实现]跳转。
@[toc]
作为一个前后端都要自己写的软件,我习惯于先从后端开始,后端先从数据库开始。
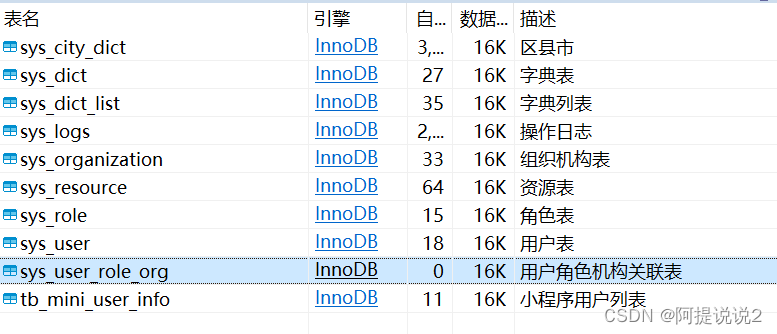
创建表结构
对于Mysql数据库,我选择了之前已经安装好的云上数据库,你也可以在本地安装,安装教程请参考其他文档。

创建数据库的时候,选择编码为utf8mb4,因为这个编码能够保存一些特殊的表情字符。
要让这个编码能正常起作用,首先通过SHOW VARIABLES LIKE '%char%';检查character_set_server是否是utf8mb4,如果不是需要修改my.cnf配置文件,命令修改无效。
由于上一篇中已经设计好了表结构,这里就不再重复,如下是创建完毕的表。
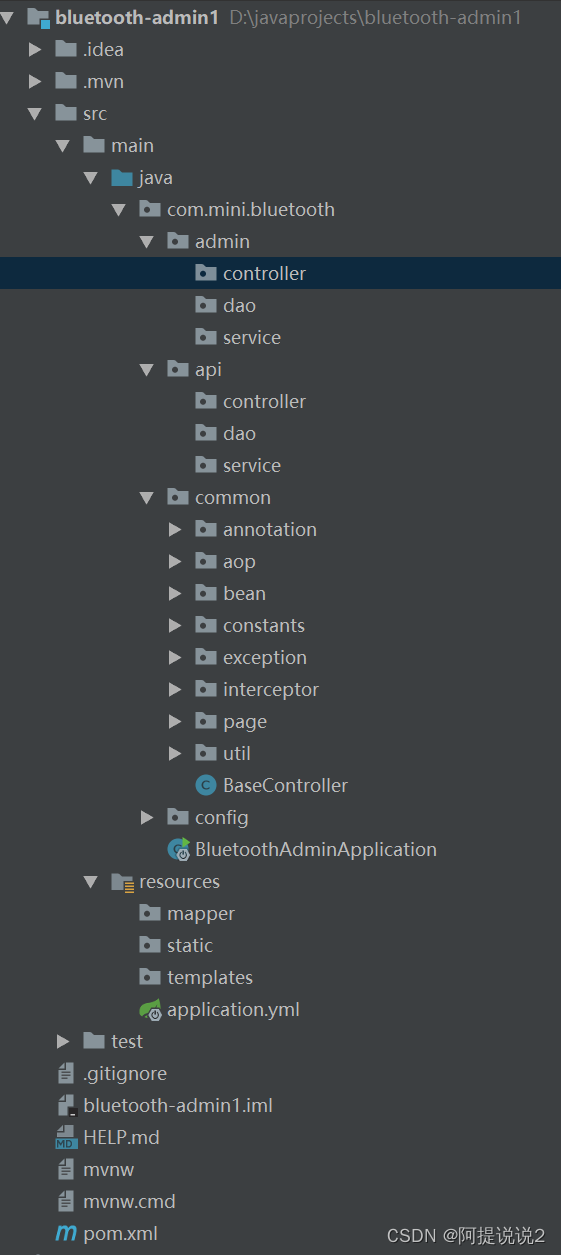
创建后端服务
由于本软件在使用的时候,对后端要求不是很高,只需要对账户进行鉴权,因此SpringBoot单体应用就已经足够。
使用Spring Initializr 创建一个Spring Boot应用

代码目录结构
admin - 管理后台相关接口服务
api - 小程序前端调用相关接口服务
common - 公共工具类、常量等
config - Web相关的配置文件,Shiro、FreeMarker等
管理后台功能实现
在介绍具体功能前,有必要介绍一下几个公共的重要类:pom.xml:maven配置BaseController:公共的Controller,内置一些公共方法
为了篇幅,在介绍功能编码实现时,我将自行选择重要的部分进行介绍,未介绍到的部分请下载源码查看
pom.xml配置
为了读者能够容易理解,这里展示了完成后的pom配置。
<?xml version="1.0" encoding="UTF-8"?><project xmlns="http://maven.apache.org/POM/4.0.0" xmlns:xsi="http://www.w3.org/2001/XMLSchema-instance" xsi:schemaLocation="http://maven.apache.org/POM/4.0.0 https://maven.apache.org/xsd/maven-4.0.0.xsd"> <modelVersion>4.0.0</modelVersion> <parent> <groupId>org.springframework.boot</groupId> <artifactId>spring-boot-starter-parent</artifactId> <version>2.0.3.RELEASE</version> <relativePath/> <!-- lookup parent from repository --> </parent> <groupId>com.mini</groupId> <artifactId>bluetooth</artifactId> <version>0.0.1-SNAPSHOT</version> <name>bluetooth-admin</name> <description>微信小程序后端</description> <properties> <java.version>11</java.version> <shiro.version>1.3.2</shiro.version> <mysql.version>8.0.11</mysql.version> <fastjson.version>1.2.58</fastjson.version> <druid.version>1.1.9</druid.version> </properties> <dependencies> <dependency> <groupId>org.springframework.boot</groupId> <artifactId>spring-boot-starter-freemarker</artifactId> </dependency> <dependency> <groupId>org.springframework.boot</groupId> <artifactId>spring-boot-starter-web</artifactId> </dependency> <dependency> <groupId>org.springframework.boot</groupId> <artifactId>spring-boot-starter-aop</artifactId> </dependency> <dependency> <groupId>org.mybatis.spring.boot</groupId> <artifactId>mybatis-spring-boot-starter</artifactId> <version>1.3.1</version> </dependency> <dependency> <groupId>com.github.pagehelper</groupId> <artifactId>pagehelper-spring-boot-starter</artifactId> <version>1.2.3</version> <exclusions> <exclusion> <groupId>org.mybatis.spring.boot</groupId> <artifactId>mybatis-spring-boot-starter</artifactId> </exclusion> </exclusions> </dependency> <dependency> <groupId>org.projectlombok</groupId> <artifactId>lombok</artifactId> <optional>true</optional> </dependency> <dependency> <groupId>org.apache.shiro</groupId> <artifactId>shiro-core</artifactId> <version>${shiro.version}</version> </dependency> <dependency> <groupId>org.apache.shiro</groupId> <artifactId>shiro-spring</artifactId> <version>${shiro.version}</version> </dependency> <dependency> <groupId>mysql</groupId> <artifactId>mysql-connector-java</artifactId> <version>${mysql.version}</version> </dependency> <dependency> <groupId>net.178le</groupId> <artifactId>shiro-freemarker-tags</artifactId> <version>1.0.0</version> </dependency> <dependency> <groupId>com.alibaba</groupId> <artifactId>druid</artifactId> <version>${druid.version}</version> </dependency> <dependency> <groupId>com.alibaba</groupId> <artifactId>fastjson</artifactId> <version>${fastjson.version}</version> </dependency> <dependency> <groupId>commons-io</groupId> <artifactId>commons-io</artifactId> <version>1.3.2</version> </dependency> <dependency> <groupId>commons-fileupload</groupId> <artifactId>commons-fileupload</artifactId> <version>1.2.1</version> </dependency> <dependency> <groupId>com.xiaoleilu</groupId> <artifactId>hutool-all</artifactId> <version>3.0.7</version> </dependency> </dependencies> <build> <plugins> <plugin> <groupId>org.springframework.boot</groupId> <artifactId>spring-boot-maven-plugin</artifactId> <configuration> <excludes> <exclude> <groupId>org.projectlombok</groupId> <artifactId>lombok</artifactId> </exclude> </excludes> </configuration> </plugin> </plugins> </build></project>spring-boot-starter-freemarker:freemarker依赖spring-boot-starter-web:web依赖spring-boot-starter-aop:aop依赖,日志记录的时候用到pagehelper-spring-boot-starter:分页插件,内部已经包含了mybatis依赖shiro-core、shiro-spring:shiro的依赖mysql-connector-java:mysql依赖shiro-freemarker-tags:shiro的freemarker标签依赖,可以在页面使用shiro标签,以便控制权限druid:数据库连接池依赖fastjson:json依赖hutool-all:工具包依赖
BaseController
/** * 基础类,所以controller都应该继承这个类 * */public class BaseController { /** * 定义了一些请求头格式 */ public static final String TEXT_UTF8 = "text/html;charset=UTF-8"; public static final String JSON_UTF8 = "application/json;charset=UTF-8"; public static final String XML_UTF8 = "application/xml;charset=UTF-8"; /** * 定义了常用的请求方法名,便于一些统一操作 */ public static final String LIST = "list"; public static final String VIEW = "view"; public static final String ADD = "add"; public static final String SAVE = "save"; public static final String EDIT = "edit"; public static final String UPDATE = "update"; public static final String DELETE = "delete"; public static final String PAGE = "page"; @Autowired protected HttpServletRequest request; @Autowired protected HttpSession session; protected UserVO currentUser(){ //用SecurityUtils.getSubject().getSession()也能获取到session UserVO userVO = (UserVO) session.getAttribute(Constants.SESSION_KEY); return userVO; } public static String redirect(String format, Object... arguments) { return new StringBuffer("redirect:").append(MessageFormat.format(format, arguments)).toString(); }}这里定义了常用的请求格式、常用用请求方法名,便于统一操作,比如拦截、一个获取当前用户名的方法;跳转字符串拼接方法
特别的:获取当前用户的方法,这里是通过HttpSession来获取,也可以用SecurityUtils.getSubject().getSession()获取到session
登录登出功能
用户输入http://host/admin或http://host/admin/login后都可以跳转到登录页面。
登录的时候,账户密码错误,需提示:用户名或密码不正确或已被禁用,不提示具体的错误,防止被穷举猜测。
登出的时候,需清空用户登录信息,并能跳转到登录页
@RestController@RequestMapping("/admin/")public class IndexController extends BaseController { @Autowired private ResourceService resourceService; @Autowired private UserService userService; /** * 登录页面跳转 */ @GetMapping("") public void index(){ } /** * 登录页面跳转 */ @GetMapping(value="login") public void login(){ } /** * 登录接口 * @param userVO * @return */ @PostMapping(value="login") public Result<String> loginSubmit(UserVO userVO) { Subject subject = SecurityUtils.getSubject(); userVO.setPassword(userVO.getPassword()); UsernamePasswordToken token = new UsernamePasswordToken(userVO.getUsername(), userVO.getPassword()); try { //调用shiro登录 subject.login(token); //对shiro的异常进行处理,前端显示不同异常 }catch (UnknownAccountException e) { return new Result<>(ResultEnum.USERNAME_PASSWORD_ERROR); } catch (IncorrectCredentialsException e) { return new Result<>(ResultEnum.USERNAME_PASSWORD_ERROR); }catch (LockedAccountException e){ return new Result<>(ResultEnum.USER_HAS_LOCKER); }catch (AuthenticationException e) { return new Result<>(ResultEnum.OTHER_ERROR); } //登录成功后跳转到首页 userVO.setLastLoginTime(new Date()); userVO.setLoginIp(subject.getSession().getHost()); userService.updateByUserName(userVO); return new Result<>("/admin/index"); } /** * 首页 * @param modelMap * @return */ @GetMapping(value = "index") public String index(ModelMap modelMap) { UserVO userVO = currentUser(); String resourceId = userVO.getResourceIds(); List<ResourceVO> result = resourceService.findById(resourceId); modelMap.put("list",result); modelMap.put("bean",userVO); return "admin/index"; } /** * 退出 * @return */ @GetMapping(value = "logout") public String logout() { Subject subject = SecurityUtils.getSubject(); subject.logout(); return "admin/login"; }}@GetMapping("")
只输入http://host/admin的情况下通过该接口跳转,freemark默认会跳转到admin/index路径,该路径的方法检测到没有登录就会跳转到login登录页
@GetMapping(value="login")
输入http://host/admin/login后跳转到登录页,freemark会自动定位到login.ftl页面
@PostMapping(value="login")
这里有几个步骤说明一下:
- 输入用户名和密码后点击登录,前端请求该接口
- 前端需要将密码MD5加密后传输到后端,通过用户名和密码创建一个UsernamePasswordToken令牌,将令牌传入SecurityUtils.getSubject()获取的Subject的login方法
- 该方法会抛出AuthenticationException身份认证异常,捕获对应的异常,并转换为自定义异常反馈给前端
- Subject的login方法处理成功后,将登录时间,登录ip更新到用户信息中
- 返回跳转后台首页地址
@GetMapping(value = "index")
后台首页地址,该方法将获取当前登录用户信息和用户具有的权限,存入ModelMap中,供前端显示
@GetMapping(value = "logout")
后台登出接口,该方法将清除当前登录用户的状态信息,并跳转到登录页
PM: 2022年6月30日01:01:41
shiro对于登录的身份认证管理,有一个重要的类UserRealm,它负责用户的权限和身份校验功能。
/** * 认证 */@Componentpublic class UserRealm extends AuthorizingRealm { @Autowired private UserService userService; @Override protected AuthorizationInfo doGetAuthorizationInfo(PrincipalCollection principals) { String username = (String)principals.getPrimaryPrincipal(); SimpleAuthorizationInfo authorizationInfo = new SimpleAuthorizationInfo(); Session session = SecurityUtils.getSubject().getSession(); UserVO userVO = (UserVO) session.getAttribute(Constants.SESSION_KEY); authorizationInfo.setRoles(userVO.getRoles()); Set<String> permissions = userVO.getPermissions(); if (username.equals("admin")){ permissions.add("*:*"); } authorizationInfo.setStringPermissions(permissions); return authorizationInfo; } @Override protected AuthenticationInfo doGetAuthenticationInfo(AuthenticationToken authenticationToken) throws AuthenticationException { String userno = (String) authenticationToken.getPrincipal(); String password = new String((char[]) authenticationToken.getCredentials()); Result<UserVO> result = userService.login(userno, password); if (result.isSuccess()){ UserVO userVO = result.getData(); Session session = SecurityUtils.getSubject().getSession(); session.setAttribute(Constants.SESSION_KEY,userVO); return new SimpleAuthenticationInfo(userVO.getUsername(), userVO.getPassword() ,getName()); } return null; }}两个重要的方法:doGetAuthorizationInfo:用于控制登录用户的权限,对于admin用户进行了特殊处理,赋予*:*
全部权限doGetAuthenticationInfo:用于登录时,对用户进行账户密码的检验,登录成功将用户信息,以Constants.SESSION_KEY作为key存入session中,这样随时随地可以从session中取出用户信息(PS:如果是分布式项目,也可以将该用户信息转json后,存在redis中,可以网上自行搜索相关文章:shiro分布式存储session)
日志管理
日志管理使用AOP来实现,代码如下:
/** * 日志采集 */@Slf4j@Aspect@Componentpublic class LogAop { @Autowired private LogService logService; private static final String SAVE_TPL = "用户名:{0},修改数据,提交参数:{1}"; private static final String USER_LOGIN_TPL = "用户:{0}登录管理后台,{1}"; @AfterReturning(value = "execution(* com.mini.admin.controller.*.*save(..))", returning = "result") public void afterSaveReturn(JoinPoint joinPoint, Object result) { try { Subject subject = SecurityUtils.getSubject(); Session session = subject.getSession(); UserVO userVO = (UserVO) session.getAttribute(Constants.SESSION_KEY); LogVO logVO = new LogVO(); logVO.setUsername(userVO.getUsername()); logVO.setRemark(JSON.toJSONString(joinPoint.getArgs())); logVO.setLoginIp(session.getHost()); logVO.setGmtCreate(new Date()); String editAccountStr = MessageFormat.format(SAVE_TPL, logVO.getUsername(), logVO.getRemark()); logVO.setRemark(editAccountStr); logService.insert(logVO); } catch (Exception ex) { log.warn("日志采集发生异常:{}", ex.getMessage(), ex); } } @SuppressWarnings("unchecked") @AfterReturning(value = "execution(* com.mini.admin.controller.IndexController.loginSubmit(..))", returning = "result") public void afterLoginReturn(JoinPoint joinPoint, Object result) { try { Subject subject = SecurityUtils.getSubject(); Session session = subject.getSession(); Result<String> stringResult = (Result<String>) result; Object[] methodArgs = joinPoint.getArgs(); UserVO userVO = (UserVO) methodArgs[0]; LogVO logVO = new LogVO(); logVO.setUsername(userVO.getUsername()); logVO.setRemark(JSON.toJSONString(methodArgs)); logVO.setLoginIp(session.getHost()); logVO.setGmtCreate(new Date()); String loginStatus = ""; if (stringResult.isSuccess()){ loginStatus = "成功"; }else { loginStatus = "失败,提交参数:"+ logVO.getRemark(); } String str = MessageFormat.format(USER_LOGIN_TPL,logVO.getUsername(),loginStatus); logVO.setRemark(str); logService.insert(logVO); } catch (Exception ex) { log.warn("日志采集发生异常:{}", ex.getMessage(), ex); } }}这里主要对Controller的save相关方法和登录操作进行了捕获,并记录了提交的参数。这样谁登录了,用户的什么账户密码都被记录的一清二楚。
| id | username | login_ip | gmt_create | remark |
|---|---|---|---|---|
| 2351 | admin | 0:0:0:0:0:0:0:1 | 2022-06-30 23:57:47.0 | 用户:admin登录管理后台,失败,提交参数:[{“length”:10,“password”:“14e1b600b1fd579f47433b88e8d85291”,“start”:1,“username”:“admin”}] |
大家可以思考下,如果在写入日志表的时候发生异常,又没有try catch,原来的调用方法会回滚数据吗?
资源管理
省略,见源码,不懂的联系我,免费提供支持
角色管理
账户管理
机构管理
数据字典
附件管理
小程序管理-用户管理
小程序功能实现
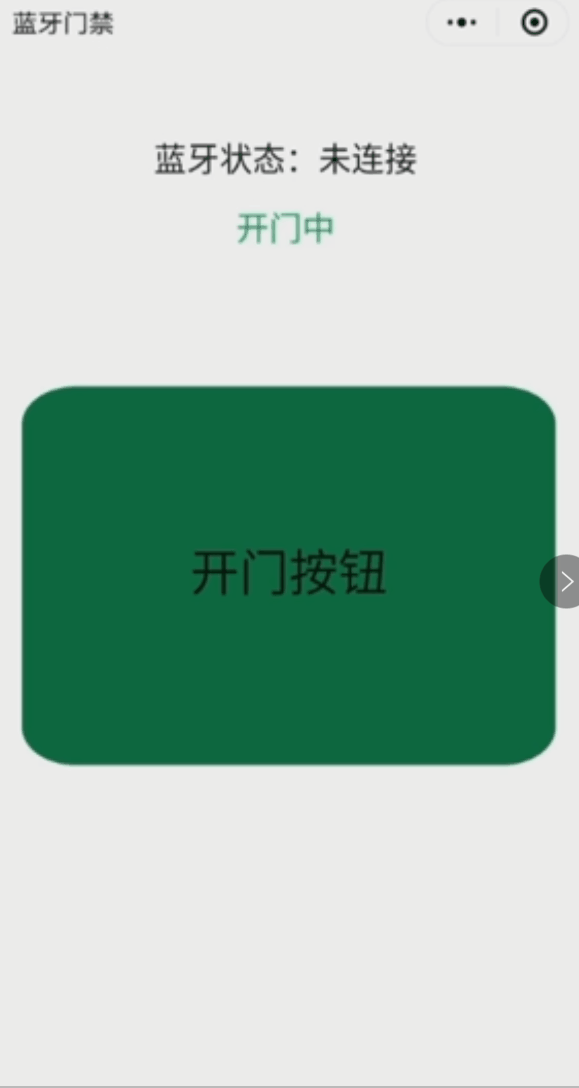
蓝牙开门前端
<view class='container'> <view class="flex-grow-1 flex-x-center flex-row home-class"> <label class="loginLab">蓝牙状态:{{blueStatus}}</label> </view> <view class="flex-grow-1 flex-x-center flex-row"> <label class="loginLab"><text class="{{isOpening?'ds':'df'}}">{{doorStatusTxt}}</text></label></view> <view class="openBtnView flex-grow-1 flex-x-center flex-row {{isClick?'view2':'view1'}}" bindtap="{{isOpening?'openDoorNo':'openDoor'}}"> <!--<button class="openBtn" bindtap='openDoor' type="primary">开门</button> --> <text class='openBtnText'>开门按钮</text> </view></view> blueStatus、doorStatusTxt是一个变量- 开门按钮的样式,通过
{{isClick?'view2':'view1'}}控制,如果是按下状态,使用view2样式,否则使用view1样式 {{isOpening?'openDoorNo':'openDoor'}}绑定了不同开门状态下,执行的函数
下面来看下JS实现部分
蓝牙开门代码实现
openDoor函数
openDoor: function() { var that = this; that.setData({ isOpen:false, isOpening: true, isClick: true, blueStatus: "未连接", doorStatusTxt: "开门中" }); this.createBLEConnection(function() { console.log("第一次开门..."); that.writeBLECharacteristicValue(); }); }首先开门的时候会赋值相关变量,用于前端页面显示,isOpen:是否开门,isOpening:是否正在开门,isClick:是否点击了按钮,blueStatus:前端页面状态显示为“未连接”,doorStatusTxt: 显示开门状态文本。
重点:writeBLECharacteristicValue:向蓝牙发送开门请求
openDoorNo函数
openDoorNo: function() { console.log("正在开门,请勿重复点击"); }这是一个空函数,该函数用于控制多次点击的时候,不会重复执行
writeBLECharacteristicValue写入蓝牙数据
writeBLECharacteristicValue() { var that = this; // 向蓝牙设备发送一个0x00的16进制数据 let buffer = new ArrayBuffer(16) let dataView = new DataView(buffer) let data = new Array(); if(this.data.userInfo.address) { data = this.data.userInfo.address.split(","); } console.log(data); dataView.setUint16(0, data[0]); dataView.setUint16(2, data[1]); dataView.setUint16(4, data[2]); wx.writeBLECharacteristicValue({ deviceId: this._deviceId, serviceId: this._serviceId, characteristicId: this._characteristicId, value: buffer, success: (res) => { console.log("写入成功") util.sleep(1000); if(!that.data.isOpen) { that.setData({ isClick: false, isOpening: false, doorStatusTxt: "开门失败" }); that.closeBLEConnection(); } }, fail: (res) => { console.log("写入失败") util.sleep(1000); if(!that.data.isOpen) { that.setData({ isClick: false, isOpening: false, doorStatusTxt: "开门失败" }); that.closeBLEConnection(); } }, }) }data = this.data.userInfo.address.split(",");这里会将从后端获取的用户房屋地址信息分割,写入dataView.setUint16(0, data[0]);
一般业主可能会有多套房,需要将他们所有的房子写入蓝牙,这样业主用同一个微信就能开多个单元蓝牙门禁
这一部分就是蓝牙开门的代码,执行这的前提是蓝牙已经连接成功,下面来看看其他部分的代码实现,我已经在代码中进行了注解。
//index.js//获取应用实例const app = getApp()var util = require('../../../utils/util.js');function inArray(arr, key, val) { for (let i = 0; i < arr.length; i++) { if (arr[i][key] === val) { return i; } } return -1;}// ArrayBuffer转16进度字符串示例function ab2hex(buffer) { var hexArr = Array.prototype.map.call( new Uint8Array(buffer), function (bit) { return ('00' + bit.toString(16)).slice(-2) } ) return hexArr.join('');}// 字符串转bytefunction stringToBytes(str) { var array = new Uint8Array(str.length); for (var i = 0, l = str.length; i < l; i++) { array[i] = str.charCodeAt(i); } console.log(array); return array.buffer;}Page({ data: { userInfo: null, devices: [], connected: false, chs: [], blueStatus: "未连接", doorStatusTxt: "未开门", isOpen: false, isOpening: false, isClick: false, intervalId: 0, isIOS: 0 }, onLoad: function () { var userInfo = wx.getStorageSync("userInfo"); var that = this; if(!userInfo){ wx.redirectTo({ url: '/pages/me/login/login', }) }else{ that.setData({userInfo: userInfo}); setTimeout(function () { that.openBluetoothAdapter(); }, 300); }; wx.getSystemInfo({ success: function(res) { if(res.platform == 'ios') { that.setData({isIOS: 1}); } }, }) }, onShow: function() { var userInfo = this.data.userInfo; var that = this; if (!userInfo) { wx.redirectTo({ url: '/pages/me/login/login', }) return; } // 判断用户是否被后台禁用 that.userIsDisable(userInfo.userId); this.setData({ doorStatusTxt: "未开门", isOpen: false}); wx.onAccelerometerChange(function (res) { //console.log(res.x + " /" + res.y + " /" + res.z); if (res.x > 0.3 && res.y > 0.6) { var isOpening = that.data.isOpening; if(!isOpening) { wx.showToast({ title: '摇一摇成功', duration: 2000 }) wx.vibrateLong(); that.openDoor(); } } }); if(this.data.isIOS == 1) { var intervalId = setInterval(this.getBluetooth, 1000); this.setData({ intervalId: intervalId }); } }, onUnload: function() { var userInfo = this.data.userInfo; if(userInfo){ this.closeBLEConnection(); } }, //转发 onShareAppMessage: function () { wx.showShareMenu({ withShareTicket: true }); var option = { title: '蓝牙门禁', path: '/pages/home/index/index', success: function (res) { } } return option; }, userIsDisable: function(userId) { var data = { userId:userId }; var url = app.globalData.gwapi + "user/getUserInfo"; util.sendPost(url,data,function(res){ if(res.code == 0){ //账号已被停用 if(!res.data) { wx.removeStorageSync("userInfo"); wx.redirectTo({ url: '/pages/me/login/login', }) } } }); }, openDoorNo: function() { console.log("正在开门,请勿重复点击"); }, openDoor: function() { var that = this; that.setData({ isOpen:false, isOpening: true, isClick: true, blueStatus: "未连接", doorStatusTxt: "开门中" }); this.createBLEConnection(function() { console.log("第一次开门..."); that.writeBLECharacteristicValue(); }); }, openBluetoothAdapter() { var that = this; wx.openBluetoothAdapter({ success: (res) => { console.log('openBluetoothAdapter success', res) that.startBluetoothDevicesDiscovery(); this.setData({ blueStatus: "蓝牙已打开" }) }, fail: (res) => { if (res.errCode === 10001) { this.setData({ blueStatus: "蓝牙未打开" }) wx.onBluetoothAdapterStateChange(function (res) { console.log('onBluetoothAdapterStateChange', res) if (res.available) { that.setData({ blueStatus: "蓝牙已打开" }) } }) } } }) }, //创建蓝牙连接 createBLEConnection(fc) { console.log("创建蓝牙连接") const deviceId = this.data.userInfo.bluetoothCode; wx.createBLEConnection({ deviceId, timeout: 2000, success: (res) => { this.setData({ blueStatus: "已连接", }) this.getBLEDeviceServices(deviceId, fc) }, fail: (res) => { this.setData({ isOpening: false, isClick: false, blueStatus: "连接失败", doorStatusTxt: "未开门" }); } }) }, //关闭蓝牙连接 closeBLEConnection() { var deviceId = this.data.userInfo.bluetoothCode; console.log("关闭蓝牙连接") wx.closeBLEConnection({ deviceId: deviceId }) this.setData({ connected: false, chs: [], canWrite: false, blueStatus: "未连接" }) }, getBluetooth() { var that = this; wx.getBluetoothDevices({ success: function (res) { that.setData({ devices: res.devices }); let deviceList = that.data.devices; for (var i = 0; i < deviceList.length; i++) { if (deviceList[i].advertisData != null) { //重点 根据advertisData 取出mac进行拼接 let bf = deviceList[i].advertisData.slice(4, 10); let mac = ab2hex(bf).toUpperCase(); console.log("mac: "+mac); var deviceId = that.data.userInfo.bluetoothCode.replace(/:/g,""); console.log("deviceId: " + deviceId); if (mac == deviceId) { that.data.userInfo.bluetoothCode = deviceList[i].deviceId; that.stopBluetoothDevicesDiscovery(); } } } clearInterval(that.data.intervalId); }, fail: function (res) { }, complete: function (res) { }, }) }, //获取蓝牙设备所有服务 getBLEDeviceServices(deviceId, fc) { console.log("获取蓝牙服务") wx.getBLEDeviceServices({ deviceId, success: (res) => { for (let i = 0; i < res.services.length; i++) { if (res.services[i].isPrimary) { this.getBLEDeviceCharacteristics(deviceId, res.services[i].uuid, fc) return } } } }) }, //获取蓝牙设备某个服务中所有特征值 getBLEDeviceCharacteristics(deviceId, serviceId, fc) { wx.getBLEDeviceCharacteristics({ deviceId, serviceId, success: (res) => { console.log('getBLEDeviceCharacteristics success', res.characteristics) for (let i = 0; i < 1; i++) { let item = res.characteristics[i] if (item.properties.write) { this._deviceId = deviceId this._serviceId = serviceId this._characteristicId = item.uuid console.log(serviceId); //this.writeBLECharacteristicValue() } if (item.properties.notify || item.properties.indicate) { wx.notifyBLECharacteristicValueChange({ deviceId, serviceId, characteristicId: item.uuid, state: true, success: (res) => { console.log(res.errMsg) this.onBLECharacteristicValueChange() }, fail: (res) => { console.log(res.errMsg) } }) } } //回调 fc(); }, fail(res) { console.error('getBLEDeviceCharacteristics', res) } }) }, // 操作之前先监听,保证第一时间获取数据 onBLECharacteristicValueChange() { wx.onBLECharacteristicValueChange((characteristic) => { const idx = inArray(this.data.chs, 'uuid', characteristic.characteristicId) console.log(ab2hex(characteristic.value)); var data = ab2hex(characteristic.value); console.log(data); if (data = 'cc'){ this.setData({ doorStatusTxt: "已开门", isOpen: true, isClick: false, isOpening:false}); this.closeBLEConnection(); wx.vibrateLong(); } }) }, writeBLECharacteristicValue() { var that = this; // 向蓝牙设备发送一个0x00的16进制数据 let buffer = new ArrayBuffer(16) let dataView = new DataView(buffer) let data = new Array(); if(this.data.userInfo.address) { data = this.data.userInfo.address.split(","); } console.log(data); dataView.setUint16(0, data[0]); dataView.setUint16(2, data[1]); dataView.setUint16(4, data[2]); wx.writeBLECharacteristicValue({ deviceId: this._deviceId, serviceId: this._serviceId, characteristicId: this._characteristicId, value: buffer, success: (res) => { console.log("写入成功") util.sleep(1000); if(!that.data.isOpen) { that.setData({ isClick: false, isOpening: false, doorStatusTxt: "开门失败" }); that.closeBLEConnection(); } }, fail: (res) => { console.log("写入失败") util.sleep(1000); if(!that.data.isOpen) { that.setData({ isClick: false, isOpening: false, doorStatusTxt: "开门失败" }); that.closeBLEConnection(); } }, }) }, closeBluetoothAdapter() { wx.closeBluetoothAdapter() this._discoveryStarted = false }, //获取本机蓝牙适配器状态 getBluetoothAdapterState() { wx.getBluetoothAdapterState({ success: (res) => { console.log('getBluetoothAdapterState', res) if (res.discovering) { this.onBluetoothDeviceFound() } else if (res.available) { this.startBluetoothDevicesDiscovery() } } }) }, //开始搜索蓝牙 startBluetoothDevicesDiscovery() { if (this._discoveryStarted) { return } this._discoveryStarted = true wx.startBluetoothDevicesDiscovery({ success: (res) => { console.log('startBluetoothDevicesDiscovery success', res) this.onBluetoothDeviceFound() }, }) }, //结束搜索蓝牙 stopBluetoothDevicesDiscovery() { wx.stopBluetoothDevicesDiscovery() }, //找到新蓝牙事件 onBluetoothDeviceFound() { wx.onBluetoothDeviceFound((res) => { console.log(res.devices); }) },})有人可能会问,你的util是什么,util是我自己封装的请求get、post的简易方法,还有格式化时间方法。
到这里,我们《微信小程序实现蓝牙开门》已经全部完成了,让我们看看完整的效果。小程序源码私信获取。
边栏推荐
- FLIR blackfly s usb3 industrial camera: white balance setting method
- 大咖云集|NextArch基金会云开发Meetup来啦!
- FLIR blackfly s usb3 industrial camera: how to use counters and timers
- 【论文阅读|深读】 GraphSAGE:Inductive Representation Learning on Large Graphs
- 3D激光SLAM:Livox激光雷达硬件时间同步
- 豆瓣平均 9.x,分布式领域的 5 本神书!
- 最近小程序开发记录
- freeswitch拨打分机号源代码跟踪
- [paper reading | deep reading] graphsage:inductive representation learning on large graphs
- ROS learning (24) plugin
猜你喜欢
ROS learning (XX) robot slam function package -- installation and testing of rgbdslam

Flir Blackfly S 工业相机:自动曝光配置及代码
FLIR blackfly s industrial camera: auto exposure configuration and code
Decryption function calculates "task state and lifecycle management" of asynchronous task capability
ROS learning (XIX) robot slam function package cartographer
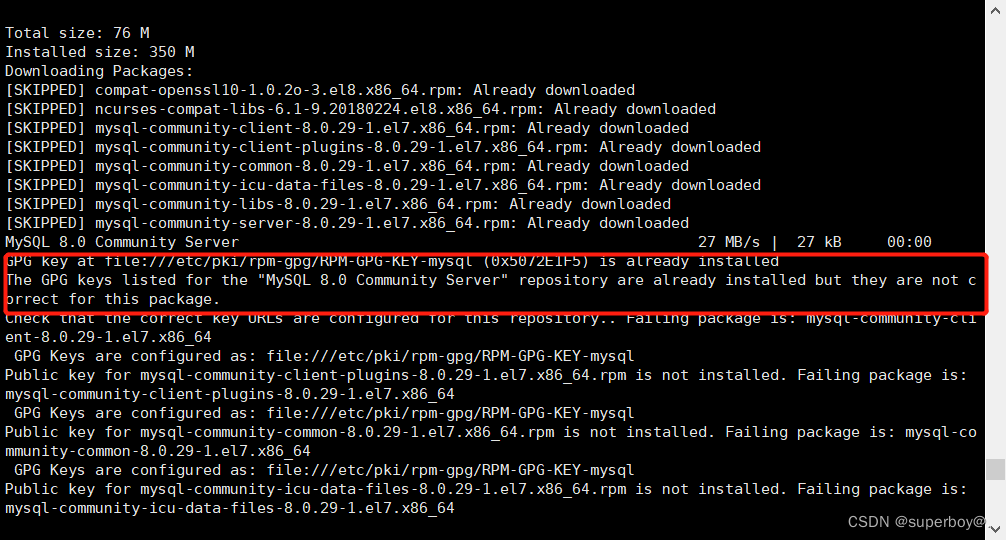
centos8安装mysql报错:The GPG keys listed for the “MySQL 8.0 Community Server“ repository are already ins
【论文阅读|深读】ANRL: Attributed Network Representation Learning via Deep Neural Networks

【论文阅读|深读】DNGR:Deep Neural Networks for Learning Graph Representations
![[paper reading | deep reading] graphsage:inductive representation learning on large graphs](/img/fe/3d4ccfa79a9624ac4901feeea1e69f.png)
[paper reading | deep reading] graphsage:inductive representation learning on large graphs

Zhang Ping'an: accelerate cloud digital innovation and jointly build an industrial smart ecosystem
随机推荐
ROS learning (25) rviz plugin
Vingt - trois mille feuilles? "Yang mou" derrière l'explosion de la consommation végétale
Flir Blackfly S 工业相机 介绍
Introduction to microservice architecture
Big guys gather | nextarch foundation cloud development meetup is coming!
How to use strings as speed templates- How to use String as Velocity Template?
Flir Blackfly S USB3 工业相机:计数器和定时器的使用方法
最近小程序开发记录
企业中台建设新路径——低代码平台
ROS學習(23)action通信機制
Word wrap when flex exceeds width
投资的再思考
NPM install compilation times "cannot read properties of null (reading 'pickalgorithm')“
Analyze "C language" [advanced] paid knowledge [i]
Livox激光雷达硬件时间同步---PPS方法
FLIR blackfly s industrial camera: auto exposure configuration and code
Seconds understand the delay and timing function of wechat applet
Stm32f4 --- general timer update interrupt
激光雷达:Ouster OS产品介绍及使用方法
Jacob Steinhardt, assistant professor of UC Berkeley, predicts AI benchmark performance: AI has made faster progress in fields such as mathematics than expected, but the progress of robustness benchma