当前位置:网站首页>Kubedm deploys kubernetes v1.23.5 cluster
Kubedm deploys kubernetes v1.23.5 cluster
2022-07-02 08:36:00 【freesharer】
kubeadm Deploy kubernetes v1.23.5 colony
The installation deployment in this example Kubernetes Clustering will be based on the following environments .
- OS: Ubuntu Server 20.04.4 LTS (
Red hat has stopped changing CentOS 8, Production environment is no longer recommended CentOS Distribution version) - Kubernetes:v1.23.5
- Container Runtime: Containerd (
docker The runtime has been deprecated , No longer recommended docker As runtime)
Pre requirements :
- At least 2 individual CPU、2G Memory
- Ban swap Swap partition
- allow iptables Check bridge flow
This use kubeadm Deploy 3 Node Kubernetes colony , contain 1 individual master Nodes and 2 individual worker node .
Node list :
| HOSTNAME | IPADDRESS | CPU | Mem | Disk | OS |
|---|---|---|---|---|---|
| master | 192.168.72.30 | 2C | 4G | 100G | Ubuntu Server 20.04.4 LTS |
| worker1 | 192.168.72.31 | 2C | 4G | 100G | Ubuntu Server 20.04.4 LTS |
| worker2 | 192.168.72.32 | 2C | 4G | 100G | Ubuntu Server 20.04.4 LTS |
Official references :
https://kubernetes.io/docs/setup/production-environment/
https://kubernetes.io/docs/setup/production-environment/container-runtimes/
https://kubernetes.io/zh/docs/setup/production-environment/tools/kubeadm/install-kubeadm/
https://kubernetes.io/docs/setup/production-environment/tools/kubeadm/create-cluster-kubeadm/
Node initialization
remarks : The following operations are performed on all nodes .
1、 Configure host name
hostnamectl set-hostname master
hostnamectl set-hostname worker1
hostnamectl set-hostname worker2
2、 To configure hosts analysis
cat >> /etc/hosts << EOF 192.168.72.30 master 192.168.72.31 worker1 192.168.72.32 worker2 EOF
3、 Update system
sudo apt update
sudo apt -y full-upgrade
4、 close swap
swapoff -a
cp /etc/fstab{
    ,.bak}
sed -e '/swap/ s/^#*/#/' -i /etc/fstab
swapon --show
5、 Confirm time synchronization
apt install -y chrony
systemctl enable --now chrony
chronyc sources

# Confirm whether the time is synchronized
timedatectl
6、 load ipvs The kernel module
Reference resources :https://github.com/kubernetes/kubernetes/tree/master/pkg/proxy/ipvs
in addition , in the light of Linux kernel 4.19 The above kernel versions use nf_conntrack Instead of nf_conntrack_ipv4.
cat <<EOF | tee /etc/modules-load.d/ipvs.conf # Load IPVS at boot ip_vs ip_vs_rr ip_vs_wrr ip_vs_sh nf_conntrack EOF

modprobe -- ip_vs
modprobe -- ip_vs_rr
modprobe -- ip_vs_wrr
modprobe -- ip_vs_sh
modprobe -- nf_conntrack

# Confirm that the kernel module is loaded successfully
lsmod | grep -e ip_vs -e nf_conntrack

# install ipset and ipvsadm
apt install -y ipset ipvsadm
install containerd
remarks : The following operations are performed on all nodes .
1、 install containerd Preconditions for container runtime
cat <<EOF | sudo tee /etc/modules-load.d/containerd.conf overlay br_netfilter EOF

sudo modprobe overlay
sudo modprobe br_netfilter

#  Set the required  sysctl  Parameters , These parameters still exist after a restart .
cat <<EOF | sudo tee /etc/sysctl.d/99-kubernetes-cri.conf net.bridge.bridge-nf-call-iptables = 1 net.ipv4.ip_forward = 1 net.bridge.bridge-nf-call-ip6tables = 1 EOF

#  application  sysctl  Parameters without restarting
sudo sysctl --system
2、 install containerd Container runtime , If the network is poor , It is recommended to use the browser to download to the local , After uploading to the server .
Download address :https://github.com/containerd/nerdctl/releases
wget https://github.com/containerd/nerdctl/releases/download/v0.18.0/nerdctl-full-0.18.0-linux-amd64.tar.gz
tar Cxzvvf /usr/local nerdctl-full-0.18.0-linux-amd64.tar.gz
3、 establish containerd The configuration file
sudo mkdir -p /etc/containerd
containerd config default | sudo tee /etc/containerd/config.toml
4、 Configuration and use systemd cgroup The driver
sed -i "s#SystemdCgroup = false#SystemdCgroup = true#g" /etc/containerd/config.toml
5、 Modify the infrastructure image
sed -i 's#k8s.gcr.io/pause:3.6#registry.aliyuncs.com/google_containers/pause:3.6#g' /etc/containerd/config.toml
6、 start-up containerd service
systemctl enable --now containerd
see containerd Running state
systemctl status containerd
install kubeadm
remarks : The following operations are performed on all nodes .
1、 add to kubernetes Source , Use alicloud apt Source to replace :
apt-get install -y apt-transport-https
curl https://mirrors.aliyun.com/kubernetes/apt/doc/apt-key.gpg | apt-key add -

cat <<EOF >/etc/apt/sources.list.d/kubernetes.list deb https://mirrors.aliyun.com/kubernetes/apt/ kubernetes-xenial main EOF
2、 install kubeadm、kubelet And kubectl
# Check for installable versions
sudo apt-get update
apt-cache madison kubectl | more

# Execution and installation
sudo apt-get install -y kubelet=1.23.5-00 kubeadm=1.23.5-00 kubectl=1.23.5-00

# Lock version
sudo apt-mark hold kubelet kubeadm kubectl
3、 start-up kubelet service
systemctl enable --now kubelet
Deploy master node
remarks : The following operations are only available in master Node execution .
1、 View installable kubernetes edition
kubectl version --short
2、 View the container image of the corresponding version and pull it locally in advance
kubeadm config images list \
  --kubernetes-version=v1.23.5 \
  --image-repository registry.aliyuncs.com/google_containers
Execute the following command on all nodes , Pull the mirror ahead of time
kubeadm config images pull \
  --kubernetes-version=v1.23.5 \
  --image-repository registry.aliyuncs.com/google_containers
View the pulled image
cat >/etc/crictl.yaml<<EOF runtime-endpoint: unix:///run/containerd/containerd.sock EOF
[email protected]:~# crictl images
IMAGE                                                             TAG                 IMAGE ID            SIZE
registry.aliyuncs.com/google_containers/coredns                   v1.8.6              a4ca41631cc7a       13.6MB
registry.aliyuncs.com/google_containers/etcd                      3.5.1-0             25f8c7f3da61c       98.9MB
registry.aliyuncs.com/google_containers/kube-apiserver            v1.23.5             3fc1d62d65872       32.6MB
registry.aliyuncs.com/google_containers/kube-controller-manager   v1.23.5             b0c9e5e4dbb14       30.2MB
registry.aliyuncs.com/google_containers/kube-proxy                v1.23.5             3c53fa8541f95       39.3MB
registry.aliyuncs.com/google_containers/kube-scheduler            v1.23.5             884d49d6d8c9f       15.1MB
registry.aliyuncs.com/google_containers/pause                     3.6                 6270bb605e12e       302kB
3、 Start initializing master node
Only in master The node starts initialization by running the following command master node :
kubeadm init --kubernetes-version=v1.23.5 \
    --apiserver-advertise-address=192.168.72.30 \
    --image-repository registry.aliyuncs.com/google_containers \
    --pod-network-cidr=172.16.0.0/16
Parameter description :
- –kubernetes-version=v1.23.5: Turn off version detection , The default value is stable-1, Can lead to
https://dl.k8s.io/release/stable-1.txtDownload the latest version number , You can specify it as a fixed version to skip network requests . - –apiserver-advertise-address:kubernetes The network interface where the default gateway is located will be used to broadcast its master node IP Address , If you need to use other network interfaces, you need to configure this parameter
- –image-repository:Kubenetes Default registry The address is
k8s.gcr.io, No domestic access , This parameter specifies it as the accessible image address , Use hereregistry.aliyuncs.com/google_containers - –pod-network-cidr: With the selected network plug-in cidr Agreement , And it cannot overlap with the network segment of the cluster node
master The node initialization process is as follows
[email protected]:~# kubeadm init --kubernetes-version=v1.23.5 \
>     --apiserver-advertise-address=192.168.72.30 \
>     --image-repository registry.aliyuncs.com/google_containers \
>     --pod-network-cidr=192.168.0.0/16 \
>     --control-plane-endpoint="k8s-apiserver-lb.example.com:6443" \
>     --upload-certs
[init] Using Kubernetes version: v1.23.5
[preflight] Running pre-flight checks
        [WARNING SystemVerification]: missing optional cgroups: hugetlb
[preflight] Pulling images required for setting up a Kubernetes cluster
[preflight] This might take a minute or two, depending on the speed of your internet connection
[preflight] You can also perform this action in beforehand using 'kubeadm config images pull'
[certs] Using certificateDir folder "/etc/kubernetes/pki"
[certs] Generating "ca" certificate and key
[certs] Generating "apiserver" certificate and key
[certs] apiserver serving cert is signed for DNS names [k8s-apiserver-lb.example.com kubernetes kubernetes.default kubernetes.default.svc kubernetes.default.svc.cluster.local master] and IPs [10.96.0.1 192.168.72.30]
[certs] Generating "apiserver-kubelet-client" certificate and key
[certs] Generating "front-proxy-ca" certificate and key
[certs] Generating "front-proxy-client" certificate and key
[certs] Generating "etcd/ca" certificate and key
[certs] Generating "etcd/server" certificate and key
[certs] etcd/server serving cert is signed for DNS names [localhost master] and IPs [192.168.72.30 127.0.0.1 ::1]
[certs] Generating "etcd/peer" certificate and key
[certs] etcd/peer serving cert is signed for DNS names [localhost master] and IPs [192.168.72.30 127.0.0.1 ::1]
[certs] Generating "etcd/healthcheck-client" certificate and key
[certs] Generating "apiserver-etcd-client" certificate and key
[certs] Generating "sa" key and public key
[kubeconfig] Using kubeconfig folder "/etc/kubernetes"
[kubeconfig] Writing "admin.conf" kubeconfig file
[kubeconfig] Writing "kubelet.conf" kubeconfig file
[kubeconfig] Writing "controller-manager.conf" kubeconfig file
[kubeconfig] Writing "scheduler.conf" kubeconfig file
[kubelet-start] Writing kubelet environment file with flags to file "/var/lib/kubelet/kubeadm-flags.env"
[kubelet-start] Writing kubelet configuration to file "/var/lib/kubelet/config.yaml"
[kubelet-start] Starting the kubelet
[control-plane] Using manifest folder "/etc/kubernetes/manifests"
[control-plane] Creating static Pod manifest for "kube-apiserver"
[control-plane] Creating static Pod manifest for "kube-controller-manager"
[control-plane] Creating static Pod manifest for "kube-scheduler"
[etcd] Creating static Pod manifest for local etcd in "/etc/kubernetes/manifests"
[wait-control-plane] Waiting for the kubelet to boot up the control plane as static Pods from directory "/etc/kubernetes/manifests". This can take up to 4m0s
[kubelet-check] Initial timeout of 40s passed.
[apiclient] All control plane components are healthy after 135.015991 seconds
[upload-config] Storing the configuration used in ConfigMap "kubeadm-config" in the "kube-system" Namespace
[kubelet] Creating a ConfigMap "kubelet-config-1.23" in namespace kube-system with the configuration for the kubelets in the cluster
NOTE: The "kubelet-config-1.23" naming of the kubelet ConfigMap is deprecated. Once the UnversionedKubeletConfigMap feature gate graduates to Beta the default name will become just "kubelet-config". Kubeadm upgrade will handle this transition transparently.
[upload-certs] Storing the certificates in Secret "kubeadm-certs" in the "kube-system" Namespace
[upload-certs] Using certificate key:
69ce81e92b717ec40ec97c7f073be779db97c73eb733975f6d156159ad132bc1
[mark-control-plane] Marking the node master as control-plane by adding the labels: [node-role.kubernetes.io/master(deprecated) node-role.kubernetes.io/control-plane node.kubernetes.io/exclude-from-external-load-balancers]
[mark-control-plane] Marking the node master as control-plane by adding the taints [node-role.kubernetes.io/master:NoSchedule]
[bootstrap-token] Using token: ycbz04.vnvwspu0vnvvcjqc
[bootstrap-token] Configuring bootstrap tokens, cluster-info ConfigMap, RBAC Roles
[bootstrap-token] configured RBAC rules to allow Node Bootstrap tokens to get nodes
[bootstrap-token] configured RBAC rules to allow Node Bootstrap tokens to post CSRs in order for nodes to get long term certificate credentials
[bootstrap-token] configured RBAC rules to allow the csrapprover controller automatically approve CSRs from a Node Bootstrap Token
[bootstrap-token] configured RBAC rules to allow certificate rotation for all node client certificates in the cluster
[bootstrap-token] Creating the "cluster-info" ConfigMap in the "kube-public" namespace
[kubelet-finalize] Updating "/etc/kubernetes/kubelet.conf" to point to a rotatable kubelet client certificate and key
[addons] Applied essential addon: CoreDNS
[addons] Applied essential addon: kube-proxy

Your Kubernetes control-plane has initialized successfully!

To start using your cluster, you need to run the following as a regular user:

  mkdir -p $HOME/.kube
  sudo cp -i /etc/kubernetes/admin.conf $HOME/.kube/config
  sudo chown $(id -u):$(id -g) $HOME/.kube/config

Alternatively, if you are the root user, you can run:

  export KUBECONFIG=/etc/kubernetes/admin.conf

You should now deploy a pod network to the cluster.
Run "kubectl apply -f [podnetwork].yaml" with one of the options listed at:
  https://kubernetes.io/docs/concepts/cluster-administration/addons/

You can now join any number of the control-plane node running the following command on each as root:

  kubeadm join k8s-apiserver-lb.example.com:6443 --token ycbz04.vnvwspu0vnvvcjqc \
        --discovery-token-ca-cert-hash sha256:d1268d9fcfbe1ca264ce0a5f47314b48ada7ecdd75b91801b9d74e58ca8b6c4c \
        --control-plane --certificate-key 69ce81e92b717ec40ec97c7f073be779db97c73eb733975f6d156159ad132bc1

Please note that the certificate-key gives access to cluster sensitive data, keep it secret!
As a safeguard, uploaded-certs will be deleted in two hours; If necessary, you can use
"kubeadm init phase upload-certs --upload-certs" to reload certs afterward.

Then you can join any number of worker nodes by running the following on each as root:

kubeadm join k8s-apiserver-lb.example.com:6443 --token ycbz04.vnvwspu0vnvvcjqc \
        --discovery-token-ca-cert-hash sha256:d1268d9fcfbe1ca264ce0a5f47314b48ada7ecdd75b91801b9d74e58ca8b6c4c
Record the above initialization information , Add... Later worker Nodes need to use .
4、master Refer to the last prompt configuration after node initialization kubectl Client connection
mkdir -p $HOME/.kube
cp -i /etc/kubernetes/admin.conf $HOME/.kube/config
chown $(id -u):$(id -g) $HOME/.kube/config
5、 View node status , Currently, the network plug-in has not been installed, and the node is in NotReady state
[email protected]:~# kubectl get nodes
NAME     STATUS     ROLES                  AGE     VERSION
master   NotReady   control-plane,master   4m48s   v1.23.5
6、 see pod state , The network plug-in is not currently installed coredns pod be in Pending state
[email protected]:~# kubectl get pods -A
NAMESPACE     NAME                             READY   STATUS    RESTARTS   AGE
kube-system   coredns-6d8c4cb4d-pgsvj          0/1     Pending   0          4m35s
kube-system   coredns-6d8c4cb4d-ppkjj          0/1     Pending   0          4m35s
kube-system   etcd-master                      1/1     Running   4          4m51s
kube-system   kube-apiserver-master            1/1     Running   4          4m45s
kube-system   kube-controller-manager-master   1/1     Running   2          4m44s
kube-system   kube-proxy-62lct                 1/1     Running   0          4m35s
kube-system   kube-scheduler-master            1/1     Running   4          4m45s
install calico The network plugin
Reference resources :https://projectcalico.docs.tigera.io/getting-started/kubernetes/quickstart
1、 download yaml file , Deploy network plug-in ,pod-cidr There is no need to modify ,calico Automatic identification .
wget https://docs.projectcalico.org/archive/v3.22/manifests/calico.yaml
kubectl apply -f calico.yaml
2、 The view node changes to Ready state
[email protected]:~# kubectl get nodes
NAME     STATUS   ROLES                  AGE     VERSION
master   Ready    control-plane,master   5m22s   v1.23.5
3、 see coredns pod The status changes to Running
[email protected]:~# kubectl -n kube-system get pods
NAME                             READY   STATUS    RESTARTS   AGE
coredns-6d8c4cb4d-kfqkc          1/1     Running   0          5m15s
coredns-6d8c4cb4d-wb8sp          1/1     Running   0          5m15s
etcd-master                      1/1     Running   5          5m32s
kube-apiserver-master            1/1     Running   5          5m33s
kube-controller-manager-master   1/1     Running   3          5m25s
kube-proxy-xrt22                 1/1     Running   0          5m15s
kube-scheduler-master            1/1     Running   5          5m31s
worker Nodes join the cluster
If master After initialization, the node join cluster command is not recorded , You can regenerate by running the following command :
kubeadm token create --print-join-command --ttl 0
stay k8s-node1 and k8s-node2 Execute the following command respectively , Register it to Cluster in :
kubeadm join 192.168.72.30:6443 --token ty560y.urplnyysammwdpy0 --discovery-token-ca-cert-hash sha256:ac393799426898705613fe78debfe034fe7b708bd0043ecf75f013acb09de12a
adopt kubectl get nodes Check the status of the node .
[email protected]:~# kubectl get nodes -o wide
NAME      STATUS   ROLES                  AGE     VERSION   INTERNAL-IP     EXTERNAL-IP   OS-IMAGE             KERNEL-VERSION      CONTAINER-RUNTIME
master    Ready    control-plane,master   6m56s   v1.23.5   192.168.72.30   <none>        Ubuntu 20.04.4 LTS   5.4.0-107-generic   containerd://1.6.2
worker1   Ready    <none>                 38s     v1.23.5   192.168.72.31   <none>        Ubuntu 20.04.4 LTS   5.4.0-107-generic   containerd://1.6.2
worker2   Ready    <none>                 29s     v1.23.5   192.168.72.32   <none>        Ubuntu 20.04.4 LTS   5.4.0-107-generic   containerd://1.6.2
Finally running pod
[email protected]:~# kubectl get pods -A -o wide
NAMESPACE          NAME                                       READY   STATUS    RESTARTS   AGE     IP              NODE      NOMINATED NODE   READINESS GATES
calico-apiserver   calico-apiserver-5b8f46477f-cxzcn          1/1     Running   0          5m59s   172.16.219.68   master    <none>           <none>
calico-apiserver   calico-apiserver-5b8f46477f-mj6b7          1/1     Running   0          5m59s   172.16.219.69   master    <none>           <none>
calico-system      calico-kube-controllers-67f85d7449-kg8dz   1/1     Running   0          6m30s   172.16.219.67   master    <none>           <none>
calico-system      calico-node-g8tqw                          1/1     Running   0          44s     192.168.72.32   worker2   <none>           <none>
calico-system      calico-node-q2fr4                          1/1     Running   0          6m30s   192.168.72.30   master    <none>           <none>
calico-system      calico-node-rlqsg                          1/1     Running   0          53s     192.168.72.31   worker1   <none>           <none>
calico-system      calico-typha-54b7fb69ff-7m5sr              1/1     Running   0          6m31s   192.168.72.30   master    <none>           <none>
calico-system      calico-typha-54b7fb69ff-wdr4p              1/1     Running   0          42s     192.168.72.32   worker2   <none>           <none>
kube-system        coredns-6d8c4cb4d-kfqkc                    1/1     Running   0          6m52s   172.16.219.66   master    <none>           <none>
kube-system        coredns-6d8c4cb4d-wb8sp                    1/1     Running   0          6m52s   172.16.219.65   master    <none>           <none>
kube-system        etcd-master                                1/1     Running   5          7m9s    192.168.72.30   master    <none>           <none>
kube-system        kube-apiserver-master                      1/1     Running   5          7m10s   192.168.72.30   master    <none>           <none>
kube-system        kube-controller-manager-master             1/1     Running   3          7m2s    192.168.72.30   master    <none>           <none>
kube-system        kube-proxy-dm4lj                           1/1     Running   0          53s     192.168.72.31   worker1   <none>           <none>
kube-system        kube-proxy-hkdxr                           1/1     Running   0          44s     192.168.72.32   worker2   <none>           <none>
kube-system        kube-proxy-xrt22                           1/1     Running   0          6m52s   192.168.72.30   master    <none>           <none>
kube-system        kube-scheduler-master                      1/1     Running   5          7m8s    192.168.72.30   master    <none>           <none>
tigera-operator    tigera-operator-b876f5799-g7sn6            1/1     Running   0          6m34s   192.168.72.30   master    <none>           <none>
Other configurations of the cluster
1、 stay master Nodes do the following , Turn on ipvs Pattern
modify kube-proxy configmap, add to mode:ipvs
kubectl -n kube-system get cm kube-proxy -o yaml | sed 's/mode: ""/mode: "ipvs"/g' | kubectl replace -f -
kubectl -n kube-system patch daemonset kube-proxy -p "{
    \"spec\":{
    \"template\":{
    \"metadata\":{
    \"annotations\":{
    \"date\":\"`date +'%s'`\"}}}}}"
Verify the working mode
# curl 127.0.0.1:10249/proxyMode
ipvs
View proxy rules
[[email protected] ~]# ipvsadm -ln
2、master Node scheduling pod
By default , For safety reasons , Cluster will not be in master Scheduling on nodes pod, If you want to be able to master Scheduling on nodes pod, for example , For stand-alone machines for development Kubernetes colony , Please run the following command :
#master The node is set to taints
[[email protected] ~]# kubectl describe nodes | grep Taints
Taints:             node-role.kubernetes.io/master:NoSchedule

# Execute the following command to remove taints The stain
[[email protected] ~]# kubectl taint nodes master node-role.kubernetes.io/master-
node/master untainted

# Look again  taint Field is none
[[email protected] ~]# kubectl describe nodes | grep Taints
Taints:             <none>

# If you want to recover Master Only state , Execute the following command :
kubectl taint node k8s-master node-role.kubernetes.io/master=:NoSchedule
Deploy the application validation cluster
To check whether it can be successfully created k8s The workload , Please log in to the control plane node and use kubectl The command creation name is nginx New deployment of :
kubectl create deployment nginx --image=nginx
Open nginx pod To access through the Internet . Create a new service node port for this purpose :
kubectl create service nodeport nginx --tcp=80:80
Use the following kubectl Command check nginx pod And service status :
[email protected]:~# kubectl get pods
NAME                     READY   STATUS    RESTARTS   AGE
nginx-85b98978db-48589   1/1     Running   0          11h

[email protected]:~# kubectl get svc
NAME         TYPE        CLUSTER-IP      EXTERNAL-IP   PORT(S)        AGE
kubernetes   ClusterIP   10.96.0.1       <none>        443/TCP        12h
nginx        NodePort    10.96.166.220   <none>        80:30379/TCP   11h
Browser access application 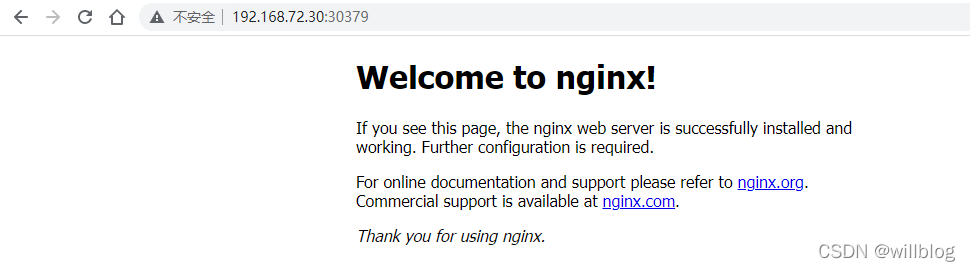
Clean up the cluster
Do the following on all nodes :
kubeadm reset -f
systemctl restart containerd
rm -rf /etc/cni/net.d/*
rm -rf /var/lib/calico
ip link delete vxlan.calico
ip link delete kube-ipvs0
Other optional configuration items
- install Kubernetes dashboard instrument panel
- install Metrics Server( Used for inspection Pod And node resource usage )
- Deploy Prometheus / Grafana monitor
- Deploy EFK、Grafana Loki Log system
- Deploy persistent storage , Optional NFS、Rook-ceph、Openebs、Longhorn etc.
- install Ingress Controller、 official Ingress-Nginx、traefic、apache apisix etc.
- Install the load balancing plug-in MetaLB、OpenELB etc.
边栏推荐
- Animation synchronization of CarSim real-time simulation
- cve_ 2019_ 0708_ bluekeep_ Rce vulnerability recurrence
- 使用wireshark抓取Tcp三次握手
- Realization of basic function of sequence table
- Rotating linked list (illustration)
- File upload and download performance test based on the locust framework
- OpenShift 容器平台社区版 OKD 4.10.0部署
- Global and Chinese markets of tilting feeders 2022-2028: Research Report on technology, participants, trends, market size and share
- [blackmail virus data recovery] suffix Hydra blackmail virus
- Sqli labs Level 2
猜你喜欢

Web security -- Logical ultra vires

Sqli labs level 1
![[blackmail virus data recovery] suffix Hydra blackmail virus](/img/27/f44334cf98229d0f8b33c70a878ca8.jpg)
[blackmail virus data recovery] suffix Hydra blackmail virus
Carsim-問題Failed to start Solver: PATH_ID_OBJ(X) was set to Y; no corresponding value of XXXXX?
Tcp/ip - transport layer
W10 is upgraded to W11 system, but the screen is black, but the mouse and desktop shortcuts can be used. How to solve it
![[dynamic planning] p4170: coloring (interval DP)](/img/52/76f8baebb19fe10db91c74fec9a697.jpg)
[dynamic planning] p4170: coloring (interval DP)

Nacos 下载启动、配置 MySQL 数据库
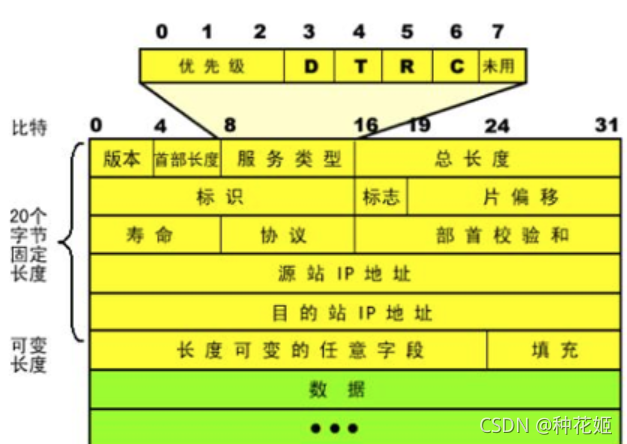
IP协议与IP地址
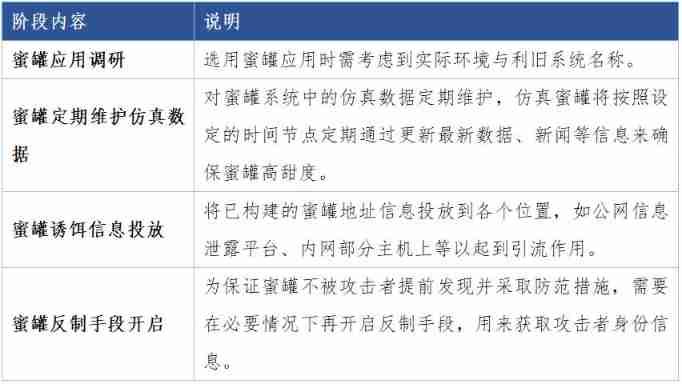
Honeypot attack and defense drill landing application scheme
随机推荐
zipkin 简单使用
Jz-061-serialized binary tree
Force buckle method summary: sliding window
kubeadm部署kubernetes v1.23.5集群
D interface and domain problems
OpenShift构建镜像
Googlenet network explanation and model building
How to build the alliance chain? How much is the development of the alliance chain
cve_ 2019_ 0708_ bluekeep_ Rce vulnerability recurrence
用数字 5,5,5,1 ,进行四则运算,每个数字当且仅当用一次,要求运算结果值为 24
Makefile基本原理
Carla-ue4editor import Roadrunner map file (nanny level tutorial)
Mutex
TCP/IP—传输层
Rotating linked list (illustration)
Analysis of the use of comparable, comparator and clonable interfaces
Viewing JS array through V8
Intelligent manufacturing solutions digital twin smart factory
Web security -- core defense mechanism
Classes and objects (instantiation of classes and classes, this, static keyword, encapsulation)