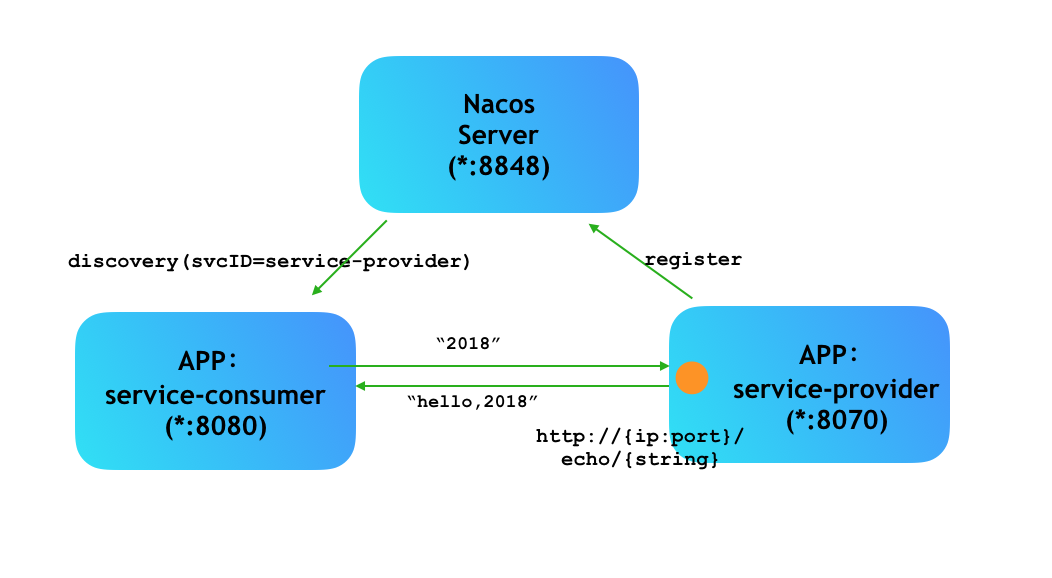
# nacos A concise tutorial ## Why do you need nacos? In the microservice Architecture , Microservices often communicate and call each other , And a service often has multiple instances to reduce load or ensure high availability . We assume that A The service wants to call B Service , The simplest way to put B The address and port of the service exist A In the configuration file of the service . And then through http Ask to complete B Service calls . however B There may be many examples of services , In addition, it may expand the package or disable some examples as required by the business , At this time B The address and port of the service may change from time to time . If it is recorded in the configuration file, it will be inconvenient . And in many B In service , Some services may break down due to various problems , We may also need to write a heartbeat test , See if all the services are working properly , Get rid of services that don't work in a timely manner . If these functions are realized completely and stably , It's a lot of work . Fortunately, where there are difficulties, there are always front man-made wheels . and Nacos It's the wheel to solve this problem .  As shown in the figure , Through simple configuration and annotation , All microservices register their information with Nacos server In the middle . When you need a call , By registering with Nacos server You can complete the call between microservices . For example, there have been interviews in the past http://12.3.3.5:8090/service To access microservices , It became http://provider/service The way to visit , Decouple the service from the port address . ## How to use Nacos ### Nacos server The start of Nacos It's very simple to use . From Nacos Download on the official website release package ,linux\mac The following is executed `sh startup.sh -m standalone`,windows The following is executed `startup.cmd -m standalone` And then you can finish Nacosserver The start of . ### Use... In microservices Nacos Do service registration and discovery Through maven Shelf bag use Nacos Discovery services ```xml ``` Simply configure in the configuration file ```yml spring: application: name: provider # This is very important , It's registered to Nacos The name of the service called in cloud: nacos: discovery: server-addr: 127.0.0.1:8848 # To configure Nacos Service address of ``` Add annotations to the startup class @EnableDiscoveryClient ```java @SpringBootApplication @EnableDiscoveryClient public class ProviderApplication { public static void main(String[] args) { SpringApplication.run(ProviderApplication.class, args); } } ``` In a few simple steps, the micro service can be registered to Nacos Server. It's so simple . Of course Nacos Besides doing service registration and discovery , It can also be used as a configuration center , Using the same method . For more information, please refer to the official documents [Nacos Official website ](https://nacos.io/zh-cn/docs/what-is-nacos.html) ## Service calls If you want to pass http://provider/service To call microservices , It also needs to be constructed http Ask for , The result of asking to come back has to be done json Analysis and so on a series of complicated work . and Ribbon It's for solving this problem . stay springcloud.alibaba Of nacos Discover the service Maven In bag , Already included ribbon. We use a few simple lines of code , You can complete the micro service call . Assume that provider There's a piece of code in the code , We're going to call ```java // Examples come from Nacos Official website @RequestMapping(value = "/echo/{string}",method = RequestMethod.GET) public String echo(@PathVariable String string) { return "Hello Nacos Discover" + string; } ``` We just need to instantiate one RestTemplate ```java @Bean public RestTemplate restTemplate() { return new RestTemplate(); } ``` Then you can call from where you want to call through the following code very simply . ```java String result = restTemplate.getForObject("http://provider/echo/"+str,String.class); ``` ## The problem of load balancing As mentioned earlier , In a microservice environment, the same service often has N Multiple cases , We don't want all calls to go to one instance , Load balancing is needed at this time . We just need to add @LoadBalanced Notes . In the configuration file spring.application.name The same application will be considered the same microservice , And then forwarding can be done through ribbon Built in policies are routed to different provider In the middle . If we expect to have provider The order of priority is higher than that of others , You can do it again provider Adjust different weights in the configuration file of . ```yml spring: cloud: nacos: discovery: weight: 1 # Configure weights ``` ## Use Feign Through the above method , It has made it very easy to call each other between microservices . But not enough ,Feign It makes the call easier . ### quote maven package ```xml ``` And then we're targeting the provider Define an interface , The method of the interface is the name of the method to be called , The argument and the call argument have the same name .@FeignClient In note name For the name of the microservice . More complex method calls may need to be coordinated in the interface @RequestMapping Specify specific routing rules , Then the microservice method can be called directly through the interface , Is it clearer and simpler ? ```java @FeignClient(name = "provider") @Service public interface TestService { String echo(String serviceName); } ``` ```java public class TestController { private final RestTemplate restTemplate; @Autowired private TestService testService; @GetMapping("/echo2/{str}") public String echo2(@PathVariable String str) { return testService.echo(str);
版权声明
本文为[itread01]所创,转载请带上原文链接,感谢


