当前位置:网站首页>Huawei device command
Huawei device command
2022-07-06 20:43:00 【51CTO】
Basic configuration
Telnet To configure
1、 Password to login
       [Huawei]user-interface console 0  // Enter the management control port


[Huawei-ui-console0]authentication-mode password


Please configure the login password (maximum length 16): Input password


[Huawei-ui-console0]user privilege level ?   // Set privilege level


[Huawei-ui-console0]idle-timeout 20 0  // Set the idle timeout to 20 minute , The default is 10 minute
- 1.
- 2.
- 3.
- 4.
- 5.
2、 User and password login
       [Huawei]user-interface console 0  // Enter the management control port


[Huawei-ui-console0]authentication-mode aaa


[Huawei-ui-console0]quit


[Huawei]aaa


[Huawei-aaa]local-user huawei password cipher hw( password )


[Huawei-aaa]local-user huawei service-type terminal  // Log in from the terminal
- 1.
- 2.
- 3.
- 4.
- 5.
- 6.
- 7.
- 8.
- 9.
- 10.
- 11.
3、PC Remote login configuration through Ethernet port
#AAA Mode remote login
       [R1]user-interface vty 0 4


[R1-ui-vty0-4]authentication-mode aaa


[R1]aaa  // Entry certification 、 to grant authorization 、 Billing mode ( abbreviation AAA Pattern )


[R1-aaa]local-user admin password cipher 123456  // Configure local users and passwords


[R1-aaa]local-user admin service-type telnet  // Select the service type of the authorized user


[R1-aaa]local-user admin privilege level 3  // Set the administrator user level
- 1.
- 2.
- 3.
- 4.
- 5.
- 6.
- 7.
- 8.
- 9.
- 10.
- 11.
# Password only remote login
       [R2]user-interface vty 0 4  // Virtual user terminal interface


[R2-ui-vty0-4]authentication-mode password  // Configure the authentication mode of the user terminal


[R2-ui-vty0-4]set authentication password simple 123456  // Set login user password


[R2-ui-vty0-4]user privilege level 3  // Set user level


[R2-ui-vty0-4]user network-admin  // Set the parameters of the login user
- 1.
- 2.
- 3.
- 4.
- 5.
- 6.
- 7.
- 8.
- 9.
4、 Set super password
FTP To configure
1、 Use the router as FTP The server
       [R1]ftp server enable


[R1]aaa


[R1-aaa]local-user winda password cipher aqx123456( A combination of letters and numbers )


[R1-aaa]local-user winda privilege level 15


[R1-aaa]local-user winda service-type ftp


[R1-aaa]local-user winda ftp-directory flash:  // Specify the directory
- 1.
- 2.
- 3.
- 4.
- 5.
- 6.
- 7.
- 8.
- 9.
- 10.
- 11.
2、 Sign in FTP The server , And send the file
       <R1>ftp 10.0.12.2


User(10.0.12.2:(none)):huawei


331 Password required for huawei.


Enter password:


230 User logged in.


[R1-ftp]put portalpage.zip  // Upload files


[R1-ftp]get portalpage.zip portal.zip  // Download the file and change the name


<R1>delete /unreserved portal.zip  // Completely delete the file
- 1.
- 2.
- 3.
- 4.
- 5.
- 6.
- 7.
- 8.
- 9.
- 10.
- 11.
- 12.
- 13.
- 14.
- 15.
Other configuration
Configure login banner
Specify the configuration file to load next time
Specify the configuration file to load next time
Set the file for next startup
Delete the saved configuration file
Turn off the message prompt function
or
route IP To configure
Floating static routing
Describe the interface
Default ( default ) route
Use... With source parameters ping command
Configure from IP Address ( solve RIPv1 Discontinuous subnet )
Static routing vs BFD linkage
# Activate BFD function
# establish BFD conversation , The name is ab( Customize ), To the end IP The address is 10.1.12.2
VLAN To configure
Port type configuration
Configure port as access
skill :
Configure the port Hybrid type
Configure the port Trunk type
change Trunk Port of PVID
Eth-trunk To configure
establish Eth-trunk 1, And add the interface to Eth-trunk 1
or
To configure Eth-trunk 1 The link is configured as access
STP To configure
STP To configure
# Modify bridge priority
# Modify port priority
# Configure edge ports ( Enable the port to quickly enter the forwarding state )
To configure MSTP
see STP
# Brief description of each interface STP state
# Specific interface details STP Information
# View the current root bridge information
# Check out the examples 1 Information about
DHCP To configure
To configure DHCP
Based on interface configuration DHCP function
       [R1]dhcp enable  // Turn on DHCP function


[R1-GigabitEthernet0/0/0]dhcp select interface  // Open the interface DHCP function


[R1-GigabitEthernet0/0/0]dhcp server lease day 2【 Optional 】    // Set the lease validity to 2 God


[R1-GigabitEthernet0/0/0]dhcp server dns-list 8.8.8.8    // by PC Automatically assigned DNS Server address


[R1-GigabitEthernet0/0/1]dhcp server excluded-ip-address 192.168.2.250 192.168.2.253    // Configure the IP Address range
- 1.
- 2.
- 3.
- 4.
- 5.
- 6.
- 7.
- 8.
- 9.
Based on global configuration DHCP
       [R1]dhcp enable  // Turn on DHCP function


[R1]ip pool huawei1  // Configure global address pool


[R1-ip-pool-huawei1]network 192.168.1.0  // Specify the address pool range


[R1-ip-pool-huawei1]lease day 2【 Optional 】  // The lease term is 2 God , Default 1 God


[R1-ip-pool-huawei1]gateway-list 192.168.1.254  // Exit gateway address


[R1-ip-pool-huawei1]excluded-ip-address 192.168.1.250 192.168.1.253  // Do not participate in automatic allocation


[R1-ip-pool-huawei1]dns-list 8.8.8.8  // To configure DNS Server address


[R1-GigabitEthernet0/0/0]dhcp select global  // Open the interface DHCP function
- 1.
- 2.
- 3.
- 4.
- 5.
- 6.
- 7.
- 8.
- 9.
- 10.
- 11.
- 12.
- 13.
- 14.
- 15.
see
DHCP relay
# oriented PC The interface of :
# oriented PC The global defined interface is called DHCP Server groups :
Frame relay configuration
DCE To configure
DTE To configure
Other configuration
see PVC
# View the map
# Static mapping
Single arm routing configuration
Configure router
       [R1]int g0/0/0.1  // Create and enter g0/0/0 Of 0.1 A subinterface


[R1-GigabitEthernet0/0/0.1]dot1q termination vid 10  // encapsulation dot1q agreement


[R1-GigabitEthernet0/0/0.1]ip address 192.168.10.254 24  // To configure IP Address


[R1-GigabitEthernet0/0/0.1]arp broadcast enable  // Turn on arp radio broadcast


[R1-GigabitEthernet0/0/0.1]dhcp select global  // Turn on DHCP Global mode


[R1-GigabitEthernet0/0/0.1]int g0/0/0.2


[R1-GigabitEthernet0/0/0.2]dot1q termination vid 20


[R1-GigabitEthernet0/0/0.2]ip address 192.168.20.254 24


[R1-GigabitEthernet0/0/0.2]arp broadcast enable


[R1-GigabitEthernet0/0/0.2]dhcp select global
- 1.
- 2.
- 3.
- 4.
- 5.
- 6.
- 7.
- 8.
- 9.
- 10.
- 11.
- 12.
- 13.
- 14.
- 15.
- 16.
- 17.
- 18.
- 19.
- 20.
Configure switches
       [SW1]vlan batch 10 20  // establish vlan 10 and vlan 20


[SW1-GigabitEthernet0/0/1]int g0/0/1  // Get into g0/0/1 Interface


[SW1-GigabitEthernet0/0/1]port link-type access  // Modify port as access Pattern


[SW1-GigabitEthernet0/0/1]port default vlan 10  // Divide ports into vlan 10 in


[SW1-GigabitEthernet0/0/1]int g0/0/2


[SW1-GigabitEthernet0/0/2]port link-type access


[SW1-GigabitEthernet0/0/2]port default vlan 20


[SW1-GigabitEthernet0/0/2]int g0/0/24  // The interface between the switch and the router needs to be modified to trunk Pattern


[SW1-GigabitEthernet0/0/24]port link-type trunk  // Modify port as trunk Pattern


[SW1-GigabitEthernet0/0/24]port trunk allow-pass vlan 10 20  // allow vlan 10 and vlan 20 The data from
- 1.
- 2.
- 3.
- 4.
- 5.
- 6.
- 7.
- 8.
- 9.
- 10.
- 11.
- 12.
- 13.
- 14.
- 15.
- 16.
- 17.
- 18.
- 19.
- 20.
- 21.
RIP To configure
Basic configuration
Other configuration
# Interface additional measures
# authentication
# Turn on RIP debugging
# Suppress the interface ( Only receive but not send )
or
       [R2-rip-1]peer IP Address   // Unicast communication


[R2-rip-1]preference x  // Change priority ( Only local )


[R2-rip-1]timers rip 20 120 60  // Modify timer


[R3]ip route-static 0.0.0.0 0 LoopBack 2  // Publish default route


[R3-rip-1]default-route originate  // There is no need to create a default route , Can also publish


<Huawei>reset rip 1 statistics  // Refresh RIP Statistics


<R1>reset ip routing-table statistics protocol rip  // eliminate RIP Learned routing information


[R2]undo rip 1  // Delete RIP


[R1]rip version2 multicase  // Configuration version 1 Can also send RIPv2 message
- 1.
- 2.
- 3.
- 4.
- 5.
- 6.
- 7.
- 8.
- 9.
- 10.
- 11.
- 12.
- 13.
- 14.
- 15.
- 16.
- 17.
OSPF To configure
To configure
To configure OSPF
Incoming routing
Publish default route
OSPF verification
# Interface authentication plaintext :
# Area authentication ciphertext :
Suppress the interface ( No receiving, no sending )
see
       [R1]dis ospf peer brief  // Check out the neighbors


[R1]dis ospf interface  // see DR、BDR


[R1]reset ospf process  // Reset OSPF process


[R1]dis ip routing-table protocol ospf  // see OSPF Learned routes


[R1]display ospf lsdb ase 172.16.0.0  // Displays the external routing information of the link state database


[R1]dis ospf int G0/0/0  // View interface's OSPF Information
- 1.
- 2.
- 3.
- 4.
- 5.
- 6.
- 7.
- 8.
- 9.
- 10.
- 11.
see LSA Information
       [R1]dis ospf lsdb router  // View a class LSA


[R1]dis ospf lsdb netword  // View class II LSA


[R1]dis ospf lsdb summary  // See three categories LSA


[R1]dis ospf lsdb asbr  // View four categories LSA


[R1]dis ospf lsdb ase  // See five categories LSA


[R1]dis ospf lsdb nssa  // View seven categories LSA
- 1.
- 2.
- 3.
- 4.
- 5.
- 6.
- 7.
- 8.
- 9.
- 10.
- 11.
Other
modify Hello and Dead Time
modify DR priority
notes : because DR/BDR The election defaults to no preemption mode , Therefore, after modifying the router priority, it will not be re elected automatically DR, Reset required OSPF process .
Modify the network type to broadcast
Modify the cost value 、 Bandwidth reference
VRRP To configure
       [SW1-Vlanif10]vrrp vrid 1 virtual-ip 10.1.1.254  // Configure the virtual gateway


[SW1-Vlanif10]vrrp vrid 1 priority 150  // Change priority


[SW1-Vlanif10]vrrp vrid 1 preempt-mode disable  // Turn off preemption mode


[SW1-Vlanif10]vrrp vrid 1 track interface g0/0/24 reduced 60  // Track the upper port


[R1-Serial2/0/0]ospf network-type p2mp  // The network type of the configuration interface is Point-to-multipoint


[S1] display vrrp  // see VRRP Information
- 1.
- 2.
- 3.
- 4.
- 5.
- 6.
- 7.
- 8.
- 9.
- 10.
- 11.
HDLC To configure
PPP To configure
Certifier
Certified party
#PAP:
#CHAP:
Use CHAP establish PPP Negotiation process of connection
Ethernet interface configuration
       [S1-G0/0/9]undo negotiation auto  // Before changing the rate and duplex mode of the interface, turn off the automatic negotiation function of the interface


[S1-G0/0/9]speed 100  // Set to 100M rate


[S1-G0/0/9]duplex full  // Full duplex mode


[S1]dis eth-trunk 1  // see Eth-trunk 1 Configuration result
- 1.
- 2.
- 3.
- 4.
- 5.
- 6.
- 7.
Firewall configuration
# Login does not require a user name and password
# Define time zone :
Link Technology
Link aggregation
       [S1]interface Eth-Trunk 1  // Aggregation between switches Eth-Trunk Equal port numbers


[S1-Eth-Trunk1]mode lacp-static  //lacp Pattern


[S1-Eth-Trunk1]trunkport GigabitEthernet 0/0/1 to 0/0/2  // Add member ports to aggregate ports


[S1-Eth-Trunk1]max active-linknumber 2  // Set the upper activity threshold


[S1-Eth-Trunk1]port link-type trunk


[S1-Eth-Trunk1]port trunk allow-pass vlan all


[S1-Eth-Trunk1]dis eth-trunk 1 verbose  // View aggregate port information


[S1] lacp priority 100  // Configure the system priority to become the master


[S1-G0/0/1] lacp priority 100  // Configure active link priority


[S1-G0/0/2] lacp priority 100  // Configure active link priority
- 1.
- 2.
- 3.
- 4.
- 5.
- 6.
- 7.
- 8.
- 9.
- 10.
- 11.
- 12.
- 13.
- 14.
- 15.
- 16.
- 17.
- 18.
Smart Link
       [S1-G0/0/1]stp disable  // Turn off the relevant interface STP


[S1]smart-link group 1


[S1-smlk-group1]port GigabitEthernet 0/0/1 master  // Set the primary port


[S1-smlk-group1]port g0/0/2 slave  // Set the slave port


[S1-smlk-group1]flush send control-vlan 10 password simple 123  // Can make smart link Group 1 send out Flush Frame function , Carry control VLAN The number is 10, The password is :123


[S1-smlk-group1]restore enable  // Turn on the failback function


[S1-smlk-group1]timer wtr 30  // The failback time is 30 second


[S1-smlk-group1]smart-link enable  // Can make Smart Link Group 1 The function of


[S1-smlk-group1]dis smart-link group 1  // see Smart Link Group 1 Information about


[S2-GigabitEthernet0/0/1]smart-link flush receive control-vlan 10 password simple 123  // Set other switches to receive and process carry control VLAN The number is 10 Of Flush frame
- 1.
- 2.
- 3.
- 4.
- 5.
- 6.
- 7.
- 8.
- 9.
- 10.
- 11.
- 12.
- 13.
- 14.
- 15.
- 16.
- 17.
- 18.
- 19.
Other configuration
Save automatically
# Save automatically
# Fixed point save
Port Mirror
Port binding
Port security
The prefix list
IPv6 To configure
       [R1]ipv6  // Turn on the whole IPv6 function


[R1-E0/0/0]ipv6 enable  // At the interface ( Connect PC) Lower open IPv6 function


[R1-E0/0/0]ipv6 address auto link-local  // Automatically generate link local address


[R1-G0/0/0]ipv6 enable  // At the interface ( Connect the router ) Lower open IPv6 function


[R1-G0/0/0]ipv6 add 2031:0:130F::1 64  // Configure global unicast address


[R1-E0/0/0]ipv6 add 2001:3:FD:: 64 eui-64  // use EUI-64 Configure address
- 1.
- 2.
- 3.
- 4.
- 5.
- 6.
- 7.
- 8.
- 9.
- 10.
- 11.
- 12.
Device version upgrade
Check whether the remaining space of the device is larger than the new package size
       <H07_S5720_BMC-05>dir flash:


Directory of flash:/


  Idx  Attr     Size(Byte)  Date        Time       FileName


    0  drw-              -  Oct 30 2019 03:37:16   dhcp


    1  drw-              -  Oct 30 2019 03:19:15   user


    2  -rw-         13,432  Oct 30 2019 03:37:25   default_ca.cer


    3  -rw-             36  Oct 30 2019 03:38:18   $_patchstate_reboot


    4  -rw-          3,684  Oct 30 2019 03:38:18   $_patch_history


    5  -rw-          1,903  Oct 30 2019 03:37:31   default_local.cer


    6  drw-              -  Oct 30 2019 03:37:42   logfile


    7  -rw-          1,111  Apr 08 2020 17:03:35   vrpcfg.zip


    8  -rw-      8,718,710  Dec 12 2013 07:53:05   s5720ei-v200r011sph008.pat


    9  drw-              -  Oct 30 2019 03:19:14   pmdata


   10  -rw-     85,051,908  Jun 28 2018 15:55:01   s5720ei-v200r011c10spc600.cc


   11  drw-              -  Oct 30 2019 03:18:44   $_install_mod


   12  -rw-            836  Mar 30 2020 10:48:44   rr.bak


   13  -rw-            836  Mar 30 2020 10:48:44   rr.dat


   14  -rw-          1,773  Apr 08 2020 17:03:36   private-data.txt


   15  drw-              -  Apr 08 2020 17:03:33   localuser


   16  drw-              -  Mar 30 2020 14:24:42   $_backup


   17  -rw-            200  Oct 30 2019 03:37:32   ca_config.ini


352,772 KB total (265,060 KB free)
- 1.
- 2.
- 3.
- 4.
- 5.
- 6.
- 7.
- 8.
- 9.
- 10.
- 11.
- 12.
- 13.
- 14.
- 15.
- 16.
- 17.
- 18.
- 19.
- 20.
- 21.
- 22.
- 23.
- 24.
- 25.
- 26.
- 27.
- 28.
- 29.
- 30.
- 31.
- 32.
- 33.
- 34.
- 35.
- 36.
- 37.
- 38.
- 39.
- 40.
- 41.
- 42.
- 43.
- 44.
take PC As FTP Server, and FTP To PC
# Connect to PC FTP Server
# Binary code
# Backup package
# Backup patch
# Upload package
# Upload patches
# sign out
# Set the new package to apply to all devices and start the package next time
# Restart the device
# Check the stack status
# Apply the patch to all and run
# Check patch information
# Select patch
# Remove package
# Remove the patch package
边栏推荐
猜你喜欢

PHP online examination system version 4.0 source code computer + mobile terminal

Deep learning classification network -- zfnet
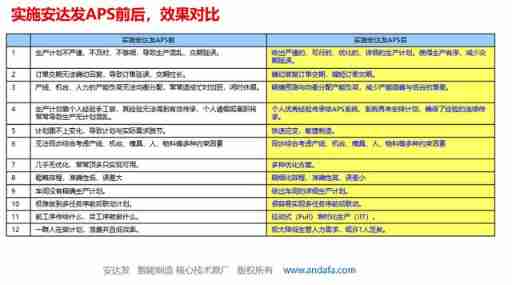
Common doubts about the introduction of APS by enterprises
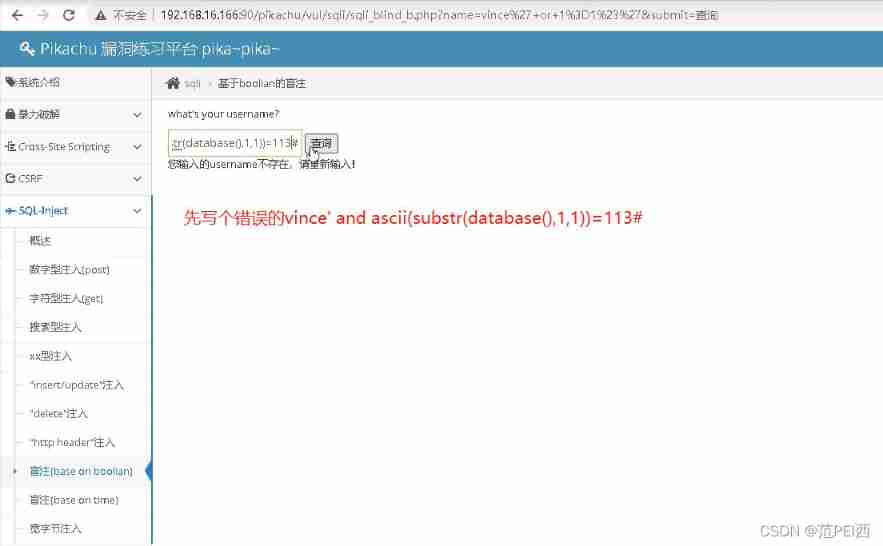
SQL injection 2
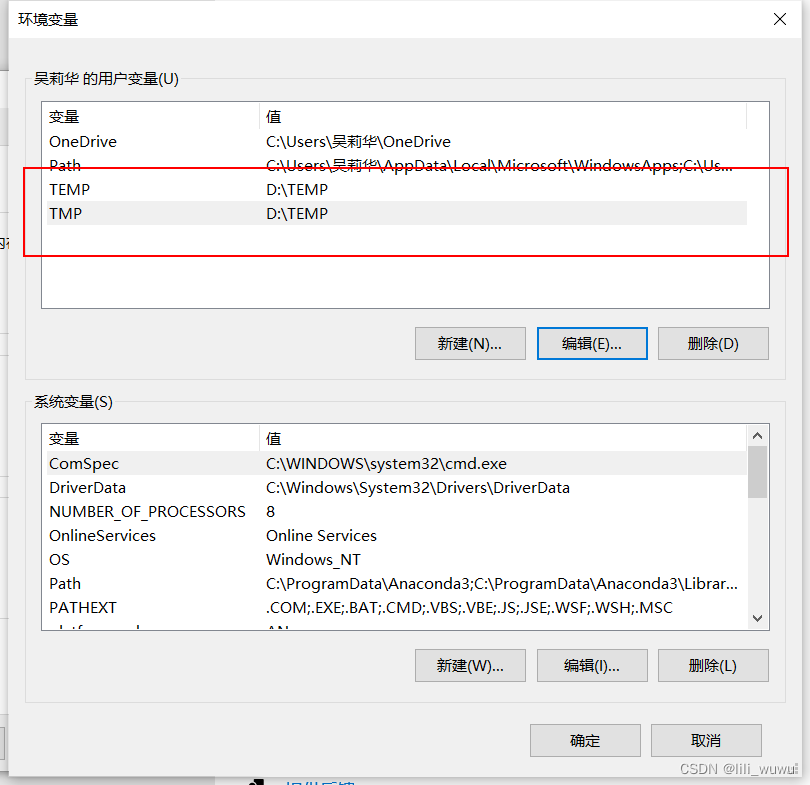
Jupyter launch didn't respond after Anaconda was installed & the web page was opened and ran without execution

Laravel笔记-自定义登录中新增登录5次失败锁账户功能(提高系统安全性)
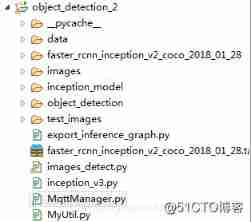
Build your own application based on Google's open source tensorflow object detection API video object recognition system (IV)

Leetcode question 283 Move zero

Spark SQL chasing Wife Series (initial understanding)
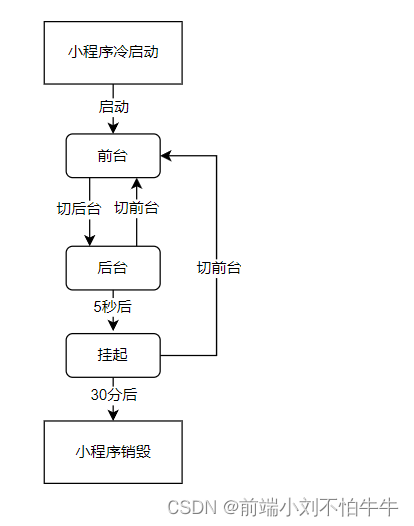
【微信小程序】运行机制和更新机制
随机推荐
Dynamically switch data sources
Boder radius has four values, and boder radius exceeds four values
Rhcsa Road
性能测试过程和计划
##无yum源安装spug监控
PHP online examination system version 4.0 source code computer + mobile terminal
动态切换数据源
Comment faire une radio personnalisée
Statistical inference: maximum likelihood estimation, Bayesian estimation and variance deviation decomposition
设计你的安全架构OKR
Error analysis ~csdn rebound shell error
解剖生理学复习题·VIII血液系统
知识图谱之实体对齐二
请问sql group by 语句问题
RT thread I2C tutorial
Detailed introduction of distributed pressure measurement system VIII: basic introduction of akka actor model
小孩子學什麼編程?
什么是RDB和AOF
Mécanisme de fonctionnement et de mise à jour de [Widget Wechat]
Function optimization and arrow function of ES6