当前位置:网站首页>Adrnoid Development Series (XXV): create various types of dialog boxes using alertdialog
Adrnoid Development Series (XXV): create various types of dialog boxes using alertdialog
2022-07-07 23:14:00 【Full stack programmer webmaster】
Hello everyone , I meet you again , I'm the king of the whole stack .
AlertDialog Dialog box that can generate various contents . But every dialog box has such a structure :
Like the one below :
This is just the simplest dialog .
Let's look at the steps required to create a dialog :
1、 Use to create AlertDialog.Builder object
2、 call AlertDialog.Builder Of setTitle() or setCustomTitle() Method to set the title
3、 call AlertDialog.Builder Of setIcon() Method settings Icon
4、 Call some other setting methods to set the title
5、 call AlertDialog.Builder Of setPositiveButton()、setNegativeButton() perhaps setNeutralButton() Join multiple button
6、 call create() Method creation AlertDialog object , Call again AlertDialog Object's show() Method to display the dialog box .
newly build Android project , Then write main.xml:
<?xml version="1.0" encoding="utf-8"?><LinearLayout xmlns:android="http://schemas.android.com/apk/res/android" android:orientation="vertical" android:layout_width="match_parent" android:layout_height="match_parent" android:gravity="center_horizontal"><!-- Display a normal text edit box component --><EditText android:id="@+id/show" android:layout_width="match_parent" android:layout_height="wrap_content" android:editable="false"/><!-- Define an ordinary button Components --><Button android:layout_width="match_parent" android:layout_height="wrap_content" android:text=" Simple dialog " android:onClick="simple" /><!-- Define an ordinary button Components --><Button android:layout_width="match_parent" android:layout_height="wrap_content" android:text=" Simple list item dialog " android:onClick="simpleList" /> <!-- Define an ordinary button Components --><Button android:layout_width="match_parent" android:layout_height="wrap_content" android:text=" Radio list item dialog " android:onClick="singleChoice" /> <!-- Define an ordinary button Components --><Button android:layout_width="match_parent" android:layout_height="wrap_content" android:text=" Multi select list item dialog box " android:onClick="multiChoice" /> <!-- Define an ordinary button Components --><Button android:layout_width="match_parent" android:layout_height="wrap_content" android:text=" Define the list item dialog box by yourself " android:onClick="customList" /> <!-- Define an ordinary button Components --><Button android:layout_width="match_parent" android:layout_height="wrap_content" android:text=" Define your own View Dialog box " android:onClick="customView" /> </LinearLayout>Here is the definition of 6 individual button And a text display box . And the corresponding onClick attribute
Next , We will write the main interface java Code :AlertDialogTest.java
package org.crazyit.ui;

import android.app.Activity;
import android.app.AlertDialog;

import android.content.DialogInterface;
import android.content.DialogInterface.OnClickListener;
import android.os.Bundle;
import android.view.View;
import android.widget.ArrayAdapter;
import android.widget.TableLayout;
import android.widget.TextView;


public class AlertDialogTest extends Activity
{
	TextView show;
	String[] items = new String[] {
			" insane Java The notes ", " insane Ajax The notes ",
			" Lightweight Java EE Enterprise application practice ",
			" insane Android The notes " };
	@Override
	public void onCreate(Bundle savedInstanceState)
	{
		super.onCreate(savedInstanceState);
		setContentView(R.layout.main);
		show = (TextView) findViewById(R.id.show);
	}

	public void simple(View source)
	{
		AlertDialog.Builder builder = new AlertDialog.Builder(this)
			//  Set dialog title
			.setTitle(" This is the dialog title ")
			//  Set icon
			.setIcon(R.drawable.tools)
			.setMessage(" This is the content of the dialog ");
		//  by AlertDialog.Builder Join in 【 determine 】button
		setPositiveButton(builder);
		//  by AlertDialog.Builder Join in 【 Cancel 】button
		setNegativeButton(builder)
			.create()
			.show();
	}

	public void simpleList(View source)
	{
		AlertDialog.Builder builder = new AlertDialog.Builder(this)
			//  Set dialog title
			.setTitle(" Simple list item dialog ")
			//  Set icon
			.setIcon(R.drawable.tools)
			//  Set simple list item content
			.setItems(items, new OnClickListener()
			{
				@Override
				public void onClick(DialogInterface dialog, int which)
				{
					show.setText(" You chose 《" + items[which] + "》");
				}
			});
		//  by AlertDialog.Builder Join in 【 determine 】button
		setPositiveButton(builder);
		//  by AlertDialog.Builder Join in 【 Cancel 】button
		setNegativeButton(builder)
			.create()
			.show();
	}

	public void singleChoice(View source)
	{
		AlertDialog.Builder builder = new AlertDialog.Builder(this)
			//  Set dialog title
			.setTitle(" Radio list item dialog ")
			//  Set icon
			.setIcon(R.drawable.tools)
			//  Set radio list items , The second item is selected by default ( The index for 1)
			.setSingleChoiceItems(items, 1, new OnClickListener()
			{
				@Override
				public void onClick(DialogInterface dialog, int which)
				{
					show.setText(" You chose 《" + items[which] + "》");
				}
			});
		//  by AlertDialog.Builder Join in 【 determine 】button
		setPositiveButton(builder);
		//  by AlertDialog.Builder Join in 【 Cancel 】button
		setNegativeButton(builder)
			.create()
			.show();
	}
	public void multiChoice(View source)
	{
		AlertDialog.Builder builder = new AlertDialog.Builder(this)
			//  Set dialog title
			.setTitle(" Multi select list item dialog box ")
			//  Set icon
			.setIcon(R.drawable.tools)
			//  Set multiple list items , Set tick No 2 term 、 The first 4 term
			.setMultiChoiceItems(items
			, new boolean[]{false , true ,false ,true}, null);
		//  by AlertDialog.Builder Join in 【 determine 】button
		setPositiveButton(builder);
		//  by AlertDialog.Builder Join in 【 Cancel 】button
		setNegativeButton(builder)
			.create()
			.show();
	}
	public void customList(View source)
	{
		AlertDialog.Builder builder = new AlertDialog.Builder(this)
			//  Set dialog title
			.setTitle(" Define the list item dialog box by yourself ")
			//  Set icon
			.setIcon(R.drawable.tools)
			//  Set self defined list items
			.setAdapter(new ArrayAdapter<String>(this
					, R.layout.array_item
					, items), null);
		//  by AlertDialog.Builder Join in 【 determine 】button
		setPositiveButton(builder);
		//  by AlertDialog.Builder Join in 【 Cancel 】button
		setNegativeButton(builder)
			.create()
			.show();
	}

	public void customView(View source)
	{
		// load /res/layout/login.xml Interface layout
		TableLayout loginForm = (TableLayout)getLayoutInflater()
			.inflate( R.layout.login, null);
		new AlertDialog.Builder(this)
			//  Set the icon of the dialog
			.setIcon(R.drawable.tools)
			//  Set the title of the dialog
			.setTitle(" Define your own View Dialog box ")
			//  Set the dialog box to display View object
			.setView(loginForm)
			//  Set a... For the dialog “ determine ”button
			.setPositiveButton(" Sign in " , new OnClickListener()
			{
				@Override
				public void onClick(DialogInterface dialog,
						int which)
				{
					//  Login processing can be run here
				}
			})
			//  Set a... For the dialog “ Cancel ”button
			.setNegativeButton(" Cancel ", new OnClickListener()
			{
				@Override
				public void onClick(DialogInterface dialog,
						int which)
				{
// Sign out . Don't do anything . } }) // establish 、 And display the dialog box .create() .show(); } private AlertDialog.Builder setPositiveButton( AlertDialog.Builder builder) { // call setPositiveButton Method add ok button return builder.setPositiveButton(" determine ", new OnClickListener() { @Override public void onClick(DialogInterface dialog, int which) { show.setText(" Click 【 determine 】button!"); } }); } private AlertDialog.Builder setNegativeButton( AlertDialog.Builder builder) { // call setNegativeButton Method join cancel button return builder.setNegativeButton(" Cancel ", new OnClickListener() { @Override public void onClick(DialogInterface dialog, int which) { show.setText(" Click 【 Cancel 】button!"); } }); }}Right here. , The fifth and sixth button Two styles are used :array_item.xml and login.xml
Let's take a look at their content :
array_item.xml:
<?xml version="1.0" encoding="utf-8"?><TextView xmlns:android="http://schemas.android.com/apk/res/android" android:id="@+id/TextView" android:textColor="#f0f" android:textSize="30dp" android:shadowColor="#ff0" android:shadowRadius="2" android:shadowDx="5" android:shadowDy="5" android:layout_width="match_parent" android:layout_height="wrap_content" />login.xml:
<?xml version="1.0" encoding="utf-8"?>
<TableLayout xmlns:android="http://schemas.android.com/apk/res/android"
	android:id="@+id/loginForm"
	android:orientation="vertical"
	android:layout_width="fill_parent"
	android:layout_height="fill_parent"
	>
<TableRow>
<TextView
	android:layout_width="fill_parent"
	android:layout_height="wrap_content"
	android:text="username:"
	android:textSize="10pt"
	/>
<!--  Input username Text box  -->
<EditText
	android:layout_width="fill_parent"
	android:layout_height="wrap_content"
	android:hint=" Please fill in the login account "
	android:selectAllOnFocus="true"
	/>
</TableRow>
<TableRow>
<TextView
	android:layout_width="fill_parent"
	android:layout_height="wrap_content"
	android:text="password:"
	android:textSize="10pt"
	/>
<!--  Input password Text box  -->
<EditText
	android:layout_width="fill_parent"
	android:layout_height="wrap_content"
	android:hint=" Please fill in password"
	android:password="true"
	/>
</TableRow>
<TableRow>
<TextView
	android:layout_width="fill_parent"
	android:layout_height="wrap_content"
	android:text=" Phone number :"
	android:textSize="10pt"
	/>
<!--  Enter the text box for the phone number  -->
<EditText
	android:layout_width="fill_parent"
	android:layout_height="wrap_content"
	android:hint=" Please fill in your phone number "
	android:selectAllOnFocus="true"
	android:phoneNumber="true"
	/>
</TableRow>
</TableLayout>adopt AlertDialog Be able to make dialog boxes of different styles , It is more practical in many times
And we can determine button To pass the data Intent Transfer to another interface .
Publisher : Full stack programmer stack length , Reprint please indicate the source :https://javaforall.cn/116202.html Link to the original text :https://javaforall.cn
边栏推荐
- Unity3D学习笔记4——创建Mesh高级接口
- 嵌入式音频开发中的两种曲线
- Network security - Eternal Blue
- Why does the market need low code?
- Brush question 4
- 消费品企业敏捷创新转型案例
- About idea cannot find or load the main class
- Use JfreeChart to generate curves, histograms, pie charts, and distribution charts and display them to jsp-2
- Brush question 5
- QT graphicsview graphical view usage summary with flow chart development case prototype
猜你喜欢
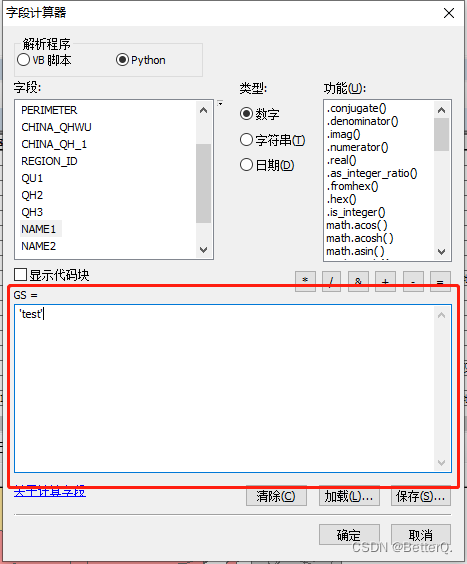
ArcGIS:字段赋值_属性表字段计算器(Field Calculator)依据条件为字段赋值
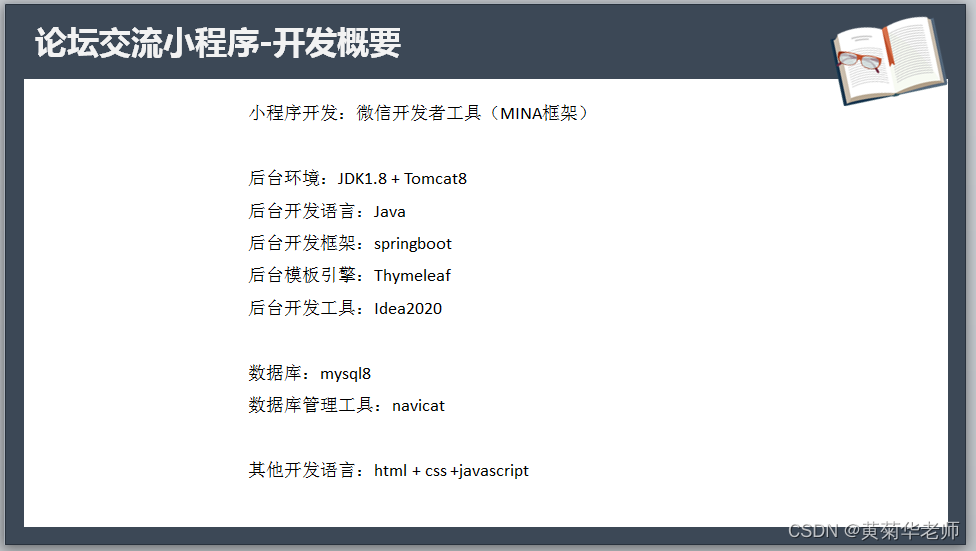
微信论坛交流小程序系统毕业设计毕设(6)开题答辩PPT
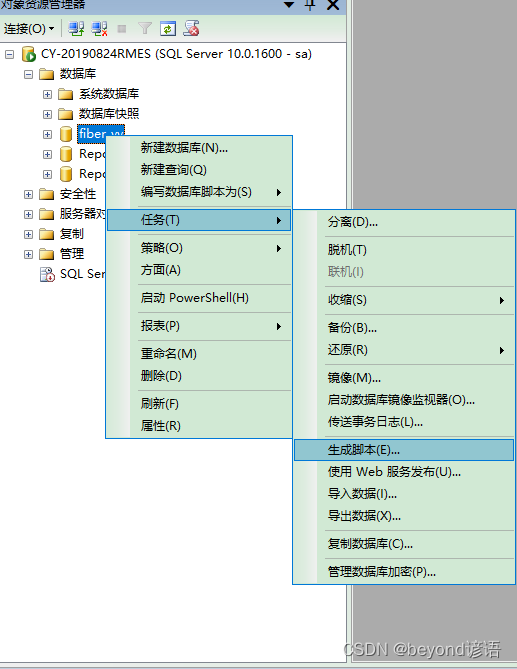
14、 Two methods of database export and import

Brush question 3

Inftnews | the wide application of NFT technology and its existing problems
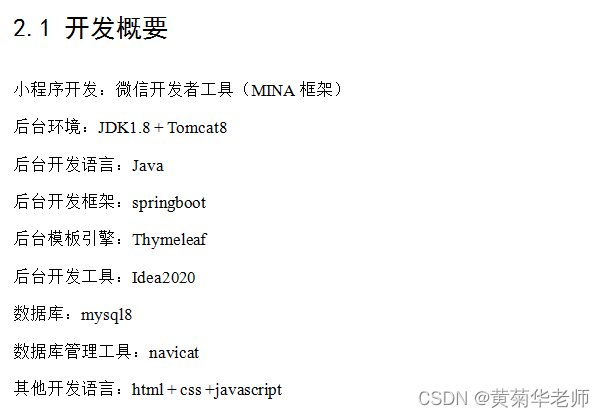
Wechat forum exchange applet system graduation design completion (6) opening defense ppt
Wechat forum exchange applet system graduation design completion (1) development outline
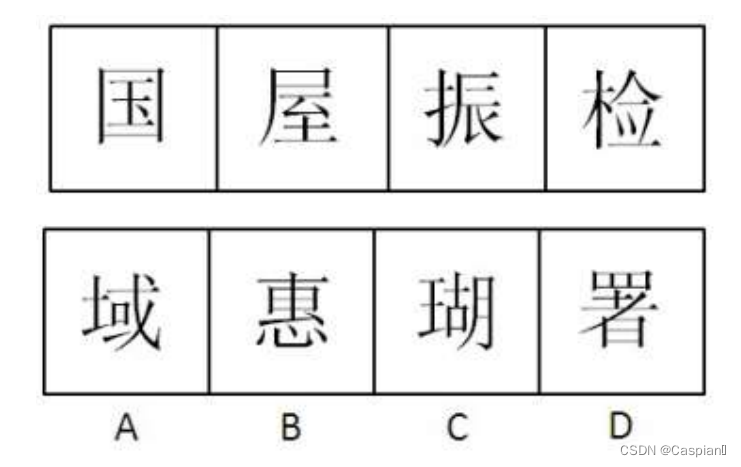
Line test - graphic reasoning - 1 - Chinese character class
UE4_UE5全景相机
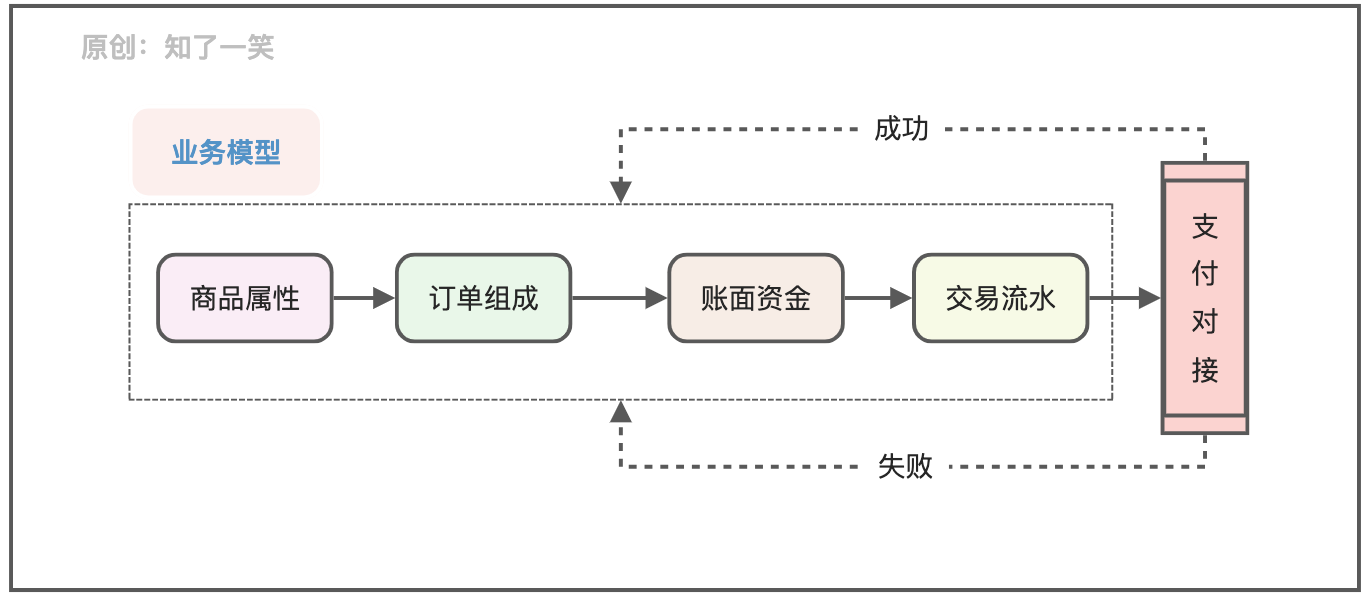
聊聊支付流程的设计与实现逻辑
随机推荐
[record of question brushing] 3 Longest substring without duplicate characters
14、 Two methods of database export and import
2022 words for yourself
Redhat下安装fedora
Personal statement of testers from Shuangfei large factory: is education important for testers?
UE4_UE5蓝图command节点的使用(开启关闭屏幕响应-log-发布全屏显示)
聊聊支付流程的设计与实现逻辑
Adults have only one main job, but they have to pay a price. I was persuaded to step back by personnel, and I cried all night
Lecture 30 linear algebra Lecture 5 eigenvalues and eigenvectors
Use JfreeChart to generate curves, histograms, pie charts, and distribution charts and display them to jsp-2
Brush question 6
Gbu1510-asemi power supply special 15A rectifier bridge gbu1510
Byte hexadecimal binary understanding
微信论坛交流小程序系统毕业设计毕设(5)任务书
网络安全-CSRF
Circumvention Technology: Registry
Line test - graphic reasoning - 1 - Chinese character class
Kubernetes' simplified data storage storageclass (creation, deletion and initial use)
ArcGIS:矢量要素相同字段属性融合的两种方法
Specific method example of V20 frequency converter manual automatic switching (local remote switching)