当前位置:网站首页>PyTorch RNN 实战案例_MNIST手写字体识别
PyTorch RNN 实战案例_MNIST手写字体识别
2022-07-06 09:11:00 【一曲无痕奈何】
# 模型1:Pytorch RNN 实现流程
# 加载数据集
# 使得数据集可迭代(每次读取一个Batch)
# 创建模型类
# 初始化模型类
# 初始化损失类
# 训练模型
# 1. 加载数据集
import torch
import torch.nn as nn
import torchvision.transforms as transforms
import torchvision.datasets as datasets
import torchvision
import numpy as np
import pandas as pd
import matplotlib.pyplot as plt
# 2、下载数据集
trainsets = datasets.MNIST(root = './data2',train = True,download = True,transform = transforms.ToTensor())
testsets = datasets.MNIST(root = './data2',train = False,transform=transforms.ToTensor())
class_names = trainsets.classes #查看类别标签
print(class_names)
# 3、查看数据集大小shape
print(trainsets.data.shape)
print(trainsets.targets.shape)
#4、定义超参数
BASH_SIZE = 32 #每批读取的数据大小
EPOCHS = 10 #训练十轮
# 创建数据集的可迭代对象,也就是说一个batch一个batch的读取数据
train_loader = torch.utils.data.DataLoader(dataset = trainsets, batch_size = BASH_SIZE,shuffle = True)
test_loader = torch.utils.data.DataLoader(dataset = testsets, batch_size = BASH_SIZE,shuffle = True)
# 查看一批batch的数据
images, labels = next(iter(test_loader))
print(images.shape)
#6、定义函数,显示一批数据
def imshow(inp, title=None):
inp = inp.numpy().transpose((1, 2, 0))
mean = np.array([0.485, 0.456, 0.406]) # 均值
std = np.array([0.229, 0.224, 0.225]) # 标准差
inp = std * inp + mean
inp = np.clip(inp, 0, 1) # 限速值限制在0-1之间
plt.imshow(inp)
if title is not None:
plt.title(title)
plt.pause(0.001)
#网格显示
out = torchvision.utils.make_grid(images)
imshow(out)
# 7. 定义RNN模型
class RNN_Model(nn.Module):
def __init__(self, input_dim, hidden_dim, layer_dim, output_dim):
super(RNN_Model, self).__init__()
self.hidden_dim = hidden_dim
self.layer_dim = layer_dim
self.rnn = nn.RNN(input_dim, hidden_dim, layer_dim, batch_first = True, nonlinearity='relu')
#全连接层:
self.fc = nn.Linear(hidden_dim,output_dim)
def forward(self, x):
h0 = torch.zeros(self.layer_dim, x.size(0), self.hidden_dim).requires_grad_().to(device)
out, hn = self.rnn(x, h0.detach())
out = self.fc(out[:, -1, :])
return out
# 8. 初始化模型
input_dim = 28 #输入维度
hidden_dim = 100 #隐藏的维度
layer_dim = 2 # 2 层RNN
output_dim = 10 #输出维度
#实例化模型传入参数
model = RNN_Model(input_dim, hidden_dim, layer_dim,output_dim)
#判断是否有GPU
device = torch.device('cuda:()' if torch.cuda.is_available() else 'cpu')
#9、定义损失函数
criterion = nn.CrossEntropyLoss()
#10、定义优化函数
learning_rate = 0.01
optimizer = torch.optim.SGD(model.parameters(), lr = learning_rate)
#11、输出模型参数
length = len(list(model.parameters()))
#12、循环打印模型参数
for i in range(length):
print('参数: %d' % (i+1))
print(list(model.parameters())[i].size())
# 13 、模型训练
sequence_dim = 28 #序列长度
loss_list = [] #保存loss
accuracy_list = [] #保存accuracy
iteration_list = [] #保存循环次数
iter = 0
for epoch in range(EPOCHS):
for i, (images, labels) in enumerate(train_loader):
model.train() #声明训练
#一个batch的数据转换为RNN的输入维度
images = images.view(-1, sequence_dim, input_dim).requires_grad_().to(device)
labels = labels.to(device)
#梯度清零(否则会不断增加)
optimizer.zero_grad()
#前向传播
outputs = model(images)
#计算损失
loss = criterion(outputs, labels)
#反向传播
loss.backward()
#更新参数
optimizer.step()
#计数自动加一
iter += 1
#模型验证
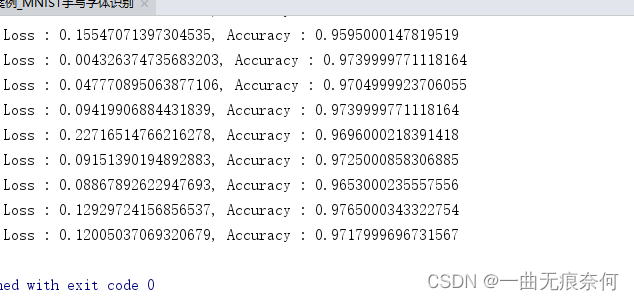
if iter % 500 == 0:
model.eval() #声明
#计算验证的accuracy
correct = 0.0
total = 0.0
#迭代测试集、获取数据、预测
for images, labels in test_loader:
images = images.view(-1, sequence_dim, input_dim).to(device)
#模型预测
outputs = model(images)
#获取预测概率的最大值的下标
predict = torch.max(outputs.data,1)[1]
#统计测试集的大小
total += labels.size(0)
# 统计判断/预测正确的数量
if torch.cuda.is_available():
correct += (predict.gpu() == labels.gpu()).sum()
else:
correct += (predict == labels).sum()
#计算
accuracy = (correct / total)/ 100 * 100
#保存accuracy, loss iteration
loss_list.append(loss.data)
accuracy_list.append(accuracy)
iteration_list.append(iter)
# 打印信息
print("epoch : {}, Loss : {}, Accuracy : {}".format(iter, loss.item(), accuracy))
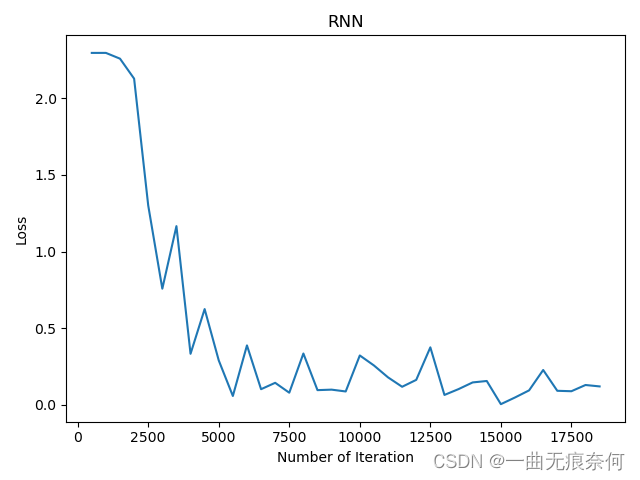
# 可视化 loss
plt.plot(iteration_list, loss_list)
plt.xlabel('Number of Iteration')
plt.ylabel('Loss')
plt.title('RNN')
plt.show()
#可视化 accuracy
plt.plot(iteration_list, accuracy_list, color = 'r')
plt.xlabel('Number of Iteration')
plt.ylabel('Accuracy')
plt.title('RNN')
plt.savefig('RNN_mnist.png')
plt.show()
边栏推荐
- Use xtrabackup for MySQL database physical backup
- 14 医疗挂号系统_【阿里云OSS、用户认证与就诊人】
- Pointer learning
- Simple solution to phpjm encryption problem free phpjm decryption tool
- Security design verification of API interface: ticket, signature, timestamp
- Vh6501 Learning Series
- Compress decompress
- 四川云教和双师模式
- 通过bat脚本配置系统环境变量
- 实现以form-data参数发送post请求
猜你喜欢
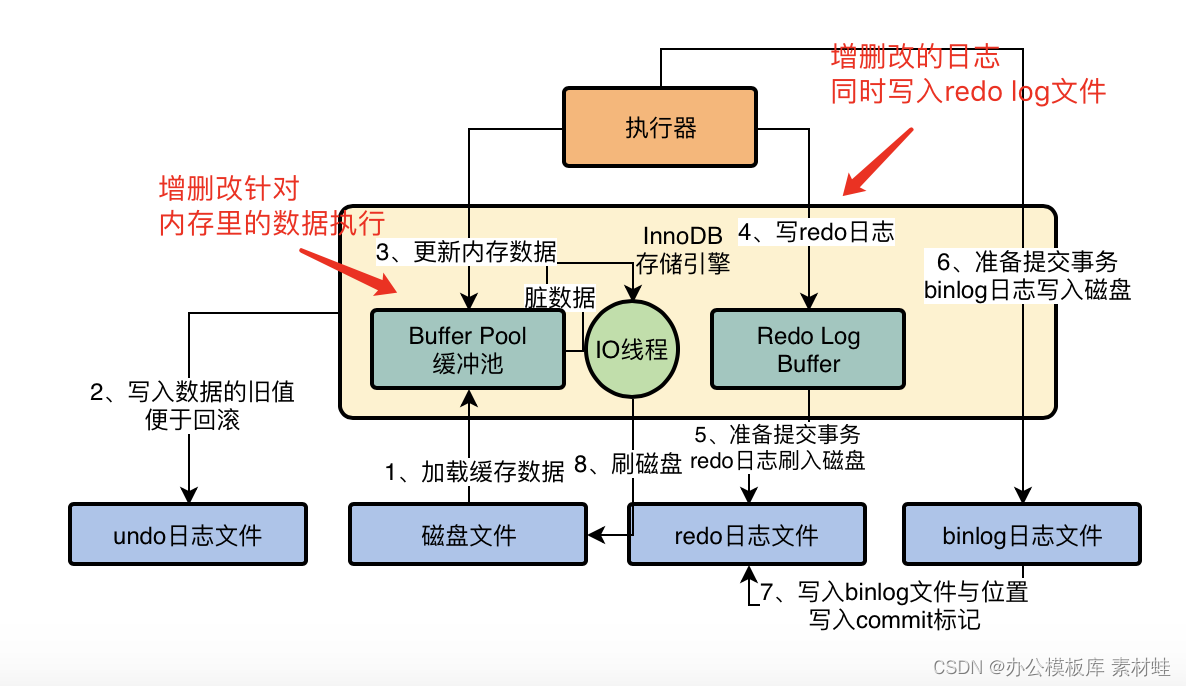
MySQL combat optimization expert 03 uses a data update process to preliminarily understand the architecture design of InnoDB storage engine
Download and installation of QT Creator
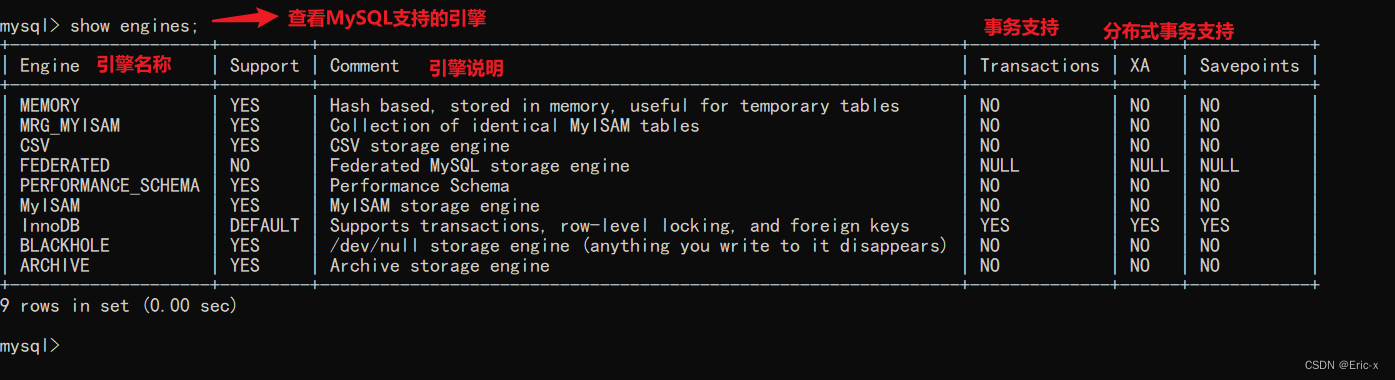
MySQL real battle optimization expert 11 starts with the addition, deletion and modification of data. Review the status of buffer pool in the database
The underlying logical architecture of MySQL
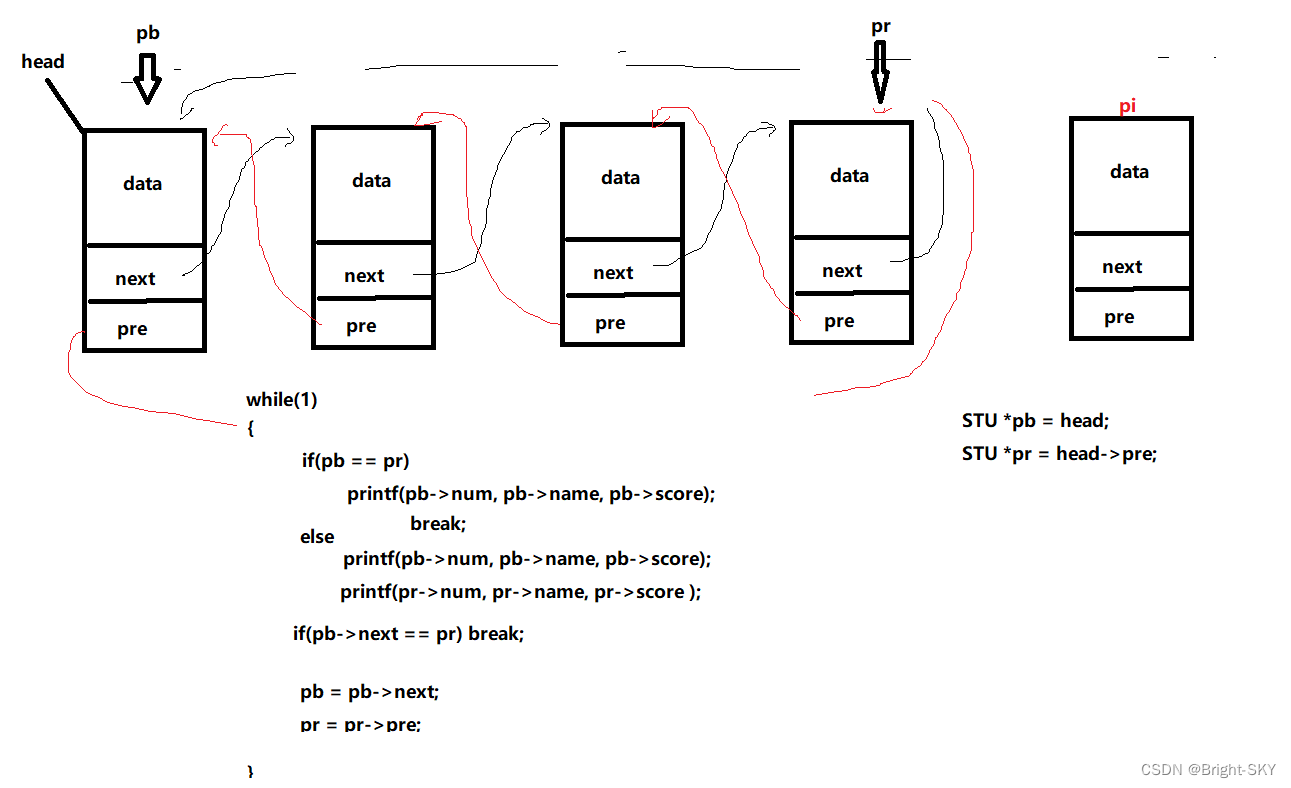
C miscellaneous two-way circular linked list
寶塔的安裝和flask項目部署
Solve the problem of remote connection to MySQL under Linux in Windows
Routes and resources of AI
Implement context manager through with

在CANoe中通過Panel面板控制Test Module 運行(初級)
随机推荐
Tianmu MVC audit I
UEditor国际化配置,支持中英文切换
CAPL script printing functions write, writeex, writelineex, writetolog, writetologex, writedbglevel do you really know which one to use under what circumstances?
如何让shell脚本变成可执行文件
The 32 year old programmer left and was admitted by pinduoduo and foreign enterprises. After drying out his annual salary, he sighed: it's hard to choose
宝塔的安装和flask项目部署
Preliminary introduction to C miscellaneous lecture document
MySQL combat optimization expert 03 uses a data update process to preliminarily understand the architecture design of InnoDB storage engine
MySQL实战优化高手03 用一次数据更新流程,初步了解InnoDB存储引擎的架构设计
MySQL ERROR 1040: Too many connections
MySQL实战优化高手05 生产经验:真实生产环境下的数据库机器配置如何规划?
Installation of pagoda and deployment of flask project
Combined search /dfs solution - leetcode daily question - number of 1020 enclaves
Good blog good material record link
Super detailed steps to implement Wechat public number H5 Message push
Windchill配置远程Oracle数据库连接
Sichuan cloud education and double teacher model
Canoe cannot automatically identify serial port number? Then encapsulate a DLL so that it must work
Not registered via @EnableConfigurationProperties, marked(@ConfigurationProperties的使用)
MySQL实战优化高手10 生产经验:如何为数据库的监控系统部署可视化报表系统?