当前位置:网站首页>Opencv+dlib to change the face of Mona Lisa
Opencv+dlib to change the face of Mona Lisa
2022-07-03 10:10:00 【Guozhou questioner】
opencv+dlib Realize a change of face for Mona Lisa
This case uses opencv+dlib Achieved a face change for the Mona Lisa .
The basic principle of face changing :
Use dlib Of shape_predictor_68_face_landmarks.dat Model , Extract the source image and target image with a face 68 Personal face feature points .
Obtain face masks according to the feature points of the face
Affine transformation of the source image makes its face aim at the face in the target image to get a new image
Perform the same operation on the face mask
Combine the two newly obtained graphs
utilize opencv, Poisson fusion of affine transformed source image and target image
One 、 Main steps
1. Import toolkit
import cv2
import dlib
import numpy as np
# Import python mapping matplotlib
import matplotlib.pyplot as plt
# Use ipython The magic method of , Embed the drawn image directly in notebook In the cell
%matplotlib inline
# Define visual image functions
def look_img(img):
    '''opencv The format of the read image is BGR,matplotlib The visualization format is RGB, So we need to BGR turn RGB'''
    img_RGB = cv2.cvtColor(img,cv2.COLOR_BGR2RGB)
    plt.imshow(img_RGB)
    plt.show()
2. Get image size ( Height , Width )
def get_image_size(image):
    """  Get image size ( Height , Width ) :param image: image :return: ( Height , Width ) """
    image_size = (image.shape[0], image.shape[1])
    return image_size
3. Get face logo ,68 Characteristic points
def get_face_landmarks(image, face_detector, shape_predictor):
    """  Get face logo ,68 Characteristic points  :param image: image :param face_detector: dlib.get_frontal_face_detector :param shape_predictor: dlib.shape_predictor :return: np.array([[],[]]), 68 Characteristic points  """
    dets = face_detector(image, 1)

    shape = shape_predictor(image, dets[0])
    face_landmarks = np.array([[p.x, p.y] for p in shape.parts()])
    return face_landmarks
4. Get face mask
def get_face_mask(image_size, face_landmarks):
    """  Get face mask  :param image_size:  Picture size  :param face_landmarks: 68 Characteristic points  :return: image_mask,  Mask picture  """
    mask = np.zeros(image_size, dtype=np.uint8)
    points = np.concatenate([face_landmarks[0:16], face_landmarks[26:17:-1]])
    cv2.fillPoly(img=mask, pts=[points], color=255)
    return mask
5. Get the affine transformed image of the source image
def get_affine_image(image1, image2, face_landmarks1, face_landmarks2):
    """  Get photo 1 Affine transformed picture  :param image1:  picture 1,  The image to be affine transformed  :param image2:  picture 2,  Just use it to get the picture size , Generate an affine transformation image of the same size  :param face_landmarks1:  picture 1 Face feature points  :param face_landmarks2:  picture 2 Face feature points  :return:  Affine transformed picture  """
    three_points_index = [18, 8, 25]
    M = cv2.getAffineTransform(face_landmarks1[three_points_index].astype(np.float32),
                               face_landmarks2[three_points_index].astype(np.float32))
    dsize = (image2.shape[1], image2.shape[0])
    affine_image = cv2.warpAffine(image1, M, dsize)
    return affine_image.astype(np.uint8)
6. Get the coordinates of the center point of the mask
def get_mask_center_point(image_mask):
    """  Get the coordinates of the center point of the mask  :param image_mask:  Mask picture  :return:  Center mask  """
    image_mask_index = np.argwhere(image_mask > 0)
    miny, minx = np.min(image_mask_index, axis=0)
    maxy, maxx = np.max(image_mask_index, axis=0)
    center_point = ((maxx + minx) // 2, (maxy + miny) // 2)
    return center_point
7. Get the union of two mask masking parts
def get_mask_union(mask1, mask2):
    """  Get the union of two mask masking parts  :param mask1: mask_image,  Mask 1 :param mask2: mask_image,  Mask 2 :return:  The union of the masking parts of the two masks  """
    mask = np.min([mask1, mask2], axis=0)  #  Masked partial union
    mask = ((cv2.blur(mask, (5, 5)) == 255) * 255).astype(np.uint8)  #  Reduce the mask size
    mask = cv2.blur(mask, (3, 3)).astype(np.uint8)  #  Blur mask
    return mask
8. Skin tone adjustment
def skin_color_adjustment(im1, im2, mask=None):
    """  Skin tone adjustment  :param im1:  picture 1 :param im2:  picture 2 :param mask:  Face  mask.  If there is , Use the face partial mean to calculate the skin color transformation coefficient ; otherwise , Use Gaussian blur to find the skin color transformation coefficient  :return:  According to the picture 2 Color adjusted picture 1 """
    if mask is None:
        im1_ksize = 55
        im2_ksize = 55
        im1_factor = cv2.GaussianBlur(im1, (im1_ksize, im1_ksize), 0).astype(np.float)
        im2_factor = cv2.GaussianBlur(im2, (im2_ksize, im2_ksize), 0).astype(np.float)
    else:
        im1_face_image = cv2.bitwise_and(im1, im1, mask=mask)
        im2_face_image = cv2.bitwise_and(im2, im2, mask=mask)
        im1_factor = np.mean(im1_face_image, axis=(0, 1))
        im2_factor = np.mean(im2_face_image, axis=(0, 1))

	im1 = np.clip((im1.astype(np.float64) * im2_factor / np.clip(im1_factor, 1e-6, None)), 0, 255).astype(np.uint8)
	return im1
9. The main program
# Create a face detector
det_face = dlib.get_frontal_face_detector()
# Load the marker detector
det_landmarks = dlib.shape_predictor("shape_predictor_68_face_landmarks.dat") # 68 spot
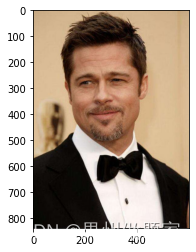
im1 = cv2.imread('peter.jpg') # Source image
im1 = cv2.resize(im1, (600, im1.shape[0] * 600 // im1.shape[1]))
landmarks1 = get_face_landmarks(im1, det_face, det_landmarks) # 68_face_landmarks
im1_size = get_image_size(im1) # Face size
im1_mask = get_face_mask(im1_size, landmarks1) # Face mask
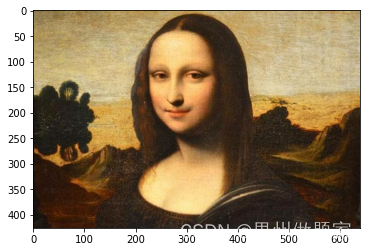
im2 = cv2.imread('mnls.jpg') # Target pictures
landmarks2 = get_face_landmarks(im2, det_face, det_landmarks) # 68_face_landmarks
im2_size = get_image_size(im2) # Target picture size
im2_mask = get_face_mask(im2_size, landmarks2) # Target image face mask
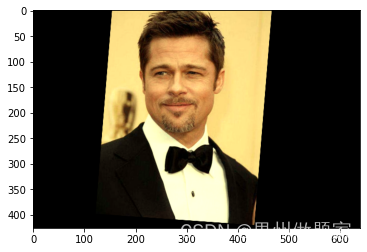
affine_im1 = get_affine_image(im1, im2, landmarks1, landmarks2) # im1( Face map ) Affine transformed picture
affine_im1_mask = get_affine_image(im1_mask, im2, landmarks1, landmarks2) # im1( Face map ) Face mask of affine transformed image
union_mask = get_mask_union(im2_mask, affine_im1_mask) # Mask merge
affine_im1 = skin_color_adjustment(affine_im1, im2, mask=union_mask) # Skin tone adjustment
point = get_mask_center_point(affine_im1_mask) # im1( Face map ) The center point of the face mask of the affine transformed picture
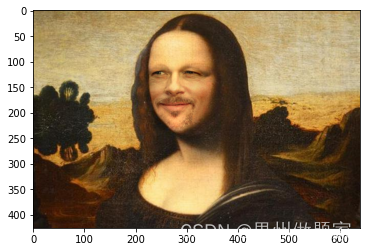
seamless_im = cv2.seamlessClone(affine_im1, im2, mask=union_mask, p=point, flags=cv2.NORMAL_CLONE) # Perform Poisson fusion
look_img(im1)
look_img(im2)
look_img(affine_im1)
look_img(seamless_im)
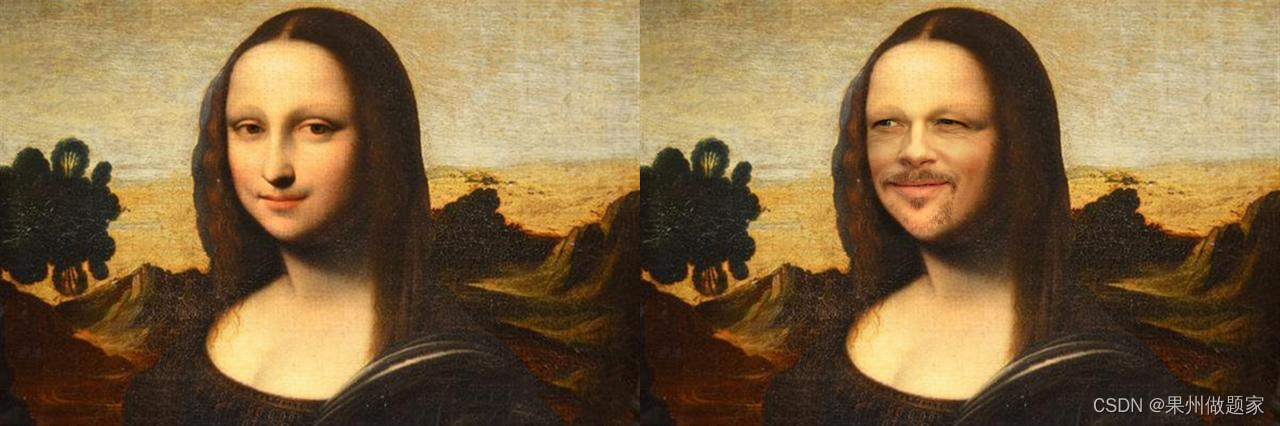
Two 、 Face changing rendering
#  Compare the original picture with the picture after changing face

from PIL import Image
img0 = cv2.cvtColor(np.hstack((im2, seamless_im)), cv2.COLOR_BGR2RGB)
im=Image.fromarray(img0)
display(im)
边栏推荐
- LeetCode - 895 最大频率栈(设计- 哈希表+优先队列 哈希表 + 栈) *
- 03 FastJson 解决循环引用
- Octave instructions
- RESNET code details
- CV learning notes - reasoning and training
- STM32 general timer output PWM control steering gear
- Opencv Harris corner detection
- Modelcheckpoint auto save model
- 4G module at command communication package interface designed by charging pile
- openEuler kernel 技術分享 - 第1期 - kdump 基本原理、使用及案例介紹
猜你喜欢

Cases of OpenCV image enhancement

I think all friends should know that the basic law of learning is: from easy to difficult

MySQL root user needs sudo login

El table X-axis direction (horizontal) scroll bar slides to the right by default
LeetCode - 919. 完全二叉树插入器 (数组)

Adaptiveavgpool1d internal implementation

1. Finite Markov Decision Process

03 FastJson 解决循环引用

2.2 DP: Value Iteration & Gambler‘s Problem
03 fastjason solves circular references
随机推荐
Windows下MySQL的安装和删除
The new series of MCU also continues the two advantages of STM32 product family: low voltage and energy saving
LeetCode - 895 最大频率栈(设计- 哈希表+优先队列 哈希表 + 栈) *
Retinaface: single stage dense face localization in the wild
Pycharm cannot import custom package
Application of 51 single chip microcomputer timer
3.2 Off-Policy Monte Carlo Methods & case study: Blackjack of off-Policy Evaluation
Leetcode bit operation
Vscode markdown export PDF error
Connect Alibaba cloud servers in the form of key pairs
51 MCU tmod and timer configuration
Leetcode - 460 LFU cache (Design - hash table + bidirectional linked hash table + balanced binary tree (TreeSet))*
getopt_ Typical use of long function
CV learning notes - camera model (Euclidean transformation and affine transformation)
LeetCode - 508. 出现次数最多的子树元素和 (二叉树的遍历)
4G module designed by charging pile obtains signal strength and quality
RESNET code details
CV learning notes - deep learning
Dictionary tree prefix tree trie
(2)接口中新增的方法