当前位置:网站首页>Natural language processing series (II) -- building character level language model using RNN
Natural language processing series (II) -- building character level language model using RNN
2022-07-02 11:56:00 【raelum】
Catalog
One 、 Mission background
The task of this paper mainly comes from PyTorch Of The official tutorial , That is, the data set given the names of people in various countries , You need to train a RNN, It can judge which country this person comes from according to the input person's name ( Classification task ).
A dataset is a names Folder , It contains 18 18 18 A text document , in [Language].txt name . In every text document , Each line is one under the language ( common ) The person's name .
It should be noted that , Official data set Suspected error ( The reptile didn't climb clean ) , stay Russian.txt In file , The first 7941 ∼ 7964 7941\sim7964 7941∼7964 There's a line To The First Page word , Obviously, this is not a personal name . Besides , The first 4395 , 5236 , 5255 4395,5236,5255 4395,5236,5255 The names of the people in the line are , ending ( I don't think Russian names end in commas ?).
Bloggers have corrected this data set for everyone , Download address ( Required points 0).
Different from the official tutorial , In this article , Bloggers will refactor the code according to their own understanding , Make it easy to understand .
Two 、 Data preprocessing
First , We need to construct a dictionary , Its format is :{language: [names ...]}.
Because people's names are made up of Unicode Character composition , We need to convert it into ASCII character :
import unicodedata
import string

#  The converted person name consists of upper and lower case letters and space characters , Single quotation mark characters
all_letters = string.ascii_letters + " '"


def unicodeToAscii(s):
    return ''.join(c for c in unicodedata.normalize('NFD', s)
                   if unicodedata.category(c) != 'Mn' and c in all_letters)


print(unicodeToAscii('Ślusàrski'))
# Slusarski
Construct a dictionary :
import os

filenames = os.listdir('names')
data = dict()
for filename in filenames:
    #  Pay attention to the need to utf-8 Format open
    with open(f'names/{
      filename}', encoding='utf-8') as f:
        #  Need to get rid of it. filename Medium .txt suffix
        data[filename[:-4]] = [unicodeToAscii(name) for name in f.readlines()]

all_categories = list(data.keys())
print(all_categories)
# ['Arabic', 'Chinese', 'Czech', 'Dutch', 'English', 'French', 'German', 'Greek', 'Irish', 'Italian', 'Japanese', 'Korean', 'Polish', 'Portuguese', 'Russian', 'Scottish', 'Spanish', 'Vietnamese']
print(data['Arabic'][:6])
# ['Khoury', 'Nahas', 'Daher', 'Gerges', 'Nazari', 'Maalouf']
From the following output results, we can see , The dataset has 18 class , And the number of data in each category is also different :
print(len(all_categories))
# 18
print([len(data[category]) for category in all_categories])
# [2000, 268, 519, 297, 3668, 277, 724, 203, 232, 709, 991, 94, 139, 74, 9384, 100, 298, 73]
Neural networks cannot directly process letters , So we need to convert the letters into corresponding One-Hot vector :
import torch
import torch.nn.functional as F


def letterToTensor(letter):
	#  obtain letter stay all_letters Index in
    letter_idx = torch.tensor(all_letters.index(letter))
    return F.one_hot(letter_idx, num_classes=len(all_letters))


r = letterToTensor("c")
print(r)
# tensor([0, 0, 1, 0, 0, 0, 0, 0, 0, 0, 0, 0, 0, 0, 0, 0, 0, 0, 0, 0, 0, 0, 0, 0,
# 0, 0, 0, 0, 0, 0, 0, 0, 0, 0, 0, 0, 0, 0, 0, 0, 0, 0, 0, 0, 0, 0, 0, 0,
# 0, 0, 0, 0, 0, 0])
The length of the vector is 54, It's because of 26 Lowercase letters +26 Capital letters + Space character + Single quote characters .
Next we need to put the whole word ( The person's name ) Encoded as tensor . Each letter in the word represents a time step , Therefore, a complete word can be regarded as a sequence . Because the length of words varies , So we regard a word as a batch, So the word should be in the shape of (sequence_length, batch_size, features) = (sequence_length, 1, 54) Tensor .
def nameToTensor(name):
    result = torch.zeros(len(name), len(all_letters))
    for i in range(len(name)):
        result[i] = letterToTensor(name[i])
    return result.unsqueeze(1)


print(nameToTensor('ab'))
# tensor([[[1., 0., 0., 0., 0., 0., 0., 0., 0., 0., 0., 0., 0., 0., 0., 0., 0.,
# 0., 0., 0., 0., 0., 0., 0., 0., 0., 0., 0., 0., 0., 0., 0., 0., 0.,
# 0., 0., 0., 0., 0., 0., 0., 0., 0., 0., 0., 0., 0., 0., 0., 0., 0.,
# 0., 0., 0.]],
#
# [[0., 1., 0., 0., 0., 0., 0., 0., 0., 0., 0., 0., 0., 0., 0., 0., 0.,
# 0., 0., 0., 0., 0., 0., 0., 0., 0., 0., 0., 0., 0., 0., 0., 0., 0.,
# 0., 0., 0., 0., 0., 0., 0., 0., 0., 0., 0., 0., 0., 0., 0., 0., 0.,
# 0., 0., 0.]]])
print(nameToTensor('abcd').size())
# torch.Size([4, 1, 54])
Because we have regarded a word as a batch, So don't use DataLoader To construct iterators , Instead, the method of random sampling is used to extract data for training .
3、 ... and 、 Model building and training
We use PyTorch Medium nn.RNN Module to build a single hidden layer one-way RNN:
import torch.nn as nn


class RNN(nn.Module):

    def __init__(self):
        super().__init__()
        self.rnn = nn.RNN(
            input_size=54,
            # 128 It's a random choice , You can also choose other values
            hidden_size=128,
        )
        # 18 Classification task , So the last floor has 18 Neurons
        self.out = nn.Linear(128, 18)

    def forward(self, x):
        # None Represents all zero initialization implicit state
        output, h_n = self.rnn(x, None)
        # output[-1] Is the hidden state output at the last moment , Equate to h_n[0]
        return self.out(output[-1])
Considering the different number of samples in different categories ( There's a big difference ), And we have regarded a word as a batch, Therefore use DataLoader It will appear more difficult . Keep the same practice as the official tutorial , That is, every time randomly from the data set data Take one from category, Again from category Take a random sample from name Feed to RNN in .
import random


def random_sample():
    category = random.choice(all_categories)
    name = random.choice(data[category])
    return category, name


print(random_sample())
# ('Irish', "O'Kane")
We choose to GPU Training on , Choose cross entropy loss and SGD Optimizer :
LR = 1e-3  #  Learning rate
N_ITERS = 10**5  #  How many to train iteration

device = 'cuda' if torch.cuda.is_available() else 'cpu'
rnn = RNN()
rnn.to(device)

criterion = nn.CrossEntropyLoss()
optimizer = torch.optim.SGD(rnn.parameters(), lr=LR, momentum=0.9)
train_loss = []


def train(model, criterion, optimizer):
    model.train()
    avg_loss = 0
    for iteration in range(N_ITERS):
        category, name = random_sample()
        #  take name Turn it into numbers
        X = nameToTensor(name).to(device)
        #  because output The shape of is (1,18), therefore target The shape of must be (1,) Not scalar
        target = torch.tensor([all_categories.index(category)]).to(device)

        #  Positive communication
        output = model(X)
        loss = criterion(output, target)
        avg_loss += loss

        #  Back propagation
        optimizer.zero_grad()
        loss.backward()
        optimizer.step()

        #  every other 1000 individual iteration Output one-time average loss And save
        if (iteration + 1) % 1000 == 0:
            avg_loss /= 1000
            train_loss.append(avg_loss.item())
            print(f"Iteration: [{
      iteration + 1}/{
      N_ITERS}] | Train Loss: {
      avg_loss:.4f}")
            avg_loss = 0
After training , Draw the curve of the loss function :
import numpy as np
import matplotlib.pyplot as plt

plt.plot(np.arange(1, N_ITERS + 1, 1000), train_loss)
plt.ylabel('Train Loss')
plt.xlabel('Iteration')
plt.show()
In order to ensure the reproducibility of the results , We need to set the global seed :
def setup_seed(seed):
    random.seed(seed)  #  by random Set seeds in the Library
    np.random.seed(seed)  #  by numpy Set seeds in the Library
    torch.manual_seed(seed)  #  by Pytorch-CPU Set seeds
    torch.cuda.manual_seed(seed)  #  For the current GPU Set seeds
    torch.cuda.manual_seed_all(seed)  #  For all GPU Set seeds
Set the seed to 42, The loss curve is as follows :

As can be seen from the above figure , The model loss is in 70000 70000 70000 individual iteration It reaches the minimum around . But here for convenience , We use the final model to test .
Four 、 Model test
In the process of training , We have trained a total of 100000 100000 100000 individual Iteration, Every Iteration There is only one sample in . In the test phase , We randomly selected 10000 10000 10000 Samples to plot the confusion matrix :
from sklearn.metrics import ConfusionMatrixDisplay


def test(model):
    model.eval()
    y_true, y_pred = [], []
    for _ in range(10000):
        category, name = random_sample()
        #  Get the subscript corresponding to the real label of the sample
        true_idx = all_categories.index(category)
        y_true.append(true_idx)

        #  Get the subscript corresponding to the prediction tag
        X = nameToTensor(name).to(device)
        output = model(X)
        y_pred.append(output.argmax().item())
    #  Draw confusion matrix
    ConfusionMatrixDisplay.from_predictions(y_true,
                                            y_pred,
                                            labels=np.arange(18),
                                            display_labels=all_categories,
                                            xticks_rotation='vertical',
                                            normalize='true',
                                            include_values=False)
    plt.show()
final result :
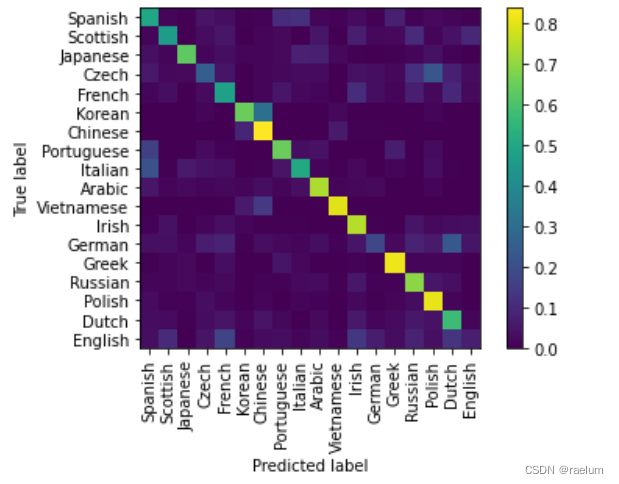
From the result of confusion matrix, we can see :
- Korean It is easy to be misjudged as Chinese,Czech It is easy to be misjudged as Polish,German It is easy to be misjudged as Dutch;
- English、German、Czech It's not easy to identify .
appendix : Complete code
Running environment :
- System :Ubuntu 20.04
- GPU:RTX 3090
- PyTorch edition :1.10
- Python edition :3.8
- Cuda:11.3
It should be noted that , stay Linux In the system ,os.listdir() The return result of and Windows Different systems , So even if the random seeds are the same , It is also possible to produce different experimental results .
import os
import string
import random
import unicodedata

import torch
import torch.nn as nn
import torch.nn.functional as F

import numpy as np
import matplotlib.pyplot as plt
from sklearn.metrics import ConfusionMatrixDisplay


class RNN(nn.Module):

    def __init__(self):
        super().__init__()
        self.rnn = nn.RNN(input_size=54, hidden_size=128)
        self.out = nn.Linear(128, 18)

    def forward(self, x):
        output, h_n = self.rnn(x, None)
        return self.out(output[-1])


def unicodeToAscii(s):
    return ''.join(c for c in unicodedata.normalize('NFD', s)
                   if unicodedata.category(c) != 'Mn' and c in all_letters)


def letterToTensor(letter):
    letter_idx = torch.tensor(all_letters.index(letter))
    return F.one_hot(letter_idx, num_classes=len(all_letters))


def nameToTensor(name):
    result = torch.zeros(len(name), len(all_letters))
    for i in range(len(name)):
        result[i] = letterToTensor(name[i])
    return result.unsqueeze(1)


def random_sample():
    category = random.choice(all_categories)
    name = random.choice(data[category])
    return category, name


def train(model, critertion, optimizer):
    model.train()
    avg_loss = 0
    for iteration in range(N_ITERS):
        category, name = random_sample()
        X = nameToTensor(name).to(device)
        target = torch.tensor([all_categories.index(category)]).to(device)

        output = model(X)
        loss = criterion(output, target)
        avg_loss += loss

        optimizer.zero_grad()
        loss.backward()
        optimizer.step()

        if (iteration + 1) % 1000 == 0:
            avg_loss /= 1000
            train_loss.append(avg_loss.item())
            print(f"Iteration: [{
      iteration + 1}/{
      N_ITERS}] | Train Loss: {
      avg_loss:.4f}")
            avg_loss = 0


def test(model):
    model.eval()
    y_true, y_pred = [], []
    for _ in range(10000):
        category, name = random_sample()

        true_idx = all_categories.index(category)
        y_true.append(true_idx)

        X = nameToTensor(name).to(device)
        output = model(X)
        y_pred.append(output.argmax().item())

    ConfusionMatrixDisplay.from_predictions(y_true,
                                            y_pred,
                                            labels=np.arange(18),
                                            display_labels=all_categories,
                                            xticks_rotation='vertical',
                                            normalize='true',
                                            include_values=False)
    plt.show()


def setup_seed(seed):
    random.seed(seed)
    np.random.seed(seed)
    torch.manual_seed(seed)
    torch.cuda.manual_seed(seed)
    torch.cuda.manual_seed_all(seed)


""" Data preprocessing """

all_letters = string.ascii_letters + " '"
filenames = os.listdir('names')
data = dict()

for filename in filenames:
    with open(f'names/{
      filename}', encoding='utf-8') as f:
        data[filename[:-4]] = [unicodeToAscii(name) for name in f.readlines()]

all_categories = list(data.keys())


""" Model building and training """

setup_seed(42)

LR = 1e-3
N_ITERS = 10**5

device = 'cuda' if torch.cuda.is_available() else 'cpu'
rnn = RNN()
rnn.to(device)

criterion = nn.CrossEntropyLoss()
optimizer = torch.optim.SGD(rnn.parameters(), lr=LR, momentum=0.9)
train_loss = []

train(rnn, criterion, optimizer)

plt.plot(np.arange(1, N_ITERS + 1, 1000), train_loss)
plt.ylabel('Train Loss')
plt.xlabel('Iteration')
plt.show()


""" Testing """

test(rnn)
If this article is helpful to you, please click a free like , This will be the biggest motivation for my creation !
边栏推荐
- HOW TO EASILY CREATE BARPLOTS WITH ERROR BARS IN R
- Redis exceeds the maximum memory error oom command not allowed when used memory & gt; ' maxmemory'
- R HISTOGRAM EXAMPLE QUICK REFERENCE
- PHP query distance according to longitude and latitude
- Time format display
- 行業的分析
- GGPLOT: HOW TO DISPLAY THE LAST VALUE OF EACH LINE AS LABEL
- How to Create a Beautiful Plots in R with Summary Statistics Labels
- The computer screen is black for no reason, and the brightness cannot be adjusted.
- HOW TO CREATE AN INTERACTIVE CORRELATION MATRIX HEATMAP IN R
猜你喜欢

Digital transformation takes the lead to resume production and work, and online and offline full integration rebuilds business logic
Redis exceeds the maximum memory error oom command not allowed when used memory & gt; ' maxmemory'

Esp32 stores the distribution network information +led displays the distribution network status + press the key to clear the distribution network information (source code attached)

Seriation in R: How to Optimally Order Objects in a Data Matrice
Mish shake the new successor of the deep learning relu activation function

The position of the first underline selected by the vant tabs component is abnormal

抖音海外版TikTok:正与拜登政府敲定最终数据安全协议

Dynamic memory (advanced 4)
Mmrotate rotation target detection framework usage record

可升级合约的原理-DelegateCall
随机推荐
Log4j2
File operation (detailed!)
Seriation in R: How to Optimally Order Objects in a Data Matrice
时间格式化显示
BEAUTIFUL GGPLOT VENN DIAGRAM WITH R
HOW TO EASILY CREATE BARPLOTS WITH ERROR BARS IN R
Tdsql | difficult employment? Tencent cloud database micro authentication to help you
vant tabs组件选中第一个下划线位置异常
HOW TO EASILY CREATE BARPLOTS WITH ERROR BARS IN R
A white hole formed by antineutrons produced by particle accelerators
[multithreading] the main thread waits for the sub thread to finish executing, and records the way to execute and obtain the execution result (with annotated code and no pit)
C # method of obtaining a unique identification number (ID) based on the current time
Digital transformation takes the lead to resume production and work, and online and offline full integration rebuilds business logic
ESP32存储配网信息+LED显示配网状态+按键清除配网信息(附源码)
Yygh-10-wechat payment
YYGH-BUG-04
Easyexcel and Lombok annotations and commonly used swagger annotations
php 根据经纬度查询距离
Log4j2
The position of the first underline selected by the vant tabs component is abnormal