当前位置:网站首页>Magnifying glass effect
Magnifying glass effect
2022-07-05 05:03:00 【Fierce chicken】
Magnifier effect
The magnifying glass effect here refers to when the mouse ( finger ) And page ( The screen ) When interacting with pictures in a box in , The picture is enlarged , The enlarged area of the picture displayed in the box changes with the mouse ( page ) Change with the change of position

Demo link :https://codesandbox.io/s/fangdajingxiaoguo-jxdfo
Source code :https://gitee.com/thisismyaddress/webpage-effects/tree/master/magnifier-effect
I've tried several different implementations below
Move the picture in the picture box
Here is by changing The size and absolute positioning offset of a picture in the picture box Achieve the final effect
HTML The basic structure of is as follows :
<div id="image">
    <!--  The picture is set to absolute positioning  -->
    <img src="./img/doge.webp" alt="doge">
</div>
here JS in The events involved are mouseenter,mouseleave,mousemove, These events are bound to the picture box (imageBox)
stay mouseenter In the event handler , Just enlarge the size of the picture in the box :
imageBox.addEventListener('mouseenter', () => {

   	//  Here will be the picture ( The picture is square like the box ) Zoom in to  450x450 , Equivalent to the picture box 3 times (150x150)
    img.style.width = '450px';
})
stay mouseleave In the event handler function, you only need to clear the positioning offset style and the picture magnification style :
//  Clear all styles  >>  Restore as is
imageBox.addEventListener('mouseleave', () => {

    img.style.width = '';
    img.style.top = '';
    img.style.left = '';
})
The key to the realization of picture magnification effect is mousemove In the event handler function of Calculation of image positioning offset
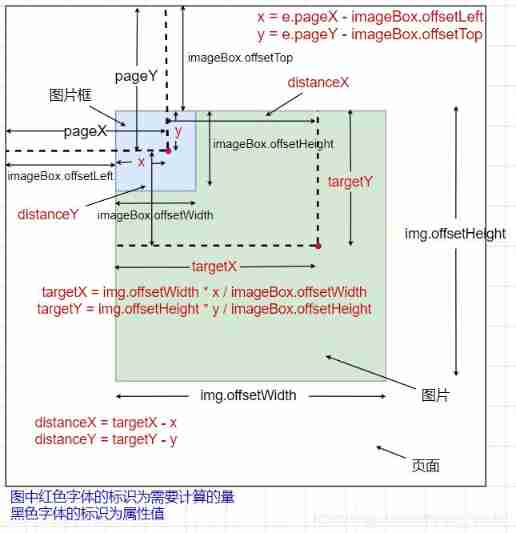
The idea here is to find the current mouse position The coordinate position relative to the upper left corner of the picture box x, y, Then calculate the relative percentage position of this coordinate position in the picture box ( For example, if the point is in the middle of the box, it is 0.5, 0.5 perhaps 50%, 50% The location of , This percentage is relative to the upper left corner of the box ), Use this percentage position to find the same relative position in the enlarged picture , The specific coordinate position of the target point in the picture targetX, targetY, then take x, y and targetX, targetY The two points overlap by positioning offset that will do , These two requirements Horizontal offset distance and vertical offset distance distanceX, distanceY, Because the picture needs to be absolutely positioned and offset relative to the frame of the picture , Then you need to reverse offset , You need to Yes, the calculated distanceX, distanceY Take a negative value , That is to say The final positioning offset is left: - distanceX + 'px'; top: - distanceY + 'px'
The following is the specific calculation of the quantity to be calculated :
The coordinates of the current mouse position relative to the upper left corner of the picture box
x, y:
The specific position of the mouse in the page can be throughe.pageX, e.pageYget (eRepresents the mouse event object ), This specific position is calculated relative to the upper left corner of the page , Then relative to the upper left corner of the frame , You can subtract the distance between the top and left sides of the box and the top and left sides of the page ( That is to sayimageBox.offsetTop, imageBox.offsetLeft) get :x = e.pageX - imageBox.offsetLeft; y = e.pageY - imageBox.offsetTop;The relative percentage position of the coordinates in the picture box :
The calculation of the relative position relative to the whole frame needs to use the height and width of the frame (imageBox.offsetWidth, imageBox.offsetHeight)x / imageBox.offsetWidth; y / imageBox.offsetHeight;The target point at the same relative position in the enlarged picture
targetX, targetY:
This requires the use of the relative position calculated above , Then multiply by the size of the enlarged picture (img.offsetWidth, img.offsetHeight) gettargetX = img.offsetWidth * x / imageBox.offsetWidth; targetY = img.offsetHeight * y / imageBox.offsetHeight;The distance to be offset
distanceX, distanceY:
The horizontal distance and vertical distance of the offset are the above two relative positionsx, yandtargetX, targetYThe difference between the horizontal distance and the vertical distance :distanceX = targetX - x; distanceY = targetY - y;Absolute positioning and offset the picture relative to the picture box , You need to move the picture backwards , Therefore, the value of the offset distance needs to be negative :
img.style.left = - distanceX + 'px';
img.style.top = - distanceY + 'px';
At this point, the calculation of the image positioning offset is over ( See the following figure for specific calculation )
So the final mousemove The event handler function is :
imageBox.addEventListener('mousemove', (e) => {

    //  The coordinates of the current mouse position relative to the upper left corner of the picture box x, y
    let x = e.pageX - imageBox.offsetLeft;
    let y = e.pageY - imageBox.offsetTop;
    //  The target point at the same relative position in the enlarged picture targetX, targetY
    let targetX = img.offsetWidth * x / imageBox.offsetWidth;
    let targetY = img.offsetHeight * y / imageBox.offsetHeight;
    //  The distance to be offset distanceX, distanceY
    let distanceX = targetX - x;
    let distanceY = targetY - y;
    //  Absolute positioning and offset the picture relative to the picture box , You need to move the picture backwards , Therefore, the value of the offset distance needs to be negative
    img.style.left = - distanceX + 'px';
    img.style.top = - distanceY + 'px';
})
Move the background picture of the picture box
Here, the picture in the above picture box is removed , Directly use the picture to be enlarged as the background picture of the picture box , adopt Change the size and position of the background picture To achieve the final effect
HTML The basic structure of is as follows :
<div id="image"></div>
The three involved here JS Events or mouseenter,mouseleave,mousemove, These events are bound to the picture box (imageBox)
stay mouseenter In the event handler , Just enlarge the size of the background picture of the box :
image.addEventListener('mouseenter', (e) => {

    // image.style.backgroundSize = '450px';
    e.target.style.backgroundSize = '450px';
});
stay mouseleave In the event handler function, you only need to clear the size and position style of the background picture :
image.addEventListener('mouseleave', (e) => {

    // image.style.backgroundSize = '';
    // image.style.backgroundPosition = '';
    e.target.style.backgroundSize = '';
    e.target.style.backgroundPosition = '';
});
The focus of the implementation here is still the calculation of the image offset , But the difference is , The size information of the background picture here is difficult to find the relevant attribute values to obtain dynamically , The specific offset distance cannot be calculated as the above method of absolute positioning . And if it is set to a fixed value , So when the magnification of the background image changes , There are a lot of changes to the program
Here, the percentage value of the position of the background picture is used to move the picture to the target position ( So you don't even have to calculate the specific offset distance )
Let's briefly talk about the position of the background picture background-position Performance when the value is percentage :
The percentage offset specifies that the relative position of the image coincides with the relative position of the container , The following formula is executed
(container width - image width) * (position x%) = (x offset value)
(container height - image height) * (position y%) = (y offset value)
 Reference resources :https://developer.mozilla.org/zh-CN/docs/Web/CSS/background-position
It can be seen from the above formula that when the size of the background picture is the same as the size of the container , There is no offset when using percentage value
In fact, the performance of percentage value is to specify a relative position relative to the upper left corner of the picture , This position will overlap with the same relative position of the container relative to the upper left corner , such as background-position: 50% 50%, This point specifies the center of the background image , Then this value will make the positive center of the background picture coincide with the positive center of the container
Return to the right topic , In this case, the percentage value of the position of the background picture is adopted , You just need to Calculate the coordinates of the current mouse position relative to the upper left corner of the picture box x, y Relative percentage position in picture box , You can achieve the correct offset of the background picture
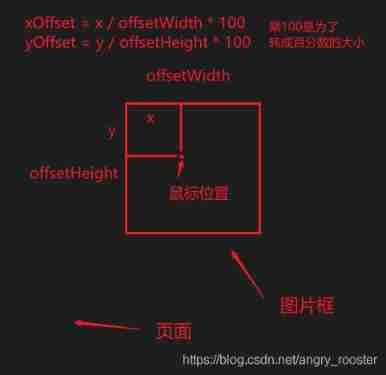
image.addEventListener('mousemove', (e) => {

    // let x = e.pageX - image.offsetLeft;
    // let y = e.pageY - image.offsetTop;
    // //  Offset percentage
    // let xOffset = x / image.offsetWidth * 100;
    // let yOffset = y / image.offsetHeight * 100;

    // image.style.backgroundPosition = xOffset + '% ' + yOffset + '%';

    //  Calculate the current coordinates of the mouse relative to the upper left corner of the picture box
    let x = e.pageX - e.target.offsetLeft;
    let y = e.pageY - e.target.offsetTop;

    //  Calculate the relative position
    //  ride  100  To convert it into a percentage
    let xOffset = x / e.target.offsetWidth * 100;
    let yOffset = y / e.target.offsetHeight * 100;

    e.target.style.backgroundPosition = xOffset + '% ' + yOffset + '%';
});
Move the background picture of the picture box —— Use as much as possible CSS characteristic
Here is mainly what I saw B A video tutorial of the station An attempt after , Although the steps are a little complicated , But in the process of realizing it, I learned new knowledge
The implementation here uses as much as possible CSS characteristic , In addition, I tried something I've never used API(getBoundingClientRect(),e.offsetX,e.offsetY)
We still use the method of moving the background picture , It involves JS Events or mouseenter,mouseleave,mousemove( Are bound to the picture box )
stay mouseenter The operation of enlarging the picture in is no longer to directly enlarge the background picture , It is Indirectly by adding attributes :
Here is the picture box Set up a zoomed="1" Properties of , To indicate that it is in an enlarged state at this time , In this case, we need to cooperate CSS Selector to change the size of the background picture :
<div id="image"></div>
#image[zoomed] {

    background-size: 450px auto;
}
image.addEventListener('mouseenter', (e) => {

    e.target.setAttribute('zoomed', 1);
})
The picture needs to be zoomed out when the mouse leaves , that Just remove the attribute that will do :
image.addEventListener('mouseleave', (e) => {

	e.target.removeAttribute('zoomed');
});

The next in mousemove In practice, the offset of picture position is realized by changing the percentage value of background picture position in the processing function , But the style of the position of the background image is not changed directly here , It is By changing two CSS attribute (--x and --y) To indirectly change the picture position and style . And the picture frame size is through getBoundingClientRect() Of an object returned width and height Property acquisition . In addition, the coordinate position of the current mouse position relative to the upper left corner of the box does not need to be calculated specially , But directly e.offsetX and e.offsetY, These two attributes represent the calculated mouse position relative to the upper left corner of the box
image.addEventListener('mousemove', moveHandler(e) {

    //  Here is a special attempt to use  getBoundingClientRect()
    //  There is no explanation here , Just know that it can return the size of the element and its position relative to the viewport
    let rect = e.target.getBoundingClientRect();

	//  there  e.offsetX  and  e.offsetY  Represents the position of the mouse relative to the upper left corner of the box , Equivalent to the above specially calculated  x  and  y
	// rect.width  amount to  e.target.offsetWidth ,rect.height  amount to  e.target.offsetHeight
    let xOffset = e.offsetX / rect.width;
    let yOffset = e.offsetY / rect.height;

	//  By changing two CSS attribute (--x and --y) To indirectly change the picture position and style
    e.target.style.setProperty('--x', xOffset);
    e.target.style.setProperty('--y', yOffset);
});
The last two events in the above event handler function are set CSS The value of the variable , It should be used at this time , Make it effective :
#image[zoomed] {

    background-size: 450px auto;
    /*  take  --x  and  --y  adopt  var()  The calculated value is parsed and applied to the position style of the background picture  */
    background-position: calc(var(--x) * 100%) calc(var(--y) * 100%);
}
Try to be compatible with the mobile terminal
The above applications are in PC End down , It cannot be used on the mobile terminal , because There is no mouse event under mobile terminal , So none of the above events will trigger , natural , The effect of a magnifying glass cannot be achieved
You need to use... Under the mobile terminal Touch event To achieve this effect , here The touch events involved are touchstart,touchend,touchmove, These events are bound to the picture box . The specific implementation ideas are consistent with the above : Touch start (touchstart) When the picture is enlarged , End of touch (touchend) Restore the picture to its original size and clear the picture offset style , When the touch point moves (touchmove) You need to calculate the offset of the picture . Only some coding adjustments need to be made in the specific implementation
Here we use the method of moving the background picture ( Moving pictures in a picture box works much the same way , Only the amount of calculation in calculating the offset will be a little larger ), And use as much as possible for the one above CSS The method of attribute is compatible with the mobile terminal
touchstart and touchend The content of the event handler function can be the same as the above mouseenter and mouseleave The difference is the same :
image.addEventListener('touchstart', (e) => {

    e.target.setAttribute('zoomed', 1);
});

image.addEventListener('touchend', (e) => {

    e.target.removeAttribute('zoomed');
});
The big difference here is touchmove The content of the event handler .
Because there may be more than one touch point that triggers a touch event ( Multiple fingers touch the screen ), So here in the calculation You need to specify a touch point , Use
e.touches[0]instead ofeSpecify a touch event object , Avoid confusion , Then the touch event source can be throughe.touches[0].targetgetbecause Touching the event object does not
e.offsetXande.offsetYThese two properties , So the location of the touch point The coordinates relative to the upper left corner of the frame still need to be specially calculated . Here, because we need to try speciallygetBoundingClientRect(), In the process of calculation, in order to obtain the position information of the frame , The name of the object returned using this methodtopandleftAttribute gets , And pay attention to : The box position information returned by this method is Relative to the viewport, not to the page In terms of the , So if the page scrolls , Use the touch point position attribute calculated relative to the pagepageXandpageYThe calculated result is inaccurate , There should be The touch point position attribute is also calculated relative to the viewportclientXandclientY// Use the touch point position calculated relative to the viewport clientX and clientY // rect = e.target.getBoundingClientRect() x = e.touches[0].clientX - rect.left; y = e.touches[0].clientY - rect.top; // If you want to use the touch point position calculated relative to the page pageX and pageY, // You need to use the box position information calculated relative to the page offsetLeft and offsetTop x = e.touches[0].pageX - e.touches[0].target.offsetLeft; y = e.touches[0].pageY - e.touches[0].target.offsetTop;In this way, the information of relative position can be calculated :
// rect = e.target.getBoundingClientRect()
xOffset = x / rect.width;
yOffset = y / rect.height;

// xOffset = x / e.touches[0].target.offsetWidth;
// yOffset = y / e.touches[0].target.offsetHeight;
Because in When touching and moving the screen , By default, the page will be dragged , To avoid that , Need to use e.preventDefault(), In addition, when a touch point contacts the screen for a long time and does not move , Will trigger the page menu , Need to pass through contextmenu What happened Do not press and hold the menu

<div id="image"></div>
//  Do not press and hold the menu
document.addEventListener('contextmenu', (e) => {

    e.preventDefault();
})
image.addEventListener('touchmove', (e) => {

    //  Prevent pages from being dragged
    e.preventDefault();

    let rect = e.target.getBoundingClientRect();

    //  because  touch  The incident did not  offsetX  and  offsetY  attribute , Therefore, additional calculation operations are required
    //  There may be multiple touch points , Here only one touch point is taken to calculate the touch position  e.touches[0]
    //  Use the touch point position calculated relative to the viewport  clientX  and  clientY( Method is relative to the viewport )
    // rect = e.target.getBoundingClientRect()
    let x = e.touches[0].clientX - rect.left;
    let y = e.touches[0].clientY - rect.top;

    //  If you want to use the touch point position calculated relative to the page  pageX  and  pageY,
    //  You need to use the box position information calculated relative to the page  offsetLeft  and  offsetTop
    // let x = e.touches[0].pageX - e.touches[0].target.offsetLeft;
    // let y = e.touches[0].pageY - e.touches[0].target.offsetTop;

    let xOffset = x / rect.width;
    let yOffset = y / rect.height;

    // let xOffset = x / e.touches[0].target.offsetWidth;
    // let yOffset = y / e.touches[0].target.offsetHeight;

    e.target.style.setProperty('--x', xOffset);
    e.target.style.setProperty('--y', yOffset);
});
At this point, the problem is When the touch point touches the screen but does not move , The enlarged area shown in the picture may be incorrect ( as follows , Even if the touch location is another location , It always shows the ear in the upper left corner of the picture )

This is because the touch point does not move at this time , It won't trigger touchmove event , The picture cannot be moved , So it needs to be in touchstart Add relevant steps to the event handler function to move the picture
//  Here, the body of the touch movement event handler is separated into an independent function
image.addEventListener('touchstart', (e) => {

    e.target.setAttribute('zoomed', 1);
    //  Avoid incorrect picture position when it is not moved after touching again
    moveHandler(e);
});

image.addEventListener('touchmove', moveHandler);

function moveHandler(e) {

    //  Prevent pages from being dragged
    e.preventDefault();

    let rect = e.target.getBoundingClientRect();

    //  because  touch  The incident did not  offsetX  and  offsetY  attribute , Therefore, additional calculation operations are required
    //  There may be multiple touch points , Here only one touch point is taken to calculate the touch position  e.touches[0]
    //  Use the touch point position calculated relative to the viewport  clientX  and  clientY( Method is relative to the viewport )
    // rect = e.target.getBoundingClientRect()
    let x = e.touches[0].clientX - rect.left;
    let y = e.touches[0].clientY - rect.top;

    //  If you want to use the touch point position calculated relative to the page  pageX  and  pageY, You need to use the box position information calculated relative to the page  offsetLeft  and  offsetTop
    // let x = e.touches[0].pageX - e.touches[0].target.offsetLeft;
    // let y = e.touches[0].pageY - e.touches[0].target.offsetTop;

    let xOffset = x / rect.width;
    let yOffset = y / rect.height;

    // let xOffset = x / e.touches[0].target.offsetWidth;
    // let yOffset = y / e.touches[0].target.offsetHeight;

    e.target.style.setProperty('--x', xOffset);
    e.target.style.setProperty('--y', yOffset);
}
The effect is as follows ( Now touch where , The zoom in position is where )

Now there is another problem When the touch point moves to the area outside the picture box ,touchmove The event is still triggered , At this time, the position of the touch point is outside the box , The image offset is still calculated according to the position of the touch point , Then it will be Causes the picture to be moved outside the visible area

To solve this problem, we need to limit the offset range of the picture , Just make some simple judgments
function moveHandler(e) {

    // ......

    //  Use the touch point position calculated relative to the viewport  clientX  and  clientY( Method is relative to the viewport )
    // rect = e.target.getBoundingClientRect()
    let x = e.touches[0].clientX - rect.left;
    let y = e.touches[0].clientY - rect.top;
    //  Limits
    x = x < 0 ? 0 : x;
    x = x > rect.width ? rect.width : x;
    y = y < 0 ? 0 : y;
    y = y > rect.height ? rect.height : y;

    //  If you want to use the touch point position calculated relative to the page  pageX  and  pageY, You need to use the box position information calculated relative to the page  offsetLeft  and  offsetTop
    // let x = e.touches[0].pageX - e.touches[0].target.offsetLeft;
    // let y = e.touches[0].pageY - e.touches[0].target.offsetTop;
    //  Limits
    // x = x < 0 ? 0 : x;
    // x = x > e.touches[0].target.offsetWidth ? e.touches[0].target.offsetWidth : x;
    // y = y < 0 ? 0 : y;
    // y = y > e.touches[0].target.offsetHeight ? e.touches[0].target.offsetHeight : y;

    // ......
}
To make the code look NB One o'clock , You can combine the above judgment statements :
function moveHandler(e) {

    // ......

    //  Limits
    x = Math.min(Math.max(0, x), rect.width);
    y = Math.min(Math.max(0, y), rect.height);
    // x = x < 0 ? 0 : x;
    // x = x > rect.width ? rect.width : x;
    // y = y < 0 ? 0 : y;
    // y = y > rect.height ? rect.height : y;

    // ......
    //  Limits
    // x = Math.min(Math.max(0, x), e.touches[0].target.offsetWidth);
    // y = Math.min(Math.max(0, y), e.touches[0].target.offsetHeight);
    // x = x < 0 ? 0 : x;
    // x = x > e.touches[0].target.offsetWidth ? e.touches[0].target.offsetWidth : x;
    // y = y < 0 ? 0 : y;
    // y = y > e.touches[0].target.offsetHeight ? e.touches[0].target.offsetHeight : y;

    // ......
}
thus , Even if the touch point moves out of the picture box, the enlarged picture can be displayed correctly

So far, the magnifying glass effect of the mobile end is completed , Now you need to combine the relevant codes of the mobile terminal with PC The related codes of the end are combined to achieve the purpose of compatibility . To facilitate the assignment of event handling functions to mouse events and touch events , At the same time, make the code structure look elegant , Here I take the code of the event handler away . because mouseenter And mouseleave The event handler functions of and touchstart And touchend The content is almost the same , Therefore, the processing functions of these four events do not need to do much difference coding . Here's one It is forbidden to press and hold the menu (contextMenu event ) It only needs to be set in the mobile terminal , Therefore, it is necessary to judge whether the event triggered at this time is a mobile end event or PC Terminal , To decide whether to disable long press menu
image.addEventListener('mouseenter', enterHandler);
image.addEventListener('mouseleave', leaveHandler);

image.addEventListener('touchstart', enterHandler);
image.addEventListener('touchend', leaveHandler);

//  Here we need to specifically extract an event handler , Because a listener that is an anonymous function cannot be removed
function prevent(e) {

    e.preventDefault();
}

function enterHandler(e) {

    e.target.setAttribute('zoomed', 1);
    //  Avoid incorrect picture position when it is not moved after touching again
    moveHandler(e);

    if (e.type === 'touchstart') {

        //  Do not press and hold the menu
        document.addEventListener('contextmenu', prevent)
    } else {

        //  Cancel long press menu
        document.removeEventListener('contextmenu', prevent);
    }
}

function leaveHandler(e) {

    e.target.removeAttribute('zoomed');
}
but mousemove and touchmove The content of the event handler of the event is quite different , There are many differences to be coded , One of the most important is the judgment of event type ( See the code below )
image.addEventListener('mousemove', moveHandler);
image.addEventListener('touchmove', moveHandler);

function moveHandler(e) {

    let rect = e.target.getBoundingClientRect();

    //  because  touch  The incident did not  offsetX  and  offsetY  attribute , Therefore, additional calculation operations are required
    let x = 0;
    let y = 0;

    //  Judgment of event type
    if (['touchstart', 'touchend', 'touchmove'].includes(e.type)) {

        //  Prevent pages from being dragged
    	e.preventDefault();

        //  There may be multiple touch points , Here only one touch point is taken to calculate the touch position  e.touches[0]
        //  Use the touch point position calculated relative to the viewport  clientX  and  clientY( Method is relative to the viewport )
        // rect = e.target.getBoundingClientRect()
        x = e.touches[0].clientX - rect.left;
        y = e.touches[0].clientY - rect.top;
        //  Limits
        x = Math.min(Math.max(0, x), rect.width);
        y = Math.min(Math.max(0, y), rect.height);
        // x = x < 0 ? 0 : x;
        // x = x > rect.width ? rect.width : x;
        // y = y < 0 ? 0 : y;
        // y = y > rect.height ? rect.height : y;
    } else {

        x = e.offsetX;
        y = e.offsetY;
    }

    let xOffset = x / rect.width;
    let yOffset = y / rect.height;

    e.target.style.setProperty('--x', xOffset);
    e.target.style.setProperty('--y', yOffset);
}
This compatibility is now complete
To streamline the code
You can see , Before I try to use getBoundingClientRect() as well as e.offsetX, e.offsetY when , compatible PC End and mobile end , There's a lot of code , You can actually change your practice , To streamline the code
image.addEventListener('mousemove', moveHandler);
image.addEventListener('touchmove', moveHandler);s

function moveHandler(e) {

    let eventObj = null;

    if (['touchstart', 'touchend', 'touchmove'].includes(e.type)) {

        //  Prevent pages from being dragged
        e.preventDefault();

        //  There may be multiple touch points , Here only one touch point is taken to calculate the touch position  e.touches[0]
        eventObj = e.touches[0];
    } else {

        eventObj = e;
    }

    let x = eventObj.pageX - eventObj.target.offsetLeft;
    let y = eventObj.pageY - eventObj.target.offsetTop;

    //  Limits
    x = Math.min(Math.max(0, x), eventObj.target.offsetWidth);
    y = Math.min(Math.max(0, y), eventObj.target.offsetHeight);

    let xOffset = x / eventObj.target.offsetWidth;
    let yOffset = y / eventObj.target.offsetHeight;

    e.target.style.setProperty('--x', xOffset);
    e.target.style.setProperty('--y', yOffset);
}
summary
The events involved in the magnifying glass effect are PC The end is mouseenter,mouseleave,mousemove, On the mobile end is touchstart,touchend,touchmove. There are more than one ways to implement , But in general, there are only three steps : Enlarge the picture when entering the picture box , When you leave the picture box, restore the picture size and clear the picture offset style , When moving in the picture box, the movement of the picture changes with the position of the mouse or contact point , Ensure that the image currently displayed in the visual area is enlarged to The mouse or contact point is in the relative position of the picture box and The enlarged picture has the same relative position Part of the picture when overlapping
Reference resources :
https://www.bilibili.com/video/BV12N411974Q
边栏推荐
- 2022 American College Students' mathematical modeling ABCDEF problem thinking /2022 American match ABCDEF problem analysis
- On-off and on-off of quality system construction
- AutoCAD - command repetition, undo and redo
- C # perspective following
- #775 Div.1 B. Integral Array 数学
- AutoCAD - Center zoom
- Lua GBK and UTF8 turn to each other
- 中国金刚烷行业研究与投资预测报告(2022版)
- 数论函数及其求和 待更新
- Understand encodefloatrgba and decodefloatrgba
猜你喜欢
用 Jmeter 工具做个小型压力测试
Séparation et combinaison de la construction du système qualité

2022/7/2 question summary
Unity parallax infinite scrolling background
UE 虚幻引擎,项目结构

Unity ugui source code graphic

2022 American College Students' mathematical modeling ABCDEF problem thinking /2022 American match ABCDEF problem analysis
AutoCAD - Document Management

Download and use of font icons

Autocad-- dynamic zoom
随机推荐
775 Div.1 B. integral array mathematics
Unity connects to the database
[LeetCode] 整数反转【7】
Lua determines whether the current time is the time of the day
AutoCAD - Center zoom
Three dimensional dice realize 3D cool rotation effect (with complete source code) (with animation code)
SQLServer 存储过程传递数组参数
[leetcode] integer inversion [7]
Emlog博客主题模板源码简约好看响应式
669. Prune binary search tree ●●
UE 虚幻引擎,项目结构
AutoCAD - continuous annotation
2022 U.S. college students' mathematical modeling e problem ideas / 2022 U.S. game e problem analysis
Redis 排查大 key 的4种方法,优化必备
Database under unity
How to choose a panoramic camera that suits you?
GameObject class and transform class of unity
AutoCAD - workspace settings
stm32Cubemx(8):RTC和RTC唤醒中断
Cocos create Jiugongge pictures