当前位置:网站首页>Scripy web crawler series tutorials (I) | construction of scripy crawler framework development environment
Scripy web crawler series tutorials (I) | construction of scripy crawler framework development environment
2022-06-11 06:26:00 【Geek student】
This article mainly introduces Scrapy Build the development environment of crawler framework . There are mainly :
Python Installation ,IDE The choice of ,MySQL And Navicat Installation , development environment Virtualenv、Virtualenvwrapper The construction of and Scrapy Installation .
Python Installation
Python Now there are two versions 2.X and 3.X, Although speaking of 2020 year 2.X Series will not be updated and maintained , however Scrapy There are many libraries to rely on , maximal Twisted Library is Python2.X Written , So use Scrapy Frame to write about crawlers , Still need to install Python2.X Of .
Installation steps : Go to official website :https://www.python.org/downloads/, Choose the appropriate version to download .

It should be noted that , During installation , This item needs to be added .3.X Series should be checked in the lower left corner .

After installation , Input at the console python Verify successful installation .

IDE The choice of
Python There are many integrated development environments , Here we choose PyCharm
Download address :https://www.jetbrains.com/pycharm/download/#section=windows
This software has pro ( charge ) And community edition ( free ), Choose according to your needs .

MySQL Installation
MySQL Is a relational database management system , It is characterized by small size 、 Fast 、 Low total cost of ownership , Especially open source , In general, small and medium-sized sites are chosen for development MySQL As website database .
Download url :https://dev.mysql.com/downloads/mysql/ Choose the right version to download .

Navicat for MySQL Installation
This software charges , How to crack Baidu by yourself .
link : https://pan.baidu.com/s/1mjPnVhm password : 7na3
Interface after installation :

install virtualenv
First, let's talk about why we need to install a virtual environment . Our computers are equipped with Python2 and Python3 Two versions , and Virtualenv It is used to create multiple independent on one machine Python Running environment . His greatest advantage is , You can make every one of them Python The project uses a single environment , It doesn't affect Python System environment , It will not affect the environment of other projects .
In short : Developing Python When it comes to applications , System installed Python3 There is only one version :3.6. All third party packages will be pip The installation to Python3 Of site-packages Under the table of contents . If we want to develop multiple applications at the same time , All these applications will share one Python, Is installed in the system Python 3. If the application A need Python 2.7, And application B need Python 3.6 What do I do ? In this case , Each application may need to have its own set of “ Independent ” Of Python Running environment .virtualenv It is used to create a set of “ Isolation ” Of Python Running environment .
Open console , Input pip install virtualenv

Creating a virtual environment
Input at the console virtualenv ScrapyProjects

This folder can be found in the directory folder

How to open ?
Through the console , open activate.bat that will do .
1. cd ScrapyProjects enter ;
2. cd Scripts enter ;
3. activate.bat enter ;

The current party appears (ScrapyProjects) It means the opening is successful .
Input python View version , The current version is 2.7.

How to switch to Python3.X Version? ?
First step : Creating a virtual environment
Input virtualenv -p C:\Users\Blueheart\AppData\Local\Programs\Python\Python36\python.exe Scrapypy3,
- -p finger Python edition .
- C:\Users\Blueheart\AppData\Local\Programs\Python\Python36\python.exe finger Python3 route .
- Scrapypy3 Refers to the name of the new virtual environment file directory .

The second step : Switch to Python3.
cd Scrapypy3enter ;cd Scriptsenter ;activate.batenter ;

Input Python, You can see ,Python It's a version of 3.6.
sign out , Input deactivate.bat that will do .

install Virtualenvwrapper
I believe you followed my steps just now , You must remember the absolute path when you start the environment , What we will install next Virtualenvwrapper Is to solve such an embarrassing thing as not remembering the absolute path .
Virtaulenvwrapper yes virtualenv The expansion pack, , For easier management of virtual environments , It can consolidate all virtual environments in one directory , management ( newly added , Delete , Copy ) A virtual environment , Quickly switch to a virtual environment .
Installation method :
Console input :pip install virtualenvwrapper-win

Create a new virtual environment :mkvirtualenv py3scrapy

List virtual environments :workon

In the directory Envs A folder is the place where virtual environments are stored .
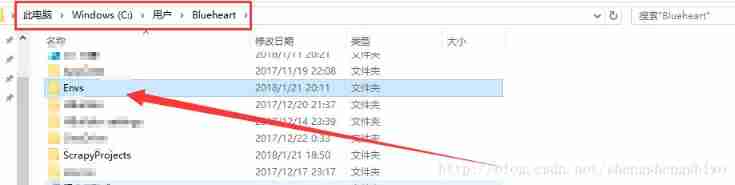
If you and I don't like putting these in C disc , Now let's change to another disk .
to Envs Change the default folder path 、
open My computer Right click attribute –> Advanced system setup –> environment variable –> System variables –> newly build –> As shown in the figure ( I put Envs Folder set to E disc )
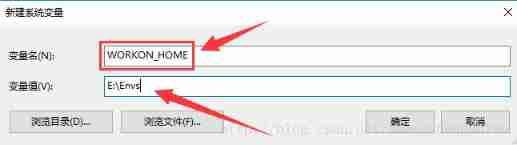
New virtual environment :

View the modified folder :

Modification successful .
remarks : Manually modify Python edition . mkvirtualenv --python=【C:\Users\Blueheart\AppData\Local\Programs\Python\Python36\python.exe】(Python route ) py3scrapy( file name )
Attach a list of commands :
| usage | effect |
|---|---|
| workon | List virtual environments |
| lsvirtualenv | List virtual environments |
| mkvirtualenv | New virtual environment |
| workon [ Virtual environment name ] | Switch virtual environment |
| rmvirtualenv | Delete virtual environment |
| deactivate | Leave the virtual environment |
The environment configuration is OK , The next in Python2 Lower installation Scrapy frame .
Input workon py2scrapy–>pip install scrapy

Just wait for the installation to succeed .
notes :
1. If the download process is slow , You can choose to use the domestic image , For example, watercress mirror image :pip install -i https://pypi.doubanio.com/simple/ scrapy
2. If an error occurs during installation , Download the corresponding files on the following website , Install... Locally .
website :https://www.lfd.uci.edu/%7Egohlke/pythonlibs/
Scrapy After installation , Check whether the installation is successful .
Import Scrapy modular

then , stay shell Whether the medium test can be executed Scrapy This command .
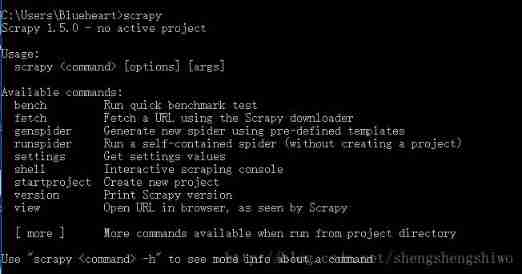
Passed the above two tests , Just explain Scrapy Installation is successful . As shown in the figure , The latest version installed is (1.5.0).
Welcome to follow my personal public number . 
边栏推荐
- 懒加载,预加载
- Servlet
- C language war "minesweeping"
- Matlab实现均值滤波与FPGA进行对比,并采用modelsim波形仿真
- Wechat applet (authorized login) (not recommended, click the home page to view the updated authorized login)
- QT socket setting connection timeout
- Stock K-line drawing
- Handwriting promise [02] - asynchronous logic implementation
- Differences between FindIndex and indexof
- Alias the path with the help of craco
猜你喜欢

CCS安装编译器的方法
This point of arrow function

347. top k high frequency elements

Transfer Learning

Sentinel annotation support - @sentinelresource usage details

Squid agent

解决ffmpeg获取AAC音频文件duration不准
SQLI_ LIBS range construction and 1-10get injection practice

Detailed installation instructions for MySQL

Login and registration based on servlet, JSP and MySQL
随机推荐
Jenkins voucher management
FPGA设计中提高工作频率及降低功耗题目合集
Servlet
统计某次操作(函数)耗时时长
347. top k high frequency elements
MATLAB realizes mean filtering and FPGA for comparison, and uses Modelsim waveform simulation
text-overflow失效
C语言大战“扫雷”
Sqli-libs range 23-24 filtration and secondary injection practice
关于parseInt()
CCS method of installing compiler
Simple knapsack problem
What is sentinel produced by Ali?
Sqli-libs post injection question 11-17 actual combat
FPGA Design -- ping pong operation implementation and Modelsim simulation
Detailed installation instructions for MySQL
EasyGBS接入的设备视频直播突然全部无法播放是为什么?数据库读写不够
021-MongoDB数据库从入门到放弃
Chapter 6 of machine learning [series] random forest model
Résoudre le problème de la durée inexacte du fichier audio AAC obtenu par ffmpeg