当前位置:网站首页>You don't have to run away to delete the library! Detailed MySQL data recovery
You don't have to run away to delete the library! Detailed MySQL data recovery
2022-07-04 22:04:00 【51CTO】
On a daily basis , There will always be shaking hands 、 Wrong condition 、 Wrong table name 、 The MIS deletion of database tables and data caused by the wrong connection of production databases . however , If you run away every time you delete the database , I'm afraid it's hard to find a job anymore ! therefore , Deleting the database and running away is not the best policy .
1、 Preface
The premise of data recovery is to make backup , And on binlog, The format is row. If there are no backup files , After deleting the database table, it will be deleted ,lsof If there are records in the , It is possible to recover some files . But if the database doesn't open this table file , Then you have to run away . If it's not on binlog, So after restoring the data , The data from the backup time point is gone . If binlog The format is not row, There is no way to flash back the data after the operation , We can only honestly follow the backup and recovery process .
2、 Direct recovery
Direct recovery is full recovery using backup files , This is the most common scenario .
2.1 mysqldump Backup full recovery
Use mysqldump File recovery data is very simple , Directly decompress and execute :
2.2 xtrabackup Backup full recovery
Recovery process :
       #  Step one : decompression ( If there is no compression, you can ignore this step )


innobackupex

       --decompress < The directory where the backup file is located >


#  Step two : Application log


innobackupex

       --apply-log < The directory where the backup file is located >


#  Step three : Copy backup files to the data directory


innobackupex

       --datadir=<MySQL Data directory > --copy-back < The directory where the backup file is located >
- 1.
- 2.
- 3.
- 4.
- 5.
- 6.
- 7.
- 8.
2.3 Based on point in time recovery
Point in time recovery depends on binlog journal , Need from binlog All logs from backup point to recovery point were found in , Then apply . So let's test that out .
New test table :
       chengqm

       -

       3306

       >>show

       create

       table mytest

       .mytest \G

       ;


       ***************************

       1. row

       ***************************


       Table

       : mytest


       Create

       Table

       :

       CREATE

       TABLE `mytest`

       (


  `id`

       int

       (

       11

       )

       NOT

       NULL AUTO_INCREMENT

       ,


  `ctime`

       datetime DEFAULT

       NULL

       ,


  PRIMARY KEY

       (`id`

       )


       ) ENGINE

       =InnoDB DEFAULT CHARSET

       =utf8
- 1.
- 2.
- 3.
- 4.
- 5.
- 6.
- 7.
- 8.
Insert one piece of data per second :
       [[email protected]

       -test

       ~

       ]$ while

       true

       ; do mysql

       -S

       /tmp

       /mysql

       .sock

       -e

       'insert into mytest.mytest(ctime)values(now())'

       ;

       date

       ;sleep

       1

       ;done
- 1.
Backup :
       [[email protected]

       -test

       ~

       ]$ mysqldump

       --opt --single-transaction --master-data=2 --default-character-set=utf8 -S /tmp/mysql.sock -A > backup.sql
- 1.
Find the log location at the time of backup :
       [[email protected]

       -test

       ~

       ]$ head

       -n

       25 backup

       .sql

       | grep

       'CHANGE MASTER TO MASTER_LOG_FILE'


       -- CHANGE MASTER TO MASTER_LOG_FILE='mysql-bin.000032', MASTER_LOG_POS=39654;
- 1.
- 2.
Suppose you want to restore to 2019-08-09 11:01:54 At this point in time , We from binlog Find from 39654 To 019-08-09 11:01:54 Log .
       [[email protected]

       -test

       ~

       ]$ mysqlbinlog

       --start-position=39654 --stop-datetime='2019-08-09 11:01:54' /data/mysql_log/mysql_test/mysql-bin.000032 > backup_inc.sql


       [[email protected]

       -test

       -

       83

       ~

       ]$ tail

       -n

       20 backup_inc

       .sql


......


###

       INSERT

       INTO `mytest`.`mytest`


###

       SET


###   @1

       =

       161

       /* INT meta=0 nullable=0 is_null=0 */


###   @2

       =

       '2019-08-09 11:01:53'

       /* DATETIME(0) meta=0 nullable=1 is_null=0 */


......
- 1.
- 2.
- 3.
- 4.
- 5.
- 6.
- 7.
- 8.
Current number of data entries :
Number of all data pieces
Then perform the recovery :
       #  Full recovery


       [[email protected]

       -test

       ~

       ]$ mysql

       -S

       /tmp

       /mysql

       .sock

       < backup

       .sql


#  Apply incremental log


       [[email protected]

       -test

       ~

       ]$ mysql

       -S

       /tmp

       /mysql

       .sock

       < backup_inc

       .sql
- 1.
- 2.
- 3.
- 4.
- 5.
Check the data :
       chengqm

       -

       3306

       >>

       select

       count

       (

       *

       )

       from mytest

       .mytest

       ;


       +----------+


       |

       count

       (

       *

       )

       |


       +----------+


       |

       161

       |


       +----------+


       1 row

       in

       set

       (

       0.00 sec

       )


chengqm

       -

       3306

       >>

       select

       *

       from mytest

       .mytest

       order

       by id

       desc

       limit

       5

       ;


       +-----+---------------------+


       | id

       | ctime

       |


       +-----+---------------------+


       |

       161

       |

       2019

       -

       08

       -

       09

       11

       :

       01

       :

       53

       |


       |

       160

       |

       2019

       -

       08

       -

       09

       11

       :

       01

       :

       52

       |


       |

       159

       |

       2019

       -

       08

       -

       09

       11

       :

       01

       :

       51

       |


       |

       158

       |

       2019

       -

       08

       -

       09

       11

       :

       01

       :

       50

       |


       |

       157

       |

       2019

       -

       08

       -

       09

       11

       :

       01

       :

       49

       |


       +-----+---------------------+


       5 rows

       in

       set

       (

       0.00 sec

       )
- 1.
- 2.
- 3.
- 4.
- 5.
- 6.
- 7.
- 8.
- 9.
- 10.
- 11.
- 12.
- 13.
- 14.
- 15.
- 16.
- 17.
- 18.
- 19.
Has recovered to 2019-08-09 11:01:54 At this point in time .
3、 Restore a table
3.1 from mysqldump Backup and restore a table
Suppose the table to be restored is mytest.mytest:
       #  Extract all data from a library


sed

       -n

       '/^-- Current Database: `mytest`/,/^-- Current Database:/p' backup

       .sql

       > backup_mytest

       .sql


#  Extract table creation statement from library backup file


sed

       -e

       '/./{H;$!d;}'

       -e

       'x;/CREATE TABLE `mytest`/!d;q' backup_mytest

       .sql

       > mytest_table_create

       .sql


#  Extract insert data statement from library backup file


grep

       -i

       'INSERT INTO `mytest`' backup_mytest

       .sql

       > mytest_table_insert

       .sql


#  Restore the table structure to  mytest  library


mysql

       -u

       <user

       >

       -p mytest

       < mytest_table_create

       .sql


#  Restore table data to  mytest

       .mytest  surface


mysql

       -u

       <user

       >

       -p mytest

       <  mytest_table_insert

       .sql
- 1.
- 2.
- 3.
- 4.
- 5.
- 6.
- 7.
- 8.
- 9.
- 10.
- 11.
- 12.
- 13.
- 14.
3.2 from xtrabackup Backup and restore a table
hypothesis ./backup_xtra_full The directory is the backup file that has been applied to the log after decompression .
3.2.1 MyISAM surface
Suppose you restore a table from a backup file mytest.t_myisam. Find... From the backup file t_myisam.frm, t_myisam.MYD, t_myisam.MYI this 3 File , Copy to the corresponding data directory , And authorize
Get into MySQL. Check the table :
       chengqm

       -

       3306

       >>show tables

       ;


       +------------------+


       | Tables_in_mytest

       |


       +------------------+


       | mytest

       |


       | t_myisam

       |


       +------------------+


       2 rows

       in

       set

       (

       0.00 sec

       )


chengqm

       -

       3306

       >>check

       table t_myisam

       ;


       +-----------------+-------+----------+----------+


       |

       Table

       | Op

       | Msg_type

       | Msg_text

       |


       +-----------------+-------+----------+----------+


       | mytest

       .t_myisam

       | check

       | status

       | OK

       |


       +-----------------+-------+----------+----------+


       1 row

       in

       set

       (

       0.00 sec

       )
- 1.
- 2.
- 3.
- 4.
- 5.
- 6.
- 7.
- 8.
- 9.
- 10.
- 11.
- 12.
- 13.
- 14.
- 15.
- 16.
3.2.2 Innodb surface
Suppose you restore a table from a backup file mytest.t_innodb, The premise of recovery is to set innodb_file_per_table = on:
- Start a new instance ;
- Build a table as like as two peas in the example. ;
- perform alter table t_innodb discard tablespace; Delete tablespace , This operation will turn t_innodb.ibd Delete ;
- Find... From the backup file t_innodb.ibd This file , Copy to the corresponding data directory , And authorize ;
- perform alter table t_innodb IMPORT tablespace; Load tablespace ;
- perform flush table t_innodb;check table t_innodb; Checklist ;
- Use mysqldump Derived data , Then import to the database to be recovered .
Be careful :
- Restore on the new instance dump Come out to avoid risks , If it's a test , You can operate the steps directly on the original library 2-6;
- Only in 8.0 Previous versions are valid .
4、 Skip misoperation SQL
Skip misoperation SQL Generally used to perform operations that cannot be flashback, such as drop table\database.
4.1 Use backup file recovery to skip
4.1.1 Don't open GTID
The steps of using backup file recovery are similar to those based on point in time recovery , The difference is that there is one more search binlog operation . for instance , I built two tables here a and b, Insert a piece of data every minute , Then do a full backup , Then delete the table b, Now I'm going to skip this SQL.
Delete table b Database status after :
- Find the log location at the time of backup
       [[email protected]

       -test

       ~

       ]$ head

       -n

       25 backup

       .sql

       | grep

       'CHANGE MASTER TO MASTER_LOG_FILE'


       -- CHANGE MASTER TO MASTER_LOG_FILE='mysql-bin.000034', MASTER_LOG_POS=38414;
- 1.
- 2.
- Find out the execution drop table Of the statement pos Location
       [[email protected]

       -test mysql_test

       ]$  mysqlbinlog

       -vv

       /data

       /mysql_log

       /mysql_test

       /mysql

       -bin

       .000034

       | grep

       -i

       -B

       3

       'drop table `b`'

       ;


# at

       120629


#190818

       19

       :

       48

       :

       30 server id

       83  end_log_pos

       120747 CRC32

       0x6dd6ab2a     Query    thread_id

       =

       29488    exec_time

       =

       0    error_code

       =

       0


       SET

       TIMESTAMP

       =

       1566128910

       /*!*/

       ;


       DROP

       TABLE `b`

       /* generated by server */
- 1.
- 2.
- 3.
- 4.
- 5.
From the results we can see drop The starting position of the statement is 120629, The ending position is 120747.
- from binglog Extract other records that skip this statement
       #  First of all  start

       -position  For backup files  pos  Location ,stop

       -position  by

       drop  The beginning of the statement


mysqlbinlog

       -vv

       --start-position=38414 --stop-position=120629 /data/mysql_log/mysql_test/mysql-bin.000034 > backup_inc_1.sql


#  The second is  start

       -position  by

       drop  The end of the statement


mysqlbinlog

       -vv

       --start-position=120747 /data/mysql_log/mysql_test/mysql-bin.000034 > backup_inc_2.sql
- 1.
- 2.
- 3.
- 4.
- 5.
- Restore backup files
State after full recovery :
       chgnqm

       -

       3306

       >>show tables

       ;


       +------------------+


       | Tables_in_mytest

       |


       +------------------+


       | a

       |


       | b

       |


       +------------------+


       2 rows

       in

       set

       (

       0.00 sec

       )


chgnqm

       -

       3306

       >>

       select

       count

       (

       *

       )

       from a

       ;


       +----------+


       |

       count

       (

       *

       )

       |


       +----------+


       |

       71

       |


       +----------+


       1 row

       in

       set

       (

       0.00 sec

       )
- 1.
- 2.
- 3.
- 4.
- 5.
- 6.
- 7.
- 8.
- 9.
- 10.
- 11.
- 12.
- 13.
- 14.
- 15.
- 16.
- Recovering incremental data
       [[email protected]

       -test

       ~

       ]$ mysql

       -S

       /tmp

       /mysql

       .sock

       < backup_inc_1

       .sql


       [[email protected]

       -test

       ~

       ]$ mysql

       -S

       /tmp

       /mysql

       .sock

       < backup_inc_2

       .sql
- 1.
- 2.
State after recovery , You can see that you have skipped drop sentence :
       chgnqm

       -

       3306

       >>show tables

       ;


       +------------------+


       | Tables_in_mytest

       |


       +------------------+


       | a

       |


       | b

       |


       +------------------+


       2 rows

       in

       set

       (

       0.00 sec

       )


chgnqm

       -

       3306

       >>

       select

       count

       (

       *

       )

       from a

       ;


       +----------+


       |

       count

       (

       *

       )

       |


       +----------+


       |

       274

       |


       +----------+


       1 row

       in

       set

       (

       0.00 sec

       )
- 1.
- 2.
- 3.
- 4.
- 5.
- 6.
- 7.
- 8.
- 9.
- 10.
- 11.
- 12.
- 13.
- 14.
- 15.
- 16.
4.1.2 Turn on GTID
Use GTID You can skip the wrong SQL:
- Find the log location at the time of backup ;
- Find out the execution drop table Of the statement GTID value ;
- Log location to the latest when exporting backup binglog journal ;
- Restore backup files ;
- Skip this GTID;
- Application steps 3 The resulting increment binlog journal .
4.2 Use the delay library to skip
4.2.1 Don't open GTID
The key operation of using deferred library recovery is start slave until. I built two in the test environment MySQL node , Node 2 delay 600 second , newly build a,b Two tables , Insert one piece of data per second to simulate business data insertion .
Current node 2 status :
       chengqm

       -

       3307

       >>show slave status \G

       ;


...


                  Master_Port

       :

       3306


                Connect_Retry

       :

       60


              Master_Log_File

       : mysql

       -bin

       .000039


          Read_Master_Log_Pos

       :

       15524


               Relay_Log_File

       : mysql

       -relay

       -bin

       .000002


                Relay_Log_Pos

       :

       22845


        Relay_Master_Log_File

       : mysql

       -bin

       .000038


             Slave_IO_Running

       : Yes


            Slave_SQL_Running

       : Yes


...


        Seconds_Behind_Master

       :

       600


...
- 1.
- 2.
- 3.
- 4.
- 5.
- 6.
- 7.
- 8.
- 9.
- 10.
- 11.
- 12.
- 13.
- 14.
Table 2 of the current node :
Delete the table at node one b:
The next step is to skip this SQL Operation steps of .
- Delay library stop synchronization
- Find out the execution drop table The first sentence of the sentence pos Location
[[email protected]
-test
~
]$ mysqlbinlog
-vv
/data
/mysql_log
/mysql_test
/mysql
-bin
.000039
| grep
-i
-B
10
'drop table `b`'
;
...
# at
35134
#190819
11
:
40
:
25 server id
83 end_log_pos
35199 CRC32
0x02771167 Anonymous_GTID last_committed
=
132 sequence_number
=
133 rbr_only
=no
SET @@SESSION
.GTID_NEXT
=
'ANONYMOUS'
/*!*/
;
# at
35199
#190819
11
:
40
:
25 server id
83 end_log_pos
35317 CRC32
0x50a018aa Query thread_id
=
37155 exec_time
=
0 error_code
=
0
use `mytest`
/*!*/
;
SET
TIMESTAMP
=
1566186025
/*!*/
;
DROP
TABLE `b`
/* generated by server */
- 1.
- 2.
- 3.
- 4.
- 5.
- 6.
- 7.
- 8.
- 9.
- 10.
From the results we can see drop The starting position of the previous sentence of the sentence is 35134, So we sync to 35134( Don't choose this wrong ).
- Delay library synchronization to skip SQL The previous one
View the status and see that it has been synchronized to the corresponding node :
chengqm
-
3307
>>show slave status \G
;
...
Master_Port
:
3306
Connect_Retry
:
60
Master_Log_File
: mysql
-bin
.000039
Read_Master_Log_Pos
:
65792
...
Slave_IO_Running
: Yes
Slave_SQL_Running
: No
Exec_Master_Log_Pos
:
35134
...
Until_Log_File
: mysql
-bin
.000039
Until_Log_Pos
:
35134
- 1.
- 2.
- 3.
- 4.
- 5.
- 6.
- 7.
- 8.
- 9.
- 10.
- 11.
- 12.
- 13.
- Skip one SQL Start synchronization after
View synchronization status , Delete table b The statement has been skipped :
chengqm
-
3307
>>show slave status \G
;
...
Slave_IO_Running
: Yes
Slave_SQL_Running
: Yes
...
1 row
in
set
(
0.00 sec
)
       chengqm

       -

       3307

       >>show tables

       ;


       +------------------+


       | Tables_in_mytest

       |


       +------------------+


       | a

       |


       | b

       |


       +------------------+
2 rows
in
set
(
0.00 sec
)
- 1.
- 2.
- 3.
- 4.
- 5.
- 6.
- 7.
- 8.
- 9.
- 10.
- 11.
- 12.
- 13.
- 14.
- 15.
4.2.2 Turn on GTID
Use GTID The steps to skip will be much simpler , Just execute one and skip SQL Of GTID The same transaction can be skipped .
- Stop syncing ;
- Find out the execution drop table Of the statement GTID;
- Execute this GTID The business of ;
- Continue syncing ;
5. Flashback .
The flashback operation is the reverse operation , For example, it was implemented delete from a where id=1, Flashback will execute the corresponding insertion operation insert into a (id,...) values(1,...), For misoperation data , Only right DML Statement is valid , And ask for binlog Set the format to ROW. This chapter introduces two easy-to-use open source tools .
5.1 binlog2sql
binlog2sql Is a public comment open source for analysis binlog Tools for , Can be used to generate flashback statements , Project address binlog2sql.
5.1.1 install
5.1.2 Generate rollback SQL
       python binlog2sql

       /binlog2sql

       .py

       --flashback \


       -h

       <host

       >

       -P

       <port

       >

       -u

       <user

       >

       -p

       '<password>'

       -d

       <dbname

       >

       -t

       <table_name

       >\


       --start-file='<binlog_file>' \


       --start-datetime='<start_time>' \


       --stop-datetime='<stop_time>' > ./flashback.sql


python binlog2sql

       /binlog2sql

       .py

       --flashback \


       -h

       <host

       >

       -P

       <port

       >

       -u

       <user

       >

       -p

       '<password>'

       -d

       <dbname

       >

       -t

       <table_name

       > \


       --start-file='<binlog_file>' \


       --start-position=<start_pos> \


       --stop-position=<stop_pos> > ./flashback.sql
- 1.
- 2.
- 3.
- 4.
- 5.
- 6.
- 7.
- 8.
- 9.
- 10.
- 11.
5.2 MyFlash
MyFlash It is a rollback developed and maintained by the technical engineering department of meituan review company DML Tools for operation , Project links MyFlash.
Limit :
- binlog Format must be row, And binlog_row_image=full;
- Support only 5.6 And 5.7;
- Can only be rolled back DML( increase 、 Delete 、 Change ).
5.2.1 install
       #  rely on

       (centos

       )


yum install gcc

       *  pkg

       -config glib2 libgnomeui

       -devel

       -y


#  Download the file


wget https

       :

       //github

       .com

       /Meituan

       -Dianping

       /MyFlash

       /archive

       /master

       .zip

       -O MyFlash

       .zip


unzip MyFlash

       .zip


cd MyFlash

       -master


#  Compilation and installation


gcc

       -w  `pkg

       -config

       --cflags --libs glib-2.0` source/binlogParseGlib.c -o binary/flashback


mv binary

       /usr

       /local

       /MyFlash


ln

       -s

       /usr

       /local

       /MyFlash

       /flashback

       /usr

       /bin

       /flashback
- 1.
- 2.
- 3.
- 4.
- 5.
- 6.
- 7.
- 8.
- 9.
- 10.
- 11.
- 12.
5.2.2 Use
Generate a rollback statement :
It will be generated after execution binlog_output_base.flashback file , Need to use mysqlbinlog Analyze it and then use it :
The original author : Cheng Qiming
边栏推荐
- TCP协议三次握手过程
- VS2019 C# release下断点调试
- 什么是商业智能(BI),就看这篇文章足够了
- PostgreSQL基本结构——表
- What is business intelligence (BI), just look at this article is enough
- Keep on fighting! The city chain technology digital summit was grandly held in Chongqing
- 智洋创新与华为签署合作协议,共同推进昇腾AI产业持续发展
- 超详细教程,一文入门Istio架构原理及实战应用
- 大厂的广告系统升级,怎能少了大模型的身影
- HDU - 1078 FatMouse and Cheese(记忆化搜索DP)
猜你喜欢
Master the use of auto analyze in data warehouse
Bookmark
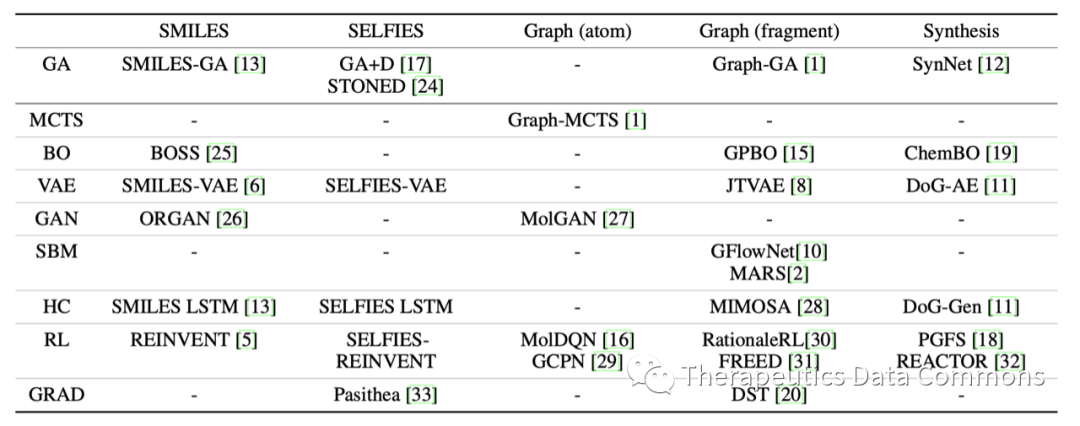
PMO:比较25种分子优化方法的样本效率
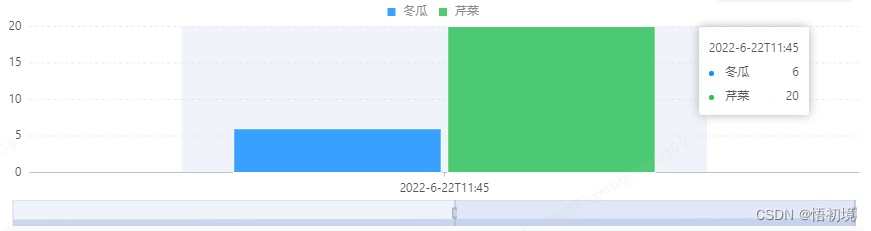
Bizchart+slider to realize grouping histogram
Operation of adding material schedule in SolidWorks drawing

Super detailed tutorial, an introduction to istio Architecture Principle and practical application
MongoDB聚合操作总结
做BI开发,为什么一定要熟悉行业和企业业务?

【LeetCode】17、电话号码的字母组合

Shutter textfield example
随机推荐
【LeetCode】17、电话号码的字母组合
Lambdaquerywrapper usage
从RepVgg到MobileOne,含mobileone的代码
湘江鲲鹏加入昇腾万里伙伴计划,与华为续写合作新篇章
Flink1.13 SQL basic syntax (I) DDL, DML
CloudCompare&Open3D DBSCAN聚类(非插件式)
WebGIS框架---kalrry
Rotary transformer string judgment
【活动早知道】LiveVideoStack近期活动一览
What is business intelligence (BI), just look at this article is enough
How was MP3 born?
MongoDB聚合操作总结
QT—绘制其他问题
283. Moving zero-c and language assisted array method
HDU - 2859 Phalanx(DP)
[public class preview]: basis and practice of video quality evaluation
智洋创新与华为签署合作协议,共同推进昇腾AI产业持续发展
【米哈游2023届秋招】开启【校招唯一专属内推码EYTUC】
超详细教程,一文入门Istio架构原理及实战应用
HDU - 1078 fatmouse and cheese (memory search DP)