当前位置:网站首页>Clickhouse (03) how to install and deploy Clickhouse
Clickhouse (03) how to install and deploy Clickhouse
2022-07-07 05:02:00 【Illusory private school】
High quality resource sharing
| Learning route guidance ( Click unlock ) | Knowledge orientation | Crowd positioning |
|---|---|---|
| 🧡 Python Actual wechat ordering applet 🧡 | Progressive class | This course is python flask+ Perfect combination of wechat applet , From the deployment of Tencent to the launch of the project , Create a full stack ordering system . |
| Python Quantitative trading practice | beginner | Take you hand in hand to create an easy to expand 、 More secure 、 More efficient quantitative trading system |
This article will introduce how to install and deploy ClickHouse, Several official recommended installation modes , And how to start after installation ,ClickHouse How to configure the cluster .
Simply speaking ,ClickHouse The construction process of is as follows :
- Environmental inspection , Environment dependent installation
- Download and install on the corresponding service Click House
- To configure config.xml and user.xml, If build Click House colony , To configure Host Document and FQDN:(Fully Qualified Domain Name) Fully qualified domain name
- start-up server
- Connect client
Here we first introduce the single machine Click House Construction and start-up of , The next article will introduce building Click House The cluster needs to be configured .
System requirements
ClickHouse It can be used anywhere with x86_64,AArch64 or PowerPC64LE CPU Architecturally Linux,FreeBSD or Mac OS X Up operation .
Official pre built binaries are usually for x86_64 Compile , And make use of SSE4.2 Instruction set , therefore , Unless otherwise stated , Support it CPU Use will become an additional system requirement .
The following is to check the current CPU Do you support SSE 4.2 The order of :
| | $ grep -q sse4\_2 /proc/cpuinfo && echo "SSE 4.2 supported" || echo "SSE 4.2 not supported" |
If you don't support SSE4.2 or AArch64,PowerPC64LE Architecture on the processor ClickHouse, The official introduction is to build from the source code through appropriate configuration adjustment ClickHouse, I won't go into details here , If you are interested, you can read the source code by yourself .
Installation package download
In the official documents , The following installation methods are introduced :DEB、RPM、Tgz、Docker、 Other environment installation and source code installation , It's essentially the same , We choose the right installation method , Follow the steps , Step by step .
Generally speaking , The installation package will contain the following :
- clickhouse-common-static — ClickHouse Compiled binaries .
- clickhouse-server — establish clickhouse-server Soft connection , And install the default configuration service
- clickhouse-client — establish clickhouse-client Client tool soft connection , And install the client configuration file .
- clickhouse-common-static-dbg — With debug information ClickHouse Binary .
DEB Installation package
It is recommended to use Debian or Ubuntu Official precompiled deb software package . Run the following command to install the package :
|  | # Install environment configuration and install software updates  |
|  | sudo apt-get install -y apt-transport-https ca-certificates dirmngr |
|  | sudo apt-key adv --keyserver hkp://keyserver.ubuntu.com:80 --recv 8919F6BD2B48D754 |
|  |  |
|  | echo "deb https://packages.clickhouse.com/deb stable main" | sudo tee \ |
|  |  /etc/apt/sources.list.d/clickhouse.list |
|  | sudo apt-get update |
|  |  |
|  | # install clickhouse |
|  | sudo apt-get install -y clickhouse-server clickhouse-client |
|  |  |
|  | # start-up clickhouse service  |
|  | sudo service clickhouse-server start |
|  |  |
|  | # Start client  |
|  | clickhouse-client # or "clickhouse-client --password" if you've set up a password. |
If you want to use the latest version , Please use testing replace stable, Generally speaking, it is used in the test environment , The production environment should be mainly stable .
RPM Installation package
CentOS、RedHat And all other rpm Of Linux The release uses official precompiled rpm package .
First , You need to add an official repository :
|  | $ sudo yum install -y yum-utils |
|  | $ sudo yum-config-manager --add-repo https://packages.clickhouse.com/rpm/clickhouse.repo |
And then use yum install
| | $ sudo yum install -y clickhouse-server clickhouse-client |
Then start clickhouse
|  | sudo /etc/init.d/clickhouse-server start |
|  | clickhouse-client # or "clickhouse-client --password" if you set up a password. |
and DEB The installation method is the same , If you want to use the latest version , Please use testing replace stable, Generally speaking, it is used in the test environment , The production environment should be mainly stable .
Tgz Installation package
If the operating system does not support installation deb or rpm package , You can use official precompiled tgz software package . Can pass curl or wget From the repository https://packages.clickhouse.com/tgz/ download .
After downloading, extract the download resource file and install it using the installation script . The following is an installation example of the latest stable version :
|  | # Get the last version number  |
|  | LATEST\_VERSION=$(curl -s https://packages.clickhouse.com/tgz/stable/ | \ |
|  |  grep -Eo '[0-9]+\.[0-9]+\.[0-9]+\.[0-9]+' | sort -V -r | head -n 1) |
|  | export LATEST\_VERSION |
|  |  |
|  | # Download the corresponding version number of tgz Installation package  |
|  | curl -O "https://packages.clickhouse.com/tgz/stable/clickhouse-common-static-$LATEST\_VERSION.tgz" |
|  | curl -O "https://packages.clickhouse.com/tgz/stable/clickhouse-common-static-dbg-$LATEST\_VERSION.tgz" |
|  | curl -O "https://packages.clickhouse.com/tgz/stable/clickhouse-server-$LATEST\_VERSION.tgz" |
|  | curl -O "https://packages.clickhouse.com/tgz/stable/clickhouse-client-$LATEST\_VERSION.tgz" |
|  |  |
|  | # Unzip the package and execute the corresponding script  |
|  | tar -xzvf "clickhouse-common-static-$LATEST\_VERSION.tgz" |
|  | # Generate ClickHouse Compiled binaries  |
|  | sudo "clickhouse-common-static-$LATEST\_VERSION/install/doinst.sh" |
|  |  |
|  | tar -xzvf "clickhouse-common-static-dbg-$LATEST\_VERSION.tgz" |
|  | # Generate a with debugging information ClickHouse Binary  |
|  | sudo "clickhouse-common-static-dbg-$LATEST\_VERSION/install/doinst.sh" |
|  |  |
|  | tar -xzvf "clickhouse-server-$LATEST\_VERSION.tgz" |
|  | # establish clickhouse-server Soft connection , And install the default configuration service  |
|  | sudo "clickhouse-server-$LATEST\_VERSION/install/doinst.sh" |
|  | # Start the service  |
|  | sudo /etc/init.d/clickhouse-server start |
|  |  |
|  | tar -xzvf "clickhouse-client-$LATEST\_VERSION.tgz" |
|  | # establish clickhouse-client Client tool soft connection , And install the client configuration file  |
|  | sudo "clickhouse-client-$LATEST\_VERSION/install/doinst.sh" |
Docker Installation package
adopt Docker install , Need you to build docker Environmental Science , It's just more about , By default you have installed docker, If not, you can search by yourself docker Installation , Set up well docker.
adopt docker install , It's very simple , You can run an instance using the official image , Just execute the following command .
|  | #  Start the server instance  |
|  | $ docker run -d --name some-clickhouse-server --ulimit nofile=262144:262144 clickhouse/clickhouse-server |
|  |  |
|  | #  Get into docker Inside and into clickhouse |
|  | $ docker run -it --rm --link some-clickhouse-server:clickhouse-server --entrypoint clickhouse-client clickhouse/clickhouse-server --host clickhouse-server |
|  | # OR |
|  | $ docker exec -it some-clickhouse-server clickhouse-client |
|  |  |
|  |  |
|  | #  adopt curl Connect to clickhouse, Output 'Hello, ClickHouse!' |
|  | $ echo "SELECT 'Hello, ClickHouse!'" | docker run -i --rm --link some-clickhouse-server:clickhouse-server curlimages/curl 'http://clickhouse-server:8123/?query=' -s --data-binary @- |
ClickHouse Of docker Mirror image , Default can only be done by docker Network access .
If you need an external network , We can also map the specific port inside the container to the host port to expose it in Docker Running in ClickHouse Or by allowing containers to use host ports directly ( It also allows archiving for better network performance ).
|  | # Map the specific port inside the container to the host port to expose in Docker Running in ClickHouse |
|  | $ docker run -d -p 18123:8123 -p19000:9000 --name some-clickhouse-server --ulimit nofile=262144:262144 clickhouse/clickhouse-server |
|  |  |
|  | $ echo 'SELECT version()' | curl 'http://localhost:18123/' --data-binary @- |
|  |  |
|  |  |
|  | # Allow containers to use host ports directly  |
|  | $ docker run -d --network=host --name some-clickhouse-server --ulimit nofile=262144:262144 clickhouse/clickhouse-server |
|  | $ echo 'SELECT version()' | curl 'http://localhost:8123/' --data-binary @- |
If you need to adjust config.xml, You can use the following command .
| | $ docker run -d --name some-clickhouse-server --ulimit nofile=262144:262144 -v /path/to/your/config.xml:/etc/clickhouse-server/config.xml clickhouse/clickhouse-server |
Other installation methods
ClickHouse You can also use the source code to install , Or download the installation package and compile it manually , If necessary, you can go to ClickHouse Check the document on the official website , There is not much introduction here .
start-up
Run the following command to start the service in the background :
| | $ sudo /etc/init.d/clickhouse-server start |
The log file will be output in /var/log/clickhouse-server/ Folder .
If the server doesn't start , Check /etc/clickhouse-server/config.xml Configuration in .
clickhouse The configuration parameters of are mainly divided into two files , One is config.xml Server configuration parameters in (Server Settings), The other is the general configuration parameters (setttings).
Start the server manually from the console :
| | $ clickhouse-server --config-file=/etc/clickhouse-server/config.xml |
under these circumstances , The log will be printed to the console , This is very convenient in the development process .
If the configuration file is in the current directory , You don't need to specify ——config-file Parameters . By default , Its path is ./config.xml.
ClickHouse Support access restriction settings . They are in users.xml file ( And config.xml At the same directory ).
By default , allow default User access from anywhere , No password required . You can see user/default/networks. For more information , Please see the Configuration Files.
After starting the service , You can use the command line client to connect to it :
| | $ clickhouse-client |
By default , Use default Users do not carry passwords to connect to localhost:9000. You can also use –host Parameter to connect to the specified server .
Example :
|  | $ ./clickhouse-client |
|  | ClickHouse client version 0.0.18749. |
|  | Connecting to localhost:9000. |
|  | Connected to ClickHouse server version 0.0.18749. |
|  |  |
|  | :) SELECT 1 |
|  |  |
|  | SELECT 1 |
|  |  |
|  | ┌─1─┐ |
|  | │ 1 │ |
|  | └───┘ |
|  |  |
|  | 1 rows in set. Elapsed: 0.003 sec. |
|  |  |
|  | :) |
When we get here , You have successfully built a stand-alone version Click House 了 .
ClickHouse Share relevant information
ClickHouse Classic Chinese document sharing
Reference article :ClickHouse(03)ClickHouse How to install and deploy
边栏推荐
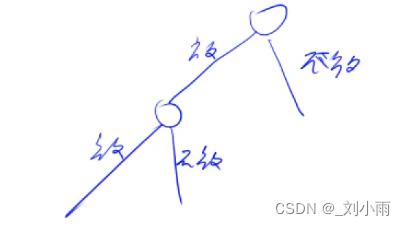
- 【二叉树】二叉树寻路
- Camera calibration (I): robot hand eye calibration
- AttributeError: module ‘torch._ C‘ has no attribute ‘_ cuda_ setDevice‘
- A simple and beautiful regression table is produced in one line of code~
- Test interview | how much can you answer the real test interview question of an Internet company?
- Analysis -- MySQL statement execution process & MySQL architecture
- npm ERR! 400 Bad Request - PUT xxx - “devDependencies“ dep “xx“ is not a valid dependency name
- 为什么很多人对技术债务产生误解
- Oracle -- 视图与序列
- Windows are not cheap things
猜你喜欢
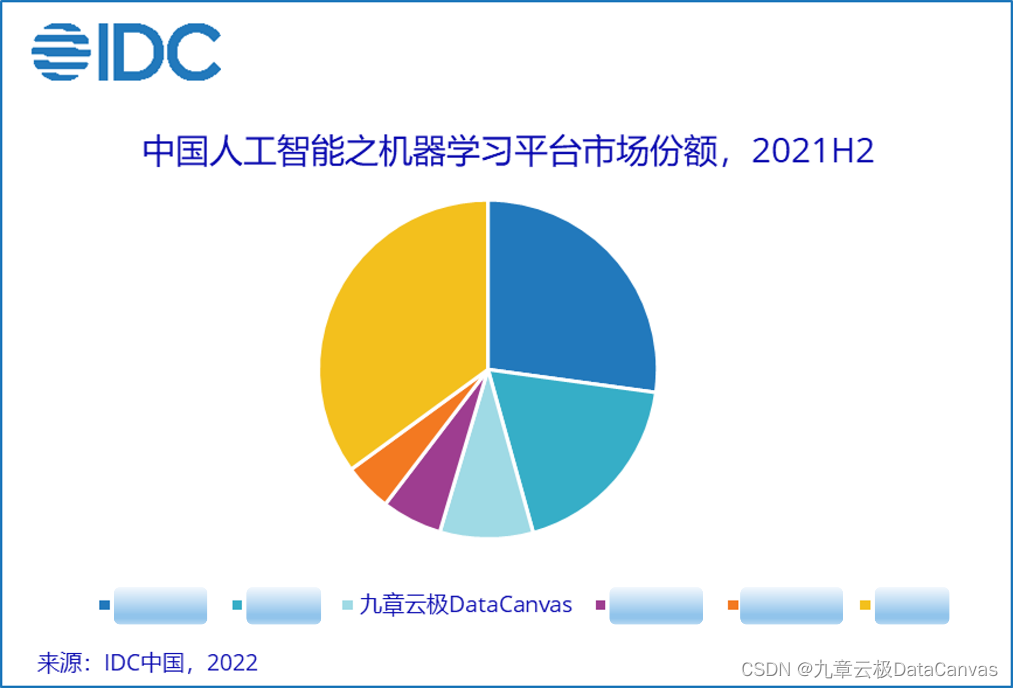
Chapter 9 Yunji datacanvas company has been ranked top 3 in China's machine learning platform market
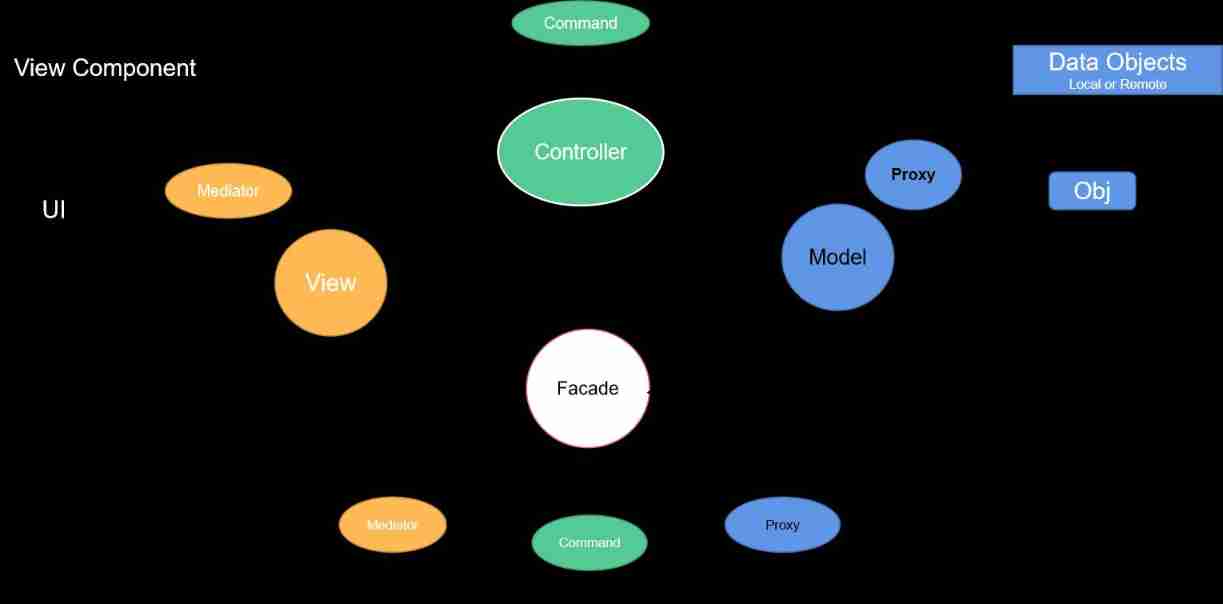
System framework of PureMVC

Liste des hôtes d'inventaire dans ansible (je vous souhaite des fleurs et de la romance sans fin)
acwing 843. N-queen problem

JDBC link Oracle reference code
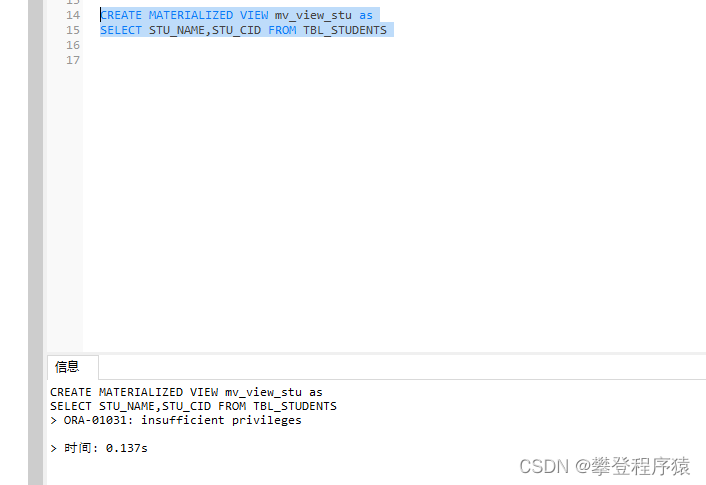
Oracle - views and sequences
Ansible overview and module explanation (you just passed today, but yesterday came to your face)
sublime使用技巧
AttributeError: module ‘torch._C‘ has no attribute ‘_cuda_setDevice‘
【Android Kotlin协程】利用CoroutineContext实现网络请求失败后重试逻辑
随机推荐
接口间调用为什么要用json、fastjson怎么赋值的、fastjson [email protected]映射关系问题
装饰器基础学习02
Run the command once per second in Bash- Run command every second in Bash?
为什么很多人对技术债务产生误解
Oracle -- 视图与序列
第一篇论文的写作流程
Pointer and array are input in function to realize reverse order output
If you‘re running pod install manually, make sure flutter pub get is executed first.
JS variable case output user name
【Android Kotlin协程】利用CoroutineContext实现网络请求失败后重试逻辑
app内嵌h5---iphone软键盘遮挡输入文字
Markdown editor
Ansible中的inventory主机清单(预祝你我有数不尽的鲜花和浪漫)
3. Type of fund
A detailed explanation of head pose estimation [collect good articles]
What work items do programmers hate most in their daily work?
Camera calibration (I): robot hand eye calibration
R descriptive statistics and hypothesis testing
Lessons and thoughts of the first SQL injection
Stm32f103ze+sht30 detection of ambient temperature and humidity (IIC simulation sequence)