当前位置:网站首页>[target detection] yolov5 Runtong voc2007 data set
[target detection] yolov5 Runtong voc2007 data set
2022-07-07 15:07:00 【zstar-_】
Preface
If readers who often read my blog , Presumably YOLOv5 No stranger . stay Pytorch:YOLO-v5 object detection ( On ) In the article , I use the coco128 Data sets , Very easy to run through . But in use VOC2007 When dataset , But encountered many obstacles . The main problem is in the stage of data label transformation ,VOC The data set annotation form is xml, It needs to be converted to txt. Many blog posts don't explain the location of the documents clearly , It led to many detours , This blog post records how to get through without detours VOC Data sets .
VOC Data sets
I am using VOC The dataset is VOC2007, Its file format is like this :
notes : The training test set and test set downloaded from the official website are divided into two compressed packages VOCtrainval_06-Nov-2007.tar and VOCtest_06-Nov-2007.tar, Here I merge them , To download my merged dataset , You can jump to the end of the text to download .
- Annotations
This file contains data annotation xml file - ImageSets
This file contains the partition of the data set - JPEGImages
This file contains the image data set
Get the data set , The first thing to do is to JPEGImages Change the folder name to images, The specific reasons will be explained later , After modification, it is shown in the figure :
Dataset processing
from GitHub On , download Yolov5 Code
Project address :
https://github.com/ultralytics/yolov5
After downloading , Create a new file in the file , I called voc_label.py, Naming , The location is random , This document mainly does two things :
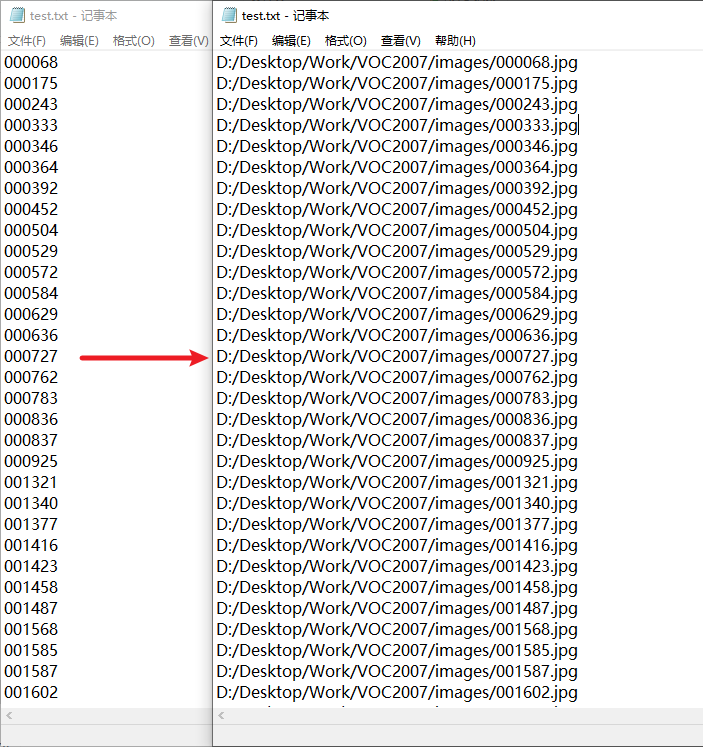
- 1、 take ImageSets Training set in 、 Test set 、 The validation set is proposed , Pieced together into an absolute path that can be accessed directly , As shown in the figure
- 2、 hold xml Format annotation is converted to txt Format , As shown in the figure :

The red box in the figure circles the data to be extracted , For each goal ,txt The format of data is 5 individual , Respectively (class, x , y , w, h), I.e. category 、 Center point (x,y), Wide and high (w,h). The conversion formula here is written in the code , No detailed description . Be careful class Must be based on 0 The starting sequence number , Otherwise, there will be an error report of category overflow during training .
voc_label.py
import xml.etree.ElementTree as ET
import pickle
import os
from os import listdir, getcwd
from os.path import join

sets = ['train', 'test', 'val']

Imgpath = 'D:/Desktop/Work/VOC2007/images'
xmlfilepath = 'D:/Desktop/Work/VOC2007/Annotations/'
ImageSets_path = 'D:/Desktop/Work/VOC2007/ImageSets/Segmentation/'
Label_path = 'D:/Desktop/Work/VOC2007/'
classes = ["aeroplane", "bicycle", "bird", "boat", "bottle", "bus", "car", "cat", "chair", "cow", "diningtable", "dog", "horse", "motorbike", "person", "pottedplant", "sheep", "sofa", "train", "tvmonitor"]


def convert(size, box):
    dw = 1. / size[0]
    dh = 1. / size[1]
    x = (box[0] + box[1]) / 2.0
    y = (box[2] + box[3]) / 2.0
    w = box[1] - box[0]
    h = box[3] - box[2]
    x = x * dw
    w = w * dw
    y = y * dh
    h = h * dh
    return (x, y, w, h)


def convert_annotation(image_id):
    in_file = open(xmlfilepath + '%s.xml' % (image_id))
    out_file = open(Label_path + 'labels/%s.txt' % (image_id), 'w')
    tree = ET.parse(in_file)
    root = tree.getroot()
    size = root.find('size')
    w = int(size.find('width').text)
    h = int(size.find('height').text)
    for obj in root.iter('object'):
        difficult = obj.find('difficult').text
        cls = obj.find('name').text
        if cls not in classes or int(difficult) == 1:
            continue
        cls_id = classes.index(cls)
        xmlbox = obj.find('bndbox')
        b = (float(xmlbox.find('xmin').text), float(xmlbox.find('xmax').text), float(xmlbox.find('ymin').text),
             float(xmlbox.find('ymax').text))
        bb = convert((w, h), b)
        out_file.write(str(cls_id) + " " + " ".join([str(a) for a in bb]) + '\n')


for image_set in sets:
    if not os.path.exists(Label_path + 'labels/'):
        os.makedirs(Label_path + 'labels/')
    image_ids = open(ImageSets_path + '%s.txt' % (image_set)).read().strip().split()
    list_file = open(Label_path + '%s.txt' % (image_set), 'w')
    for image_id in image_ids:
        list_file.write(Imgpath + '/%s.jpg\n' % (image_id))
        convert_annotation(image_id)
    list_file.close()
When using , Replace path and category classes that will do .
After running , Four files will be generated under the dataset folder ,labels Medium txt Document and images The names of the pictures in correspond one by one .
Training preparation
YOLOv5 It's through yaml Format configuration file to find the corresponding training test data , Therefore, you need to simply configure this file before training .
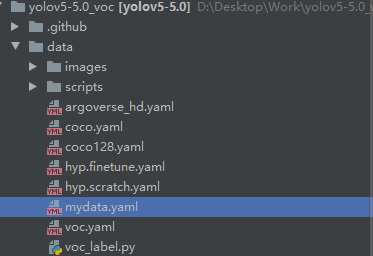
Even though YOLOv5 It has its own voc.yaml The configuration file , But in order to train your data later , I'll build a new one here mydata.yaml to VOC Import data .
train: D:/Desktop/Work/VOC2007/train.txt
val: D:/Desktop/Work/VOC2007/val.txt
test: D:/Desktop/Work/VOC2007/test.txt

# number of classes
nc: 20

# class names
names: [ 'aeroplane', 'bicycle', 'bird', 'boat', 'bottle', 'bus', 'car', 'cat', 'chair', 'cow', 'diningtable', 'dog', 'horse', 'motorbike', 'person', 'pottedplant', 'sheep', 'sofa', 'train', 'tvmonitor' ]
The content of the document is very simple , You need to specify the path of three data sets , Number of categories and category name .
Start training
open train.py file
Three parameters need to be adjusted
I use yolov5s As a pre training model , Modify as shown in the following figure .
After running , The program will be automatically downloaded from the official website yolov5s.pt Model file , Put it under the root directory .
If the previous operation is the same as mine , By this time, you should be able to successfully run through the training program .
Program default epochs by 300, In order to see the effect as soon as possible , It can be made smaller , After training , Will be in runs -> train -> exp See the training and verification documents .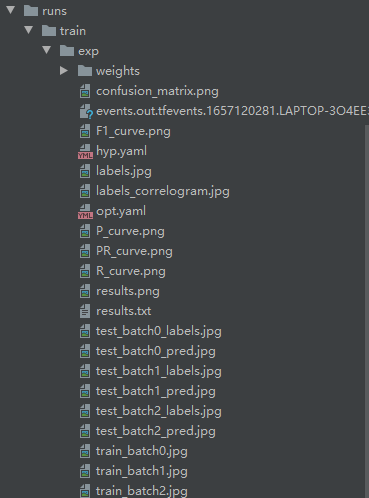
If run again , You will find that a new folder is generated exp2… This is because yolov5 By default, the results of each run are stored in a separate folder .
Please refer to train.py Of 518 That's ok
opt.save_dir = increment_path(Path(opt.project) / opt.name, exist_ok=opt.exist_ok | opt.evolve) # increment run
there increment_path Function is to accumulate every time exp Serial number , If you need to save the results to the specified path , You can directly replace the path to the right of the equal sign .
Of course ,Yolov5 It also provides a convenient way to place continuous generation exp file .
In the super parameter setting , One parameter is exist-ok, His tacit view is that False, Set it to True, Then the program will run again in the nearest exp Generate the file .
in addition , There are also various parameters , The meaning of parameters is supplemented as follows , For research reference .
    parser = argparse.ArgumentParser()
    parser.add_argument('--weights', type=str, default='yolov5s.pt', help='initial weights path')
    parser.add_argument('--cfg', type=str, default='models/yolov5s.yaml', help='model.yaml path  Model configuration and network structure yaml File path ')
    parser.add_argument('--data', type=str, default='data/mydata.yaml', help='data.yaml path  Data set configuration yaml File path , Include the path of the dataset , Key information such as class name ')
    parser.add_argument('--hyp', type=str, default='data/hyp.scratch.yaml', help=' Super parameter configuration yaml File path ')
    parser.add_argument('--epochs', type=int, default=2)
    parser.add_argument('--batch-size', type=int, default=16, help='total batch size for all GPUs')
    parser.add_argument('--img-size', nargs='+', type=int, default=[640, 640], help='[train, test] image sizes  Enter the resolution and size of the image ')
    parser.add_argument('--rect', action='store_true', help='rectangular training  Whether to use rectangular image training , The default is False')
    parser.add_argument('--resume', nargs='?', const=True, default=False, help='resume most recent training  From the given path/last.pt Get back to training , If it is empty , From the recently saved path/last.pt Get back to training ')
    parser.add_argument('--nosave', action='store_true', help='only save final checkpoint  Save the model , Save only the last checkpoint , The default is False')
    parser.add_argument('--notest', action='store_true', help='only test final epoch  Not during training test, Test only the last round , The default is False')
    parser.add_argument('--noautoanchor', action='store_true', help='disable autoanchor check  No automatic adjustment anchor, The default is False')
    parser.add_argument('--evolve', action='store_true', help='evolve hyperparameters  Whether to carry out hyperparametric evolution , The default is False')
    parser.add_argument('--bucket', type=str, default='', help='gsutil bucket')
    parser.add_argument('--cache-images', action='store_true', help='cache images for faster training  Whether to cache pictures to memory in advance , To speed up training , The default is False')
    parser.add_argument('--image-weights', action='store_true', help='use weighted image selection for training')
    parser.add_argument('--device', default='', help='cuda device, i.e. 0 or 0,1,2,3 or cpu')
    parser.add_argument('--multi-scale', action='store_true', help='vary img-size +/- 50%%  Whether to carry out multi-scale training , The default is False')
    parser.add_argument('--single-cls', action='store_true', help='train multi-class data as single-class  Train all data according to one category ')
    parser.add_argument('--adam', action='store_true', help='use torch.optim.Adam() optimizer  Whether to use  torch.optim.Adam()  Optimizer , The default is False')
    parser.add_argument('--sync-bn', action='store_true', help='use SyncBatchNorm, only available in DDP mode  Whether to use cross card synchronization BN')
    parser.add_argument('--local_rank', type=int, default=-1, help='DDP parameter, do not modify')
    parser.add_argument('--workers', type=int, default=0, help='maximum number of dataloader workers')
    parser.add_argument('--project', default='runs/train', help='save to project/name')
    parser.add_argument('--entity', default=None, help='W&B entity')
    parser.add_argument('--name', default='exp', help='save to project/name')
    parser.add_argument('--exist-ok', default=True, action='store_true', help='existing project/name ok, do not increment')
    parser.add_argument('--quad', action='store_true', help='quad dataloader')
    parser.add_argument('--linear-lr', action='store_true', help='linear LR')
    parser.add_argument('--label-smoothing', type=float, default=0.0, help='Label smoothing epsilon')
    parser.add_argument('--upload_dataset', action='store_true', help='Upload dataset as W&B artifact table')
    parser.add_argument('--bbox_interval', type=int, default=-1, help='Set bounding-box image logging interval for W&B')
    parser.add_argument('--save_period', type=int, default=-1, help='Log model after every "save_period" epoch')
    parser.add_argument('--artifact_alias', type=str, default="latest", help='version of dataset artifact to be used')
    opt = parser.parse_args()
Start testing
The above process only applies to the training and verification of the model , open test.py, The test set can be used to test the model .
The parameters that need to be modified are similar to the training program , It is worth noting that ,yolov5 Two model files will be output after each training , One is best.pt, That is, the best performance on the verification set (mAP The highest ) Model of , The other is last.pt, That is, the model of the last round of training . Generally speaking , Input best.pt Just test it out .
After the test run , Will be in runs Generate a test file , Among them, the training results and annotation results can be compared .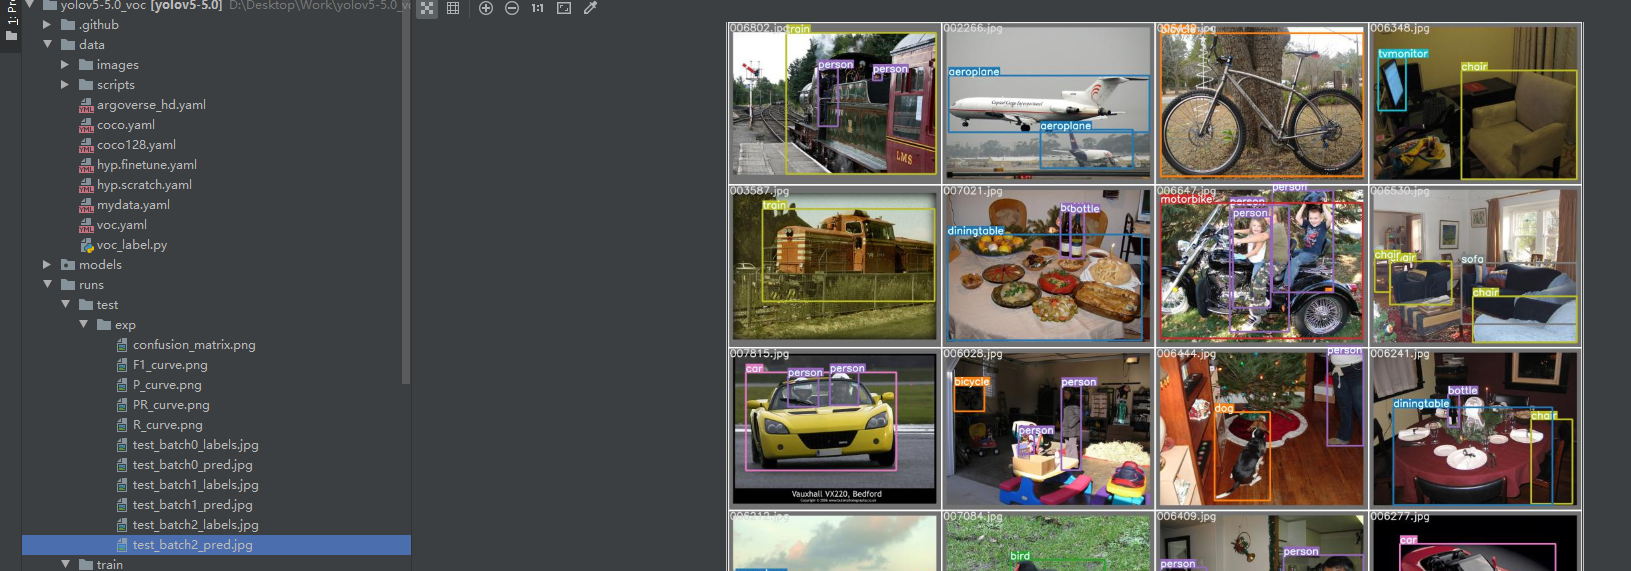
Start detection
Training / The test only stays within the data set , Next, we need to detect some data outside the data set , open detect.py file
modify source Folder for detecting pictures , After running , stay run->detect Output test results .
More expansion
If your goal is to get through VOC Data sets , It is estimated that it has been successful now ( You can like this article to share your happiness of success ).
If you want to go deeper into Yolov5 Model , Continue reading .
Super parameter comment
During the training , Introduced --hyp This attribute , stay data/hyp.scratch.yaml In this file , It contains all the parameter settings of training .
The following is the explanation of the meaning of each parameter .
# Hyperparameters for COCO training from scratch
# python train.py --batch 40 --cfg yolov5m.yaml --weights '' --data coco.yaml --img 640 --epochs 300
# See tutorials for hyperparameter evolution https://github.com/ultralytics/yolov5#tutorials

#  Optimizer related
lr0: 0.01  # initial learning rate (SGD=1E-2, Adam=1E-3)  Initial learning rate
lrf: 0.2  # final OneCycleLR learning rate (lr0 * lrf)  Cosine annealing hyperparameter
momentum: 0.937  # SGD momentum/Adam beta1  Learning rate momentum
weight_decay: 0.0005  # optimizer weight decay 5e-4  Weight attenuation coefficient

#  Warm up learning related
warmup_epochs: 3.0  # warmup epochs (fractions ok)  Preheating learning epoch
warmup_momentum: 0.8  # warmup initial momentum  Warm up the learning rate momentum
warmup_bias_lr: 0.1  # warmup initial bias lr  Warm up the learning rate

#  Different loss function weights , And other loss functions
box: 0.05  # box loss gain giou Coefficient of loss
cls: 0.5  # cls loss gain  Coefficient of classification loss
cls_pw: 1.0  # cls BCELoss positive_weight  classification BCELoss The weight of the median positive sample
obj: 1.0  # obj loss gain (scale with pixels)  Coefficient with or without object loss
obj_pw: 1.0  # obj BCELoss positive_weight  Presence or absence of objects BCELoss The weight of the median positive sample
iou_t: 0.20  # IoU training threshold  Labels and anchors Of iou threshold iou training threshold

# anchor Anchor frame
anchor_t: 4.0  # anchor-multiple threshold  The length of the label h wide w/anchor Length h_a wide w_a threshold ,  namely h/h_a, w/w_a All in (1/4.0, 4.0) Between
# anchors: 3 # anchors per output layer (0 to ignore)

#  Data enhancement related  -  Color conversion
fl_gamma: 0.0  # focal loss gamma (efficientDet default gamma=1.5)
hsv_h: 0.015  # image HSV-Hue augmentation (fraction)  tonal
hsv_s: 0.7  # image HSV-Saturation augmentation (fraction)  saturation
hsv_v: 0.4  # image HSV-Value augmentation (fraction)  Lightness
#  Data enhancement related : rotate 、 translation 、 Twist, etc
degrees: 0.0  # image rotation (+/- deg)  Rotation Angle
translate: 0.1  # image translation (+/- fraction)  Horizontal and vertical translation
scale: 0.5  # image scale (+/- gain)  The zoom
shear: 0.0  # image shear (+/- deg)  shear
perspective: 0.0  # image perspective (+/- fraction), range 0-0.001  Perspective transformation parameters
#  Data enhancement related  -  Flip
flipud: 0.0  # image flip up-down (probability)  Upside down probability
fliplr: 0.5  # image flip left-right (probability)  Left right flip probability
#  Data enhancement related  - mosaic/mixup
mosaic: 1.0  # image mosaic (probability)  Conduct mosaic Probability ( One image fuses four images )
mixup: 0.0  # image mixup (probability)  Conduct mixup Probability ( For two samples - Label data pairs are added proportionally to generate new samples - Tag data )
What I use is YOLOv5-5.0 edition , There is only one super parameter file . In the latest version of the official website , Multiple files have been added .
The attributes of each file are still the above , It's just that the numbers are different . As for how to adjust and participate in the meeting to make the effect better , More experiments are necessary .
The logic of changing the file name
Now let's solve the remaining problems , Why change the name of the picture folder to images
In source dataset.py Of 341 That's ok , Defined img2label_paths This path function , It's fixed images and labels The name of .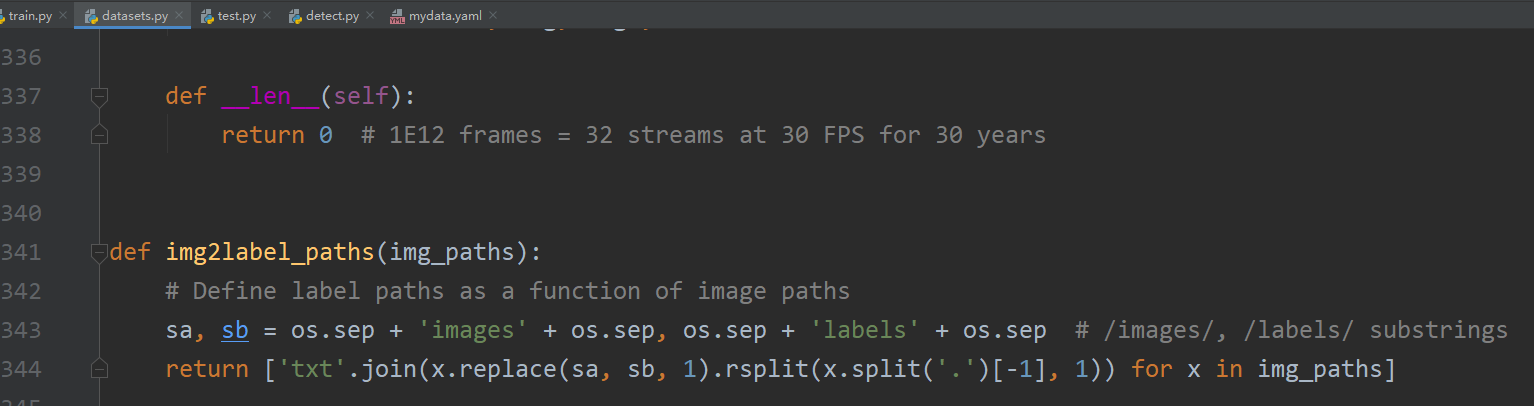
If the folder name is not changed , This error will be reported .
AssertionError: train: No labels in D:\Desktop\Work\XDUAV-dataset2\train.cache. Can not train without labels.
Data sets / Source code
This article uses VOC2007 Dataset download address :
https://pan.baidu.com/s/1Be9Ya5__2J9LKJhV5RkhaA?pwd=8888
After editing this article Yolov5 file :
https://pan.baidu.com/s/1GHAbUdU-Rf0dNc-FYgonCA?pwd=8888
边栏推荐
- 2022年5月互联网医疗领域月度观察
- Niuke real problem programming - day16
- Niuke real problem programming - day13
- CTFshow,信息搜集:web10
- buffer overflow protection
- 安恒堡垒机如何启用Radius双因素/双因子(2FA)身份认证
- Guangzhou Development Zone enables geographical indication products to help rural revitalization
- Qu'est - ce qu'une violation de données
- 数学建模——什么是数学建模
- Pat grade a 1103 integer factorizatio
猜你喜欢

What is data leakage
CTFshow,信息搜集:web3

JSON解析实例(Qt含源码)
Wechat applet - Advanced chapter component packaging - Implementation of icon component (I)
![[server data recovery] a case of RAID data recovery of a brand StorageWorks server](/img/8c/77f0cbea54730de36ce7b625308d2f.png)
[server data recovery] a case of RAID data recovery of a brand StorageWorks server
Ctfshow, information collection: Web3

Ctfshow, information collection: web7
Unity之ASE实现全屏风沙效果
【OBS】RTMPSockBuf_Fill, remote host closed connection.

Ctfshow, information collection: web9
随机推荐
Mathematical modeling -- what is mathematical modeling
Promoted to P8 successfully in the first half of the year, and bought a villa!
2. 堆排序『较难理解的排序』
In the field of software engineering, we have been doing scientific research for ten years!
Ctfshow, information collection: web13
简述keepalived工作原理
Qu'est - ce qu'une violation de données
智汀不用Home Assistant让小米智能家居接入HomeKit
Ctfshow, information collection: web4
【跟着江科大学Stm32】STM32F103C8T6_PWM控制直流电机_代码
Ctfshow, information collection: web9
一文读懂数仓中的pg_stat
Lidar knowledge drops
CTFshow,信息搜集:web3
Delete a whole page in word
Lidar Knowledge Drop
【深度学习】图像超分实验:SRCNN/FSRCNN
Ctfshow, information collection: web14
Niuke real problem programming - day18
Navigation - are you sure you want to take a look at such an easy-to-use navigation framework?