当前位置:网站首页>YoloV6实战:手把手教你使用Yolov6进行物体检测(附数据集)
YoloV6实战:手把手教你使用Yolov6进行物体检测(附数据集)
2022-07-04 03:54:00 【AI浩】
摘要
YOLOv6 主要在 BackBone、Neck、Head 以及训练策略等方面进行了诸多的改进:
- 统一设计了更高效的 Backbone 和 Neck :受到硬件感知神经网络设计思想的启发,基于 RepVGG style[4] 设计了可重参数化、更高效的骨干网络 EfficientRep Backbone 和 Rep-PAN Neck。
- 优化设计了更简洁有效的 Efficient Decoupled Head,在维持精度的同时,进一步降低了一般解耦头带来的额外延时开销。
- 在训练策略上,采用Anchor-free 无锚范式,同时辅以 SimOTA[2] 标签分配策略以及 SIoU[9] 边界框回归损失来进一步提高检测精度。
在 COCO 数据集上,YOLOv6 在精度和速度方面均超越YOLOv5、YOLOX和 PP-YOLOE等这样比较有代表性的算法,相关结果如下图 所示:

这篇文章没有论文,只有美团的一篇论文介绍和github的代码,链接如下:
github地址:https://github.com/meituan/YOLOv6
详见:
https://tech.meituan.com/2022/06/23/yolov6-a-fast-and-accurate-target-detection-framework-is-opening-source.html
今天这篇文章主要演示如何跑通代码。
数据集
数据集是Labelme标注的数据集,下载地址:
https://download.csdn.net/download/hhhhhhhhhhwwwwwwwwww/14003627
数据集是我为了调物体检测模型制作的,数据集有两个类别,分别是:aircraft,oiltank。
如果有人想做别的尝试,也可以选用我制作的另一个数据集,也是Labelme标注的格式,链接如下:
https://download.csdn.net/download/hhhhhhhhhhwwwwwwwwww/63242994。
总共32种飞机:
[‘c17’, ‘c5’, ‘helicopter’, ‘c130’, ‘f16’, ‘b2’, ‘other’, ‘b52’, ‘kc10’, ‘command’, ‘f15’, ‘kc135’, ‘a10’, ‘b1’, ‘aew’, ‘f22’, ‘p3’, ‘p8’, ‘f35’, ‘f18’, ‘v22’, ‘f4’, ‘globalhawk’, ‘u2’, ‘su-27’, ‘il-38’, ‘tu-134’, ‘su-33’, ‘an-70’, ‘su-24’, ‘tu-22’, ‘il-76’]
接下来是如何制作yolov6数据集,yolov6使用的数据集格式和yolov5一样。如图: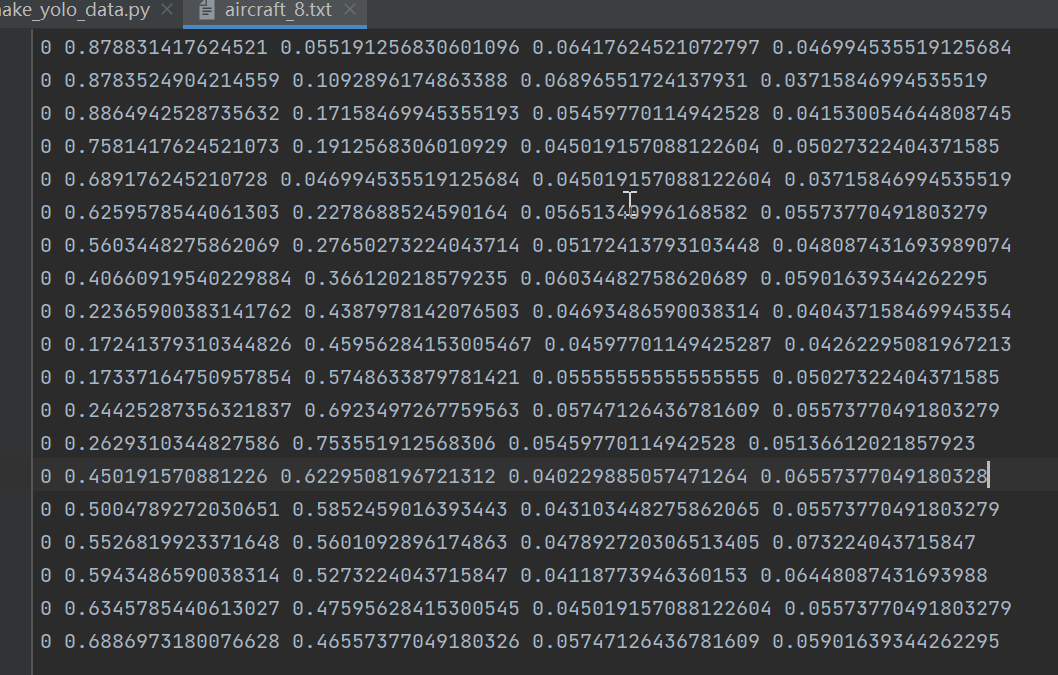
格式:类别,中心点x,中心点y,w,h。
新建脚本make_yolo_data.py,插入代码:
import os
import shutil
import numpy as np
import json
from glob import glob
import cv2
from sklearn.model_selection import train_test_split
from os import getcwd

def convert(size, box):
    dw = 1. / (size[0])
    dh = 1. / (size[1])
    x = (box[0] + box[1]) / 2.0 - 1
    y = (box[2] + box[3]) / 2.0 - 1
    w = box[1] - box[0]
    h = box[3] - box[2]
    x = x * dw
    w = w * dw
    y = y * dh
    h = h * dh
    return (x, y, w, h)


def change_2_yolo5(files, txt_Name):
    imag_name=[]
    for json_file_ in files:
        json_filename = labelme_path + json_file_ + ".json"
        out_file = open('%s/%s.txt' % (labelme_path, json_file_), 'w')
        json_file = json.load(open(json_filename, "r", encoding="utf-8"))
        # image_path = labelme_path + json_file['imagePath']
        imag_name.append(json_file['imagePath'])
        height, width, channels = cv2.imread(labelme_path + json_file_ + ".jpg").shape
        for multi in json_file["shapes"]:
            points = np.array(multi["points"])
            xmin = min(points[:, 0]) if min(points[:, 0]) > 0 else 0
            xmax = max(points[:, 0]) if max(points[:, 0]) > 0 else 0
            ymin = min(points[:, 1]) if min(points[:, 1]) > 0 else 0
            ymax = max(points[:, 1]) if max(points[:, 1]) > 0 else 0
            label = multi["label"]
            if xmax <= xmin:
                pass
            elif ymax <= ymin:
                pass
            else:
                cls_id = classes.index(label)
                b = (float(xmin), float(xmax), float(ymin), float(ymax))
                bb = convert((width, height), b)
                out_file.write(str(cls_id) + " " + " ".join([str(a) for a in bb]) + '\n')
                #print(json_filename, xmin, ymin, xmax, ymax, cls_id)
    return imag_name

def image_txt_copy(files,scr_path,dst_img_path,dst_txt_path):
    """ :param files: 图片名字组成的list :param scr_path: 图片的路径 :param dst_img_path: 图片复制到的路径 :param dst_txt_path: 图片对应的txt复制到的路径 :return: """
    for file in files:
        img_path=scr_path+file
        shutil.copy(img_path, dst_img_path+file)
        scr_txt_path=scr_path+file.split('.')[0]+'.txt'
        shutil.copy(scr_txt_path, dst_txt_path + file.split('.')[0]+'.txt')


if __name__ == '__main__':
    classes = ["aircraft", "oiltank"]
    # 1.标签路径
    labelme_path = "LabelmeData/"
    isUseTest = True  # 是否创建test集
    # 3.获取待处理文件
    files = glob(labelme_path + "*.json")
    files = [i.replace("\\", "/").split("/")[-1].split(".json")[0] for i in files]
    trainval_files, test_files = train_test_split(files, test_size=0.1, random_state=55)
    # split
    train_files, val_files = train_test_split(trainval_files, test_size=0.1, random_state=55)
    train_name_list=change_2_yolo5(train_files, "train")
    print(train_name_list)
    val_name_list=change_2_yolo5(val_files, "val")
    test_name_list=change_2_yolo5(test_files, "test")
    #创建数据集文件夹。
    file_List = ["train", "val", "test"]
    for file in file_List:
        if not os.path.exists('./VOC/images/%s' % file):
            os.makedirs('./VOC/images/%s' % file)
        if not os.path.exists('./VOC/labels/%s' % file):
            os.makedirs('./VOC/labels/%s' % file)
    image_txt_copy(train_name_list,labelme_path,'./VOC/images/train/','./VOC/labels/train/')
    image_txt_copy(val_name_list, labelme_path, './VOC/images/val/', './VOC/labels/val/')
    image_txt_copy(test_name_list, labelme_path, './VOC/images/test/', './VOC/labels/test/')
思路:
第一步 使用train_test_split方法切分出训练集、验证集和测试集。
第二步 调用change_2_yolo5方法将json里面的数据转为yolov5格式的txt数据,返回训练集、验证集和测试集的图片list。
第三步 创建数据集文件夹,然后将图片和txt文件copy到对应的目录下面。
数据集的结构如下图:
Yolodata_demo
└─VOC
    ├─images
    │  ├─test
    │  ├─train
    │  └─val
    └─labels
        ├─test
        ├─train
        └─val
训练
有了数据集就可以开始训练了。下载yolov6的代码,将其解压到指定的位置,然后将数据集复制到yolov6的根目录。如下图:
打开requirements.txt,查看本地环境缺少哪些库,然后安装即可。
torch>=1.8.0
torchvision>=0.9.0
numpy>=1.18.5
opencv-python>=4.1.2
PyYAML>=5.3.1
scipy>=1.4.1
tqdm>=4.41.0
addict>=2.4.0
tensorboard>=2.7.0
pycocotools>=2.0
onnx>=1.10.0  # ONNX export
onnx-simplifier>=0.3.6 # ONNX simplifier
thop  # FLOPs computation
在tools文件夹下面新建__init__.py,里面不放任何内容。
因为在其他地方引用了tools里面的文件,不加这个脚本就会报错。
修改yaml文件
打开data/dataset.yaml,如下图: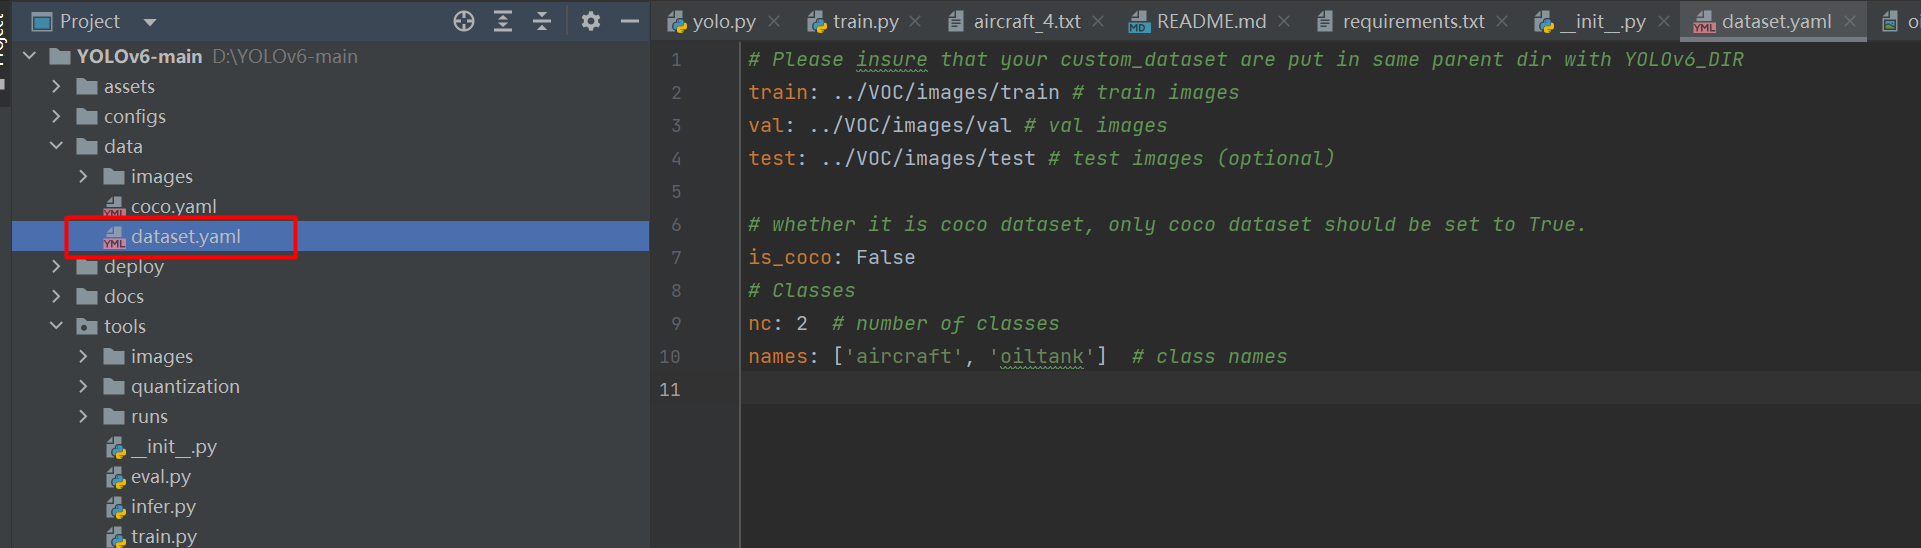
# Please insure that your custom_dataset are put in same parent dir with YOLOv6_DIR
train: ../VOC/images/train # train images
val: ../VOC/images/val # val images
test: ../VOC/images/test # test images (optional)

# whether it is coco dataset, only coco dataset should be set to True.
is_coco: False
# Classes
nc: 2  # number of classes
names: ['aircraft', 'oiltank']  # class names
train、val、test:代表image路径。
如果我们使用命令python tools/train.py训练,则将目录设置为:
train: ./VOC/images/train # train images
val: ./VOC/images/val # val images
test: ./VOC/images/test # test images (optional)
如果在tools目录下使用python train.py或者直接run,则将目录设置为:
train: ../VOC/images/train # train images
val: ../VOC/images/val # val images
test: ../VOC/images/test # test images (optional)
这个细节要注意一下,启动的目录不同,对应的路径也不相同。
修改train.py
def get_args_parser(add_help=True):
    parser = argparse.ArgumentParser(description='YOLOv6 PyTorch Training', add_help=add_help)
    parser.add_argument('--data-path', default='../data/dataset.yaml', type=str, help='path of dataset')
    parser.add_argument('--conf-file', default='../configs/yolov6s.py', type=str, help='experiments description file')
    parser.add_argument('--img-size', default=640, type=int, help='train, val image size (pixels)')
    parser.add_argument('--batch-size', default=16, type=int, help='total batch size for all GPUs')
    parser.add_argument('--epochs', default=400, type=int, help='number of total epochs to run')
    parser.add_argument('--workers', default=0, type=int, help='number of data loading workers (default: 8)')
    parser.add_argument('--device', default='0', type=str, help='cuda device, i.e. 0 or 0,1,2,3 or cpu')
    parser.add_argument('--eval-interval', default=20, type=int, help='evaluate at every interval epochs')
    parser.add_argument('--eval-final-only', action='store_true', help='only evaluate at the final epoch')
    parser.add_argument('--heavy-eval-range', default=50, type=int,
                        help='evaluating every epoch for last such epochs (can be jointly used with --eval-interval)')
data-path:数据集配置文件的路径。
conf-file:模型配置文件的路径。
img-size:输入图片的尺寸,将图片resize该尺寸输入到模型中。yolo系列的模型一般要求尺寸为32的倍数。
batch-size:BatchSize的大小。根据显卡的显存设置,一般情况拉满显存即可。
epochs:epoch的大小。
workers:cpu核数的设置,在win系统设置为0。
workers:验证的间隔。
然后就可以开始训练,我这里直接运行train.py脚本。
由于数据集量不大,很快就能跑完。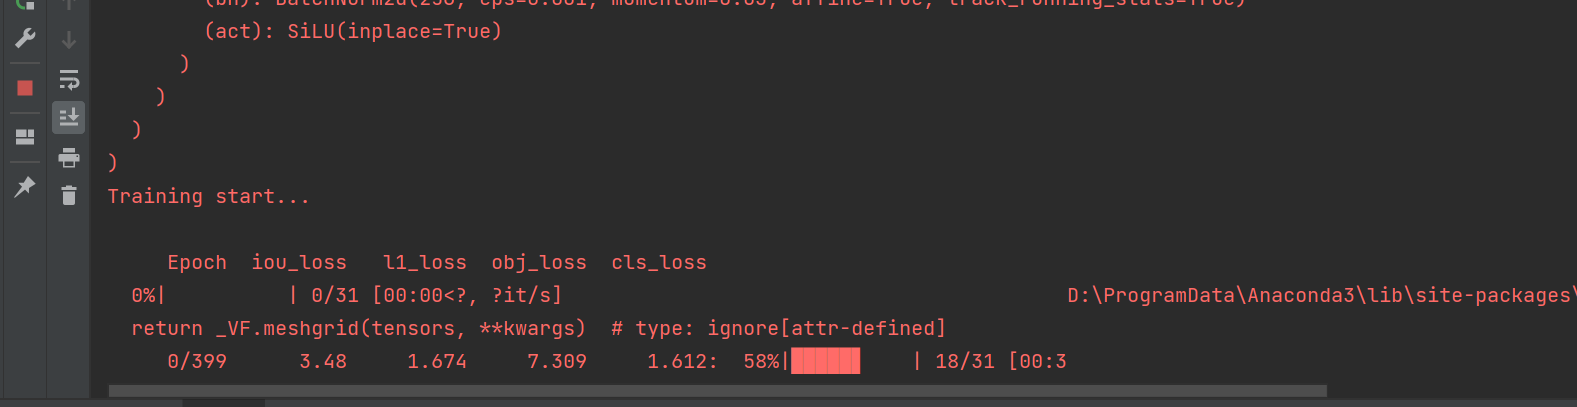
测试
等训练完成后就可以开启测试了。训练完成后我们在tools/runs找到weights,选用best_ckpt.pt。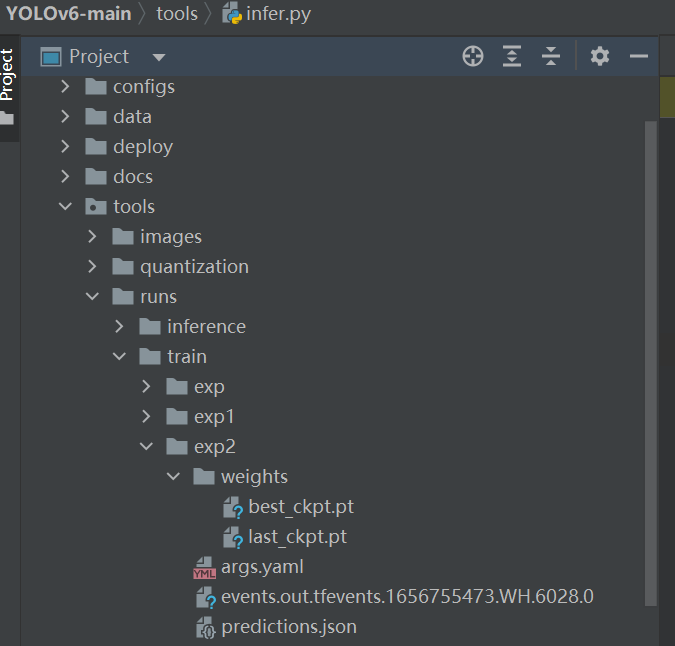
打开tools/infer.py,修改参数:
def get_args_parser(add_help=True):
    parser = argparse.ArgumentParser(description='YOLOv6 PyTorch Inference.', add_help=add_help)
    parser.add_argument('--weights', type=str, default='runs/train/exp2/weights/best_ckpt.pt', help='model path(s) for inference.')
    parser.add_argument('--source', type=str, default='images', help='the source path, e.g. image-file/dir.')
    parser.add_argument('--yaml', type=str, default='../data/dataset.yaml', help='data yaml file.')
    parser.add_argument('--img-size', type=int, default=640, help='the image-size(h,w) in inference size.')
    parser.add_argument('--conf-thres', type=float, default=0.25, help='confidence threshold for inference.')
    parser.add_argument('--iou-thres', type=float, default=0.45, help='NMS IoU threshold for inference.')
    parser.add_argument('--max-det', type=int, default=1000, help='maximal
weights:训练权重的路径。
source:测试图片的路径,我这里把测试图片放在tools/images文件夹下面。
img-size:和训练的图片保持一致。
conf-thres:置信度的最小值。
iou-thres:IoU的值。
max-det:单张图片检测到目标不能超过该值。
运行inter.py测试images中的图片。


效果确实不错!!!
完整的代码
https://download.csdn.net/download/hhhhhhhhhhwwwwwwwwww/85881120?spm=1001.2014.3001.5503
边栏推荐
- 关闭的数据能用dbca删除吗? 能
- Kivy教程之 更改背景颜色(教程含源码)
- Pytest基础自学系列(一)
- B. All Distinct
- I.MX6U-ALPHA开发板(C语言版本LED驱动实验)
- NFT new opportunity, multimedia NFT aggregation platform okaleido will be launched soon
- Correct the classpath of your application so that it contains a single, compatible version of com. go
- Asahi Kasei participated in the 5th China International Import Expo (5th ciie) for the first time
- Developing mqtt access program under QT
- How to view installed r packages in R language
猜你喜欢
![leetcode:1314. Matrix area and [2D prefix and template]](/img/b4/2c9e66c8eafe1db2a3d07e861494e0.png)
leetcode:1314. Matrix area and [2D prefix and template]

NFT new opportunity, multimedia NFT aggregation platform okaleido will be launched soon

Kivy教程之 更改背景颜色(教程含源码)

Asahi Kasei participated in the 5th China International Import Expo (5th ciie) for the first time

Imitation of "game bird" source code, mobile game issue evaluation, open service, open test collection, game download website template
How do good test / development programmers practice? Where to go

Statistical genetics: Chapter 3, population genetics
Dp83848+ network cable hot plug

RPC技术

【愚公系列】2022年7月 Go教学课程 001-Go语言前提简介
随机推荐
Distributed cap theory
Leetcode 121 best time to buy and sell stock (simple)
Rhcsa 04 - process management
Wechat official account infinite callback authorization system source code
CRS-4013: This command is not supported in a single-node configuration.
ADB tools
Use NRM and NVM to manage your NPM source and node versions
Main applications of TDK lambda power supply
What should a novice pay attention to when looking for an escort
EIG在智利推出可再生能源平台Grupo Cerro
Operation of ES6
Architecture training graduation design + summary
Kivy教程之 07 组件和属性绑定实现按钮button点击修改label组件(教程含源码)
Emlog用户注册插件 价值80元
Keysight n9320b RF spectrum analyzer solves tire pressure monitoring scheme
附件2-2保密承诺书.docx
(pointer) write function void fun (int x, int *pp, int *n)
[Yugong series] go teaching course 001 in July 2022 - Introduction to go language premise
多位科技公司创始人向Entrepreneur First提供高达1.58亿美元的C轮融资,协助其投资下一代全球创新者
I.MX6U-ALPHA开发板(C语言版本LED驱动实验)