当前位置:网站首页>Pycharm installation pyqt5 and its tools (QT designer, pyuic, pyrcc) detailed tutorial
Pycharm installation pyqt5 and its tools (QT designer, pyuic, pyrcc) detailed tutorial
2022-06-13 02:38:00 【Infinite thoughts】

Abstract :Qt Is a common user interface design tool , And in the Python Use... In PyQt This toolkit , It is Python Programming languages and Qt Successful integration of Libraries . This blog post introduces in detail in PyCharm How to install the configuration completely and gracefully PyQt5 All toolkits for , The main contents include P y Q t 5 \color{#4285f4}{P}\color{#ea4335}{y}\color{#fbbc05}{Q}\color{#4285f4}{t}\color{#34a853}{5} PyQt5、 P y Q t 5 \color{#4285f4}{P}\color{#ea4335}{y}\color{#fbbc05}{Q}\color{#4285f4}{t}\color{#34a853}{5} PyQt5- t o o l s \color{#4285f4}{t}\color{#ea4335}{o}\color{#fbbc05}{o}\color{#4285f4}{l}\color{#34a853}{s} tools Dependent package installation and Q t \color{#4285f4}{Q}\color{#ea4335}{t} Qt D e s i g n e r \color{#4285f4}{D}\color{#ea4335}{e}\color{#fbbc05}{s}\color{#4285f4}{i}\color{#34a853}{g}\color{#ea4335}{n}\color{#fbbc05}{e}\color{#4285f4}{r} Designer、 P y U I C \color{#4285f4}{P}\color{#ea4335}{y}\color{#fbbc05}{U}\color{#4285f4}{I}\color{#34a853}{C} PyUIC、 P y R c c \color{#4285f4}{P}\color{#ea4335}{y}\color{#fbbc05}{R}\color{#4285f4}{c}\color{#34a853}{c} PyRcc Settings of three tools . Finally, a simple demonstration PyQt5 And how to use the three tools , The contents are as follows :
List of articles
* Click to jump to the main installation steps introduction section *
Preface
In many cases, you need to design a program GUI Interface , stay Python The most commonly used user interface design tools in are PyQt. Because we usually use more IDE yes PyCharm, For ease of use PyQt Design the user interface , Here is a summary of PyCharm Simple installation method for installation configuration . Some people may not know the purpose of these tools , Here is a brief introduction to the dependent packages and tools to be installed and configured :
PyQt5:PyQt5 It's a set Python binding Digia QT5 Application framework .Qt Libraries are the most powerful GUI One of the Libraries ,PyQt5 As Python A module of , It has 620 Multiple classes and 6000 Functions and methods . This is a cross platform toolkit , It can run on all major operating systems , Include UNIX,Windows,Mac OS.PyQt5 It's a double license . Developers can use the GPL Choose between and commercial license , Details can be found at PyQt5 Official website .——PyQt5 Chinese Course
PyQt5-tools:PyQt5 There are no commonly used Qt Tools , For example, graphical interface development tools Qt Designer,PyQt5-tools Contains a series of common tools .——PyQt5 Tools documentation
Qt Designer: Can pass Qt Designer To write the UI Interface ,Qt Designer The design of is in line with MVC The architecture of , It realizes the separation of view and logic , So as to realize the convenience of development .Qt Designer The operation mode in is very flexible , The control is placed by dragging and dropping, and the control effect can be viewed at any time .Qt Designer along with PyQt5-tools Install with package , Its installation path is in “Python The installation path \Lib\site-packages\pyqt5-tools” Next .——PyQt5 Crash course
PyUIC:Qt Designer Generated .ui file ( Is essentially XML File format ) Can pass pyuic5 The tool translates into .py file .——PyQt5 Crash course
PyRcc: In the use of PyQt When developing the interface , stay Qt Designer Images and other resources used in need to be compiled into py file , You need to use PyRcc The tool makes it easy to qrc The file is converted to py file .——PyQt5 Installation tutorial
The author himself has conducted configuration tests on several Windows 10 The computer , The installation and configuration process is presented to you through this tutorial , This tutorial is constantly updated , If you have a better method or problem , Comments are welcome .
1. Kit installation
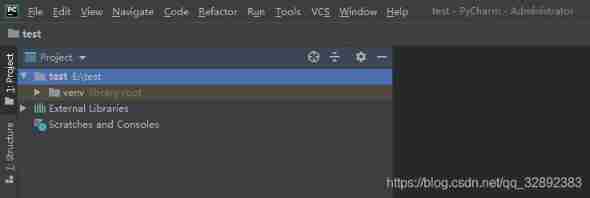
For a newly created Python Environmental Science , Installation is required first PyQt Related toolkits for , the reason being that Python All dependent packages of can be accessed through pip Installation , Because we are PyCharm Program design in , Here we can go through PyCharm The environment management interface in . For new projects test, The file interface is shown in the following figure ( Click to zoom in ) Shown :
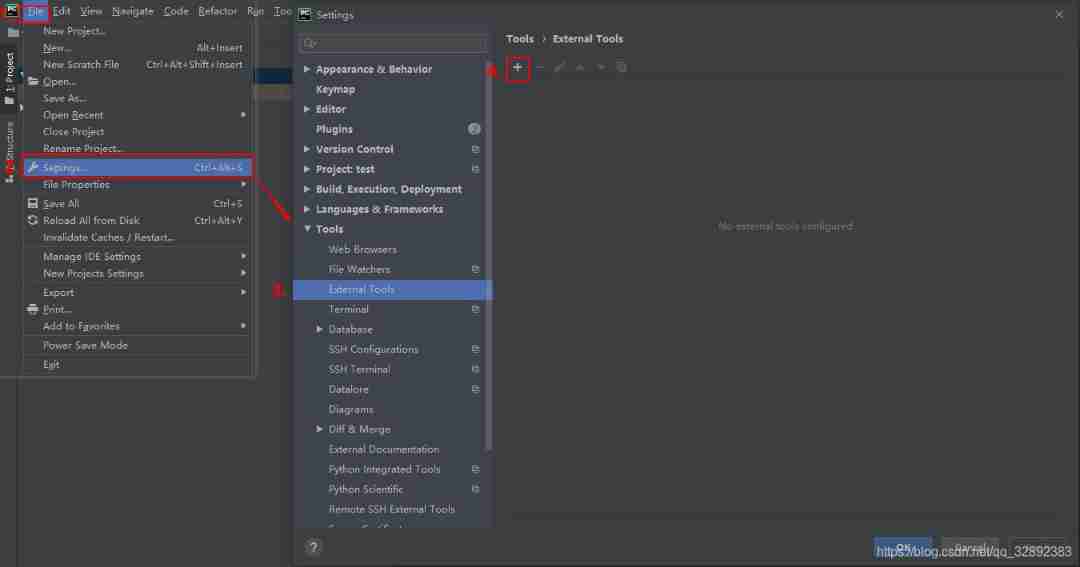
One 、 Click on the menu bar “File”, Choose the pop-up “Setting” Options , Here's the picture ( Click to zoom in ) Shown :

Two 、 choice “Project”, Choose the pop-up “Project Interpreter” Options , Click to see the currently installed environment and dependent packages , Here's the picture ( Click to zoom in ) Shown , Click the right side. “ plus ” Button to add a new dependent package :

PyQt5
3、 ... and 、 It can be seen that... Is not currently installed pyqt5 The dependency package of , Click on “ plus ” The button pops up the installation interface, as shown in the figure below ( Click to zoom in ) Shown , Enter in the search box “PyQt5” The corresponding dependent packages can be searched , Click on “Install Package” Button to install ( The installation version can be selected in the green box ), Wait for installation to complete :

PyQt5-tools
Four 、 Install... In the same way PyQt5-tools tool kit , Type in the search box “PyQt5-tools”, Select the dependent package to install , Click on “Install Package” Installation , As shown in the following figure :

5、 ... and 、 The two toolkits are installed , Returning to the previous interface, you can see that these two dependent packages appear in the dependency package management interface , As shown in the figure below :
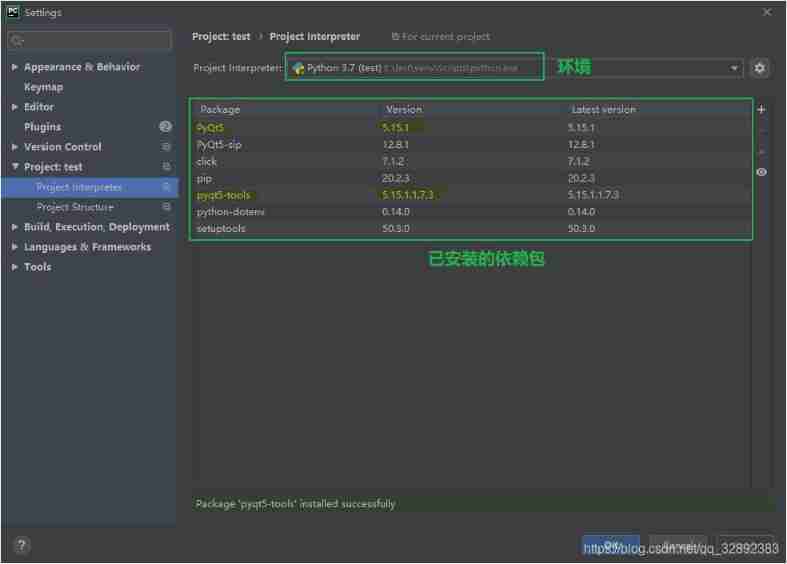
thus PyQt The installation of the tool kit is complete , In the editor or command line, you can use “import PyQt5” Call the library . Here, determine the installation position , Normally, the installation location of these two packages is Python Under the installation directory of “\Lib\site-packages\” Catalog , For example, the two installation positions here are shown in the figure below ( I'm here Python For virtual environments , The installation position is “E:\test\venv”):

2. Design tool configuration
Dependent package installation completed , Next, I'll show you how to do it in PyCharm Add tools to , In fact, these tools are being installed PyQt5-tools Is already included in the directory , Just in PyCharm Some configuration steps are required for easy use in . First, to ensure Windows The system can correctly identify PyQt5-tools Common commands for , Also need to PyQt5-tools The installation directory of is added to the system environment variable Path in .
Environment variable Settings
One 、 Right click in the file manager “ My computer ”, Pop up the shortcut menu , choice “ attribute ”→“ Advanced system setup ” The system properties dialog box pops up , As shown in the figure below :

Two 、 choice “ senior ”, Click on the “ environment variable ”, The environment variable setting box pops up , Select... In the system variable “Path” Variable , As shown in the figure below :

3、 ... and 、 double-click “Path” environment variable , Enter the environment variable editing interface , Click on “ edit ” Add at the end pyqt5-tools Installation position of , Click ok , As shown in the figure below :
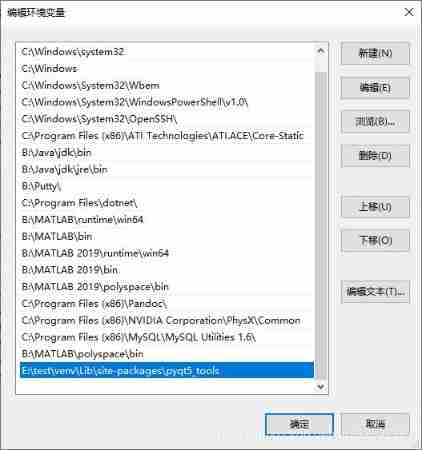
In this step, you can also choose “ Browse ”, Select... Through the folder selection dialog box pyqt5-tools Installation position of , Its installation path is in “Python The installation path \Lib\site-packages\pyqt5-tools”( It needs to be modified according to the actual situation ), Here's the picture ( Click to enlarge the picture ) Shown :

3、 ... and 、 Click in the environment variables interface “ newly build ”, Create a new file named in the system environment variable “QT_PLUGIN_PATH” The variable of , As shown in the figure below :
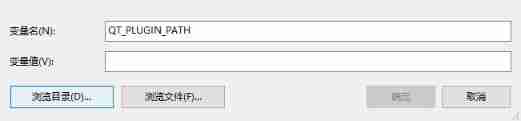
The value of this variable is Qt Where the plug-in is installed , It can be done by “ Browse the catalog ” Find... In turn “plugins” Folder , Usually it is located in “Python The installation path \Lib\site-packages\PyQt5\Qt\plugins\” Location ( It needs to be modified according to the actual situation ), Click on “ determine ”, As shown in the figure below :

Environment variable setting completed , Next, let's introduce in PyCharm Set in Qt Tools , It mainly includes Qt Designer、PyUIC、PyRcc These three tools , Its function has been introduced in the preface , The following describes the tool setting process in turn .
Qt Designer
One 、 Click on the menu bar “File”, Pop up the drop-down box , choice “Setting”, Pop up the setting interface . Select... In the setting interface “Tools”→“External Tools”, The operation of this part is shown in the following figure :
Click on “ plus ” Button new tool , The tool configuration interface pops up : stay “Name” Fill in one column “Qt-Designer”; stay “Program” Fill in one column designer.exe file location , My position here is :“E:\test\venv\Lib\site-packages\pyqt5_tools\Qt\bin\designer.exe”( Fill in according to the actual situation ); stay “Working directory” Fill in one column “$FileDir$”. Finally, click “OK”, As shown in the figure below :

Two 、 Click on the menu bar “Tools”, Pop up the drop-down box , choice “External Tools”, The tool selection box pops up . choice “Qt-Designer” And click the , If it appears Qt Designer The software interface of indicates that the configuration is successful , Of course, the following question box may also appear :
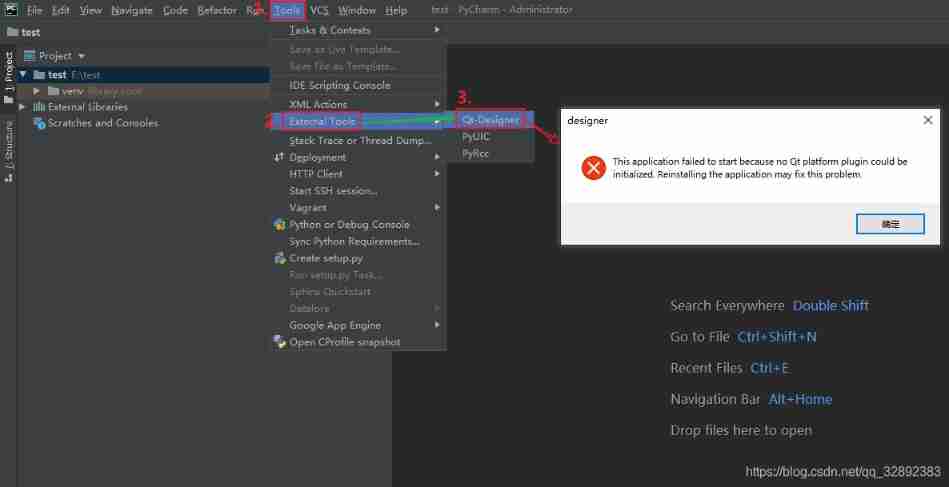
If the above problems occur , The solution is to pyqt5_tools\Qt\plugins Folder , cover site-packages\pyqt5_tools\Qt\bin Under the table of contents , The overwritten folder is as follows :

After the above operation , Follow step 2 again to open Qt Designer software interface .
PyUIC
One 、 Add as above PyUIC Tools , Click on “ plus ” Button , In the pop-up edit settings box Name Fill in one column “PyUIC”;
Two 、Program Fill in pyuic5.exe The file path of this program , Generally in “Python Environmental Directory \Scripts\pyuic5.exe”( It needs to be modified according to the actual situation ), You can also click the folder selection button on the right to browse the folder and select the location ;

3、 ... and 、 stay Arguments Fill in the following contents :
$FileName$
-o
$FileNameWithoutExtension$.py
Four 、Working directory Fill in the following :
$FileDir$
5、 ... and 、 After completion , Click on “OK”, The above steps refer to the steps in the picture .
PyRcc
One 、PyRcc The configuration mode of the tool is the same as PyUIC be similar , Also in “External Tools” Click... In settings “ plus ” Button , In the settings box “Name” Fill in one column “PyRcc”;

Two 、Program Fill in pyrcc5.exe The file path of this program , Generally in “Python Environmental Directory \Scripts\pyrcc5.exe”( It needs to be modified according to the actual situation ), You can also click the folder selection button on the right to browse the folder and select the location ;
3、 ... and 、 stay Arguments Fill in the following contents :
$FileName$
-o
$FileNameWithoutExtension$_rc.py
Four 、Working directory Fill in the following :
$FileDir$
5、 ... and 、 After completion , Click on “OK”, The above steps refer to the steps in the picture .
3. Using the demonstration
Depending on the package and tool installation configuration , Here is a simple demonstration of how to use . First open or create a new Python project , Click on the “Tools”, choice “External Tools”, You can see the three previously set tools , choice “Qt Designer” open Qt Design tools , The steps are as follows :

After opening the software , Select... In the pop-up guide interface “Main Window”, And then click “Create” Button , Create a form interface , As shown in the figure below :

Drag three... In the control selection bar on the left side of the software interface “Push Button” To the middle design box , Double click the button to modify the displayed characters , As shown in the figure below :

Drag two... In the control selection bar on the left side of the software interface “Label” Control to the middle design box , As shown in the figure below :

As shown in the figure below , Click on “Resource Browser” Pencil chart under , Pop up new qrc The edit box of the file .
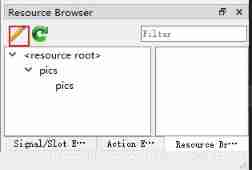
As shown in the figure below , Click New (1 No. label ) Button to create a new qrc file , establish qrc Click Add File... After the file (2 No. label ), towards qrc Add two pictures to the resource file , Finally, click “OK” determine .

Select the added label forms , In the right attribute edit bar “text” Properties of the “pixmap” Choose... In one column “Choose Resource”, As shown in the figure below :

In the resource selection box, select just added qrc Pictures of the , Click ok , To the other label Do the same thing , As shown in the figure below :

The final interface is shown in the following figure , Click on the menu bar “File” Next “Save” Save the interface as ui File and put it in the project directory .
stay PyCharm Select the saved ui file , Use “Tools” Under the “External Tools” Medium “PyUIC” The tool converts the file to the desired py file .

stay PyCharm Select the saved qrc file , Use “Tools” Under the “External Tools” Medium “PyRcc” The tool converts the resource file to the required py file .

stay PyCharm Open to use “PyUIC” Tool conversion py file , Add the following code below :
if __name__ == '__main__':
    import sys
    from PyQt5.QtWidgets import QApplication, QMainWindow
    import pics_ui_rc #  Import the added resources ( Fill in the file name according to the actual situation )
    app = QApplication(sys.argv)
    MainWindow = QMainWindow()
    ui = Ui_MainWindow()
    ui.setupUi(MainWindow)
    MainWindow.show()
    sys.exit(app.exec_())
stay PyCharm Click to run the file , The final operation interface is as follows :

Conclusion
Because this blog mainly introduces the installation steps , About PyQt The design blog intermediary is simple , More detailed explanation will be introduced in the following tutorial . Because of the limited ability of bloggers , The methods mentioned in the blog post are even tested , There will inevitably be omissions . I hope you can enthusiastically point out the mistakes , So that the next modification can be more perfect and rigorous , In front of you . At the same time, if there is a better implementation method, please don't hesitate to give us your advice .
边栏推荐
- 02 optimize the default structure of wechat developer tools
- Opencv 17 face recognition
- Understand CRF
- Cumulative tax law: calculate how much tax you have paid in a year
- How to learn to understand Matplotlib instead of simple code reuse
- too old resource version,Code:410
- [reading point paper] deeplobv3 rethinking atlas revolution for semantic image segmentation ASPP
- 03 认识第一个view组件
- [reading papers] visual convolution zfnet
- [pytorch] kaggle large image dataset data analysis + visualization
猜你喜欢

Chapter7-13_ Dialogue State Tracking (as Question Answering)

Basic principle of bilateral filtering
![Leetcode 926. 将字符串翻转到单调递增 [前缀和]](/img/ca/d23c1927bc32393cf023c748e4b449.png)
Leetcode 926. 将字符串翻转到单调递增 [前缀和]

Superficial understanding of conditional random fields

02 optimize the default structure of wechat developer tools
![[data analysis and visualization] key points of data drawing 11- precautions for radar chart](/img/46/41e4e0fedb3653b119b0e2af836d85.jpg)
[data analysis and visualization] key points of data drawing 11- precautions for radar chart

Hstack, vstack and dstack in numpy

哈夫曼树及其应用
![[reading papers] comparison of deeplobv1-v3 series, brief review](/img/80/714b8e5b2ad31b0a1a0b8320a3c714.jpg)
[reading papers] comparison of deeplobv1-v3 series, brief review

冲刺强基计划数学物理专题一
随机推荐
Mbedtls migration experience
Leetcode 926. 将字符串翻转到单调递增 [前缀和]
Paper reading - group normalization
[keras learning]fit_ Generator analysis and complete examples
Opencv 07, pixel read, change and bitmap write
How did you spend your winter vacation perfectly?
[keras] generator for 3D u-net source code analysis py
Automatic differential reference
After idea uses c3p0 connection pool to connect to SQL database, database content cannot be displayed
regular expression
Principle and steps of principal component analysis (PCA)
Introduction to arm Cortex-M learning
Leetcode 450. 删除二叉搜索树中的节点 [二叉搜索树]
[life science] DNA extraction of basic biological experiments
[reading some papers] introducing deep learning into the public horizon alexnet
[data analysis and visualization] key points of data mapping 7- over mapping
数仓笔记|针对客户维度建模需要关注的5个因素
[deep learning] fast Reid tutorial
Redirection setting parameters -redirectattributes
For loop instead of while loop - for loop instead of while loop